Gigabyte has jumped headfirst into the market with their Dynamic Energy Saver technology. Does power savings come at a performance cost? Is it just marketing spin? We will run DES set to the most aggressive power saving setting during all of our tests while using the worst case processor, a Q6600. Results are compared between the EP35-DS4 and the P35-DQ6 which lacks DES to verify performance is not impacted and to see what gains in power savings can be expected.
INTRODUCTION
Green is all the rage these days. Green is healthy, green is great for the environment, green is more of the crinkly stuff found in your purse or pocket. Green is also the color of the dollar signs seen by companies that recognize the potential of this new environmentally conscious market.
Already most electronics are now RoHS compliant. From graphics cards to motherboards, iPods to some RAZR phones, they are rated to be lead, mercury, cadmium, chromium, PBB, even PBDE free. Before that there was EnergyStar, most people remember the now familiar yellow and green logo seen in the top left corner of their computer’s start up screen that indicated the product or appliance it was featured on was not unnecessarily wasteful with power.
Now the current trend is focusing on energy more than ever, regardless whether to cut costs at the end of the month or the simple knowledge that over half of the United State’s energy is produced from coal, therefore lower energy consumption translates into less coal pollution. When many consumers are penny pinching wherever they can, companies like Gigabyte and ASUS have decided to begin marketing energy saving motherboards not to a niche market, but to the masses.
For this article we will put one of these new Gigabyte Dynamic Energy Saver (DES) motherboards to the test with a power hungry Q6600 QuadCore processor. We will see if you can really save power without compromising your computers performance or more importantly its stability. By the end of this review we will find out if DES shows any appreciable value or is just more marketing hype to take advantage of the greener marketplace.
ABOUT GIGABYTE
GIGABYTE is known throughout the industry as a leader in mainboard and VGA technology. Pioneering such technologies as the i-Ram and all solid capacitor design of their motherboards, it easy to see why they have grown to be a world class provider of technology to the home user. Here is an excerpt taken from their web site:
GIGABYTE, one of the most well-known IT brands in the industry, started as a motherboard technology research laboratory with the passion of a few young engineers two decades ago. With the vision and insights to the market, GIGABYTE has become one of the world’s largest manufacturers. On top of motherboards and graphics accelerators, GIGABYTE has further expanded its product portfolio to include notebook and desktop PC’s, digital home entertainment appliances, networking servers, communications, mobile and handheld devices. GIGABYTE has risen from an eight-man office to a world class enterprise in the IT industry.
FEATURES & SPECIFICATIONS
Gigabyte has jumped headfirst into the market with DES, as they have now refreshed their entire line of motherboards with DES capable motherboards ranging from the premium X48 to the economical EP31-DS3L. All Dynamic Energy Saver equipped motherboards will feature an “E” in front of the P35 or X38 chipset model, with the exception of all X48 models which already include DES technology by default.
Some users that have within the past few months or less bought a P35 or X38 based motherboard may be able to install the DES software, although only the most recent motherboard revisions are supported. Those users that just purchased Gigabyte motherboards and wish to check for DES compatibility can find more information here. Simply updating to the most recent BIOS and then attempting to install the DES software may prove to be a faster solution however, as the software checks for compatibility upon startup for you.
The EP35-DS4 is not the first DES equipped motherboard Bjorn3D has reviewed. My colleague Victor’s review of the EX38-DS4 can be found here. For this review we will be focusing more on how DES impacts the performance and overall stability of the motherboard, and just what sort of power savings can be expected with a near worst case scenario as far as choice of processors go!
As with most Gigabyte motherboards the EP35-DS4 features Gigabyte’s unique Ultra Durable 2 technology, which is promised to provide lower temperatures, better power delivery, and in general raise power efficiency of the motherboard.
|
Gigabyte® GA-EP35-DS4
Detailed Features & Specifications |
|
|
CPU
|
|
|
Chipset
|
|
|
Memory
|
|
|
Audio
|
|
|
LAN
|
|
|
Expansion Slots
|
|
|
Form Factor
|
|
|
Storage Interface
|
South Bridge:
GIGABYTE SATA2 chip:
iTE IT8718 chip:
|
| IEEE 1394 |
|
|
USB
|
Integrated in the South Bridge
|
|
Internal I/O Connectors
|
|
|
Back Panel Connectors
|
|
|
I/O Controller
|
|
|
H/W Monitoring
|
|
|
BIOS
|
|
|
Unique Features
|
|
|
Bundle Software
|
|
|
Remark
|
|
PACKAGE & CONTENTS
Surprisingly or not the box is not green but red, following the usual Gigabyte style design. We are quickly becoming a fan of this no nonsense style where fancy graphics or cover art is eschewed in favor of important info for potential buyers. As expected the Gigabyte EP35-DS4 supports all current “Core” processors with FSB’s from 800MHz to twice that of 1600MHz, even though the P35 chipset lacks “official” FSB1600 support and only supports it through automatic overclocking of the FSB.
On the back we find all the information one could possibly want neatly arranged by topic regarding the motherboard’s more unique features, including a small diagram of the board itself.


Opening up the box we were pleasantly surprised to find the contents very neatly organized and secured so as to not risk motherboard damage or even inconsequential but no less annoying a bent manual. The sample was subjected to the standard rigors of shipping a typical retail kit would have to endure.

Besides the expected IDE and floppy cables, Gigabyte included two (out of a potential eight) of their standard latching SATA cables. As anyone that was ever had to use the original generation SATA cables, latching SATA cables are a godsend for many reasons and are much appreciated.
Beneath the I/O plate is an eSATA cable and a 4-pin molex-to-SATA power connector cable, both of which for use with the included PCI bracket. The PCI bracket allows two internal SATA ports to be used as eSATA ports, and also provides a 4-pin molex power connector that can be converted to a SATA power connector with the included cable. This approach is versatile as it does not tie up potential ports for dedicated eSATA ports on the back I/O panel, and can be simply be left uninstalled if not even needed. You can even use the bracket on other motherboards.

As far as the paperwork goes we have Gigabyte case badge stickers, a copy of the Intel boxed processor installations instructions, a photo reference hardware installation guide, combo driver & utility CD, and of course the manual. The CD includes Norton Internet Security, Kaspersky Anti-Virus, and a slew of other minor but useful system utilities. When first inserted the CD will automatically check to ensure all required drivers are installed, and will prompt you to install any that are not found on the system. If newer drivers are found then it will not prompt you to install the outdated driver.
The manual is written in a natural, easy to follow English and is quite thorough. However we should note that it is completely English-only and in black & white print, but includes plenty of image references for the motherboard and its BIOS screens. Gigabyte does offer the manual for download available in 15 other separate languages on their website. I can only say I wish other manuals were always this detailed and comprehensive.

A CLOSER LOOK
To no one’s surprise the motherboard is the traditional Gigabyte blue and not, you guessed it, a green color. What a pity. (Just kidding!) With the exception of the sticker placed over the old model number and the Dynamic Energy Saver sticker this looks like any typical motherboard, although it holds a few surprises…

Starting on the back I/O port we find a plethora of USB ports, eight to be exact. From left to right are the two PS/2 ports, coaxial and optical S/PDIF out connectors, two 1394a Firewire ports, a single Gigabit Ethernet jack, and lastly the 7.1 surround-sound jacks. Those still needing serial and LPT printer ports can still find them on internal headers, but will need to supply their own cables to use them.

The CPU socket area is kept well clear, although we have discovered in extreme situations wide coolers with not enough height may still rub against the edge of the northbridge cooler. Our Arctic Freezer 7 Pro just barely fit, although a cooler such as the Scythe Ninja that had more height clearance will have plenty of room. A four pin CPU fan header is standard these days. Just behind the copper heatpipe assembly is the EPS 12V connector. If no EPS 12V connector is available the black plastic cover indicates where to plug in the 4-pin AUX power connector instead, although for overclocking or Quad-core processors the EPS 12V connector is highly recommended to maintain stability.

The memory slots are correctly color coded for dual-channel memory placement. The 4-pin molex connector seen here is actually routed to the PCIe slots to provide additional power to the graphics card(s), although it was moved here to allow for much better cable management. Some astute readers may be able to notice the phase LEDs, which we will cover in detail a bit later.

One critique we have is that Gigabyte still uses a single phase for memory power. With four RAM modules almost common in high-end motherboards and high memory voltages becoming the norm two phases would be a very welcome addition, besides providing better stability at higher memory frequencies.
The Gigabyte SATA 2 chip controls the purple ports while the orange and yellow ports are handled by the ICH9R southbridge. The two primary yellow SATA ports denote the first and second ports. The single IDE port can control up to two devices. The bright yellow headers (beside the purple SATA ports) are the internal USB headers, and towards the top left edge of the motherboard the single gray connector is the internal firewire port.

Also a Gigabyte standard is the jumperless 2-pin clear CMOS prongs that are hiding in plain sight exactly between the trailing edge of the two PCIe slots. Gigabyte is confident enough in their BIOS recovery settings to not even include a jumper, so in the (admittedly rare) event you need to reset the BIOS a jumper or screwdriver can be (very!) carefully used to short these two pins. Still, we would of liked to see at least a clear CMOS button somewhere on this motherboard, as this board is targeted towards the enthusiast market where such small touches can make a big difference to the user.
Here we have both PCIe 16x slots. Gigabyte has done a good job ensuring that using a dual-GPU configuration with dual slot cards will not completely block all the PCI or PCIe ports. Do be aware that as with all P35 motherboards (save two exceptions) these slots can only operate Crossfire in 16x+4x mode. Moving on, the two headers on the right edge of the board give the option for serial and LPT printer ports, however you will need to supply your own cables for these if you wish to use them. At the bottom corner of the board is where Gigabyte hides–er, places the Revision number, which is 2.1 for this particular motherboard.

On the back there is nothing but a sea of blue. That is to say that no Crazy Cool back-plate is used on this motherboard for either the CPU or MCH, which can be viewed as a positive or a negative depending on the user you ask.

One serious problem on this particular motherboard and in general most Gigabyte P35 based boards is that almost all types of installed graphics cards will need to be removed first if you wish to change system RAM. There is simply not enough space left between the top of the GPU and the memory tabs, and just about any GPU is long enough to create this problem. For those that don’t take no for an answer you can force the issue, however either scraped digits and/or potential damage of your hardware will result!

EP35-DS4 BIOS
It often pays to read the manual, and for new Gigabyte users this is no exception. Besides listing a mostly comprehensive explanation of the available BIOS settings the manual also makes a point to mention the CTRL+F1 key combo. Past users of Gigabyte motherboards will likely know about the CTRL+F1 key combo already, which must be used once inside the BIOS menu to “unlock” the full range of BIOS settings.
I am not sure why Gigabyte still chooses to require this because there are more than a few voltage settings that are not hidden by default, any one of which could easily lead to the user killing some piece of hardware if they are not sure about what they are doing.
For example, setting +1.55v under the RAM voltage seems pretty safe, right? That’s certainly much less than the 1.8 volts typical DDR2 runs at. Instead it is a pretty safe way to guarantee you an instant fire, besides several dead sticks of memory. Rather than actually undervolting your memory, this setting would be feeding your RAM a full 3.35v!


Power Management setup offers the usual settings, and as the board is Vista certified it includes the HPET settings. The High Precision Event Timer is only used for Windows Vista and some of the more recent Linux kernels. If installing Vista 32bit then HPET should be set to 32bit mode in the BIOS, and likewise if installing Vista 64bit HPET should be set to 64bit mode.
The PC Health Status menu is where you can find vCore, temperature, and fan speed readings and also manage automatic fan speed controls. Gigabyte has changed their practice of listing “OK” or “FAIL” for the voltages and now displays the actual voltage reading. Those users that are able and plan on adjusting their PSU rails manually should never rely on the reported BIOS or software voltages, as for several reasons they will simply never be nearly as correct as an actual multi-meter. That’s all fine and dandy, but most users that rely on these readings unwittengly adjust their PSU voltage rails even further out of spec instead of correcting them.


One thing that almost any overclocker including myself would prefer to see is the actual voltage values listed under the M.I.T. menu. For example most users will not know what the default voltage setting the P35 MCH uses, so of what is knowing you set to “+0.3”? Without knowing the original voltage there is just no proper context to know if some settings are extreme or not. Many of the provided voltage options hold little meaning and can be simply dangerous if changed to far. To help with this, the PCI-E voltage should have a base value of 1.5v while the MCH should have a default of 1.25v. The RAM voltage setting assumes the JEDEC specification of 1.8v for the memory, so if setting “+0.3” that would give the RAM 2.1v. Thankfully Gigabyte has seen the wisdom of listing the CPU specific vCore at the bottom of this screen, otherwise users would be in real trouble trying to guess this value!
CPU Host Control of course controls the FSB setting, while C.I.A.2 is the covert name for the auto-overclocking setting control. Performance Enhance is the indirect means of controlling the tRD value for Gigabyte boards, and has Standard, Turbo, and Extreme values to select from. Turbo is selected by default, and Extreme is best used for systems running at stock clockspeeds in order to gain the best performance.


System Memory Multiplier controls memory divisors, so a 1:1 ratio would translate into a 2x multiplier. CPU Voltage offers settings between 0.700v for those that enjoy under-volting their processors all the way up to 2.35v for those other users that live in Antarctica (Or Canada).


Last but not least is this BIOS allows for saving up to eight different BIOS configurations for easy recall later which is extremely helpful to have for those that wish to test various BIOS profile settings to find their system’s “sweet spot”. The Load CMOS settings menu also gives a few extra options in addition to the usual fallback “Load Optimized Defaults” and “Load Failsafe Defaults” for those having boot issues.


A CLOSER LOOK: Dynamic Energy Saver
Since we already covered which boards feature Gigabyte’s DES technology on page two, we’ll simply jump into explaining what DES actually is and how it works.
As our readers may of guessed already, DES is not purely a software technology. Interestingly enough it owes its existence to Intel’s latest VRM 11.1 specification that was released with the latest 45nm Penryn processor generation. This VRM 11.1 hardware specification is required for DES to function hence why previous motherboards such as the P35-DQ6 we used will not support DES. One of the new capabilities offered by this VRM specification allows power regulation to by dynamically modified on the fly, so Gigabyte specially designed their DES software to interface and take advantage of this new specification.
Choosing the voltages and settings to use across a wide range of single, dual, and quad-core processors for both 65nm and 45nm generation processors is no simple matter, however Gigabyte must firmly believe they have not only figured out the secret sauce to making this work. And more importantly, making it work without compromising the computers stability in the process.
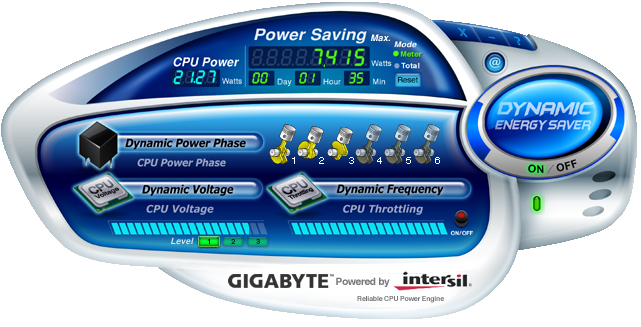
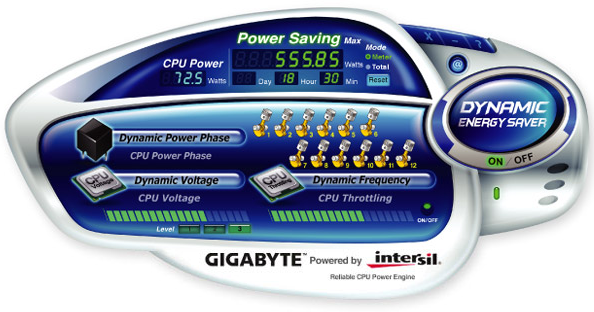
Computer technology for some reason naturally lends itself to automotive analogies, so we’ll use one here. Gigabyte’s Dynamic Energy Saver works by shutting down unneccesary phases which power the CPU. This is exactly the same principle as many high-end vehicle engines, which stop feeding gasoline to unneeded engine cylinders while cruising on the highway in order to improve on overall gas mileage. The only difference is DES doesn’t save you gasoline, it saves on your electricity bill.
Each cylinder corresponds to a single phase on the motherboard, as the DES software will correctly identify whether your particular motherboard has 4, 6, or even 12 phases such as the DQ6 models. When lit up the phases are active, and the software autonomously controls the number of phases without any user input needed. All you have to do is press the power button to activate the software!
There are only a few things you need to decide, and the major one is the aggressiveness of the power savings you wish to use. Dynamic Energy Saver offers three levels of power savings, and each one saves just a bit more power than the previous. The key point to be made here is that shutting down phases translates into undervolting your processor! As to be expected, not all processors can be guaranteed to undervolt the same, and so Gigabyte has elected to offer the three levels of aggressiveness on the power savings for just this reason.
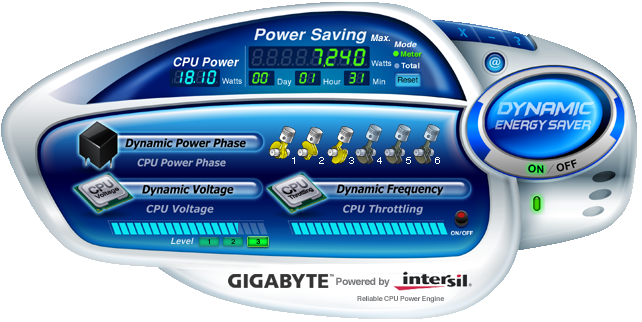
Also you may of noticed the CPU Throttling section. Oddly during our testing the blue bars would change as if the application was actively throttling the CPU, however with Enhanced Halt (C1E) State and Speedstep both deactivated in the BIOS no actual CPU throttling was taking place. The red button allows CPU Throttling to be toggled on and off, but at this time this is one function does not appear to work yet. For the purposes of our review we left DES’s CPU throttling toggled off.
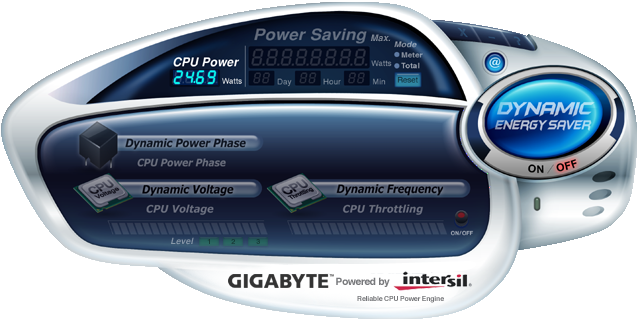
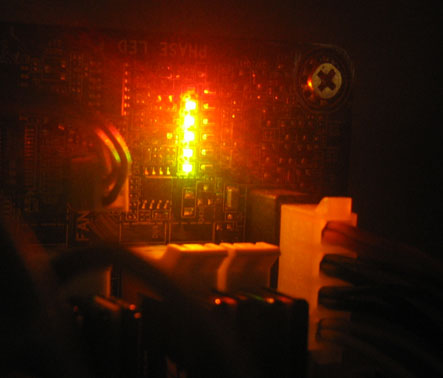
Besides the obvious CPU power indicator and the power savings meter (which can be toggled between meter and total modes), the @ button is a one-click check for newer versions of the DES software. Additionally the green light below the illuminated ON button is the on/off toggle for the motherboard phase LED lights. While not the best of pictures, there are green, yellow, and red LEDs that are designed to light up according to the number of active CPU phases in use.
For those readers certainly wondering, Dynamic Energy Savor will only function if it detects the system is operating at the stock speed for your Intel processor. Unfortunately this makes complete sense, as the goal of overclocking is instead of “Dynamic Energy Saving” but rather “Dynamic Energy Spending” in order to achieve those higher clockspeeds!

TEST SETUP
To truly test Gigabyte’s Dynamic Energy Saver we ran all benchmarks on the EP35-DS4 with the most aggressive (Level 3) setting of DES in use. This should easily show if the DES software incurs any sort of performance penalty or even system instability, because we are comparing the EP35-DS4 to its older sibling the P35-DQ6 which lacks DES capability.
This may not seem fair at first, but remember the goal is to evaluate the EP35-DS4 and ensure no compromises were made in order to reduce power consumption!
As the official service pack for Vista was not released in time for this review we elected to use the usual clean install with all other updates applied. Each system was defragmented before testing, and all tests were run three times with the results averaged. A Kill-A-Watt P3 power meter was utilized during the power tests.
| Test Platform | |
| Processor | Intel Q6600 G0 Core 2 Quad @ 2.4GHz (1.20v) |
| Motherboard |
Mainboard # 1: Gigabyte GA-P35-DQ6, BIOS F6
Mainboard # 2: Gigabyte GA-EP35-DS4, BIOS F2
|
| Memory | 4 x 1GB of Corsair XMS2-6400c4 @ 4-4-4-12 |
| Drive(s) | Seagate 320GB Barracuda 7200.10 SATA Drive |
| Graphics | FOXCONN 8800GTS 320MB running ForceWare 169.25 |
| CPU Cooling | Arctic Freezer 7 Pro |
| Power Supply | PC Power & Cooling 750w Quad Silencer |
| Display | Dell 2407WFP |
| Case | Antec P180b |
| Operating System | Windows Vista Ultimate 32-bit |
| Benchmarks & Games | |
| PCMark05 1.2.0 | |
| Sisoft Sandra XII 2008 | |
| Everest Ultimate 4.20 | |
| CineBench R10 | |
| Euler3D | |
| SuperPI 1.5mod XS | |
| WinRAR 3.61 | |
| HD Tach 3.0.4.0 | |
| Company of Heroes: Opposing Fronts 2.202 | |
| Crysis 1.2 | |
| Half Life 2 Episode Two | |
| Lightsmark | |
Overclocking
The Gigabyte EP35-DS4 overclocked beautifully in traditional Gigabyte fashion, quickly reaching 3.20GHz with stock 1.20 CPU voltage. However due to the cooler used in this review I was unwilling to push the Q6600 beyond 3.2GHz as temperatures simply were beyond my personal allowable preferences. Needless to say the cooler was holding the overclock back, the EP35-DS4 overclocked just as great as the older revision P35-DQ6 motherboard up until I decided against overclocking further.
One thing to make note of that was not explicitly mentioned on the BIOS page. This is the first Gigabyte motherboard we’ve reviewed that features “Loadline Calibration” as a BIOS option. Unfortunately I do not consider “more choices” to be a good thing in this instance, because this setting effectively removes vdroop. “Vdroop” is not just a safety measure but also is critical for maintaining stability during those periods when the CPU must nearly instantaneously switch from a high-load state to low load state, for example exiting a game or closing Prime95. If you ever experience an overclocked system running stable under load, but then either crashes or goes unstable just after the full load is removed then this is one thing vdroop effectively helps prevent. Until now only ASUS motherboards typically offer this feature, but unfortunately Gigabyte now does as well.
Long story short, my best overclocking advice is to leave this setting disabled. Just like with the optional setting to feed 2.3v to your CPU or 3.35v to your RAM, it is just another BIOS setting you are given but shouldn’t ever use.
POWER CONSUMPTION
As the point of this review is to test whether Gigabyte’s DES is marketing hype or marketing genius, we elected to cover the power consumption results first! Again we took measurements with our Kill-A-Watt P3 power meter. For idle we left the desktop sit for 5 minutes before taking measurements, and for load we used Prime 95.
Before we look at DES specifically though, lets look at whether the base motherboards offer any differences in power used. This first graph is with Intel’s EIST (Otherwise known as SpeedStep) and C1E Enhanced Halt State features disabled on both boards, and DES was not activated.
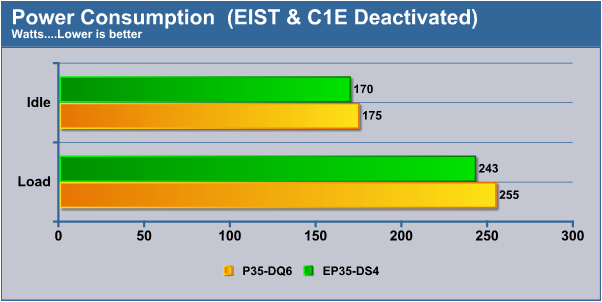
These motherboards should have identical power consumption figures visible as the DS4 and DQ6 share the same chipset and near identical feature sets. Surprisingly there is a small power savings of 5 watts at idle, and a larger 12 watts under load between them even without the software active. Next lets look at the same results but with EIST and C1E left enabled in the BIOS.
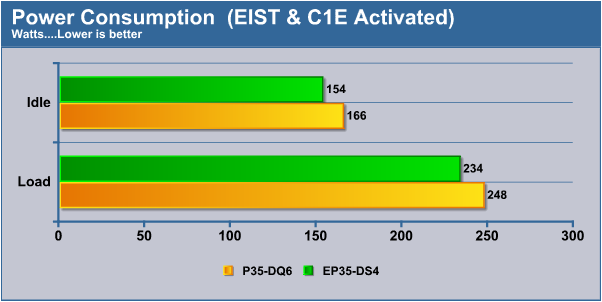
Again the EP35-DS4 is leading with a 11 watts at idle and a further 14 watts under load. Considering that 14 watts is enough to power a 60 watt equivalent flourescent light these are tangible results, and we’ve not even looked at DES yet.
Dynamic Energy Saver
For those interested here are the results for the voltages changes. Our Q6600 operates with a stock vCore of 1.20v.
Something to keep in mind however is that while our specific 65nm Q6600 apparently thrives on low voltages, not all processors are created equal and some system instability may occur for users setting level 3 power savings in the DES software. When lowering voltages users should be aware that the processor also becomes more susceptible instablity as the temperature rises, so CPUs running without effective cooling could also face instability with DES.
| Q6600 G0 Voltage (Under Prime95 Load) | |||
| DES Level | vCore | vCore after vdroop | |
| Off | 1.20 |
1.152
|
|
| Level 1 | 1.15 | 1.104 | |
| Level 2 | 1.12 | 1.088 | |
| Level 3 | 1.10 | 1.040 | |
Before testing we verified our processor was still stable by using Prime95. Therefore we still recommend that users trying out Gigabyte’s Dynamic Energy Saver do the same just to ensure the system remains stable. An unstable CPU can lead to strange behavior, crashes, and eventually data corruption. Overall Gigabyte’s DES has worked superbly well. The program never crashed nor errored once throughout our testing, and except for the apparently non-working CPU Throttling feature everything else worked smoothly.
DES Results
Obviously as only the EP35-DS4 is capable of running DES these results are from the EP35-DS4 motherboard, however they can be directly compared to the above numbers turned in by the P35-DQ6. Our specific Q6600 processor was fully stable at the most aggressive power setting, so the results for all three settings are shown here with “1” being the least aggressive and “3” the most aggressive on power savings.
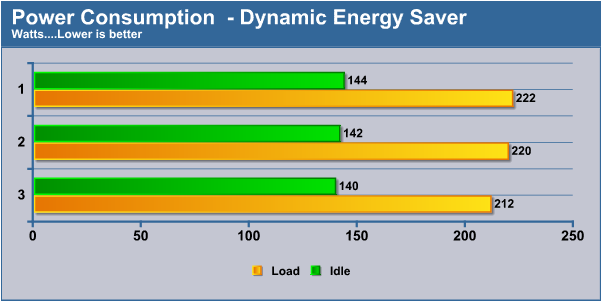
The results at idle are not much when taken by themselves, and we see only a 10 watts of savings between DES’s lowest and highest settings. However all told, there is a rather significant power savings here… perhaps it would become more apparent with one more graph?
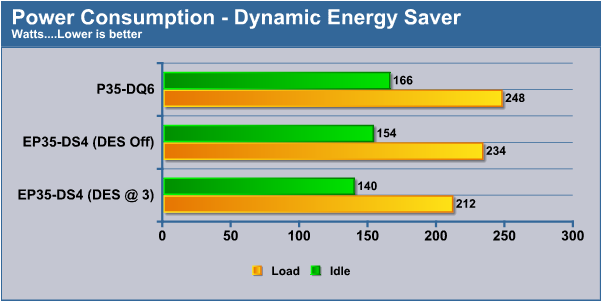
Looking directly at the best power savings the P35-DQ6 can afford us compared to the best power savings the EP35-DS4 offers, there is a very sizeable difference between these motherboards. All told, the EP35-DS4 uses 26 watts less power just at idle, and an amazing 36 watts less power at load than the P35-DQ6! The difference grows even larger with EIST and C1E disabled.
What is amazing is the P35-DQ6 is no slouch when it comes to power savings compared to other typical motherboards out there, so when the EP35-DS4 easily turns in a 36 watt difference that is saying something! Both of these motherboards already use Gigabyte’s Ultra Durable 2 technology for improved efficiency.
I could say that 36 watts is almost equivalent to two “100 watt brightness” fluorescents, and for some readers that is significant enough. For others it probably doesn’t mean very much though. So suppose you are one of those users that leaves their computer on all the time, and say you also happen to run Folding@Home on it (Or some other favorite distributed computing project) so the machine is never idle. For those Texans using 36 watts only amounts to about $3.12 if left running an entire year. Should you live in Hawaii that is instead a few pennies under $8 for an entire year. So even assuming the worst case scenario, which is that your current motherboard isn’t as power friendly as the P35-DQ6 thereby making an even larger than 36-watts of difference, the savings on the electric bill still isn’t going to be staggering.
Now that I’ve gotten that negativity out of the way, many enthusiast households do tend to have two or three computers running. An HTPC or a fileserver, a gaming or work machine, and if you are smart fortunate a third PC dedicated for the spouse or kids. Suddenly before you know it that little bit of savings does start to add up every month.
And lets face it, Gigabyte’s DES is not just a new marketing spin or even about saving a few bucks every year, it is also about doing that little extra bit to cut down on pollution and save the environment. Even those folk that view “saving the environment” as a cliché phrase would have to admit if all the Gigabyte motherboards out there in the world were currently equipped with DES and saving 26-36 watts each whenever they were turned on, then the overall power savings would be huge.
Considering Gigabyte is a major tier-one motherboard supplier, DES has the potential to truly add up to something as more and more Gigabyte users eventually migrate over to newer DES equipped boards, and Gigabyte has positioned themselves to do exactly that. Best yet a Gigabyte motherboard with DES doesn’t cost anything extra, there is no premium to pay for going “green” with a DES motherboard.
TESTING – PCMARK05, SISOFT SANDRA & EVEREST
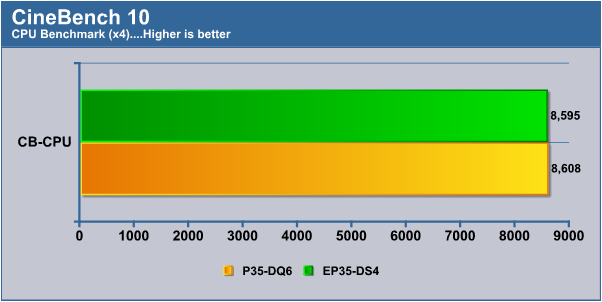
As mentioned on the test configuration page, all benchmarks are run with Gigabyte’s Dynamic Energy Saver active on the DS4 and set to the most aggressive power saving setting. Not only is this important to keep in mind, but it also means the CPU benchmarks should be of particular interest to discern if DES incurs any sort of performance penalty.
PCMark05
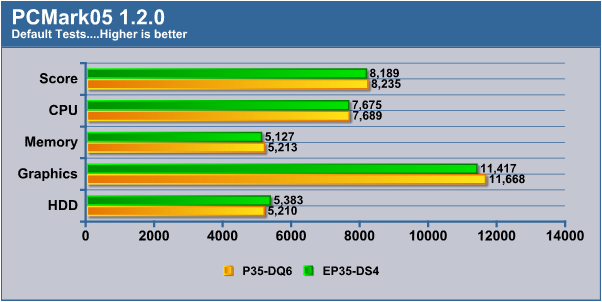
This venerable benchmark stable is getting a bit long in the tooth and was never intended to be run on the Vista OS, however it still provides a quick and easy snapshot of overall system performance. Bjorn3D will be replacing this benchmark with the much updated PCMark Vantage at a future date.
SiSoft Sandra XII 2008
SiSoftware’s SiSoft Sandra is an old favorite amongst reviewers and enthusiasts in general for benchmarking system components. SiSoftware continues to update their software to allow the home user easy comparison with other modern system configurations, and still finds new possible component benchmarks to add with every new release.
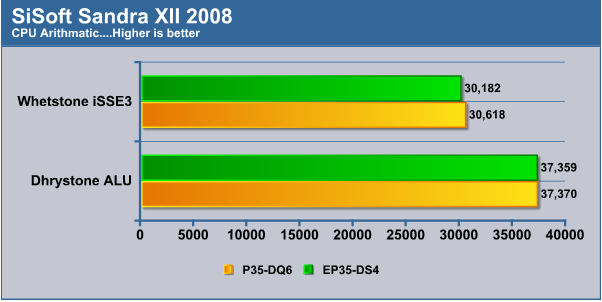
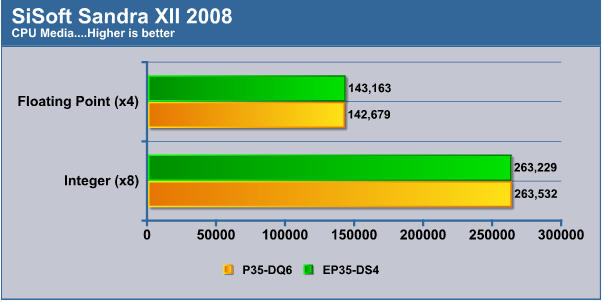
As expected there is no difference between these motherboards, but more importantly no indicators of any performance penalties either. Also as already mentioned no instability was encountered in these tests or any others whatsoever.
Everest Ultimate 2007
Everest is designed primarily as a program to give users detailed system information and extensive monitoring capabilities, however it naturally includes a few benchmark tests as well that we utilize for further comparison.
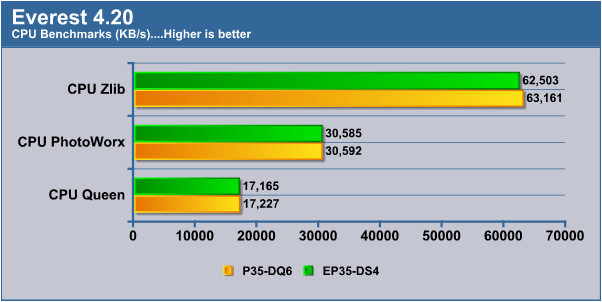
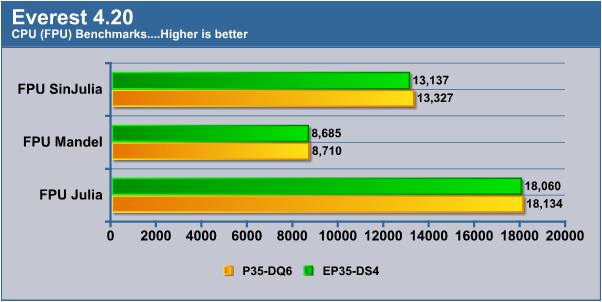
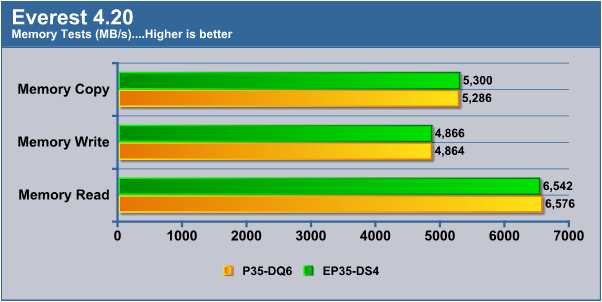
The processor, processor FPU, and the memory benchmarks are all pretty much identical, and align well with what we saw with Sisoft Sandra.
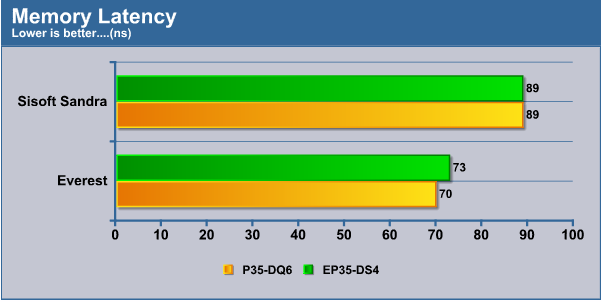
Memory latency is a tricky subject, as just about every single program likes to give its own result for memory latency. Therefore we combined both Sisoft’s and Everest’s results together here.
TESTING – CINEBENCH 10, SUPERPI 1.5XS, WINRAR & HD TACH
CineBench R10
CineBench R10 is more of a real world test suite designed to benchmark the CPU’s performance, and has the ability to test a single core, or generate rendering threads per CPU core available while also offering the secondary ability to test GPU OpenGL rendering. MAXON’s CineBench R10 is based on MAXON’s animation software CINEMA 4D, which is used by both studios and production houses worldwide for 3D content creation. For this test we utilized the Rendering xCPU benchmark which spawns four threads.
SuperPI Mod 1.5XS
Most widely used as an instant benchmark for comparing overclocked systems or the performance of different overclocks, this simple piece of software calculates PI anywhere from 16 thousand to 32 million digits. This software is well known for being highly dependant on CPU speed and is also easily affected by even the slightest change in memory subsystem latency. For this test we used the common one million and two million tests, and results were rounded to the nearest second.

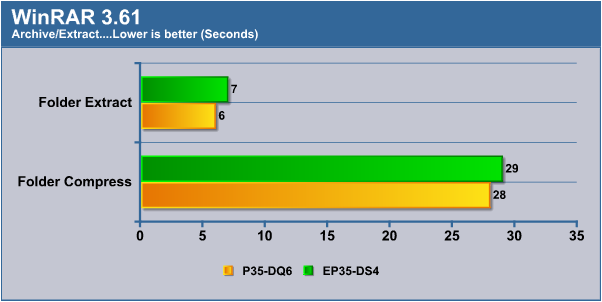
WinRAR 3.61
If you haven’t heard of WinRAR then you must live on Neptune, as this is an old but longstanding must-have program developed by Eugene Roshal for archiving, compressing, and extracting almost every type of standard compressed file. Versions 3.61 and newer are multithreaded to take advantage of multi-core systems.
For the first test we measured the time required to create a compressed archive of the 123MB CineBench folder, then how long to extract it.
This program features a little known system benchmarking test found under the Tools menu which checks the maximum sustained KB/s throughput the computer can handle along with also providing built in error checking during the test.
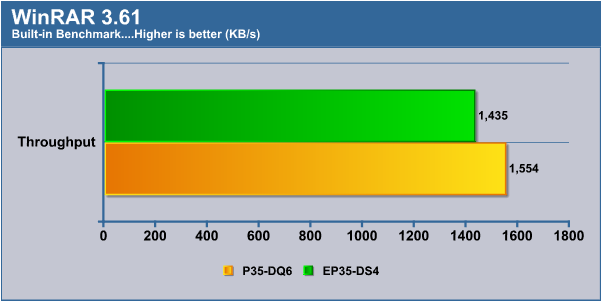
We can see the DQ6 manages to score slightly higher which aligns with the above archive and extraction results. This is likely the result of the slightly better memory latency we saw with Everest on the previous page, probably due to further fine tuning in the BIOS.
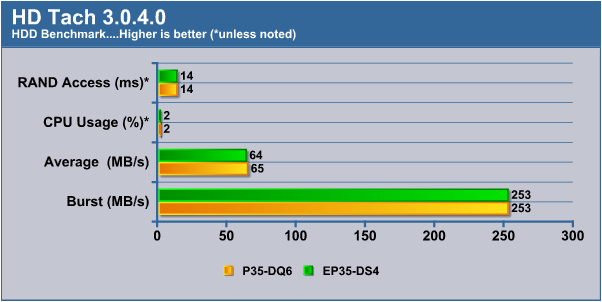
HD Tach 3.0.4.0
HD Tach is another popular, free tool for benchmarking hard drive and solid-state media performance such as thumbdrives. CPU Usage is a rough approximation and not usually accurate, but was included nonetheless. Again as expected, there is hardly any difference between results of these boards!
TESTING – EULER3D, CRYSIS, COMPANY OF HEROES, HL2 EPISODE TWO, & LIGHTSMARK
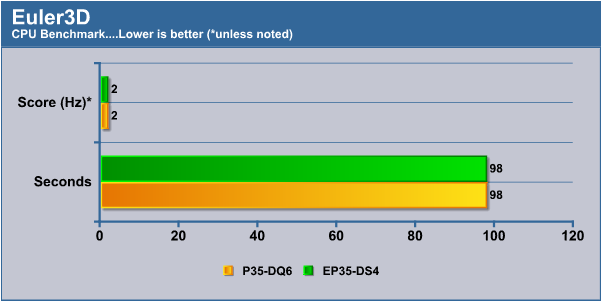
Euler3D
Euler3d is a highly CPU-centric test. Basically it combines a Computational Fluid Dynamic simulator with structural motion equations designed to predict aeroelastic and aeroservoelastic effects over a wide range of Mach airspeeds. Again, basically it computes airflow characteristics over various surfaces. 😉
This test would again be great for showing any discrepancies between motherboards that might have arisen from DES. This program is a benchmark testcase using already known results for the AGARD 445.6 aeroelastic test wing at Mach 0.50. A benchmark score is reported as a CFD cycle frequency, in Hertz, and the time taken to complete the computations is given.
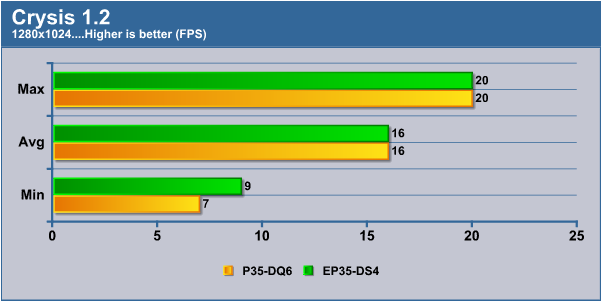
Crysis
Crysis has become a benchmark staple thanks to the well-known ability it has to make even high-end current generation GPUs beg for mercy, without forgetting about the CPU either. For this test we used the popular Crysis benchmark utility and selected a GPU limited test using “High” game settings.
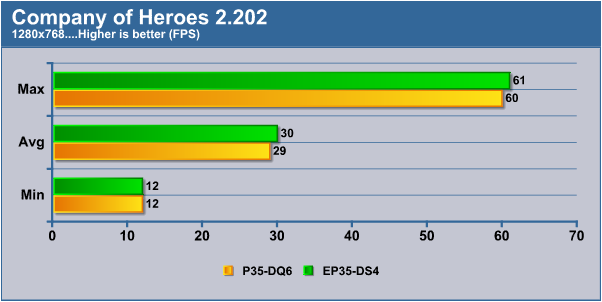
Company of Heroes: Opposing Fronts
Company of Heroes is an excellent RTS game developed by Relic Entertainment, and Opposing Fronts builds upon that with an even more demanding DX10 graphics engine. This game features a built-in benchmark utility that we ran for these tests. It should be noted that the benchmark has not been modified from the original CoH game so results are comparable. Despite what the maximum frame results might indicate, we did disable vsync using the “-nosync” shortcut for this test.
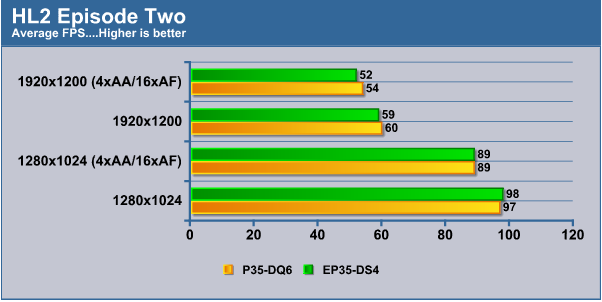
HL2 Episode Two
HL2 Episode Two should need no introduction, as it is a continuation of the original Half Life saga brought to us by Valve. If you don’t know what it is, then you don’t know what you have been missing! For this test we tested two resolutions both with and without Anti-aliasing and Anisotropic Filtering.
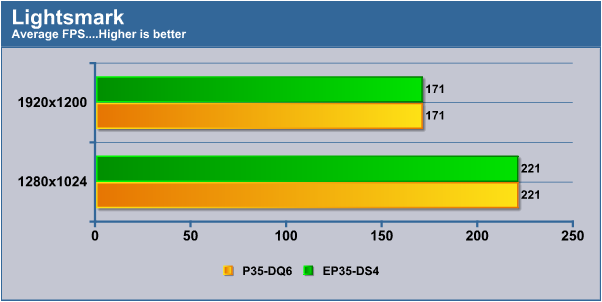
Lightsmark
Lightsmark is an aspiring bechmark showcasing some stunning realtime global illumination and penumbra shadow demonstrations. While not one of our usual tests it has been generating some buzz on our forums, and so we included results from two resolutions to round off the last of our testing.
CONCLUSION
The GA-EP35-DS4 with DES is an interesting development in motherboards. Without increasing price Gigabyte has re-released their entire mainstream and enthusiast line of motherboards now equipped with the hardware to support the Dynamic Energy Saver utility. Getting more (or rather less) without paying more is certainly great, but is it worth it?
Assuming the processor handles the undervolting while remaining stable then Gigabyte’s Dynamic Energy Saver will not adversely affect your computers performance. Those users that have their computers running more often than not, and especially those households with two, three, or even more computers will certainly appreciate the quickly mounting savings they will enjoy over the entire lifetime of the DES motherboard(s). This isn’t even factoring in that DES will lead to a cooler running system, and therefore less heat to exhaust.
The EP35-DS4 specifically is a great choice in that it delivers all of the great performance we’ve come to expect from Intel’s P35 chipset, and now that it offers DES things only have gotten better. Still, while the EP35-DS4 is great, it is not perfect though. Enthusiasts will still be required to remove the GPU before they can safely install or remove their memory, and these days memory seems to be the most actively swapped piece of hardware in the computer.
With possible voltage options of 2.3v for the CPU and 3.35v for the DDR2 RAM this certainly looks to be a motherboard geared to the extreme enthusiast, however it does not even feature built-in buttons on the PCB for simple reseting of the CMOS or powering on the system. The BIOS recovery features work excellently so few users will need such a button, but those few users would undoubtedly very much appreciate having them nonetheless.
With a price around $170 the Gigabyte EP35-DS4 delivers full features an enthusiast would be looking for and solid performance at a reasonable price. This board is Crossfire capable, however with only x16+x4 PCIe support users looking for Crossfire would be better served looking to X38 or X48 motherboards.
Despite the memory and GPU spacing problem it isn’t a showstopper, and for those users looking for a solid P35 motherboard most of the other cons are simply not applicable anymore as they are limitations of Intel’s P35 chipset rather than the motherboard. Thanks to a good price for a near twin motherboard of the premium DQ6 along with Gigabyte’s Dynamic Energy Saver, this motherboard should at the top anyones shortlist.
Pros:
+ All-Solid Capacitors
Cons:


