For a value gaming board MSI has delivered the performance and features we need for a cheap price.
Introduction
AM3 parts are slowly coming around and everybody who have happend to stay on the AMD camp are getting excited. DDR3 prices are slowly coming down to a mainstream price and so now it’s time to upgrade. MSI seemed to have jumped the gun on most companies and have released two boards for our AMD gaming community. We have today the 790GX-G65 mainboard that supports the growing demand for DDR3 as well as the new AM3 processors that support this RAM. Tie that together with some Crossfire support, EZ overclocking features, onboard HD 3300 VGA, and many more features and you have quite the beginer AM3 board.
One thing to notice is how cheap it is to upgrade to DDR3 for AMD and when you do this many new options will become avalible for the future. The overclocking ability will also be tested and since we are using DDR3 we hope to see some improvements over DDR2 standards. The sweet deal is the flexibility of AMD’s platforms so really DDR2 or DDR3 AMD has you coverd. Enough talk, let’s move along to see what MSI has to offer.

About Micro-Star International
Founded in August 1986, MSI has continued to uphold a business philosophy that stresses “Award-winning product quality and outstanding customer service.” MSI specializes in the design and manufacture of mainboards, graphics card, add-on cards, servers/workstations, iPC, barebones, communication devices, CE products, Notebooks, and car PC products.
“Quality Products Create Faithful Customers” is a motto that guides all that we do at MSI. For this reason, MSI goes all out to be the best of the best in research and development. Currently, 2,500 experienced engineers staff our research and development department. This talented team carries out its work with the latest research equipment, continuing to raise the bar on product quality and innovative product features.
At MSI, we put our motto — “Quality Products Create Faithful Customers”–into living practice. In 1995 and 1996, we received ISO-9002 and ISO-9001 product quality certification, respectively. In 1999, MSI received ISO-14001 environmental certification, affirming our commitment to the environment. Furthermore, MSI products undergo rigorous quality control testing, attaining a 99.6% quality rate, a level far higher than the industry standard. MSI’s superior product quality has garnered exceedingly favorable coverage from the global media, countless awards, and a very enthusiastic customer response.
In recent years, MSI has aggressively expanded into mainland China to meet the needs of our global customers. In the first quarter of 2001, the Baoan Plant in Shenzhen started production, vastly increasing MSI’s production output as well as revenue. Aside from the Baoan Plant in Shenzhen, MSI has also established production facilities and a research and development center in Kunshan, China in 2003. The mainboard annual production is expected to reach 20.8 million units and the annual graphics card production is expected to reach 11.8 million units. Combined with the production from Taiwan, MSI is now becoming one of the biggest mainboard and graphics card manufacturers in the world.
To keep abreast of the global market and offer our customers the best service, speediest product delivery, as well as sales and technical support, MSI has established subsidiaries in mainland China, Czech Republic, Hong Kong, Japan, Korea, India, Taiwan, the U.S.A., Canada, Brazil, Germany, France, Australia, the Netherlands, Turkey, U.K., Russia, Ukraine, Serbia, and Poland.
To broaden our global market and to build a good image, we keep striving on marketing promotions, for example, posting advertisement on some reputed media, releasing news information, improving product box design, holding many promotion activities and attending all important PC exhibitions in the world. Apart from developing the mainboard, graphics card, server/workstation, and barebone, MSI has also introduced the communication, CE, Notebook, iPC, and car PC products to bridge the transition to the post-PC world. MSI adopts a diversified business model, and is transforming itself into a leader in the Consumer Electronics age.
Together, we are entering a greatly-accelerated world. Let MSI be the first to welcome you into this exciting new Digital Universe!
Features

• Saving Power under Variable Loading.
• Power Usage More Efficiency.

• Save your time of trying
• Achieve OC goal in short time
• If BIOS crash, it still can boot from USB Drive
• Update BIOS from USB Drive by M-Flash Fucntion
• Endurable to operation under higher frequency & temperature
• Avoid exploding capacitors to cause mainboards failure
• All shielded choke could reduce core power loss, lower EMI interference.
• Store energy longer at higher frequency, achieving higher efficiency.
• Buy an essential CPU but want to reach higher performance
• Skip the complicated BIOS OC setting and enjoy the higher level CPU performance
• Independent IGP memory can reduce the consumption of system memory.
• 2x USB, IEEE 1394, front panel (JFP1/2)& audio(JAUD1) M-connector in the package
• Easy to tell the definition of each pin
• Help power-users tweaking process in-chasis enviornment
• Onboard SATA ports are stacked on the mainboard to avoid mechanical issue with giant graphic cards like 8800 Ultra.

• The ultimate multi-GPU performance gaming platform.
• Provides 2.7x faster performance than single graphic card solution.
-Blocks online identity theft by phishing Web sites
-Detects and eliminates spyware
-Removes viruses and Internet worms automatically
-Protects against hackers

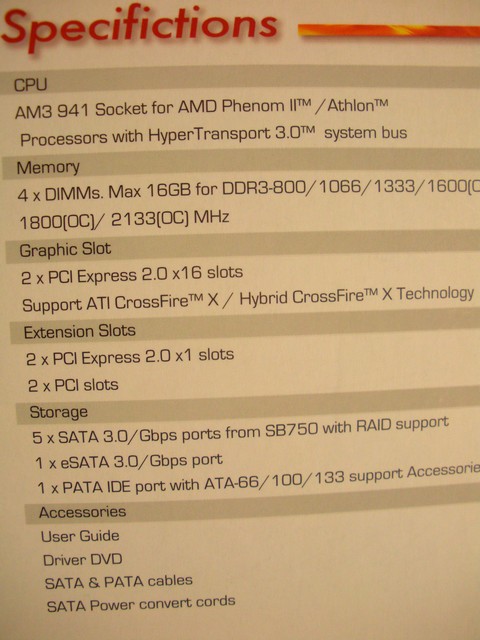
Specifications
| MSI AM3 790GX-G65 |
|
|
CPU
|
AM3 941 Socket for AMD Phenom II/Athlon Processor with HyperTransport 3.0 system bus
|
|
Chipset
|
AMD 790GX/SB750
|
|
System Bus
|
Up to 5200 MT/s HyperTransport™ 3.0 interface
|
|
Memory
|
Up to 16gig DDR3 800/1066/1333/1600(OC)/1800(OC)/2133(OC) Mhz
|
|
Expansion Slots
|
2x PCI Express 2.0 16x slots (Single card 16x/Dual card 8x/8x)
2x PCI Express 2.0 1x slots
2x PCI slots
|
|
VGA
|
Integrated ATI Radeon™ HD 3300 GPU.
Max. shared memory: 512 MB SidePort Memory – onboard 128MB DDR3 1333 memory Supports HDMI™ Technology with max. resolution up to 1920 x 1200 (1080P) Supports Dual-link DVI with max. resolution up to 2560×1600 @60Hz Supports D-Sub with max. resolution up to 2560×1440 @ 75Hz Hybrid CrossFireX™ Support Dual independent displays support with HDMI/DVI and D-Sub Supports Microsoft® DirectX 10, OpenGL 2.0, Shader Model 4.0 Hardware Decode Acceleration for H.264,VC-1, and MPEG-2 |
|
Storage
|
SB750 Chipset
1 xUltraDMA 133/100/66 for up to 2 PATA devices 5 xSATA 3 Gb/s ports Support RAID 0,1,5,10 2 xeSATA 3.0/Gbps port
|
|
LAN
|
10/100/1000 Mbits/sec LAN Subsystem using the Realtek Ethernet LAN Controller
|
|
Audio
|
8-Channel (7.1) HD Audio with six analog audio outputs and S/PDIF digital audio Pin-Header
|
|
IEEE 1394
|
2 x IEEE-1394a Ports (1 external port, 1 internal header) |
|
USB
|
12 USB 2.0 ports (6 ports at mid-board, 6 ports at back panel)
|
|
Overclocking Features
|
MSI’s EZ OC switch
Max FSB
OC Memory support up to DDR3 2133
|
|
Back Panel I/O Ports
|
1 x DVI
1 x D-Sub 1 x HDMI 1 x External SATA 1 x S/PDIF Out (Optical) 1 x IEEE 1394a 1 x RJ45 port 6 x USB 2.0/1.1 8 Channel Audio I/O 1 x PS/2 Keyboard (Purple) |
|
Internal I/O Connectors
|
3 x USB connectors (6 ports)
1 x Floppy disk drive connector 1 x IDE connector 5 x SATA connectors 1 x IEEE 1394a connector 1 x CPU Fan connector 3 x Chassis Fan connector 1 x S/PDIF Out connector CD audio in Front panel audio connector COM connector 24-pin ATX Power connector 4-pin ATX 12V Power connector |
|
Accessories
|
1 x UltraDMA 133/100/66 cable
4 x SATA cable 1 x M-Connector 2 x SATA to Molex power cables
1 x I/O Shield 1 x User’s manual |
|
Support CD
|
Drivers
Live Update 3 Notron Internet security Adobe Acrobat Reader Esobi Manual |
|
Form Factor
|
ATX Form Factor
12 inch x 9.6 inch 30.5 cm x 24.5 cm ) |
Pictures & Impressions

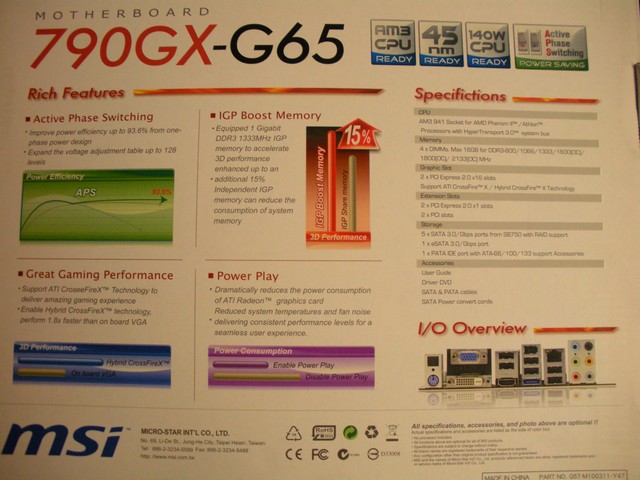
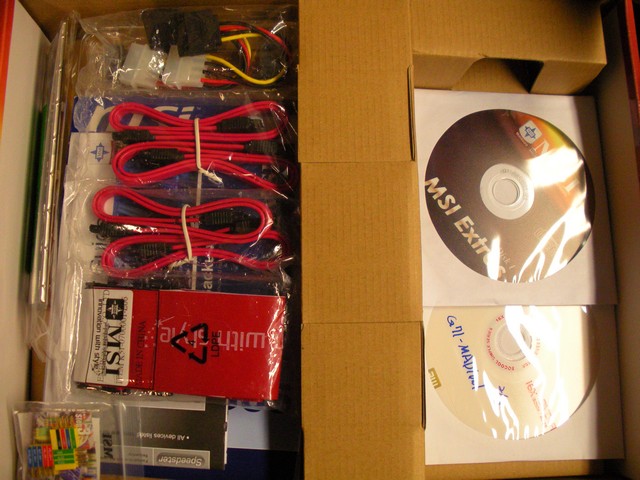
The box is pretty normal for a motherboard box. You have your name and model number as well as the processors supported on the front of the motherboard, Specifications and features in the back, more specifications on the side, and the packaging is pretty normal for a motherboard as well. Motherboard on bottom, cardboard middle and your bundle on top. The bundle on the left looks pretty cram packed but I assure you it’s safe.
The bundle includes:
- 4 x SATA Cables
- 1 x PATA Cable
- 1 x M-Connector
- Instruction Manual
- Driver CD
- MSI Extras CD
- 2 x Molex to SATA cables
- Setup Guide
- Crossfire Link Cable
Pretty standard bundle but for the price you shouldn’t expect a whole lot.

Here we have an overshot of the motherboard. The layout seems pretty nice for a mainstream board with only a few minor snags here and there. The colors look a bit old school but I suppose that’s better than looking like a bag of melted Skittles. Overall layout is very nice and not cramped where as most budget boards are. So far, thumbs up.
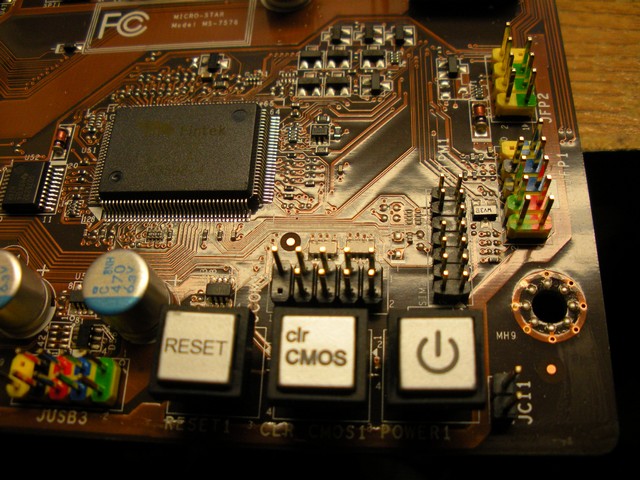
Heres a close up of the bottom right part of the board. You have your obvious push buttons (Clear CMOS/Power/Reset), 1 of 3 of the USB headers, PC speaker header, front panel connectors, COM port header, and the Trust Platform Module header. The TPM was not included with my board so unfortunately I cannot elaborate on this. I like this layout myself, everything is right in one area and you don’t have to go looking around the board for all your headers and connections. Plus most of the time it’s easier to plug everything in one area for better cable management.
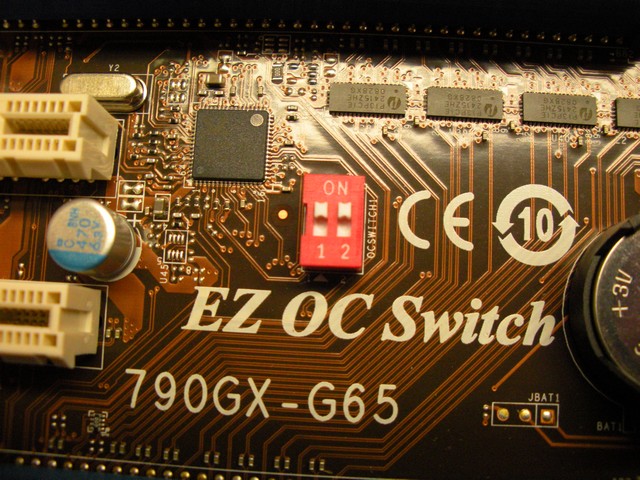
Here I picture the EZ OC Switch and motherboard model. Of course, the switch is the main focus here. With this switch you simply put the switches in the “on” position and the motherboard is supposed to simply auto overclock for you. Either that, or you can use the auto overclock “Max FSB” feature in the bios which I will elaborate later.
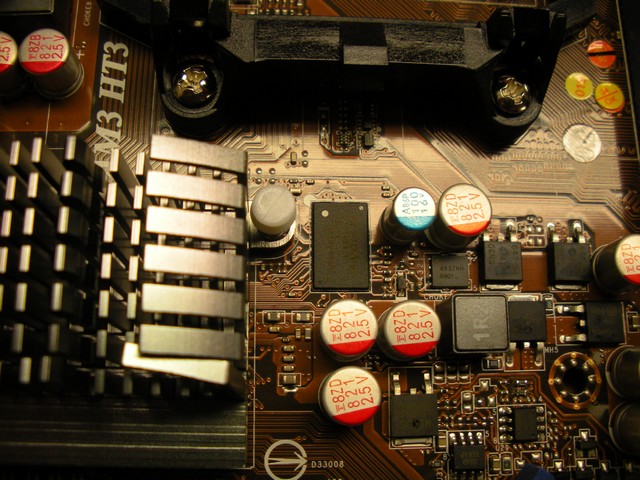
Here in center focus would be the IGP’s dedicated 128MB of DDR3 1333. This is supposed to help all you IGP people rockin integrated video, so maybe now you can max out Vista Solitaire.

Here we have a shot of the PCI-E ports and SATA ports. I did this shot this way because it shows you how none of the ports will be blocked by your massive cards. This was pretty good thinking by our friends over at MSI.
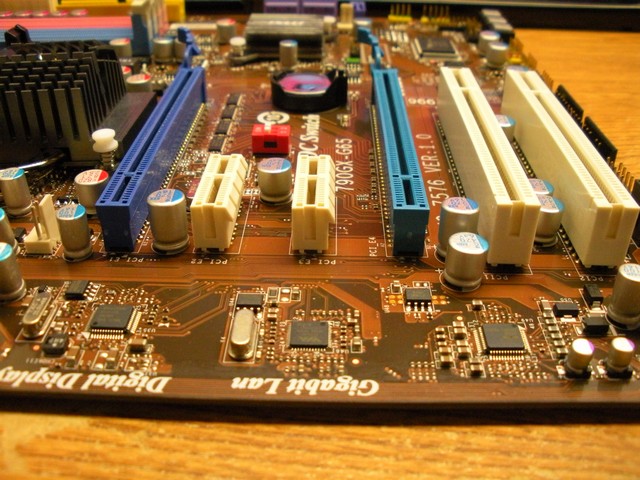
I went ahead and took another shot of the slots for you. It shows that you can have two dual slot cards and still retain a PCI card and PCI-E 1x sound card for a full out system. It may be a plastic sandwhich but MSI meant business when they figured out the slot layout for this board. On top of all that you can still get to your bottom headers and keep all of your SATA drives plugged in. I see no problems with this end of the board.
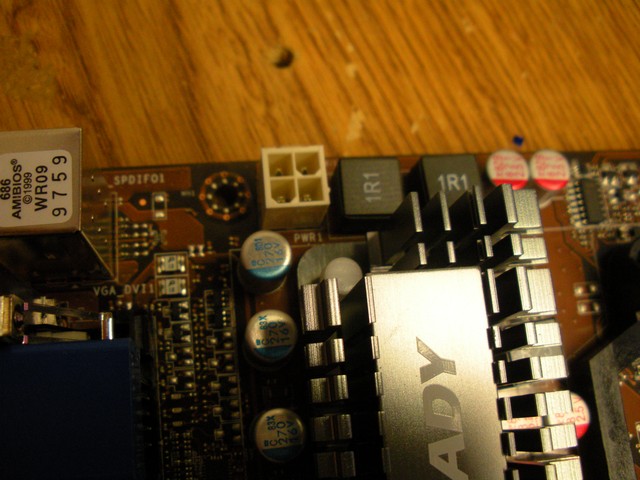
Heres a shot of the 4-pin connector for the CPU. It is placed in a nice spot so that it won’t take an Olympic Gymnastics champ to bend, flex, moan, and groan to plug your cable in for you around your massive air cooler.


Click to Enlarge
Heres where we start to see problems. By just glancing at the positioning of the RAM slots you can tell that you will have a problem with big air coolers. Actualy in fact a whole two RAM slots are coverd up by the TRUE I used in this review. The bad news is that I have seen alot of AM3/AM2+ boards with such a CPU/RAM positioning which is quite sad. The good news is that most of these boards have the dual channel slots side by side so you can still have two sticks in dual channel as pictured.

Here is a shot of the bundle that I listed earlier

Finally here is a full blown system setup for you with Crossfire action for those that like to see the board setup in a case. Let’s go take a look at the bios.
Bios
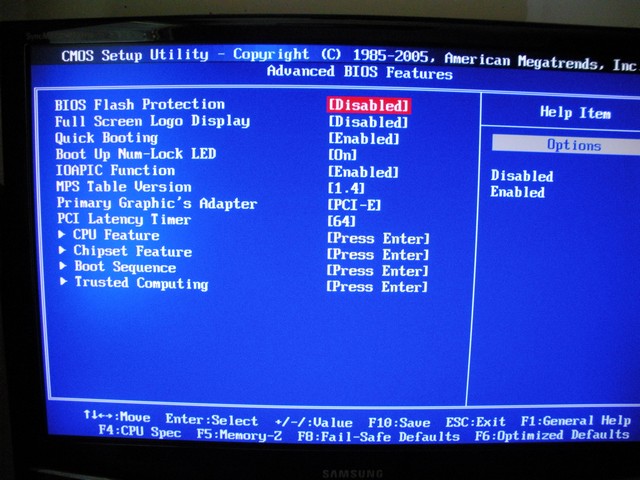
I decided to take a few shots of the bios for you and explain some of the key features. Since most everything is boring I decided to go straight to the interesting part everybody is waiting to find out about. First up is the Advanced BIOS Features page. Everything is pretty normal and self explanitory. The Trusted Computing part of the bios is for that TPM I explained about not getting. On to the next part.
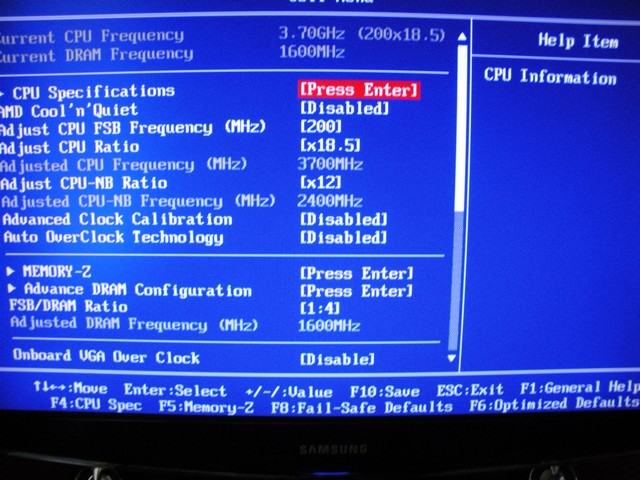
The interesting part, overclocking page otherwise known as Cell Menu. CPU Specifications leads you to a few lists you can’t edit that just basicaly tells you about your CPU and it’s specifications. Adjusting the CPU Ratio simply means changing the multiplier of the CPU for those that have “Black Edition” processors. This is the easy overclock which is the route I decided to take. CPU-NB Ratio is changing the NB Frequency. I’ve noticed a good performance increase by keeping this around 2200-2400. This is only by chance that your CPU will support these clocks, though. Auto Overclock simply let’s you set to “Max FSB” which will in turn let your motherboard decide what the maximum stable frequency your system will run at. FSB/DRAM Ratio will change the ratio between your FSB and RAM. For me, this is a simple clock up to 1600 and will make things easy for anybody who dosent want to overclock using FSB to get higher DDR3 speeds.
Next up we have the sub-menu from the Memory-Z in the previous picture. This is simply put a CPU-Z for your ram inside the BIOS. It would be alot better if it was more accurate, but kudos for the idea anyways.
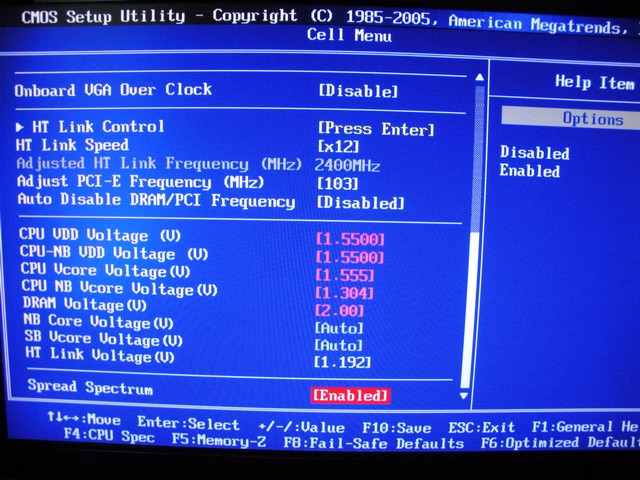
Here we have the “Riskay” part of the bios. Voltage adjustments. Starting at the top, we have HT Link menu which will let you change your HT link speed from 16x to 8x or just let the bios decide by setting to Auto. Next is your HT Link “Ratio” (Speed) which will let you decide how fast you want your HT speed. It is normal to keep this the same speed as your NB-CPU Ratio. Next up is your voltages which are all pretty self explanitory. I don’t reccomend anybody using the settings I am using to attain a 3.7ghz overclock.


Click to Enlarge
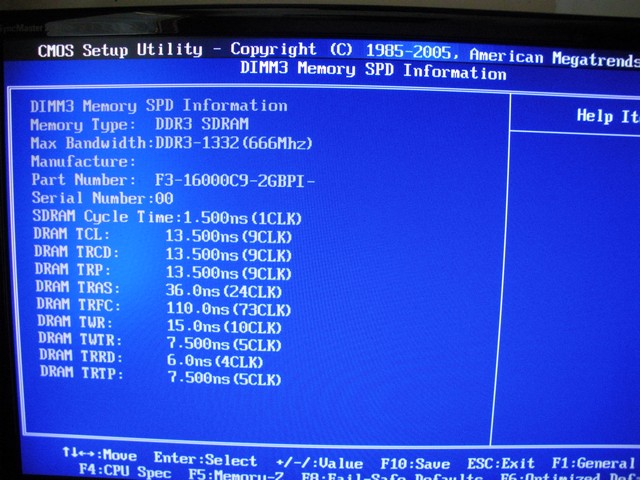
Here we have an exstensive list to adjust the timings on your RAM. I suggest anybody who dosen’t have exstensive knowledge of RAM timings to leave these set to Auto or only adjust the ones specified on your RAM sticks. You can find them on the little sticker that shows the brand name and speeds.
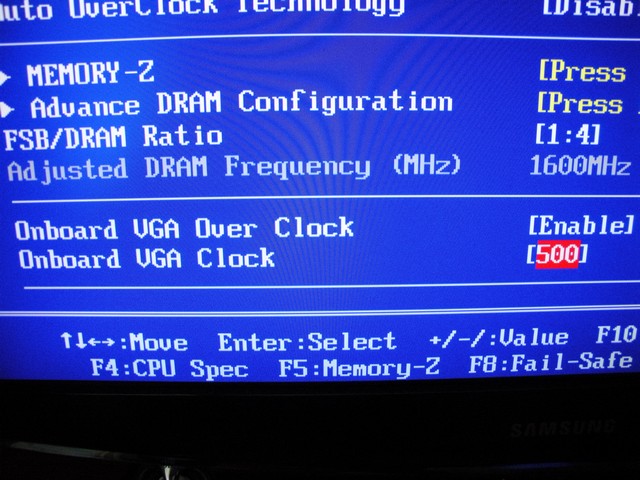
Finally we have what I think is pretty awesome but pretty funny at the same time. An option to overclock the core of your IGP. I suggest upgrading the cooling on your board before messing with this setting or you will surely overheat something.
Testing and Methodology
Here comes the hard, long, boring, sit wait and take a poo part. Ok not really but you get my point. We use Acronis Clone to copy a fresh install of Vista X64 to each system before running benchmarks to get maximum performance from our drivers and hardware. Well lets take a look at some CPU-Z shots to show you exactly how I have this AMD setup configured.
CPU-Z
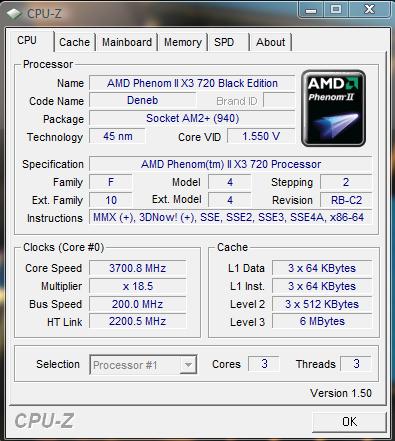
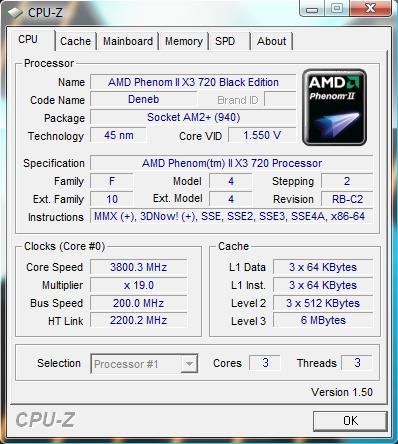
For my CPU test subject I’m using the Phenom II X3 720 Black Edition. I have it clocked at 3.7ghz which was easily attainable. I know what you’re thinking and no, I could not unlock it using the ACC bios trick. Either this board dosent do it or I dont have a chip from one of the two special batches.
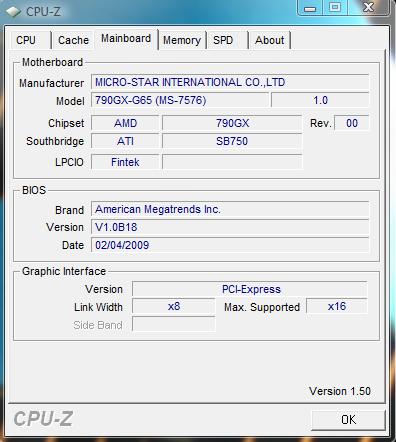
This ones pretty simple. It is just showing the MSI 790GX-G65 board and its insides.
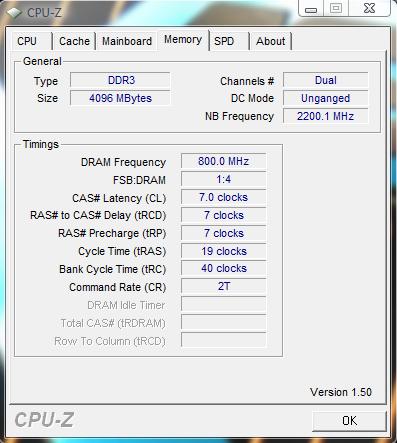
Here you can see have my G.Skill downlocked to 1600mhz effectively and I dropped the timings to accomodate for the speed. As I had said before dual channel slots are side by side so remember this. I wouldn’t want you sitting back scratching your head wondering why your ram isn’t in dual channel mode even though your using the 2 seperate colors. Cause you know how it is, instruction manuals are for wimps! All kidding aside though dual channel is in fact same color.
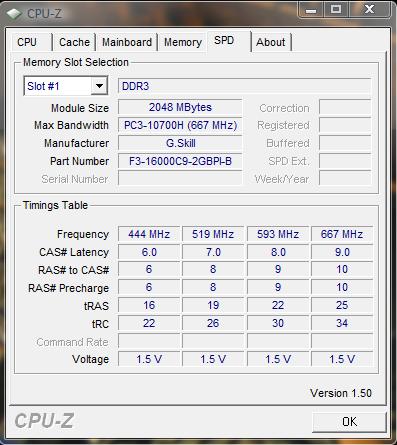
Here we have more of my memory. My G.Skill kit is rated for 2000mhz 9-9-9-24 @ 1.9v. Either this motherboard or CPU-Z isn’t detecting my memory correctly. I would be willing to bet it is the motherboard as we seen from the Memory-Z screenshots in the bios.
Test Rig
| Test Rig “Univac” |
|
| CPU | AMD Phenom II X3 720BE @ 3.7ghz |
| Motherboard | MSI 790GX-G65 |
| Ram | 2x2gig G.Skill DDR3 2000mhz |
| CPU Cooler | TRUE Black 120 & 2 Kaze 3000rpm 120mm fans |
| Hard Drives |
Western Digital 160gig SATA 1 (System) Western Digital 160gig Scorpio Black SATAII (enclosure) |
| GPU’s |
Crossfire 4870s 820/1050 |
| PSU | Thermaltake Toughpower 1000 Watt Modular |
| OS |
Windows Vista Ultimate X64 SP1 |
|
This is my sweet little POS =) |
|
Test Suite
|
Synthetic Benchmarks |
|
3DMark Vantage |
|
3DMark06 |
|
SiSoft SANDRA Business 2009 |
|
Everest Ultimate Edition v. 5.0 |
|
Cinebench R10 64 bit |
|
HD Tach |
3DMARK06 V. 1.1.0

3DMark06 developed by Futuremark, is a synthetic benchmark used for universal testing of all graphics solutions. 3DMark06 features HDR rendering, complex HDR post processing, dynamic soft shadows for all objects, water shader with HDR refraction, HDR reflection, depth fog and Gerstner wave functions, realistic sky model with cloud blending, and approximately 5.4 million triangles and 8.8 million vertices; to name just a few. The measurement unit “3DMark” is intended to give a normalized mean for comparing different GPU/VPUs. It has been accepted as both a standard and a mandatory benchmark throughout the gaming world for measuring performance.
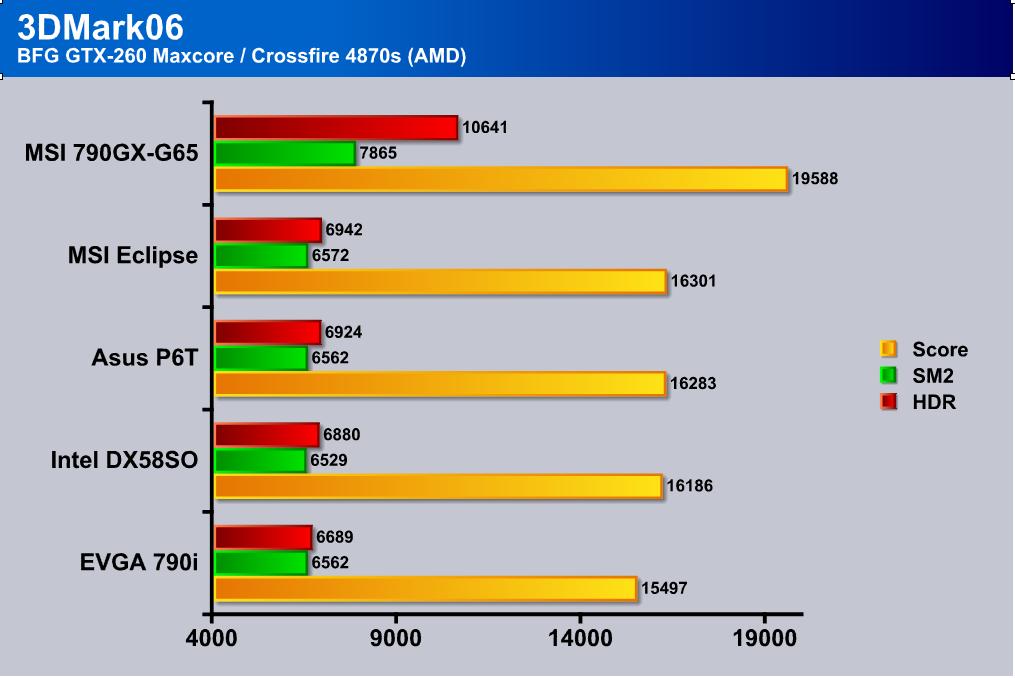
By looking at this chart even with as old as 3DMark06 is the single Nvidia card is just no match for the Crossfire setup. Unfortunately I could not get 06 to run on my single setup due to it not really liking Vista x64.
3DMark Vantage

The newest video benchmark from the gang at Futuremark. This utility is still a synthetic benchmark, but one that more closely reflects real world gaming performance. While it is not a perfect replacement for actual game benchmarks, it has its uses. We tested our cards at the ‘Performance’ setting.
Currently, there is a lot of controversy surrounding NVIDIA’s use of a PhysX driver for its 9800 GTX and GTX 200 series cards, thereby putting the ATI brand at a disadvantage. Whereby installing the PyhsX driver, 3DMark Vantage uses the GPU to perform PhysX calculations during a CPU test, and this is where things get a bit gray. If you look at the Driver Approval Policy for 3DMark Vantage it states; “Based on the specification and design of the CPU tests, GPU make, type or driver version may not have a significant effect on the results of either of the CPU tests as indicated in Section 7.3 of the 3DMark Vantage specification and white paper.” Did NVIDIA cheat by having the GPU handle the PhysX calculations or are they perfectly within their right since they own Ageia and all their IP? I think this point will quickly become moot once Futuremark releases an update to the test.
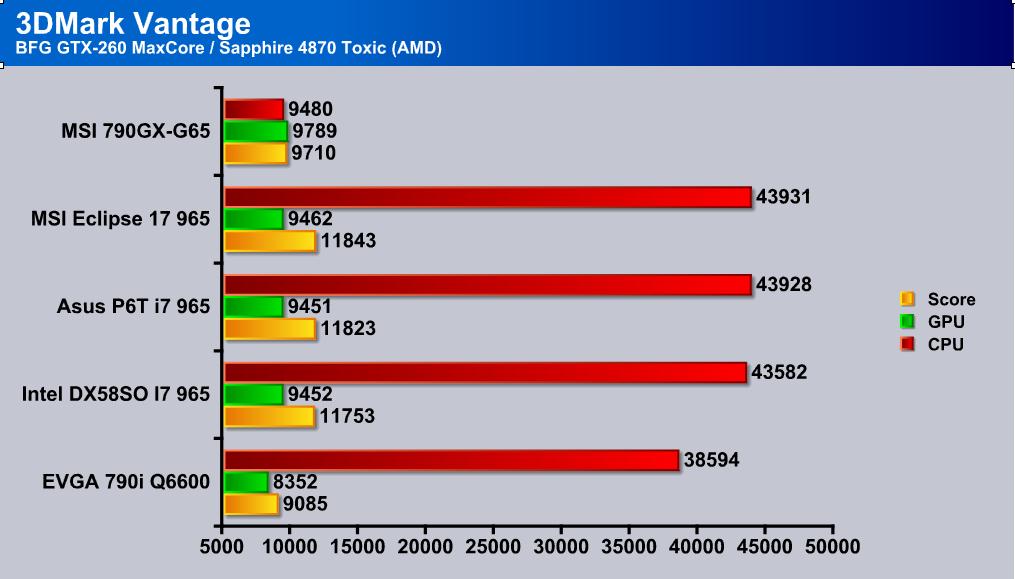
As obvious as it may be the i7’s really do give the AMD counterparts a kick in the groin. I think what we can all do here is just get a ball park as to what your system (If you where to build one that is) might perform like and have an i7 rig next to it to compare as well as a q6600 with DDR3.
Cinebench
“CINEBENCH is a real-world test suite that assesses your computer’s performance capabilities. MAXON CINEBENCH is based on MAXON’s award-winning animation software, CINEMA 4D, which is used extensively by studios and production houses worldwide for 3D content creation. MAXON software has been used in blockbuster movies such as Spider-Man, Star Wars, The Chronicles of Narnia and many more. MAXON CINEBENCH runs several tests on your computer to measure the performance of the main processor and the graphics card under real world circumstances. The benchmark application makes use of up to 16 CPUs or CPU cores and is available for Windows (32-bit and 64-Bit) and Macintosh (PPC and Intel-based). The resulting values among different operating systems are 100% comparable and therefore very useful with regard to purchasing decision-making. It can also be used as a marketing tool for hardware vendors or simply to compare hardware among colleagues or friends.”
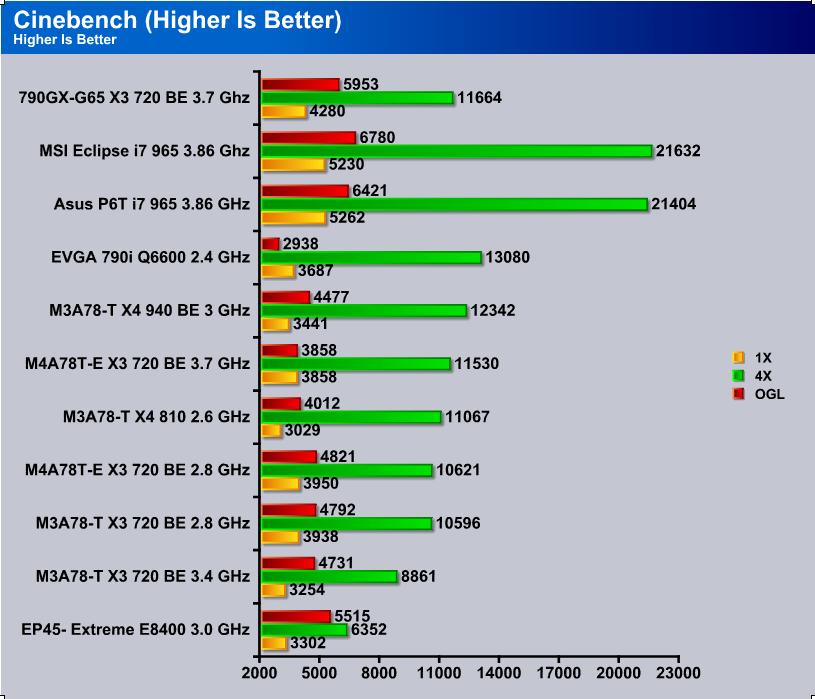
As a direct comparison here we can see that our MSI board clearly takes the lead only being lost to the quad core 940. Our AM3 platform only looses by a small margin though. 790GX may be a mainstream chipset but I would say it has enough umph to get you going.
HD TACH
HD TACH performs sequential read and write tests on removable media and fixed disks. HD Tach is also capable of performing the sequential read and write tests on the entire disk instead of the small number of zones in the quick and long test. We opted to use the Short 8 (MB) and Long 32(MB) tests in the sequential read mode only, as sequential writes are covered by other benchmarks.
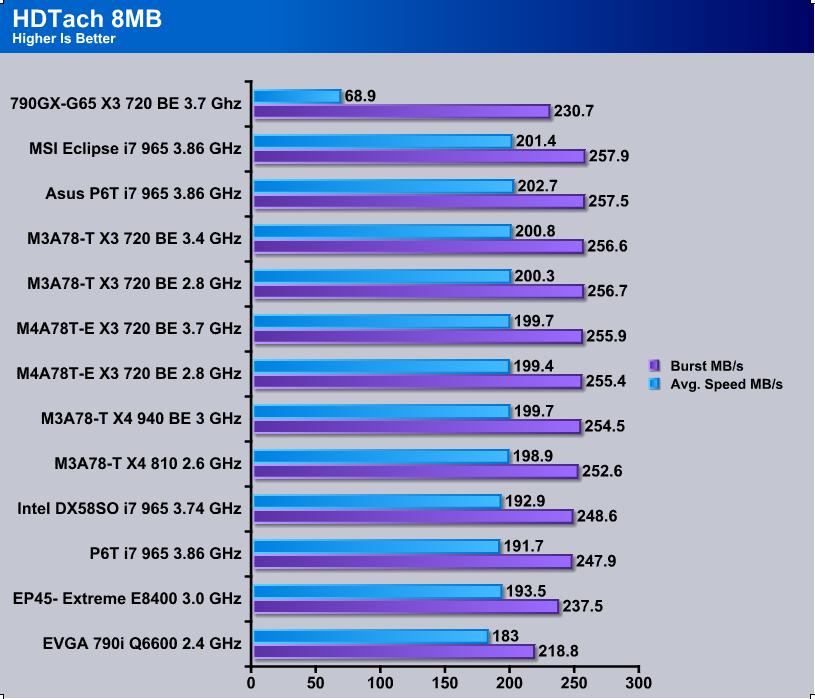
With these two benches you will see just how far a mechanical hard drive is falling behind. Unfortunately the SSD I had to bench with failed on me and my time for review was coming to an end with this board so needless to say I had to make do. Anyways, comparing these results I would say SSD > Hard Drive. Right?
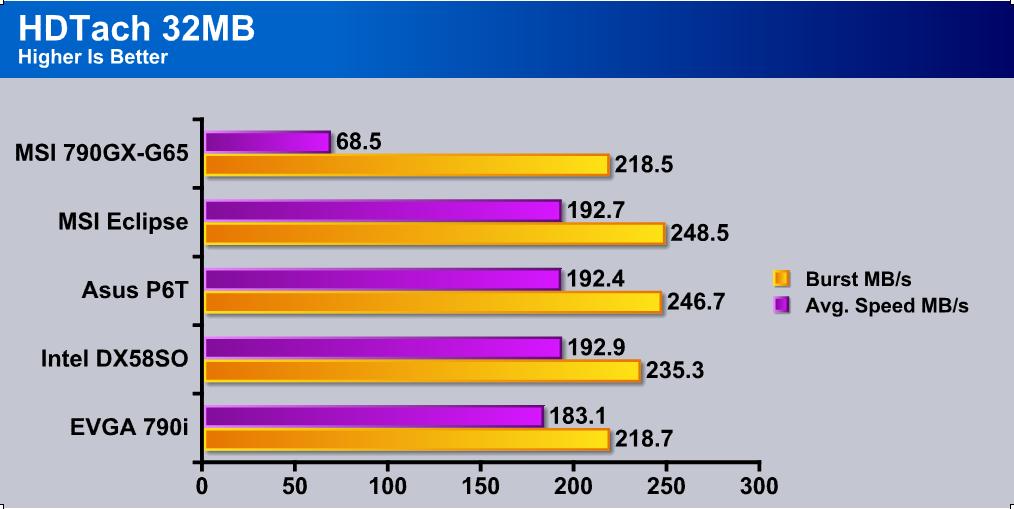
My hard drive’s burst speed wasnt bad on this test. I think the difference here is actualy in chipsets but they have SATA controlers down.
EVEREST ULTIMATE
“EVEREST Ultimate Edition is an industry leading system diagnostics and benchmarking solution for enthusiasts PC users, based on the award-winning EVEREST Technology. During system optimizations and tweaking it provides essential system and overclock information, advanced hardware monitoring and diagnostics capabilities to check the effects of the applied settings. CPU, FPU and memory benchmarks are available to measure the actual system performance and compare it to previous states or other systems. Furthermore, complete software, operating system and security information makes EVEREST Ultimate Edition a comprehensive system diagnostics tool that offers a total of 100 pages of information about your
CPU AES
This integer benchmark measures CPU performance using AES (a.k.a. Rijndael) data encryption. It utilizes Vincent Rijmen, Antoon Bosselaers and Paulo Barreto’s public domain C code in ECB mode.
CPU AES test uses only the basic x86 instructions, the test consumes 48 MB memory, and it is Hyper Threading, multi-processor (SMP) and multi-core (CMP) aware.
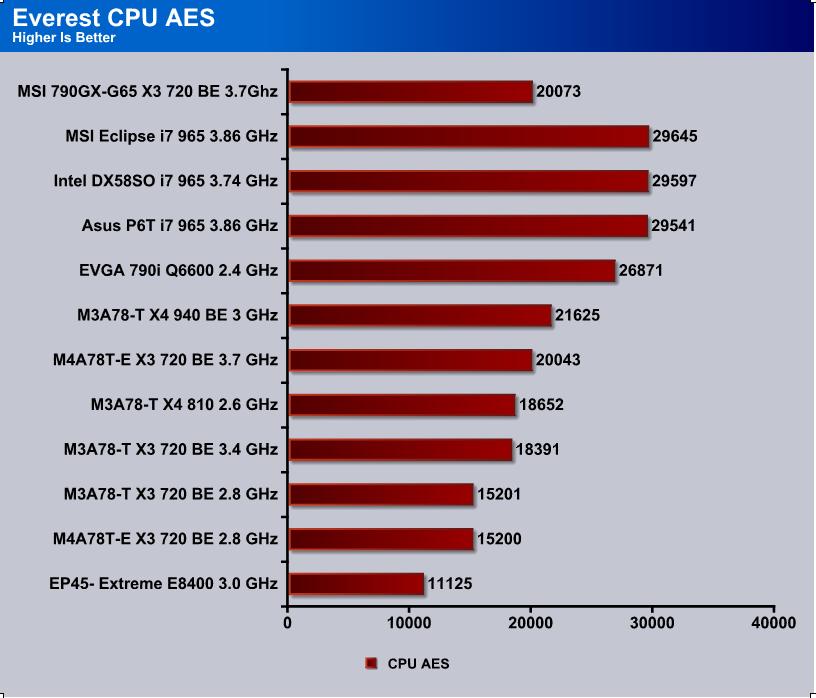
It seems that the move to DDR3 isn’t really great and that it seems going for a 940 and DDR2 might be the better economicaly better decision. I’m sure we will see this trend alot in the next few tests.
CPU Queen
This simple integer benchmark focuses on the branch prediction capabilities and the misprediction penalties of the CPU. It finds the solutions for the classic “Queens problem” on a 10 by 10 sized chessboard.
CPU Queen test uses integer MMX, SSE2 and SSSE3 optimizations. It consumes less than 1 MB system memory and it is Hyper Threading, multi-processor (SMP) and multi-core (CMP) aware.
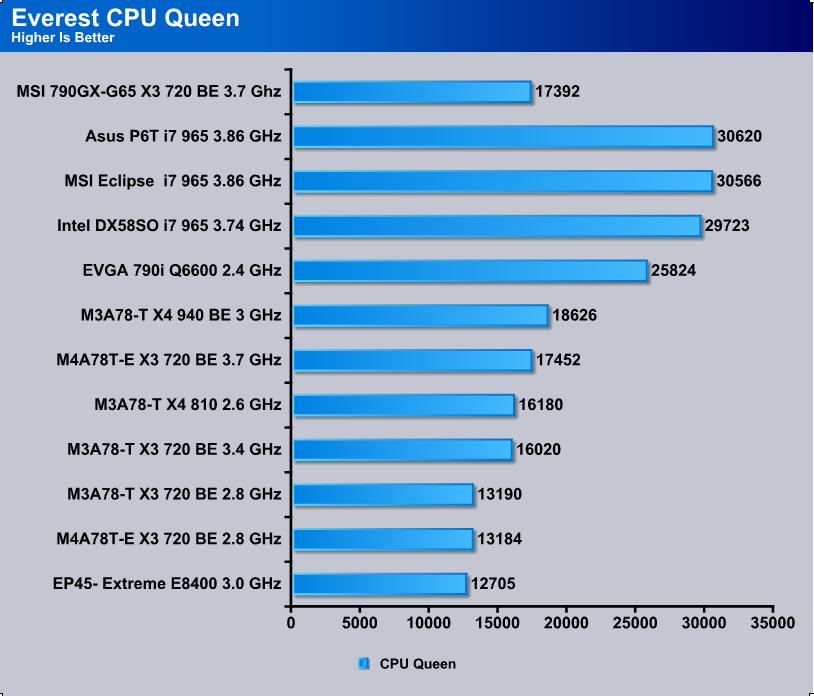
I think by looking here that it might even be wise to just stick with a cheap AM3 cpu and keep your old AM2+ board. I personaly would wait for a newer revised AMD chipset before purchasing a DDR3 board for AM3.
CPU ZLib
This integer benchmark measures combined CPU and memory subsystem performance through the public ZLib compression library Version 1.2.3 (http://www.zlib.net).
CPU ZLib test uses only the basic x86 instructions, and it is Hyper Threading, multi-processor (SMP) and multi-core (CMP) aware.
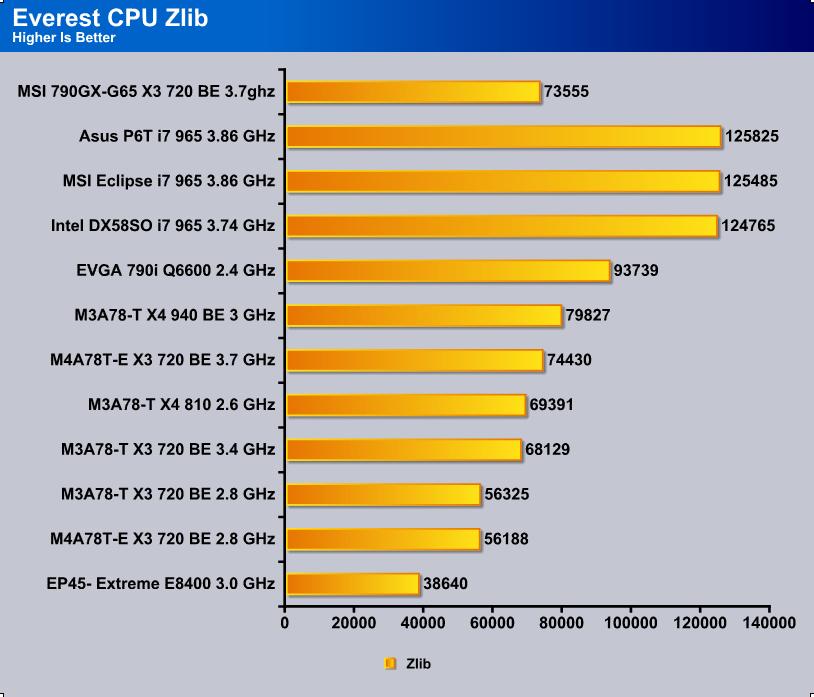
We continue to see the popular trend and even here the Asus AM3 board is beating out the MSI board. If you look closely stock clocked AM3 and AM2+ they are about the same and the move to DDR3 dosen’t really help.
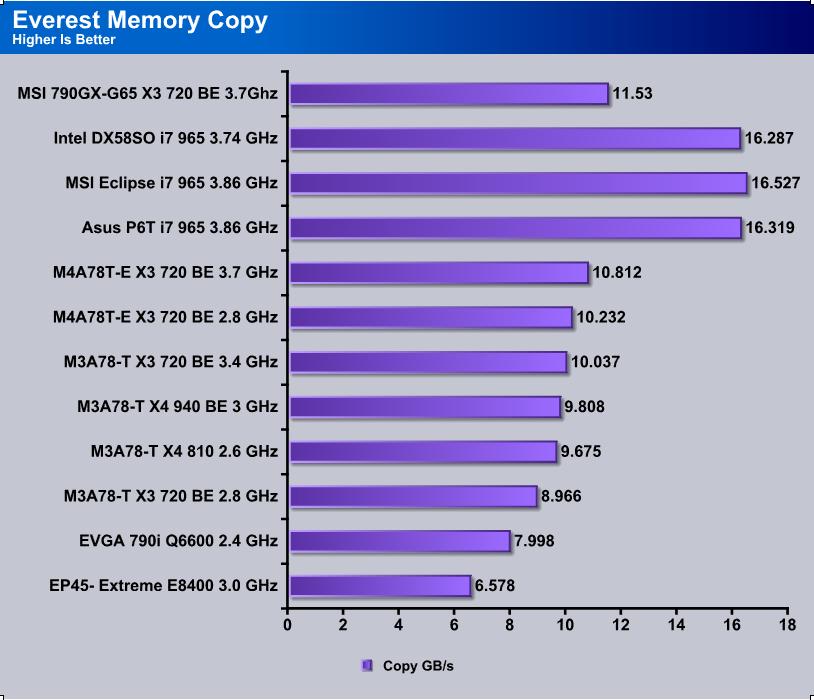
Moving on to actual Memory benchmarks we can see here that the move to DDR3 is starting to look alot better. Matter of fact, with DDR3 prices droping tremendously lately having DDR3 might be the better bet. Like 775 though, in real world applications you will see there isn’t much of a gain.

The DDR3 trend continues as it whoops up on DDR2 in benchmarks, but not by much. As I said before, real world you wont notice much of a difference.
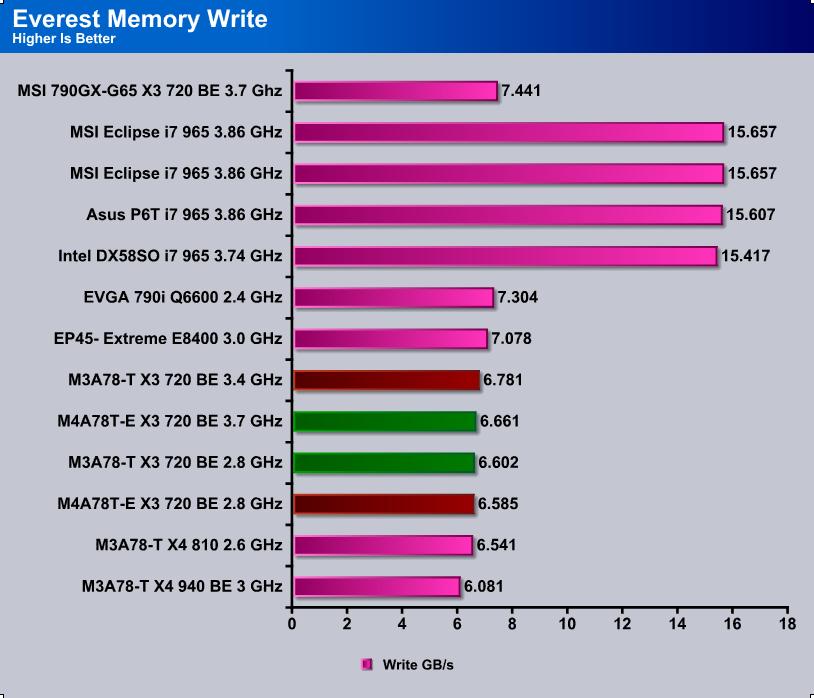
Looking here at Memory writes you will see that the MSI actualy has a gain and yet again DDR3 prevails. I guess the question really is do you want to keep your quad and stay with DDR2 or do you want to go DDR3 and get a Triple core?
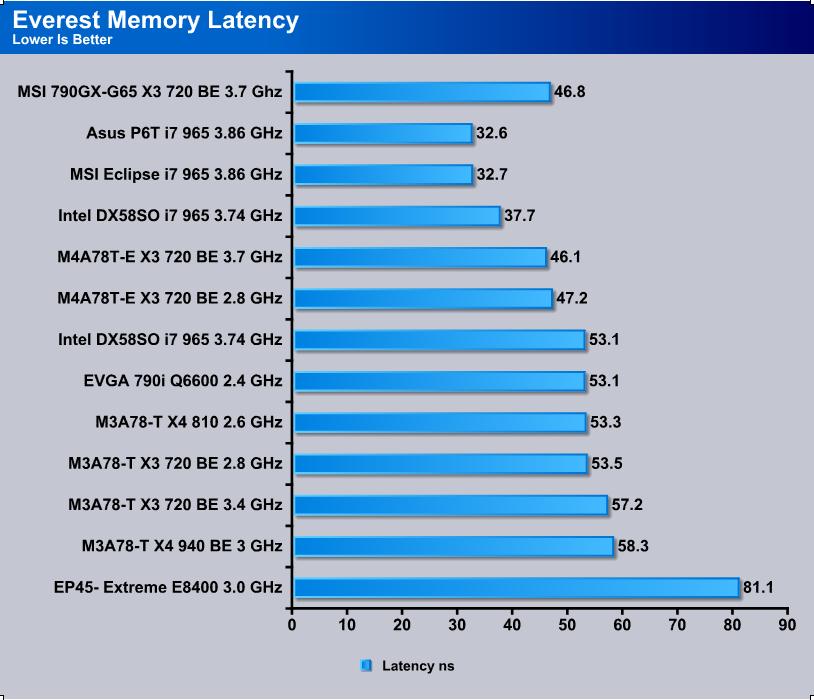
It seems that Asus has the gain here. No doubt it’s pretty close between the two board companies in the DDR3 battle.
Overclocking
Well you would figure that since this board is pretty much your budget AM3 board right now that it wouldn’t be able to overclock very well. Or actualy when you say budget most people think locked bios, or no options at all. This is simply not the case at all and in fact I am very impressed with how good this board actualy OCs. Let’s just find out shall we?
As we can see it only took me 1.55v to get up to 3.8ghz. This was my maximum overclock and the most stable overclock at this voltage was 3.7. Using the multiplier this is not bad at all. Actualy, it keeps up with my quad counterpart the 940 in alot of benches if not beating it by utilizing DDR3. Now I know most all of us dont have unlocked multipliers or “Black Edition” processors so heres the catch. I couldn’t really get much out of the system by raising the FSB. I dont know why this is but I would be willing to bet it might just be my setup acting funny. The only downside to the overclocking features of this board is you can’t raise the voltages past 1.55v. If your an uber extremeist like me with overclocking (even on air) you want to put the most amount of volts through your processor to see how far you can actualy get it. Well it seems 1.55v is enough to keep me stable at 3.7ghz so im pretty happy with that. Also I might add, my HT and NB Frequency are both at 2400mhz which going from 1800 to 2200 you will see a nice increase in performance. As I stated previously though, it’s hit and miss whether or not you can get to the 2200mhz mark.
Integrated Video (IGP)
ATI HD3300
This motherboard comes with onboard graphics, or as enthusiasts used to call bottleneck hell. Now though IGP’s are doing great things. I wouldn’t put my leg out and say awesome graphics but they do alot more than they used to. For instance full HD playback, DVI/HDMI output, DirectX10, SM4.1, onboard DDR3, and much more. Compare this to only a few years ago and you will be amazed at how much IGP’s have improved.
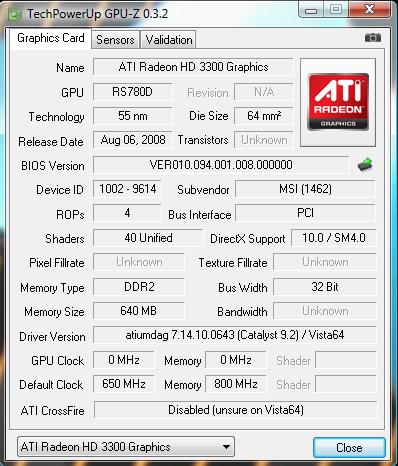
I will only show a GPU-Z screenshot of this because I believe it would be kind of pointless to make the IGP a major selling point on a mainstream gamer board. The onboard is perfect for “light” gaming, internet browsing, Blu-Ray watching, and the works. I highly suggest though to get a graphics card if you want to do any serious kind of gaming. The HD3300 is really only meant to get you up and running or good for an HTPC setup. Unfortunately though GPU-Z dosent tell us much information. The Memory clock can in fact be overclocked from the stock settings of 1333 up to 1700 in the bios. This shot dosen’t reflect that I have overclocked the GPU Memory to 1700. It also dosen’t show that the core clock is 500mhz which can also be overclocked within the bios. Among other things not being right at least you can see that the onboard graphics is in fact HD3300.
Conclusion
Well I wanted to take this time since it’s most appropriate here to explain myself a little from the things I have said perviously. I know I was a bit confusing so I’ll clear it up. From what we can tell the jump to DDR3 is a two sided coin. I suggest that if you already have an AM2+ rig at your disposal to just pick up a 940 and keep it for a while until newer AMD chipsets come out and better quad-core AM3 processors. There are many advantages and disadvantages with the jump to DDR3. Higher latencies are coverd by much higher clock speeds. The problem here though is if your CPU dosent natively support those higher speeds you need to use something lower if you don’t plan to overclock. This has two sides as well. If you buy lower speeds it’s cheaper, if you buy higher speeds to overclock you have the speed gains but a higher cost.
From the benchmarks it seems that if you are going into a fresh AMD rig an AM3 setup right now would be your best bet for everyday computing. DDR3 is alot cheaper than it used to be and a triple core overclocked is just as good as it’s quad counterpart and with DDR3 sometimes better. If you have an AM2+ rig though as I said stick with it and get yourself a nice quad.
As for the motherboard it is the bomb-digity for it’s price. High overclocking abilities, excelent slot positioning, excelent features positioning like SATA and front headers, dosen’t look like a Carebear, and the IGP isn’t to bad either. You can’t really ask for more since the MSI 790GX-G65 only goes for $129.99 on Newegg.com. Considering it’s bigger brother is $50 more and only has a few more extra enthusiast features it puts this board in the right place for mainstream users and the budget gamer who wants high performance. I really only have one thing to complain about; the RAM slots are way to close to the CPU. Other than that this board is great for its price.
We are trying out a new addition to our scoring system to provide additional feedback beyond a flat score. Please note that the final score isn’t an aggregate average of the new rating system.
- Performance 9
- Value 10
- Quality 9
- Warranty 9
- Features 9
- Innovation 9
Pros:
+ Great Slot Positioning
+ Great BIOS options for budget board
+ Price
+ Good Overclocking Ability
+ Onboard GPU for Backup
+ Reset, Power, and Clear CMOS buttons.
Cons:
– RAM slots way to close to CPU Socket
MSI has delivierd a top notch budget board for a top notch price. For this I give it an 8 out of 10 and the Bjorn3D Seal Of Approval.


