ABS Canyon 595 is a unique case where the external drive bay has been redesigned to face toward the side of the case. It has an elegant exterior, is light-weight, and made with all aluminum. Read more and see if this case can be the ideal case for you?
INTRODUCTION
Every once in awhile, we will see a company that breaks out of the mold and bring something unique and radical. More than often, these radical designs will make news headlines but the concept or the product may never materialize or catches on. Taken BTX, for example, although a good idea, it has never gained enough momentum to become a standard. However, this does not mean that companies have given up trying to reinvent and being creative.
ABS is a company that has been specialized in customized desktops. In addition to provide customized gaming desktops, the company also sells PSUs and cases. Awhile back, ABS has launched Canyon 695. The all aluminum full-tower case retails at insanely $599.99. Of course, not everyone is willing to shed out that much cash for a computer case, so ABS have made some modification and released the Canyon 595 at $100 less than. Though still expensive, it is at least not as bad as its big brother. We are fortunately enough to have been contacted by the manufacturer to review the case. So, let us look at what $500 gets you for a case.
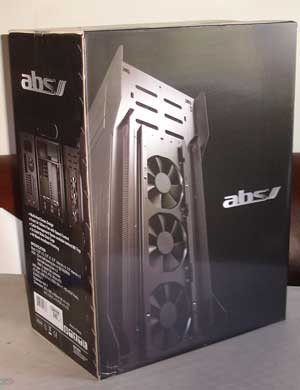
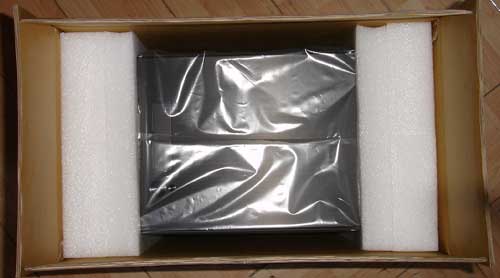
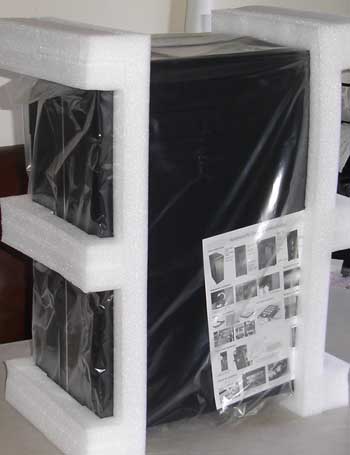
Our review sample arrives at our doorstep without out as much as a scratch. The case is nested inside a cardboard box where on its outside is where you can find the specification and a very nice picture of the case. Two pieces of Styrofoam are used to hold the case in place so it will not move around during shipping to cause any dent or scratch. The box is huge and we shall see why that is the case in just a minute once we got a glance of the actual product.
Here you go, now the question remains is it worth your hard-earned money? We shall try to justify this question as we pay more attention to its features and design.
A quick glance at the Canyon cases will remind you that it is simply slightly modified version of the Lian-Li TYR PCX-2000 case. Any computer enthusiast would sure not be a stranger to the name Lian-Li. Lian-Li is a name that is synonymous to Mercedes Benz to the car industry, which the company makes one of the best and elegant cases in the industry. It is regarded as the best among the best and it is always been anyone’s dream to own a Lian-Li case.
Features:
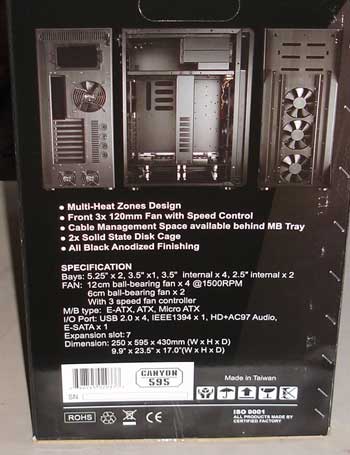
- Handcrafted Full Aluminum Chassis.
- Full Black Anodized.
- Innovative Multiple Heat Zones Design for Perfect Thermal Solution.
- Total 4 x 120mm and 2 x 60mm cooling fans to maximize internal air flow.
- Front 3x Front Double Ball Bearing Fan with 3-level Fan Speed Switch & Easy Clean Filter.
- Behind MB Cable Management Design.
- 2x 2.5” SSD Cage.
- Pull-to-open side panels.
- Removable motherboard tray.
- Graphics card holder to help secure long/heavy graphics card in position.
- Optical Drives can be installed to open toward either left or right.
- Sound insulation on the side panels to reduce the noise level.
EXTERIOR


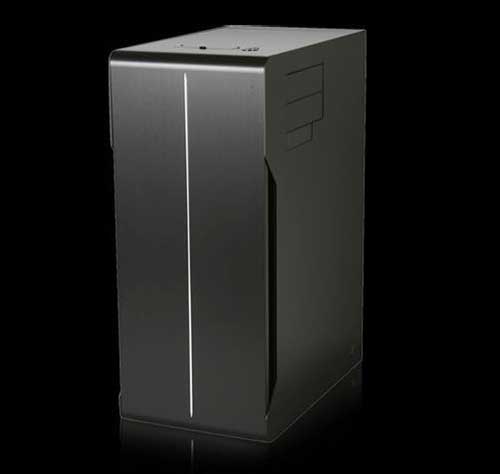
Although the ABS Canyon may not be a trend-setter with its design, it certainly breaks the mold of the other ATX cases with its modification. Contrary to other cases, it is taller and less deep than other ATX case. The exterior of the Canyon is very simple and elegant. All black exterior is made with brushed aluminum which gives a very nice finish. In fact, the whole case is made with aluminum so despite its size, it is really light.


You will not find any flashing light anywhere on the exterior of the case, only a line of silver metal runs through the front bezel with indicators for the Power on/off and hard drive activity. Again, keeping with the theme of simplistic and elegance. Notice that the edges around the front and the back is rounded which makes it less edgy and has a feel of a HTPC speaker. So if you plan to place the case in your living room for HTPC use, it will fit right into the decor.
What is unique about this case is its redesigned shape. Unlike many ATX cases where the case is often long from the back to the front, the Canyon is narrower but taller. It has the dimension of 250 cm x 595 cm x 430 cm (WxHxD). The reason that it is shallower yet taller is because the hard drive bay has been moved to the bottom of the case. In addition, the external 5.25’’ drive bay has been rotated 90 degrees facing toward the side of the case, allowing the drives to be ejected toward left or right side of the case.
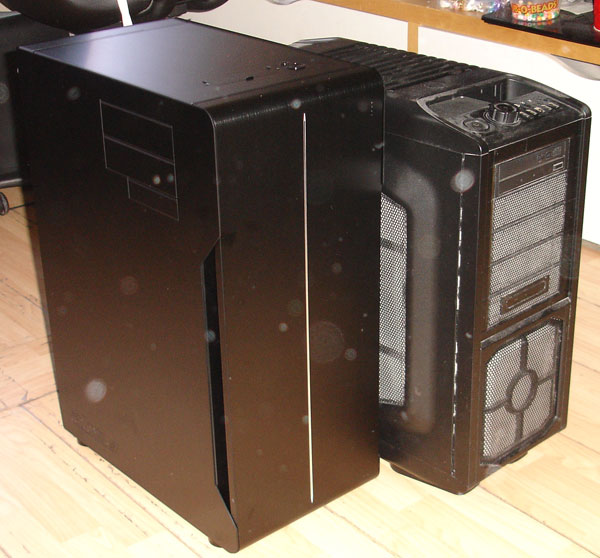
The Canyon 595 is a cut-down version of the Canyon 695 (Lian-Li TYR PCX-2000). By removing two extra hard drive spaces and additional PSU compartment, the Canyon 595 is a shorter version of its big brother. By placing the case next to the Cooler Master Sniper, we can actually see that the case is not as tall as we originally have thought.
We actually liked such design where it makes it more convenient to use these drives. Two external 5.25’’ drive bay and one external 3.5’’ drive bay can be mounted on the either side of the case. There is no drive bay cover for the external drive, so be sure to get a black color drives to match the case’s black exterior. The side panels fit quite nicely over the bay cover to prevent any dusts from falling into the case. However, after we have installed the drives, we found that it is not that easy to completely align the drives to covert the opening.


The front bezel can easily removed with a minimal force. A single piece of aluminum covers the front of the case. Upon removal of the bezel, we see three 120mm fans covering the front of the case. A very nice removable dust filter covers the fans. The fans are rated at 1500 RPMs and ABS includes a very convenient fan controller with three settings to adjust the fan speed for a balanced noise and cooling performance. Unfortunately, to gain access to such controller, one must remove the front bezel. It would have been much appreciated if such controller can be found on the outside of the case.
We feel that the front bezel can be a tad too easy to remove. We just have to gently pull the side of the front panel and the bezel comes off quite easily. It is probably not going to be a major issue but it’s something that can be an annoyance when you tries to move the case and accidentally pulled the bezel off.
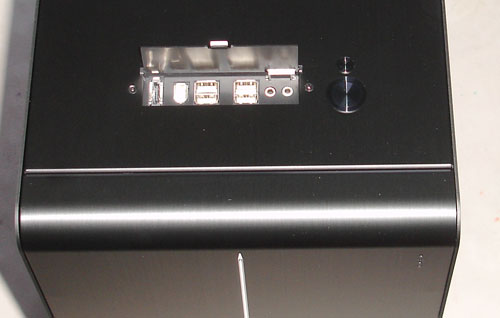
On the top is where the front connectors are located. Here you will find the on/off switch and a reset button. Four USB 2.0 ports, a FireWire port, a eSATA port, and headphone and mic port are included. We like the fact that there is a cover for these ports to prevent any dust build up in the connectors. The completely flat on and off switch and reset button is a nice touch so you won’t accidentally press any button when you put something on top of the case. Though we are not too thrilled with the USB ports placement as they are a tad too close that can be an issue with fatter USB devices.
On the back, you will notice that the case’s PSU is top mounted rather than bottom mounted. We actually prefer to have a bottom mounted PSU especially with a case like this. The weight of the PSU will help to stabilize the case better if it is mounted on the bottom (not that the case wobbles at all but it would be a better placement on the bottom). A single 120mm fan is located on the top just behind the CPU to give it added cooling. Four pre-drilled holes for watercooling tubes are on the back, making it ready for liquid cooling setup. Plenty of ventilation holes all around the case to assist cooling. Way toward the bottom you will find two 60mm fans are designed to cool the hard drives. It can be seen that a total of 8 expansion slots is available.
Overall, the exterior of the Canyon 595 is excellent with very nice finish and craftsmanship that we come to expect from Lian-Li. Despite its slightly taller design, it is actually not too bad when we put it against other similar tower like the Cooler Master’s Sniper.
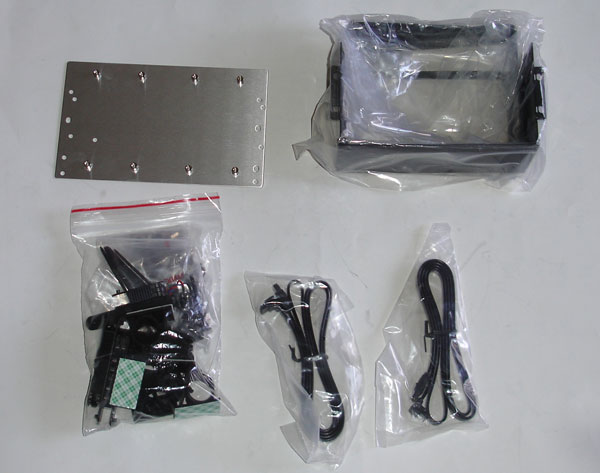
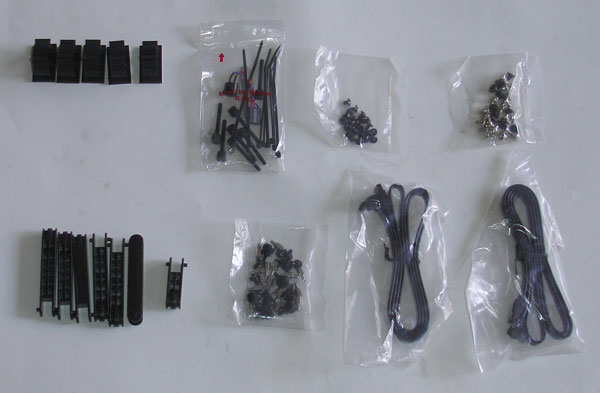
ABS includes all of the necessary cables and adapter in black color to match the case. A few cable ties and five clamps are included for cable management. In addition, two SATA cables are included with the angled connector. A metal mounting bracket for SSI CEB/EEB motherboard.
INTERIOR


The side panels can be removed extremely easy by unscrewing two screws on the back and pull the lock to release the panel. Both sides can be removed which makes installation of components much easier. On both side panels, you will find noise damping pads covering the motherboard compartment.

The Canyon is divided into three compartments. On the top is where the PSU and the external storages are located. The middle section is the motherboard compartment and on the bottom is the hard drive compartment.
PSU and external storage compartment
Motherboard compartment
Internal storage compartment
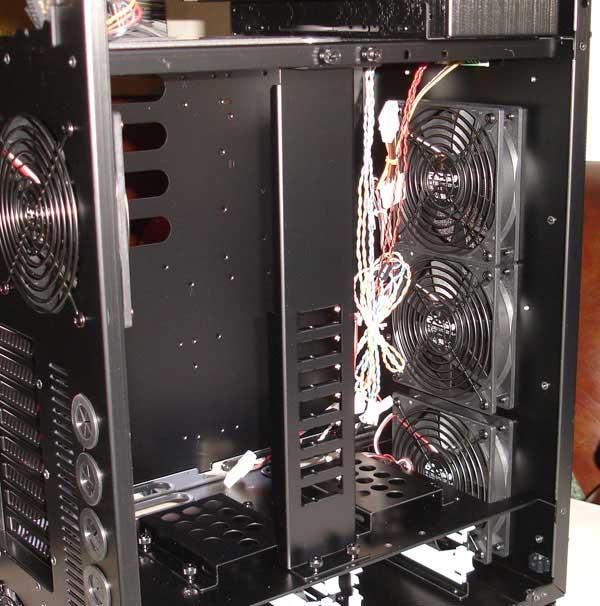
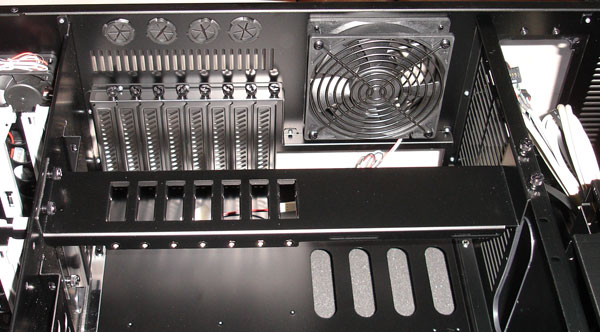
Inside we get a better view of the fan placements. Three 120mm intake fans on the front suck cool air through the motherboard and the hard drive compartment. A single 120mm fan just behind the CPU will be the sole exhaust fan for the motherboard compartment (in addition to the PSU fan). Two 60mm fan is located in the hard drive compartment to exhaust the hot airs out of the case in this area.
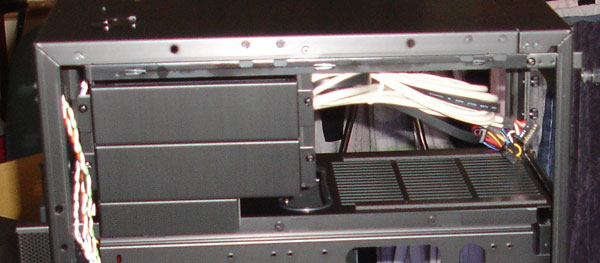
Let us take a closer at the PSU and the external drive bay compartment. As mentioned earlier that users can mount the external drives in either side of the case. However, the drive cage is not removable but luckily both side’s cover can be removed to gain access to the back of the drive for easy cable installation.
The 5.25” drive is easy to install. First, we had to remove the faceplate and then simply attach the four screws on both sides of the drive and roll the drive into the drive bay. A single screw is needed on the side of the drive to secure the drive in place. We did not have to remove both faceplates with our drive installation.

We encountered a problem with the 3.5” external drive unfortunately. The poorly documented manual fails to mention how to install the 3.5” external drive. We ended up simply screws the drive to the case with a couple of screws included. The lack of proper documentation is quite unacceptable for the price the case is asking.

The power supply installation also caused us some headache. Despite its roomy space, we had problem with our SilverStone power supply’s modular connector. We do not blame ABS in this part, as our power supply is a tad longer than standard ATX power supply; despite its length, it actually will fit into the PSU compartment without the need for the extension bracket that ABS has included. However, the modular connector has prevented us to screw the PSU onto the case. We ended up having to use the extension. At least ABS has thought about it when they design such case and includes an extension.
We do have one small complaint with the PSU extension. As you can see from the picture, because the PSU extends out of the case, the fan on the PSU will not be directly pointing above the CPU area, which can hinder the case’s ability to cool the CPU. We shall see its effect when we do our testing. Some larger PSUs actually have a cooling fan near the front of the PSU, which we believe would be better suited for such case.
Motherboard Compartment


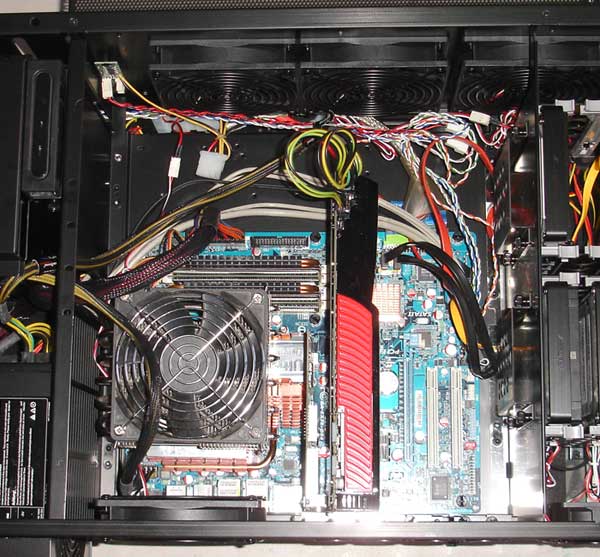
In the motherboard compartment, we see a large space and plenty of room to work. The case supports ATX, EATX, M-ATX, and SSI CEB (server board); plenty of motherboard form factors are supported. The EATX sure will come in handy as we have seen quite a few X58 boards with triple x16 slots in such form factor. The motherboard tray is removable for easily installation. ABS also has provided a few openings underneath the CPU socket area, which allows users to gain access to the CPU mounting holes without removing the motherboard. We can see from the picture that there are two 120mm fans pulling airs directly to the motherboard on the front of the case.
The Canyon utilizes thumbscrews for the motherboard tray, which is unique. We do like the easiness of thumbscrew but its slightly bulkier size can pose some minor problem. We did not encounter any problem with the thumbscrews.
We initially thought with removable tray and the ample of spaces to work, installation of the components into the ABS Canyon should be a breeze. However, we could not be more wrong. We soon discover that the opening underneath the CPU socket area is not big enough for our motherboard (Gigabyte EX38-UD4P) so it does not expose all of the CPU mounting holes. As a result, we had to remove the motherboard in order to install our heatsink.
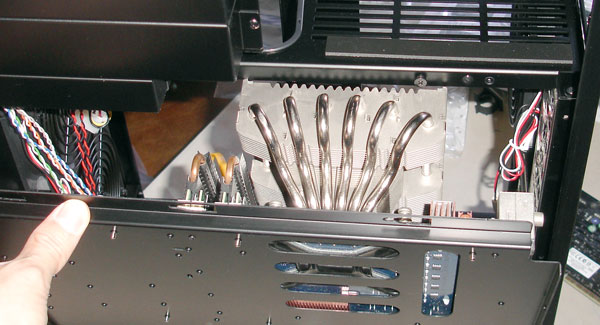
We also had problem installing the motherboard with the heatsink pre-mounted outside of the case. The PSU compartment does not offer enough clearance for our Noctua NH-C12Pheatsink. Our heatsink is a non-tower design cooler with modest size and if the case has issue with such heatsink, we would be sure that it would have issue with a tower design cooler and probably most of the enthusiast’s coolers out there. We ended up have to install the motherboard without the heatsink attached, which defeat the purpose of having a removable motherboard tray.
With the motherboard installed, we feel that the space near the CPU socket area is a bit tight. Our heatsink just barely fit with the heat pipe almost touching the PSU compartment. In addition, it could be slightly difficult to install the auxiliary power connector with the heatsink installed. This is not entirely ABS’s fault as it is partially due to the placement of the port on our board.
We did not encounter any issue our GTX 285. There is plenty of clearance for even the longest expansion cards and ample of spaces for cable management. Users can use the included cable ties and holders to organize the cables and plenty of spaces are available underneath the motherboard tray to hide all of the cables.
Installing the expansion card requires use of thumbscrews. A total of 8 slots are provided for expansion card. This will come in handy for those who use Gigabyte X58 boards. The Gigabyte’s board layout prohibits us to put dual slot graphics cards in tri-sli due to case limitation but this case will be able to support it because of the extra space under the ATX motherboard.
ABS provides a handy PCI card holder that is designed to secure the card in place. Simply attach the plastic card holder to the pillar and use the included thumbscre to hold the card holder in place. The retention pillar can be mounted in two places, in the middle of the motherboard compartment for shorter expansion cards or toward the front of the case for longer cards. Unfortunately, if it is mounted in the middle section, it won’t be able to secure the longer video card as it is shown in the picture above. If it is mounted toward the front, it won’t be able to secure the shorter cards.
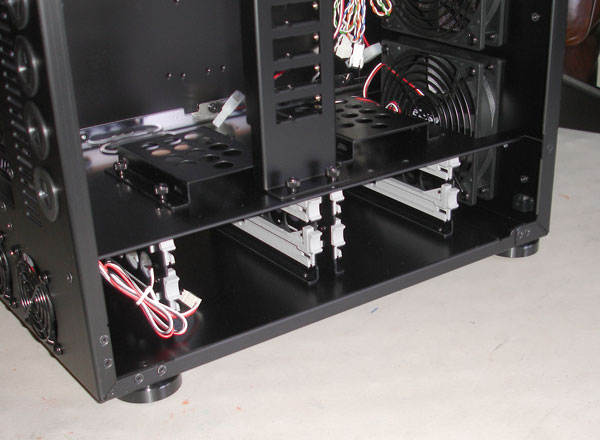
All the way towards the bottom of the motherboard compartment has two internal slots for 2.5” drives. They will definitely come in handy for your SSDs. We are glad to see ABS includes such spaces with SSD gaining in popularity.
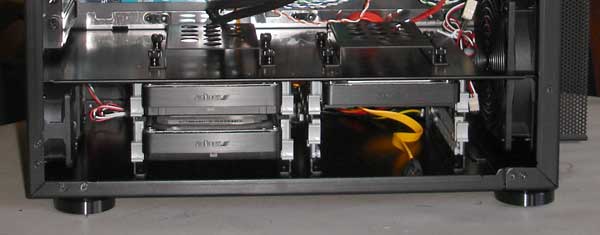
A total of four 3.5” hard drives can be installed on the bottom. ABS uses a metal rail that need to be screwed onto the hard drive. Then you can simply slide the hard drive in and out of the drive cage. The data and power cables are routed behind the hard drive for the best cable management.
Unfortunately, given to the size of the case, four a 3.5” internal storage space is too limited in our opinion. SSD is still too expensive for most users so not everyone will be able to afford it. There is also no way to convert more spaces for additional 3.5” or 2.5” storage space, which further limits the case’s expansion.
Finally, the cables for the fans are all very long and ABS includes various Molex to fan connector, which allows users to power the fan with the regular 4 pin Molex. The power adapter can all be chain-linked so there is no worry to run out of them.
COMMENTS AND IMPRESSION

We like to comment a little bit with the installation process and our impression with the ABS Canyon 595. ABS Canyon’s installation requires various screws and parts to be screwed on. Although we do prefer to have tool-less installation, we do not mind too much fastening a few screws here and there if they help to secure the components. However, we could not help but wonder if ABS (Lian-Li) can design the case that may reduce the number of screws needed.
We ended up spending almost two hours installing various parts into the case. This is partially due to the poor documentation of the case. As a result, we had to spend time to figure out how to install the external 3.5” drive. Even with the parts that are mentioned in the documentation, we sometimes had hard time to figure out which screws to use because there are just so many of them.
In addition, we had to install each of the fan connector to the fan controller individually. We would think that whoever purchase the case would probably want to use the fan controller so we would love to see them pre-attached to the controller to reduce the amount of time to route the cables and find the connectors.
PERFORMANCE
Let’s take a look at the Canyon’s cooling performance. We install the Gigabyte EX38-DS4 board with Intel Core 2 Qud Q9300 overclocked to 3.0GHz. We use the EVGA GTX 285 as our video card of choice.
The idle temperature is taken with the system booting into Windows for at least 15 minutes inactive. The load temperature is taken with the system running in Prim95 and Furmark for 15 minutes to maximize the GPU and CPU load. This will give you the worst case scenario as in normal use, neither CPU or GPU would most likely to get to such temperature over a long period of use.
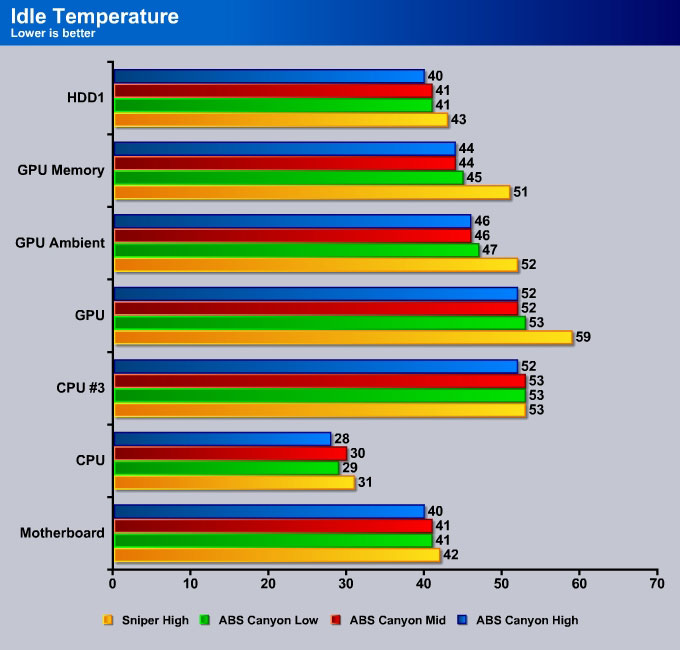
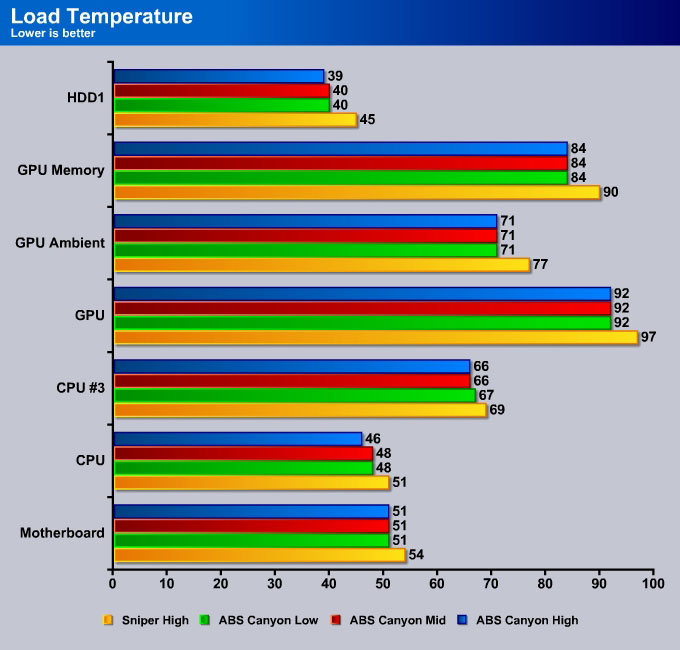
The cooling performance of the ABS Canyon 595 is excellent. It beats Cooler Master Sniper in every single category. We see a very impressive cooling performance with our graphics card. It goes by showing that just how streamline and efficient the three 120mm front and single 120mm back fans are in keeping the components cool.
We originally had question to whether the extended PSU can have ill result with our CPU cooling but as you can see from the picture, the Canyon still beats the Cooler Master Sniper. It is able to lower the CPU temperature by 3˚C cooler at low and mid fan speed and whopping 5˚C at highest speed under load. To give some credit, the Sniper’s case lacks the added cooling from the PSU because its PSU is bottom mounted so it does not gain the additional cooling.
The strategically placed 60mm fan on the bottom of the case for the hard drive pays off. We measured a 5˚C cooler with the Canyon. Unfortuanately, the noise level for these 2 fans is too loud to our liking. They rattle and vibrates even at the low fan speed setting. We ended up have to disconnect them once we finished the test. Without the two 60mm exhaust fan, we notice the hard drives will run at 3 to 4 degrees higher which bring it closer to what we observed with the Sniper. Still even at such temperature, the hard drive is still within acceptable range.
In terms of noise level, the Canyon runs very quiet at low and mid fan speed setting. At the high setting, the noise level is audible but not too loud to the point where it becomes unbearable. We probably would keep the fan speed setting at mid level for our day to day use and crank up the setting to high during game or in a hot summer day. Bare in mind that our comment on the noise level is without the two 60mm.
CONCLUSION
The ABS Canyon has many innovations and features what we love. We absolutely love the elegant and minimalist black exterior and really like the side loading 5.25” drive bays. The case is roomy and supports a wide range of motherboards. Its cooling performance is also excellent. Just like any other Lian Li’s case, it is very well constructed with high quality material.
Users with water-cooling setup will also come to appreciate the pre-installed four water tubing openings. The removable motherboard tray, cable managements, and washable dust filters are nice features to have. Users would sure appreciate the 2.5” internal bay for the SSD space and the adjustable fan controller.
However, despite its excellent ideas, its execution could have been better. The case is unfortunately plagued by many little annoyances. One of our biggest complaints would be the two very noisy 60mm rattling fans. We simply cannot stand the rattling noise that we had to unplug the fans. Unfortunately, it is impossible to mount larger fan due to the space limitation so you either have to replace two quieter 60mm fan or simply unplug the fans. Luckily, the hard drive’s temperature does not seem to be effected too significantly.
We found that despite its roominess, the case ended up to be harder to install as we originally thought. It is partially due to the fact the removable motherboard tray will not work with the larger heatsink pre-mounted. The crammed space near the CPU area and the inaccessibility of the back of the CPU for heatsink installation without removing the motherboard is something that we wish to be improved.
In terms of the storages, we really wish to see more storage spaces. It appears that ABS does not fully utilize the case’s space intelligently. For customer who uses ATX or EATX case, there are plenty of spaces in the motherboard compartment that can be transformed into additional storage spaces. Since the case is also designed to be used with SSI CEB (server board), six storage spaces (four 3.5” and two 2.5”) are definitely not going to satisfy the server enviroment.
For a case that costs $500, we really had high expectation for it. Unfortunately, after testing it, the case is somewhat of a letdown. The poor documentation, limited storage spaces, noisy fans, and cumbersome installation are things we really wish ABS could improve upon.
We are using an addition to our scoring system to provide additional feedback beyond a flat score. Please note that the final score isn’t an aggregate average of the new rating system.
- Performance 8
- Value 6
- Quality9
- Warranty 9
- Features 9
- Innovation 9
Pros:
+ Very elegant and stylish look
+ Excellent cable management
+ Quiet (without the 60mm fans)
+ Very good cooling performance
+ Excellent built quality
+ Water tubing holes pre-installed
+ Supports ATX, EATX, SSI CEB
Cons:
– Price
– Two 80 mm fan rattles and
– Removable motherboard tray will not work with larger CPU heatsink
– Power supply compartment could have issue with larger PSU and hinders cooling performance
– Front bezel is a tad easy to remove
– Fan controller is not located outside of the case
– Better documentation and installation instruction
– PCI card holder does not work
– Only has spaces for 6 drives (2 2.5” and 4 3.5” SATA hard drives)
For a case with excellent craftmanship and innovations, the ABS Canyon 595 unfortunately is plagued by rattling fan noise, poor documentation and lack of storage spaces. At $500 retail price, we do expect more out of the case and hope that ABS can improve upon these areas.
Final Score: 7.5 out of 10.


Dear Victor,
I have this case and have owned it for probably about 2 years now, and I have never tried to install a 3.5″ or 5.25″ drive until now. (I’ve been using an external usb drive.)
Now I want to install a usb 3.0 panel into the 3.5″ bay. I don’t understand: how/where do I run the cables?? Your review says that you were easily able to run the cables to the drives. Where? It literally appears as though there should have been a hole in the plate that separates the upper compartment from the motherboard compartment, but as if ABS just forgot to do it. As far as I can tell from your pics your case doesn’t have any extra hole there either, so maybe there’s nothing wrong with mine. But from your pics I can’t tell how you wired your drives…
Can you explain how you did it? Where did you run the cables? If you can remember?
Thanks!
hi, which motherboard are you using? A lot of the newer boards should have internal USB 3.0 header where you can just plug in the cable to the board. If you are talking about one of those USB 3.0 expansion bracket that route the cable to the rear of the case, then you are out of luck as the board has no such opening. You can potentially just use one of the watercooling holes to route the cable.
Thanks for your reply!
Hmm… maybe it was a distraction for me to mention what exactly I’m trying to install. I would just like to know where/how you routed the power & SATA cables that connect to your CD-ROM and whatever else you installed in the drive cage. I can’t see how you did it from the pics, and for some reason I can’t figure out where those cables should go.
Thank you again!
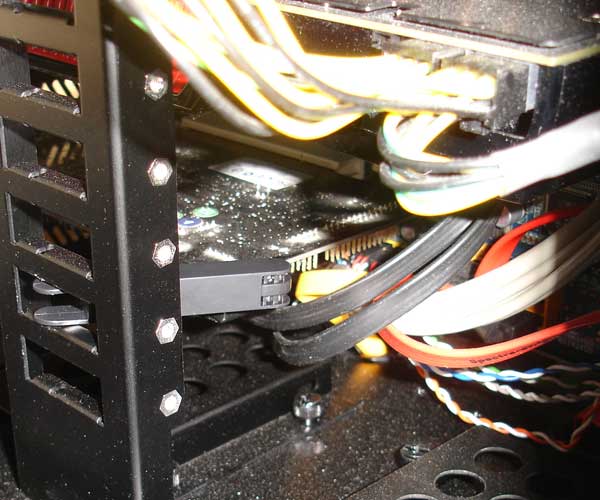
ah okay. well those cables are connected to the rear of the drive. You would be able to route the cable through the opening that is between the drive cage and the PSU. alternatively, if your cable is long enough (and the sata ports on your mobo are located on the bottom of the board), you can also route the cable through the opening on the bottom where your sata HDD cable would go through (the holes just next to the two 2.5” drives bay).
Ok, got it. The “opening that is between the drive cage and the PSU” is this one, at the top:
http://img713.imageshack.us/img713/8427/0gnc.jpg
Hah, I’m not sure why I didn’t see this right away. So obvious. I think maybe at first I thought there wasn’t any room due to the front panel cables that are already taking up much of the opening. But there’s enough room. I was able to squeeze a USB cable through it. I’m in the process of installing a usb 3.0 front panel thing (http://www.silverstonetek.com/product.php?pid=328). Only problem is that the cable is not long enough so I’ll need an extension.
**
However, just curious: I’m still not seeing what you are referring to by “you can also route the cable through the opening on the bottom […] (the holes just next to the two 2.5” drives bay)”. I’m not seeing any other opening. Strangely, as you can see in my pic, despite all the dust, there’s that depression on the bottom plate (facing downward) which looks as though there should be an opening there but as if someone forgot to make it…
yeah, the opening is small but you can squeeze it there. I do also find a lot of these front panel usb 3.0 cable are extremely short as well.
as for the 2.5” drive bay. I mean you can route the cable underneath the motherboard tray to the bottom of the 3.5” drive and go through the opening on the bottom of the case where the 3.5” drives will go. If got a long USB cable and your usb 3.0 header is located on the bottom of the mobo, then this is an option for you.
Ah, okay, I understand what you’re suggesting. Thanks for all your help!