Kingston has released a HyperX 2133 MHz kit for Core i5 (LGA 1156) and it’s low voltage needs. Running stock at 2133MHz this kit is sure to blow your socks off.
Introduction
Unlike Core i7 LGA 1366 the memory vendors were ready and waiting for Core i5/i7 LGA 1156. When Core i7 LGA 1366 came around the memory IC manufacturers couldn’t keep up with demand for low voltage memory IC’s for Triple Channel DDR3 that met the low voltage requirements. Memory was expensive and hard to come by. When LGA 1156 Core i5/i7 hit the shelves memory vendors were primed and ready for it.
Our first kit of LGA 1366 Triple channel ram was a paltry 1066MHz kit that got us up and running so we weren’t complaining. Low and behold we did a road trip to California for the Gigabyte, Intel, Kingston Core i5/i7 demo and saw a kit of Kingston HyperX 2133 MHz running in one of the Demo rigs. Well that was love at first Super Pi and we had to have a kit.
Kingston was nice enough to hotshot us a 4GB kit of Dual Channel DDR3 2133MHz HyperX in time for the LGA 1156 launch and we have to tell you that this is an exceptional kit. The XMP Profile made it plug and play at 2133MHz and if you had experience with DDR3 on AMD or LGA 775 (Intel) you know how big a pain it was. This was snap in place, set the XMP profile and drive away at a blazing 2133MHz and unheard of 8-8-8-24 timings. Needless to say as soon as we opened the package it was geektastic geekgasms until we got the kit installed. When the machine booted to 2133MHz first time out of the gate we knew we’d chosen the right kit to launch i5/i7 with.

Sporting the high end T1 heat spreader and classy HyperX look we knew it was finally time to break out a little surprise we’ve been holding back for an appropriate kit of HyperX.

Yes that’s right we have been hording a Kingston HyperX Fan waiting on a kit that deserves a little extra TLC. If 2133MHz doesn’t deserve a little extra TLC then no kit does.
Please note that while some HyperX kits might include the HyperX fan the kit of Kingston HyperX 2133 MHz we received did not have the fan bundled with it. Since the HyperX Fan kit runs $19.95 we would highly recommend investing in a fan when you pick up your ram. On our 4GB kit of HyperX 2133MHz Dual Channel DDR3 we weren’t seeing abnormally high temperatures anyway, but after installing the fan we saw a 7 – 10° C drop in temperatures. As we all know lower temperatures means more overclocking headroom and longer life. The $19.95 investment in the HyperX fan is money well spent.
Specifications
Kingston HyperX Dual Channel DDR3 2133MHz (4GB)
- Extreme Performance 2133MHz
- Low Latency (8-8-8-24)
- XMP Ready
- Equipped with T1 Heat shield
- 100% Tested and Verified
- Lifetime Warranty
- RoHS Compliant
- Tested on Intel® P55 chipset (1.65v)
Sporting Kingstons’ fairly new T1 heat spreader and running at a native 2133MHz and timings of 8-8-8-24 you can expect blazing performance from this kit. The XMP profile let us plug the HyperX kit into our Gigabyte GA-P55-UD6 board and once we set BIOS for the XMP profile it booted right into Vista on the first try and we were up and running at a blazing 2133MHz. Each module is individually tested and sports a lifetime warranty.

When you recieve a kit like this it’s hard to stop and take pictures before you install it. We’re glad to say we had the good sense to slam the kit into the rig and run it like a demon before we shot the pics. We mean, get real, who could wait for pictures when you’ve got a 2133MHz kit of HyperX screaming to get into a rig.
Kingston HyperX Fan
- Whisper-quiet — 28 dBAm maximum
- 12V rated. 8V-13.5V operational range
- RPM: 3000 +/- 10%
We can attest to the HyperX fan being totally quiet, even in a quiet test room you can’t hear the fan even with the chassis side open. Designed to run off a motherboard header the dual fans pull between 8 and 13.5v and run at 3000RPM the fans add that little extra cooling to your high end ram kit to give you a little lore overclocking headroom and extend the life of your ram.

Done in Kingston Blue this little gem will provide between 7 and 10° C cooler ram operation and provide a little extra downward airflow to help cool the ram slot area.
Keep in mind the fan is not bundled with this particular kit so if you want the extra cooling you will have to spring the additional $19.95 unless they decide to bundle it with the kit.
Pictures

Kingston HyperX with the T1 heat spreader typically comes on a plastic hang card with a clam shell plastic design. It attractively displays the ram yet provides an adequate amount of protection.

The T1 heat spreader provides a large amount of heat sink surface area to dissipate the heat away from your memory modules.

Getting close in on the sticker you can see this is indeed a KHX2133C8D3T1K2/4GX HyperX kit designed to run at 1.65v. For the less tech savvy we’ll give a blow by blow on the sticker. The KHX is Kingstons’ code for HyperX Memory (KHX = Kingston HyperX), which is followed by 2133 and is the speed of the ram in MHz, then you see the C8 and that stands for the Cas Latency of the ram kit often referred to as Cas 8 or 8-8-8 timings. The D3 that follows stands for DDR3, the T1 is the heat spreader type, K2 is Kit of 2, and 4GX stands for 4GB. Bet you didn’t know we spoke HyperX, speaking HyperX is a lot better than speaking Klingon. After all you can’t buy a Klingon.

Kingston is one of the few, what we would consider, tough kits. By that we mean you could almost drive a nail with the heat spreader on one of these kits. Sure it would get scarred up a little and we would never (probably wouldn’t) try and drive a nail with a stick but it has a solid enough feel that you probably could. You shouldn’t have to worry about a flimsy heat spreader that will snap off when you insert the ram stick. We have heard rumors that in a pinch the T1 heat spreader doubles as a comb, we wouldn’t know from personal experience (that’s our story and we’re sticking to it).

Any idea why we tossed this shot in? Well we didn’t really have a good reason except we wanted to tell you that coming near our 2133Mhz kit of Kingston HyperX might result in the loss of a hand.
HyperX Fan

The fan, which we have been saving for a while, comes in a plain cardboard box and has a Kingston Blue sticker on it. Typically these boxes have a pletura of information on them but Kingston opted for a plain tasteful sticker and left the product to speak for itself.

Once we got the box open the simple, yet effective, design of he fan system was a little amazing. Fan body, two legs and two screws.

Shown from the bottom you get little hint that these are brightly lit Blue LED fans that add more than the purchase prices worth in bling alone.

Assembly takes just a minute or so and even though there was no 100 page manual we figured it out quickly on our own.

A lot of people think the legs on the fan connect to the ram, in reality the legs go over the ram clips and also serve to ensure that the ram clips don’t get accidentally popped open.

Turns out the HyperX fan complimented our Sunbeam 9 bay acrylic chassis quite well. Since the Chassis comes with Blue LED Fans this is a good kit to add a little bling to the rig.
Once again the fan is not included with the kit, it is an additional add on purchase and we highly recommend it. For a mere $19.95 you get extra cooling for your ram kit and extra bling for the gaming shrine.
Testing & Methodology
We did a fresh load of Vista Ultimate 64 bit on the Crucial 128GB SSD and loaded all the latest motherboard drivers for the Gigabyte GA-P55-UD6. We updated the BIOS to the newest available BIOS at the time of testing. We ran each test 3 times and report the average of each three pass run here.
Being a locked multiplier CPU you have to OC to reach some of the higher end kits rated speeds. The highest kit speed we saw without us or the XMP having to raise the Bclk on hte rig was 1600MHz. To that end when you reach the overclocking section we included the CPU-Z screen for CPU and Ram so you can see the Bclk used on the kit being tested.
Test Rig
| Test Rig “Quadzilla i5” |
|
| Case Type | Sunbeam 9 Bay Acrylic Chassis |
| CPU | Core i7 870 |
| Motherboard | GIgabyte GA-P55-UD6 |
| RAM |
Kingston HyperX DC DDR3 2133MHz 4GB Kit Cas 8 (KHX2133C8D3T1K2/4GX) Patriot Viper 2 Sector 5 DC DDR3 2000MHz 4GB Kit Cas 8 (PVV34G2000LLKB) Corsair Dominator DC DDR3 1600MHz 4GB Kit Cas 8 (CDM4GX3M2A1600C8) |
| CPU Cooler | Thermalright Mux 120 (Dual 120mm Fans) |
| Hard Drives | Crucial 128 GB SSD(MLC/Samsung controller) |
| Optical | Sony DVD R/W |
| GPU(s) | BFG GTX-260 Maxcore |
| Case Fans | 120mm Fan cooling the mosfet CPU area |
| Docking Stations | None |
| Testing PSU | Tagan BZ 700w Modular |
| Legacy | None |
| Mouse | Razer Lachesis |
| Keyboard | Razer Lycosa |
| Gaming Ear Buds |
Razer Moray |
| Speakers | None |
| Any Attempt Copy This System Configuration May Lead to Bankruptcy |
|
Test Suite
|
Synthetic Benchmarks & Games |
|
SANDRA XII Professional |
|
Everest Ultimate Edition v.4.60 |
|
SuperPi Mod 1.5XS |
|
WinRar v.3.71 Compression Benchmark |
Everest Ultimate

“EVEREST Ultimate Edition is an industry leading system diagnostics and benchmarking solution for enthusiasts PC users, based on the award-winning EVEREST Technology. During system optimizations and tweaking it provides essential system and overclock information, advanced hardware monitoring and diagnostics capabilities to check the effects of the applied settings. CPU, FPU and memory benchmarks are available to measure the actual system performance and compare it to previous states or other systems. Furthermore, complete software, operating system and security information makes EVEREST Ultimate Edition a comprehensive system diagnostics tool that offers a total of 100 pages of information about your PC.”
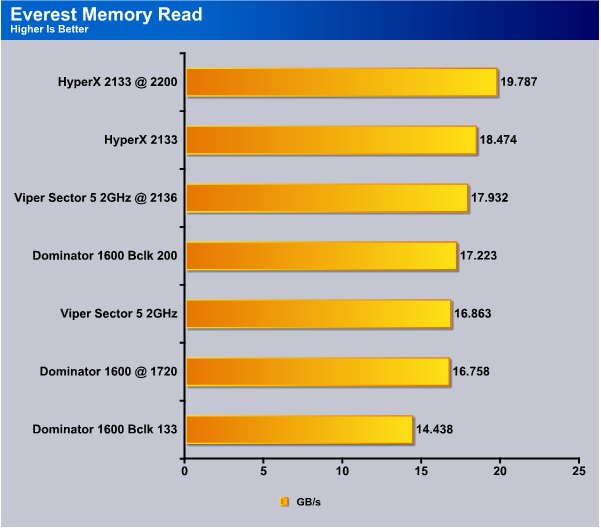
The 4GB kit of Kingston HyperX topped the chart in the Everest Memory Read test and at stock speed churned out an amazing 18.474GB/s when we overclocked it to 2208MHz performance rose to 19.787GB/s and that’s about double the performance we saw with DDR3 on the LGA 775 platform.
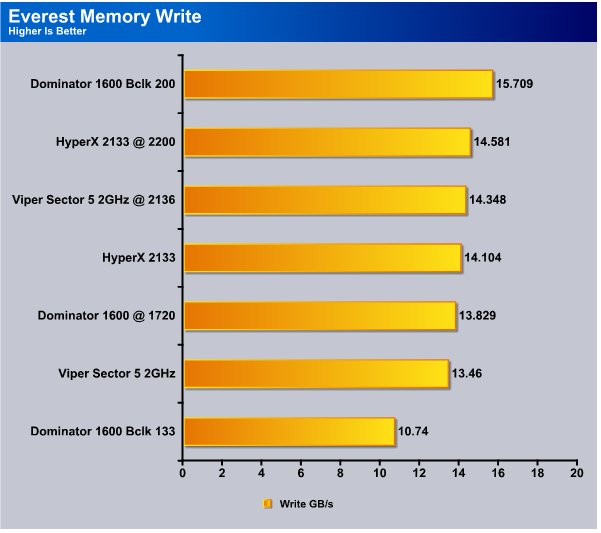
Yes we know it loks a little strange having the Dominator 1600MHz kit topping the chart in the Write department, we raised the Bclk on the kit to 200 and the higher Bclk produced some really good numbers. Rest assured that if we ran the Kingston kit at Bclk 200 with the CPU at 3.8GHz it would do better. Actually we have ran the Kingston kit with a higher Bclk and it performed well, the Dominator is clocked like that for a different ram review showing the differences between Stock speed, OC speed and Stock speed with a high Bclk.
Performance wise the HyperX kit turned in a 14.581GB/s running at 2200MHz, the Viper Sector 5 kit manages to squeeze in with 14.348GB/s overclocked to 2136 followed by the HyperX kit running at stock speed which turned in a 14.104GB/s.
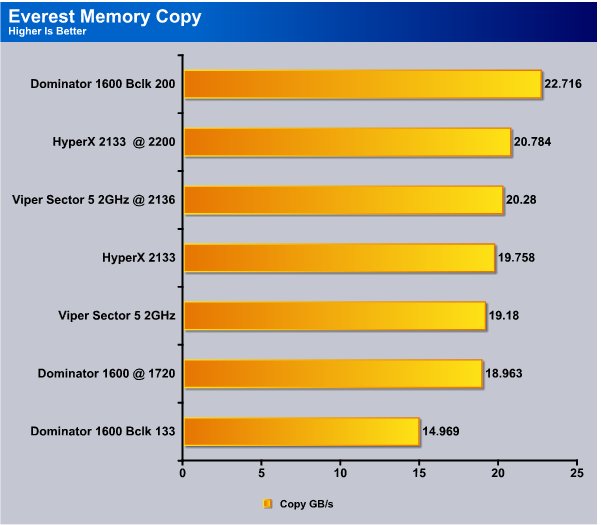
The Everest Memory Copy test shows the HyperX 2133MHz kit turning in another amazing score of 20.784GB/s while running at 2208MHz. The Sector 5 kit again snuck ahead when overclocked to 2136MHz and turned in a 20.28GB/s while the HyperX running at 2133 turned in a 19.758GB/s. Keep in mind that the scores are affected by the CPU overclock and since i5/i7 CPU’s are locked multiplier CPU’s you raise the Bclk to clock kits above 1600MHz to their rated speeds. The raising of the Bclk makes a tremendous difference. That’s why we clocked the Dominator kit to Stock 1600MHz with a Bclk of 133, then 1600MHz with a Bclk of 200. Take any of these kits and crank the Bclk as high as it will go and still run the kit at or above the rated speed and performance will increase. The XMP profile setting is what we are using on the Kingston HyperX and that sets the Bclk to 174MHz. The XMP profile on the Dominator sets the Bclk to 133 and the CPU to it’s stock speeds. So if we are talking out of the box performance plug and play the Dominator places last with 24.969 and the HyperX would be way on top. Since the XMP was so low on the Corsair kit we clocked it up ourselves to show the performance difference you would get.
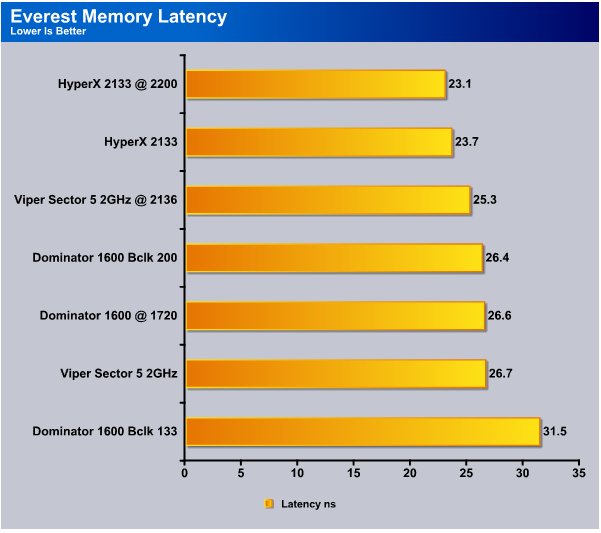
The HyperX 2133MHz kit overclocked turned in the lowest latency with a 23.1ns latency, at stock speed it turned in a 23.7ns latency and the rest of the kits are inhaling Kingston’s dust. Checking out the rear of the T1 heat spreader so to speak.
WinRar v. 3.71

This module in WinRar generates random data, which contains specially introduced redundancy, increasing the load to both the processor and memory. Data is then passed through RAR compression and decompression algorithms, and the output of the decompression algorithm is compared to the source data. If any differences are found, WinRar then reports “Errors found – Yes” in the command window. WinRar displays a size of processed data and compression speed, current and resulting, in kilobytes per second.
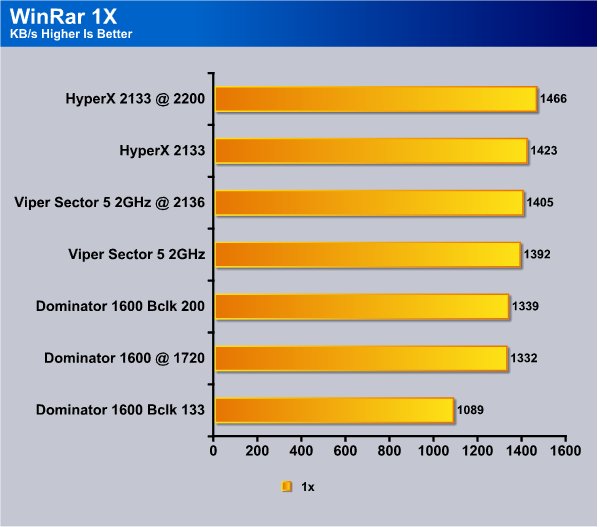
With WinRar running the single threaded test we see the Kingston HyperX 2133 kit blazing with a score of 1466KB/s when overclocked. The HyperX kit running at stock speed turned in 1423KB/s and was closely trailed by the overclocked Viper 2 Sector 5 kit.
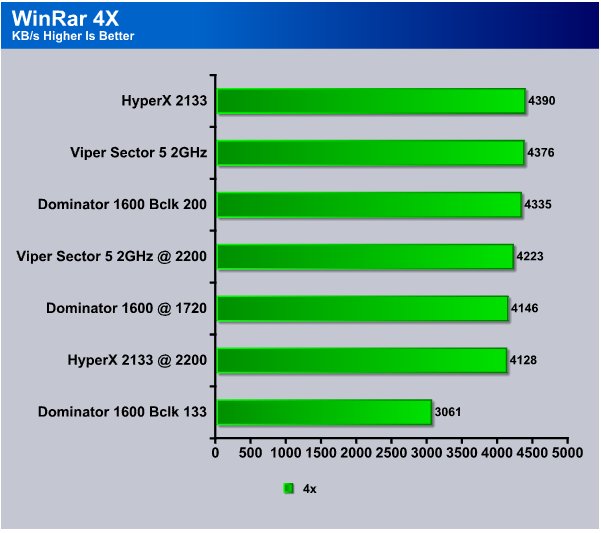
In the Multi-threaded portion of WinRar the Kingston kit again tops the chart with 4390KB/s and is closely followed by the Viper 2 Sector 5 kit. Notice both the Viper 2 Sector 5 and Kingston kit lost performance when overclocked.
Sisoft Sandra
“SiSoftware Sandra (the System ANalyser, Diagnostic and Reporting Assistant) is an information & diagnostic utility. It should provide most of the information (including undocumented) you need to know about your hardware, software and other devices whether hardware or software. It works along the lines of other Windows utilities, however it tries to go beyond them and show you more of what’s really going on. Giving the user the ability to draw comparisons at both a high and low-level. You can get information about the CPU, chipset, video adapter, ports, printers, sound card, memory, network, Windows internals, AGP, PCI, PCI-X, PCIe (PCI Express), database, USB, USB2, 1394/Firewire, etc.”
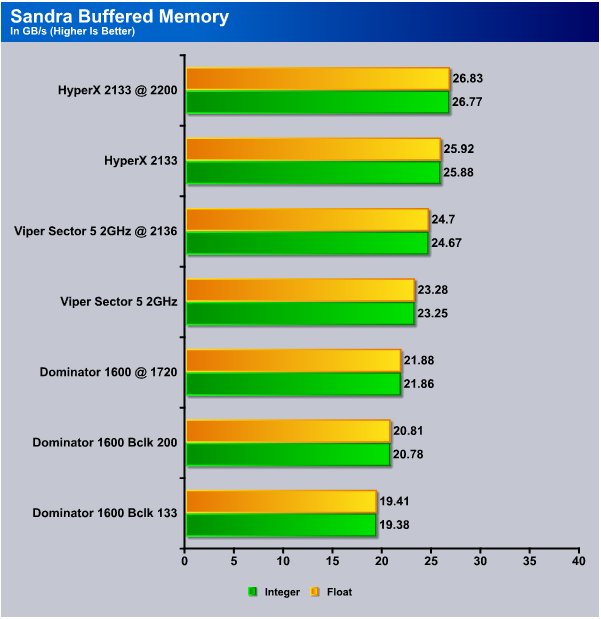
All the kits did amazingly well in Sandra, the HyperX 2133 kit turned in the highest score with an unreal score of 26.83GB/s when overclocked and 25.92GB/s at stock speed. Currently the only platform that can challenge this bandwidth is the LGA1366 i7 Intel platform and it’s triple channel ram. Comparing triple channel to Dual channel was just a little to apples and oranges for us so we went straight to comparing low voltage i5 to itself. Cross platform comparisons are of limited use.
Super Pi

Super Pi is the “Gold standard” for many when it comes to judging system performance. We ran 1 and 2 Meg calculations, again running each test three times and reporting the average of the results.

In Super Pi the Viper 2 Sector 5 kit took a slim lead and we suspect that has more to do with CPU and Bclk speed than ram speed. With a Bclk of 178MHz and a CPU speed of 3.94GHz as opposed to the Kingston HyperX kits 174 Bclk and CPU speed of 3.728GHz the extra CPU speed probably kicked the Viper kit ahead. That tends to be one of the problems with locked multiplier CPU’s. To OC you have to use the CPU multiplier and raise the Bclk. That limits the possible combination’s of CPU and ram speed.
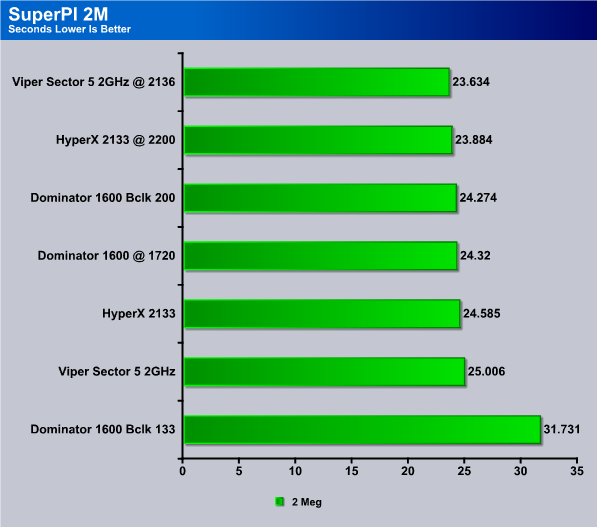
The HyperX kit turned in a 23.884 second time when overclocked and a score of 24.585 seconds at the stock speed. Keeping in mind that is only 1 second from the first place score this test was a squeaker and probably affected by the different overclocks and Bclks. Sometimes tweaking makes all the difference.

Lets take a look at the Kingston Kit just like CPU-Z shows on first boot.
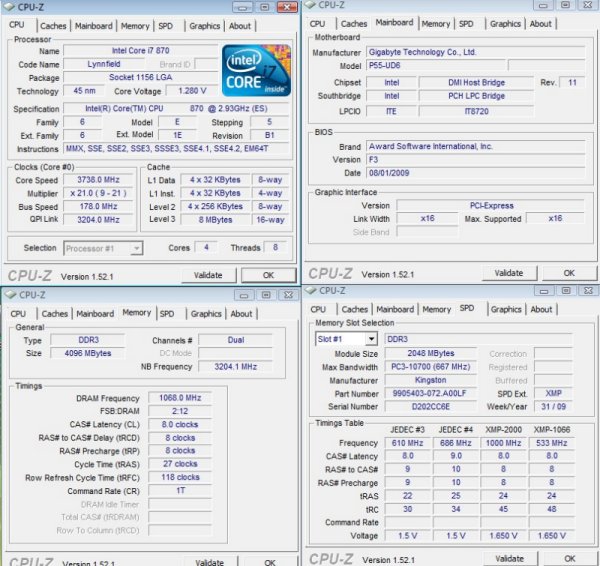
Like we mentioned by enabling the XMP on the Kingston HyperX on the Gigabyte GA-P55-UD6 board the kit was plug and play. All we did on the way out of BIOS was kick the CPU multiplier up to 21 and that gave us a solid first boot to 3.738GHz CPU and 2136MHz memory. It even held the timings at 1T so for a kit with 8-8-8-24 and getting a stable 1T command rate we are really happy with the kit even if we don’t get an overclock, and you know we got an overclock.
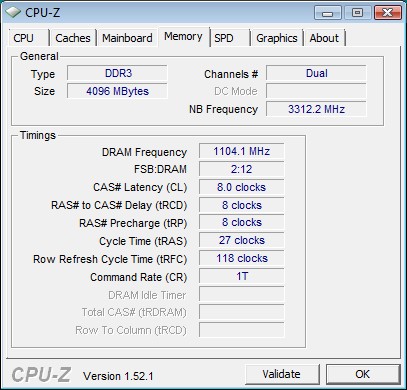
We easily hit 2208MHz and truthfully that’s not the highest frequency we hit. We got higher frequencies out of the kit but it seemed like performance was degrading beyond this point and instead of going up scores went down. Yea we know pictures or it didn’t happen. Sorry when we hit 2250Mhz the ram kit flew across the room and one stick landed in the fish tank and killed our favorite Angel fish so we couldn’t get a shot of that.

Yea right we always get the shot, we reached a frequency of 2256MHz without much effort but increasing the voltages in BIOS for the PCH and holding the ram voltage at 1.65v we had hit decreasing returns and the ram seemed to be starving for voltage. We got higher numbers from the 2208MHz overclock than we did from the 2256MHz OC. So performance wise the 2208MHz OC was better, bragging rights we could have went higher than 2256MHz but doing so would require a higher voltage than Intel says is safe.
Conclusion
The Kingston HyperX kit is without a doubt the fastest kit we have seen to date. We hear rumors of other kits clocked to 2133MHz native but until we get those kits in hand this is the fastest i5 kit we have hands on. We seriously doubt any kit will have tighter timings than the HyperX kit (8-8-8-24) and for ease of use and plug and play functionality there is no way to beat Kingstons performance.
We’ve run a lot of Kingston kits and when it comes to plug and play no hassle ram kits Kingston has the undisputed crown. We were a little amazed when the 2133MHz kit booted right in Vista rock solid stable with no tweaking on the ram or chipset voltages. One reviewer had to physically reach up and close his mouth when he saw the kit boot and run stable on the first try. We even kicked the multiplier up to 21 and booted stable to 3.74GHz and that makes the Kingston HyperX and Gigabyte GA-P55-UD6 an unbeatable combination for those that want high performance without all the tweaking hassles.
We’re glad that Kingston went with the newer T1 heat spreader and the ram ran great with nothing more than that. Adding the HyperX fan was just icing on the cake for us. We got a nice 7 – 10° C temperature decrease using the fan. With such a high end kit it almost makes one wonder why the fan isn’t bundled with it but at $19.95 for the fan if your getting a kit that is this high end it’s still a good investment.
We love the performance of the kit, we really like that it’s the same blue color many rigs use for interior lighting, and with the lit fan clamped on, the kit looks and performs better than any kit we’ve seen to date. We highly suspect that no kit will outperform the HyperX kit given equal Bclk and CPU OC. That would tend to put the KING in KINGston. Long live the King(ston).
We are using an addition to our scoring system to provide additional feedback beyond a flat score. Please note that the final score isn’t an aggregate average of the new rating system.
- Performance 9.5
- Value 8
- Quality 10
- Warranty 10
- Features 9.5
- Innovation 10
Pros:
+ Champion Overclocker
+ Amazing 2133MHz Kit And Has Headroom To Spare
+ T1 Heat Spreader Looks Great And Performs Well
+ Almost Substantial Enough To Drive A Nail
+ Easy To Overclock
+ Plug And Play 2133MHz Kit, Catch Us Before We Faint!
Cons:
– At $375 A Little Pricey But Then The Best Always Is
– Spoiled Us Early In The i5 Platforms Release
The 4GB Kingston HyperX DDR3 Dual Channel 2133MHz kit literally puts the King in KINGston, we don’t expect to find any kits that run faster or outperform this kit in the foreseeable future. With it’s fantastic speed, overhead for overclocking, effective T1 heat Spreader the HyperX kit scores an: 9.5 out of 10 and the Bjorn3D Golden Bear Award.


