The Silverstone Temjin Series TJ10B chassis has a very stylish clean look, and to top it off, it is design is excellent for powerful internal water cooling loops with its included radiator support bars.
Introduction
Silverstone came out with their Temjin Series chassis back a few years ago. One of their successful Temjin chassis’ was the TJ09 which later got upgraded with the help of customers feedback to the Silverstone Temjin Series TJ10. The older high end gaming chassis TJ09 had excellent reputation with Digital Storm as they started using multiple water cooling loops in their systems. However Maingear’s “Ephex” line is using the Silverstone TJ10 chassis for their systems. This brought up lots of attention and made me curious how good could this chassis be? So I decided to give the TJ10 a go and try to implement my own internal water cooling system with the RadSupport09 and with some of the latest hardware on the market. Seeing that the Temjin TJ10 case was built a few years back however, it made me curious if this chassis could keep up with the latest hardware and the current competition on the market.
The Silverstone Temjin TJ10 chassis comes in many different styles. Depending on what the user prefers, some of the most known models are the Black and Silver TJ10, which are named TJ10B and TJ10S respectively. These models come with either a windowed or solid closed side panel. Many of the reviews written in the past have taken a look at the TJ10 with the window side panels and just some of their features, so we here at Bjorn3D, decided to take it one step further and try to build a killer gaming rig from the parts that we gathered over time. To accomplish this, our goals were to have an internal water cooling system that will cool the CPU, but also try to install AcoustiPack Ultimate Soundproofing Kit and AcoustiPack Acoustic Noise Reduction Foam Blocks to fight the annoying noise some of the latest computer systems make.
Today we will be taking a look at the Silverstone Temjin Series TJ10B chassis with a solid side panel. To test this case we will be measuring the overall temperatures of all the hardware installed in this chassis. This will measure how effective the air circulation is in the TJ10. Our second test will be to see how well the AcoustiPack Products provided by AcousticPC will work with the Silverstone TJ10 chassis. Will it help lower the overall noise generated inside the case if it a closed chassis without any windows? And finally what are some advantages and disadvantages with the RadSupport09 that allows us to use internal water cooling systems. Let’s take a look at this chassis.
Thank you for Silverstone and AcousticPC for sponsoring us with the Silverstone TJ10, the Custom Built Water Cooling System, and the AcoustiPack Products!
Features
- Premium all-aluminum chassis for extended ATX, ATX, SSI motherboards
- 120mm fan only design for ultimate performance & quietness
- Unprecedented air duct dedicated for graphics card cooling
- Advanced structural engineering with superior chassis stiffness
- User friendly layout with multiple tool-less access
- Classic SilverStone styling and finish
 |
 |
 |
|
TJ10 outfitted with AMD QuadFX platform and 12″ long Leadtek Quadro FX 5600 1.5GB GDDR3 in SLI |
||
 |
 |
 |
|
TJ10 outfitted with AMD FX platform and 12″ long Diamond Radeon HD 2900XTX 1GB GDDR4 (OEM version) in CrossFire |
||
Specifications
| Specifications | Silverstone Temjin TJ10B |
|---|---|
| Model Number |
SST-TJ10B (black) SST-TJ10S (silver) SST-TJ10B-W(black, with window) SST-TJ10S-W(silver, with window) |
| Material |
Aluminum front panel/door, 2.0mm aluminum body |
| Motherboard |
SSI, Extended ATX, ATX, Micro ATX |
| Multimedia |
— |
| Drive Bay |
External 5.25″ x 4, 3.5″ x 1 Internal 3.5″ x 6 |
| Cooling System |
Front 1x 120mm fan slot Rear 1x 120mm exhaust fan, 1200rpm, 21dBA Side 1x 120mm mid-section fan, 1200rpm, 21dBA Top 2x 120mm fan slots |
| Expansion Slot |
7 |
| Front I/O Port |
USB2.0 x 2 |
| Power Supply |
1 x Optional standard PS2 (ATX) or 1 x Redundant PS2 |
| Expansion Card |
optional (support for 12″ graphics card) |
| Net Weight |
13 kg |
| Dimension |
207 mm (W) x 521 mm (H) x 644 mm (D) |
| Extra |
The Silverstone TJ10 is built from a 2mm thick aluminum. Steel parts are nickel plated SPCC. Even though it is thick enough to keep the whole system intact and sturdy enough to move around and easily put your hardware in it, we fill like the side panels could have been a bit thicker.
One nice thing about the Silverstone TJ10 is it’s very nice refined and straight hair-brushed black surface. It’s very stylish and looks clean and professional.
External


Finally on the exterior portion of this chassis, we can see the left side of the case which also has a solid standard left side panel. The other model comes with a windowed left side panel. Since we wanted to keep this case looking as clean as possible, we decided to review this model instead of the windowed model. This also allowed us to cover the side panel with AcoustiPack Ultimate PC Soundproofing Kit provided by AcousticPC. The back side of the TJ10 is neatly designed. A few things that quickly come to our eyes is that the power supply gets installed on the bottom of the chassis. There is extra ventilation provided towards the top. This extra space can also be well used up with an internal radiator that you can install with the help of the RadSupport09 that can be ordered separately. In this review we will also take a look at that.
For those that are interested, the 4 bottom feet come with plenty of rubberized areas which makes this case extremely sturdy and hard to knock over on a desk. Also these anti-vibration feet make sure you don’t get any unnecessary vibration from the PC that could make you annoyed.
A back I/O shield plate is not included, which in my opinion was a good choice to leave out due to the fact that all motherboards are different and they all come with their own I/O shield plates anyway. Lower down we can see the 7 expansion slots that come with a ventilated expansion slot covers. This will allow the video cards and any other hot hardware installed in the back of the system to let the hot air out on the back. Right next to the expansion slots we can see a few more ventilation holes included, which can also help in reducing overall heat in the case, however if you are going for a quite PC, these features could actually hurt the overall soundproofing of the system. Two more things to look at are the included 120mm fan on the back of the TJ10 which also comes with a fan grille. This is more expensive to implement however it helps in overall performance of the fan and also helps in lower noise being caused by air hitting unnecessary areas. And finally we see two large 1/2″ water cooling holes which allow the user to install an external water cooling system on this chassis.
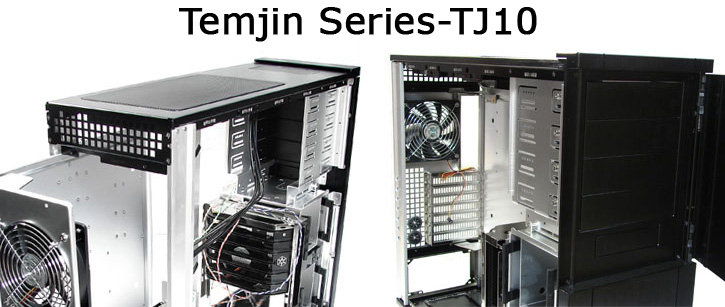
Internal


And finally this is the last picture in this section. These ar the accessories that come with the Silverstone Temjin TJ10B chassis. The two bars in the middle are the RadSuppor09 bars, which allow you to mount a 240 radiator inside the top of the chassis. This is not included in the standard package, but can be ordered separately. The chassis comes with a manual, and different screws packaged in different zip lock bags.
Hardware Installation

Installing the water cooling loop


dampening the PC with acoustic foam


Testing methodology
To test this system for Acoustic Noise and temperature, we have used several methods to acquire the information. Since I do not own a device that measures accurately the dBA level of the case, we have came up with another good way to measure the delta of the noise that is being produced by the case. To do this we have taken out our camera (Canon Vixia HV30) and set up a XLR Audio-Technica AT897 shotgun microphone 1 meter away from the case. We have used an XLR converter from Beachtek to make sure the noise being picked up by the camera is clean without any noise.
To acquire the delta measurement for the noise, we have changed the volume settings on the camera to show 0dBA when the system was off. Once the system was turned on, the amount of dBA the noise have went up was measured and recorded. The noise was measured without any of the AcoustiPack Products and then with all the AcoustiPack products installed.
To test for temperature change, we have used built in software to measure the NB, GPU, and CPU temperatures under idle and load. The results were recorded.
Here is the system we have used:
| Test Rig | |
| Case | Silverstone Temjin Series TJ10B |
| CPU | Intel Core I7 920 Extreme 2.66Ghz @ 3.8Ghz (vcore 1.35v) |
| Motherboard | ASUS P6T SE X58 Motherboard |
| Ram | OCZ DDR3-12800 1600Mhz (7-7-7-18 1.66v) 12GB Kit |
| CPU Cooler | Custom Water Cooling Loop from AcousticPC |
| Hard Drives |
2x Western 2x Seagate |
| Optical | Sony DVD R/W |
| GPU |
EVGA GeForce GTS 250 1024MB |
| Case Fans |
2x Noctua NF-P12 120mm Fans – Top on Radiator 1x Silverstone 120mm Fan – Back 1x Silverstone 120mm Fan – Front 1x Noctua NF-P12 120mm Fan – Hard Drives Front |
| Additional Fans |
1x Cool-It Memory Fan Cooler 1x 80mm SilenX Slim Fan |
| PSU |
Sapphire PURE 1250 Watt Modular Power Supply |
| Mouse | Logitech G5 |
| Keyboard | Logitech G15 |
Results
Here are the temperatures:
| Hardware | Temperature (Without AcoustiProducts) |
|---|---|
| CPU |
Idle: 37C Load: 71C |
| GPU |
Idle: 39C Load: 72C |
| NB |
Idle: 40C Load: 48C |
| Hardware | Temperature (With AcoustiProducts) |
|---|---|
| CPU |
Idle: 38C Load: 72C |
| GPU |
Idle: 39C Load: 72C |
| NB |
Idle: 41C Load: 49C |
From the temperatures above, it might be interesting to see that even a powerful water cooling system that I have set up in this case seems to bring the CPU temperature up to 72C under load when it was overclocked to 3.8GHz. This is because this Core i7 920 chip is the older revision that produces more heat. The newer edition Core i7 920 processors do not produce as much heat as my Engineering Sample Core i7. So this temperature has to be looked at a bit differently. With a newer Core i7 I could have gotten a few more degrees lower however it’s not far from the actual temperature.
The temperature difference with and without the acoustic foam is very little. Only 1C, which in my opinion is worth in exchange for low noise PCs.
The Acoustic Noise:
| Silverstone Temjin TJ10B with AcoustiPack Products – Noise Test (Delta) |
|---|
|
With Acoustic Foam (Whole System) : 6dBA |
|
Without Acoustic Foam (Whole System) : 10.5dBA |
|
With Acoustic Foam (DVD Drive Load with Whole System) : 6dBA |
|
Without Acoustic Foam (DVD Drive Load with Whole System) : 15dBA |
Overall I am very satisfied with the combination of the Silverstone TJ10 and the AcoustiPack Products. We can still hear some noise coming from the PC due to the hard drives only being covered with a mesh instead of a complete cover, and plenty of holes in the front, top and the back and the bottom where the noise could escape. Even though it did not silence the PC completely, we can see it did help tremendously and it makes HTPC systems or high end systems where low acoustic noise is needed a dream to work with.
So this just concludes that there is a possible way to implement high end coolers with low acoustic PCs!
CONCLUSION
Silverstone laid down one professional chassis for us, the TJ10B which is a great combination of look, style, quality and performance. This chassis has the potential for all the latest hardware except for 2.5″ drives. The extended ATX chassis allows great support for long video cards, making sure even the longest will fit without any problems. The front 120mm fan blows direct cold air straight at the video cards and spreads the air around the chassis. This takes care of the side ventilation since the hard drive is in a different compartment with an additional 120mm fan that can be installed.
While this case blows some of the other cases out of the water, there are some disadvantages that you might not like. The TJ10 does not come with any cable management features which is a bummer because more time has to be put into making sure the system looks neat and tidy and also does not interfere with airflow. Next there is no backplate hole cut out on the motherboard tray, which can come very useful if you change your high end coolers a lot. The side panel feels a bit flimsy but it does the job. We would have like to see a thicker side panel, not only because it is sturdier, but also it helps improve on acoustic noise dampening. Next up there are two more things to explain. One that there are no dust filters installed in this chassis which makes it a hassle to clean the PC when it gets dusty, and two, if you are considering on doing an extreme internal water cooling setup with this chassis, make sure to understand that our tests have shown that it is better to pull air from the radiator instead of pushing air through. With the Silverstone TJ10 and the RadSupport09 you can only push air through and not pull. The only way you could set up a pull setup is by having two single radiators using the fan holders.
Finally we would like to add that we enjoyed working with this case a lot. It made system building very easy and also made it look professional. There is no doubt that this chassis will still be one of the top dogs on the market. I would recommend this chassis for anybody looking for a killer quiet gaming PC, but I would also recommend installing some AcoustiPack Products to dampen the noise and make up for the thinner side panels. I would also recommend this chassis for computer enthusiasts and people looking to build a quiet PC.
| OUR VERDICT: Silverstone Temjin Series TJ10B Chassis | ||||||||||||||||||
|
||||||||||||||||||
|
Summary: The Silverstone Temjin Series TJ10B chassis kept me interested in designing a very nice looking quiet and also well cooled system for gamers, computer enthusiasts, or even people using this system for their HTPC needs. Not only does it look clean and professional, but it also feels nice and quality compared to other chassis! The Silverstone Temjin TJ10 will receive Bjorn3D’s Golden Award with a 9 out of 10 score! |

I would like to thank Silverstone and AcousticPC for providing me with the necessary parts to make this review and project possible!


Hi, I’m planning on building a very similar watercooled PC, I wonder if there is any conflict between the motherboard tray metal corner piece and one of the two rad-fan (its the place right above the 6-pin CPU power connection) do you think that I can go with a 47mm thick 240-rad? this is 40mm. Thanks.
You might have a problem with 47mm thick rad, but you might be able to get away with it. Depends on how far your fans will attach, because the radiator I used, the fan was actually next to the metal, so it didn’t get in the way at all, so technically I could have made it a push-pull cooler, but you have to keep in mind that the motherboard will come close when dealing with thicker radiators or more fans.
As far as I can tell Mike, it looks like it does. Hopefully it will work out for you.