Known for their HyperX line of memory, Kingston is no stranger to high performance. We review Kingston’s HyperX Blu kit, affordable memory that maintains the performance heritage.
Introduction
To satisfy entry level enthusiasts, Kingston expanded their HyperX lineup by adding HyperX Blu kits. These kits consist of high performance, a seamless clipless design, heatspreaders to improve thermal performance, and most important of all, value.
Kingston’s HyperX Blu kits aim to offer HyperX performance without asking the typical HyperX price. For the first time ever, gamers and PC enthusiast can have HyperX performance at a very affordable price. From what we’ve experienced first hand, there isn’t much different between HyperX and HyperX Blu, except the price. If you’ve always wanted Kingston’s HyperX memory but couldn’t justify the cost, HyperX Blu might just be the right kit for you.
Specifications
- Kit Number/Model: KHX1600C9D3B1K2
- Timings: 9-9-9-27
- Capacity: 4GB (2x2GB)
- Voltage: 1.5v (1333MHz) / 1.7-1.9v (1600MHz)
- Frequency: 1333MHz / 1600MHz
- Type: DDR3 Non-ECC
- Pins: 240
- Specifically targeted at entry level gamers and PC enthusiasts.
Pictures & Impressions
Kingston’s HyperX blu kits comes wrapped in typical memory packaging, plastic. Both the bottom and top are plastic and are sealed together with a label sticker that displays the specifications.

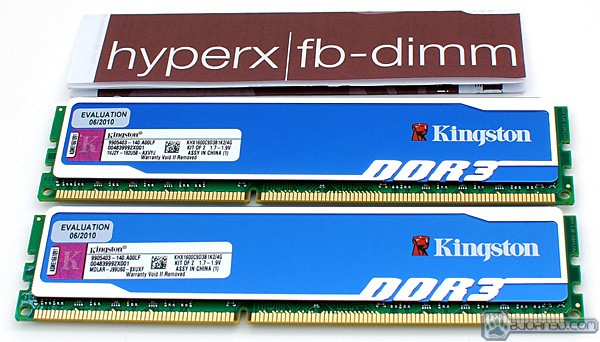
Within the packaging you get the two memory DIMM’s and a manual.
The manual is simple and straight forward showing only the installation procedure. No timings or voltages are explained. Specifications are only listed on the stickers. Very simple manual, very simple packaging.
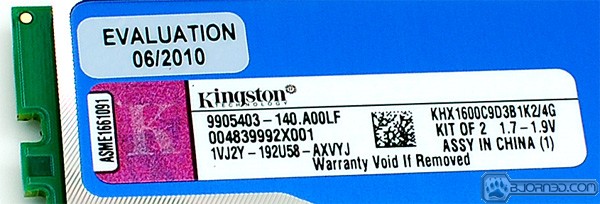
On one side of the DIMM’s is a sticker that gives detailed specifications.
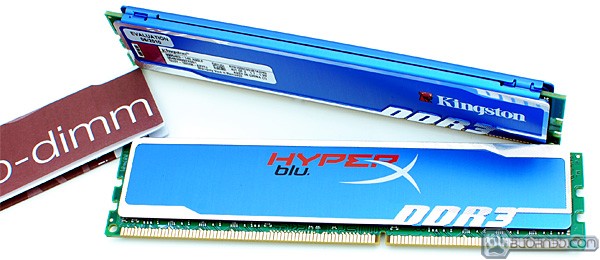
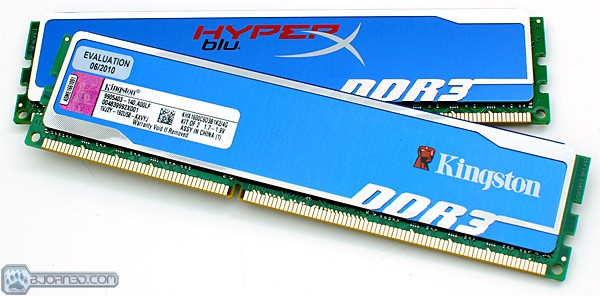
The HyperX blu DIMM’s are simple as well. Wrapped in Kingston blue heatspreaders, the HyperX blu sticks look almost identical to normal HyperX sticks. The only thing that really differentiates them is the word “blu” on the side of the heatspreaders.
Testing Methodology
|
We’ve expanded our testing suite considerably for P55 and will continue to use the same tests across most of the motherboards and CPU’s we test. We run each test a total of at least three times minimum, some tests we run more than 3 times. We average the total of all the tests from each benchmark then report the average here. The OS we use is Windows 7 Professional 64bit with all patches and updates applied. We also use the latest drivers available for the motherboard and any devices attached to the computer. We don’t disable a bunch of background tasks or particularly tweak the OS or system for bigger numbers. We do turn off drive indexing and daily defragging. We also turn off Prefetch and Superfetch. This is not an attempt to produce bigger benchmark numbers. Drive indexing and defragging can interfere with testing in that one test might occur without defragging going on and the next test defragging might be active, the same thing goes for drive indexing. We can’t control when defragging and indexing occur precisely enough to guarantee that they won’t interfere with testing, so we turn them off. Prefetch tries to predict what you will load the next time you boot the machine. We disable it because we want to know how the program runs without any of the files being cached, otherwise each test run we’d have to clear pre-fetch to get accurate numbers. Lastly we disable Superfetch, Superfetch loads often used programs into memory and is one of the reasons people consider Vista to be such a memory hog. Vista fills the memory in an attempt to predict what you will load. Having one test run with files cached, and another test run with the files being un-cached would result in skewed numbers. Again since we can’t control it we turn it off. Other than those 4 things which can potentially interfere with benchmarking, and do so out of our control, we leave everything else running. |
| Test Rig “i5_alive” |
|
| Case Type | NZXT Tempest |
| CPU | Core i5 750 |
| Motherboard |
ASUS P7P55D Deluxe |
| Tested RAM |
Kingston HyperX blu DDR3 1600MHz 4GB Kit |
| CPU Cooler | Custom Water |
| Hard Drives | Seagate 320GB 7,200RPM |
| Optical | ASUS DVD R/W |
| GPU(s) | Sapphire 5850 1GB |
| Case Fans | 120mm (Front & Rear), 140mm x 2 (Top) |
| PSU | Corsair HX 650W |
| Mouse | Microsoft Wheel Mouse Optical |
| Keyboard | Logitech Illuminated |
| *** Any attempt copy this system configuration may lead to awesomeness. |
|
|
Software Used |
| Everest Ultimate v5.0 |
| SiSoft SANDRA XII Professional SP2 |
| Super PI |
| Intel Burn Test v2.4 |
| CPUID CPU-Z v1.53.1 |
To test the memory kits thoroughly, we ran the kits through benchmarks to ensure stability and proper function. Everest Ultimate, SiSoft Sandra, Super PI and Intel Burn Test were used to stress both the system and the memory to test for stability and also result reporting. To monitor frequencies and timings, we used CPUID’s CPU-Z.
Memory Timings Explained
Memory timings can be very confusing so it is only right that we explain them before reporting results during a review. Let’s start off with the numbers you usually see on a memory DIMM’s sticker, the timings. Memory timings are what ultimately decide how far a memory DIMM will overclock and perform. The lower number(s) the timings are, the better they will overclock. A 9-9-9-24 rated timing kit is a common timing on affordable DDR3 memory kits. Anything below those common timings will result in a higher price tag due to faster performance. So what do those numbers really mean? First, we need to explain what numbers relate and correspond to.
There are four main timings that heavily effect memory performance:
CAS Latency (tCL), RAS to CAS Delay (tRCD), Row Precharge Time (tRP), and RAS Active Time (tRAS).
To point out these values, we are going to use the now common DDR3 1600MHz, 9-9-9-24 timings.
CAS Latency Time (tCL) 9-9-9-24
CAS stands for Column Address Strobe. Latency is the amount of time taken to respond. The lower the CAS Latency value is the faster the memory controller and modules communicate. The memory controller talks to individual modules on the DIMM’s requesting data in cycles.
RAS to CAS Delay Time (tRCD) 9-9-9-24
RAS stands for Row Address Strobe and CAS stands for Column Address Strobe. The RAS to CAS Delay value is the amount of time in cycles it takes to do a task requested by the memory controller.
Row Precharge Time (tRP) 9-9-9-24
The Row Precharge value is the amount of time in cycles needed for the Row Address Strobe (RAS) to collect before another row can be utilized. This acts almost like a queue in a sense.
RAS Active Time (tRAS) 9-9-9-24
RAS stands for Row Address Strobe. RAS Active Time is the amount of time in cycles of a row being occupied by Row Precharge (tRP) and unoccupied.
The lower the value for each timing, the faster the memory modules can work together and report back whatever was requested from the memory controller/processor.
Let’s move on to clocking results.
First Boot
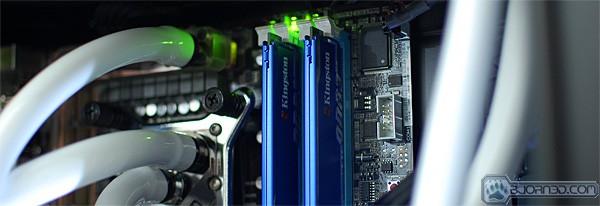
Before getting too crazy with overclocking, we wanted to make sure everything worked right out of the box. We popped the Kingston HyperX blu DIMMs in and then went into the BIOS and set the rated frequency, timings, and voltage. Seconds later we were in Windows without any issues.

Kingston’s HyperX blu kit runs at 1600MHz with 9-9-9-27 timings, which is exactly what CPU-Z reported. To test stability, we ran Intel Burn Test multiple times and everything passed with flying colors. With the memory confirmed stable at default values, we were anxious to see if this kit was capable of achieving the same clocks that its big brother HyperX kit did. Being a value kit, we didn’t have high hopes for its overclocking abilities but to our surprise, the Hyper blu kit was actually an impressive overclocker.
Default Frequency & Lowered Timings
Like many value 1600MHz kits, timings will almost always be in the 9-9-9-24 to 9-9-9-28 range. In general, lowered timings usually equates to increased performance which is why lower timed kits cost more. An easy way to get more performance from any memory kit is to simply lower the timings. To keep things easy with the HyperX blu kit, we lowered each timing value by one and tested for stability with Intel Burn Test. After many stability runs and reboots, here is what we came up with.

8-8-8-24 timings aren’t exactly impressive, but coming from 9-9-9-27, they are certainly appreciated. We were hoping to reach the magical CAS 7 latency, but keeping the value aspect and pricing in mind, we can’t exactly complain. 8-8-8-24 is still an improvement over default values and performance increases will be evident. Overall, we were happy with what we achieved in the lowered timing results.
2000MHz? Easy.
To really see what the HyperX blu kit was capable of, we had to push the frequency. Sticking to Bjorn3D ritual, we left the timings and voltage at default values and simply raised the memory divider. In a matter of 1-2 minutes, we were running this value HyperX blu 1600Mhz kit at 2000MHz without any issues.

We now had a 1600MHz value kit at 2000MHz at default timings and voltage in literally 1-2 minutes. We rebooted, went into the BIOS, changed the divider to achieve 2000MHz, and booted back into Windows. To verify stability we ran Intel Burn Test and all was well. So in short, this HyperX blu kit is very capable of keeping up with the big brother HyperX kits. If maximum frequency and value is your priority, this kit is far more superior in comparison to the standard HyperX kit. You get similar performance for a lot less dollar.
Everest Ultimate

“EVEREST Ultimate Edition is an industry leading system diagnostics and benchmarking solution for enthusiasts PC users, based on the award-winning EVEREST Technology. During system optimizations and tweaking it provides essential system and overclock information, advanced hardware monitoring and diagnostics capabilities to check the effects of the applied settings. CPU, FPU and memory benchmarks are available to measure the actual system performance and compare it to previous states or other systems. Furthermore, complete software, operating system and security information makes EVEREST Ultimate Edition a comprehensive system diagnostics tool that offers a total of 100 pages of information about your PC.”
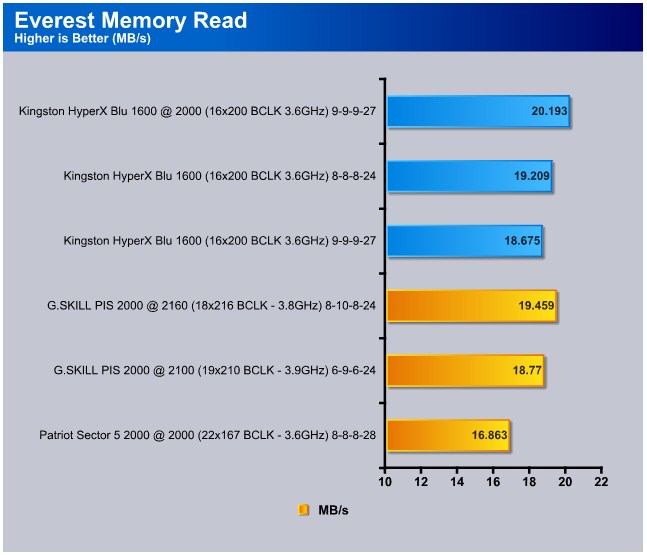
In the Everest Memory Read test, Kingston’s HyperX blu kit beat G.SKILL’s PIS kit at 2160MHz despite having higher timings, a lower frequency (2000MHz), and a lower CPU clock. Even at 1600MHz, the HyperX blu kit shows strong performance easily surpassing Patriot’s Sector 5 kit and also manages to keep up with the GSKILL kit at 2100MHz. Nothing about the read test results depicts the Kingston HyperX blu memory as a value kit. Very strong numbers to say the least.

In the Everest Memory Write test the HyperX blu kit easily beat out the competition, no matter the frequencies and timings. In a way we felt like the write test heavily favored Kingston memory, the performance gap is clearly large. We ran the numbers multiple times to confirm consistency, and they are indeed consistent.
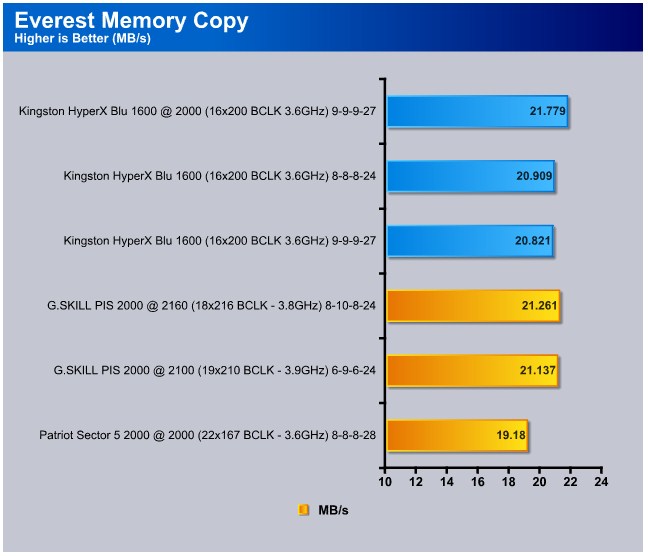
In the Everest Memory Copy test, Kingston’s HyperX blu memory again shows strong performance. Beating G.SKILL’s kit at 2160MHz, and 2100MHz by a fair amount, over 500 points. Even at 1600MHz the HyperX blu kit holds it own especially with the reduced timings.
We weren’t expecting such great performance in the Everest results but the numbers don’t lie. The HyperX blu memory is very capable of keeping up with much more expensive kits. Simply lowering the timing or spending an hour overclocking can improve performance dramatically. It’s hard to recommend the standard, more expensive HyperX kits when the blu option performs this well.
Sisoft Sandra
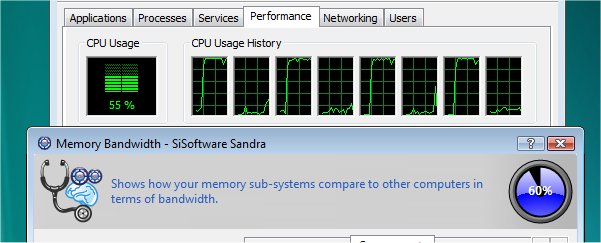
“SiSoftware Sandra (the System Analyser, Diagnostic and Reporting Assistant) is an information & diagnostic utility. It should provide most of the information (including undocumented) you need to know about your hardware, software and other devices whether hardware or software. It works along the lines of other Windows utilities, however it tries to go beyond them and show you more of what’s really going on. Giving the user the ability to draw comparisons at both a high and low-level. You can get information about the CPU, chipset, video adapter, ports, printers, sound card, memory, network, Windows internals, AGP, PCI, PCI-X, PCIe (PCI Express), database, USB, USB2, 1394/Firewire, etc.”
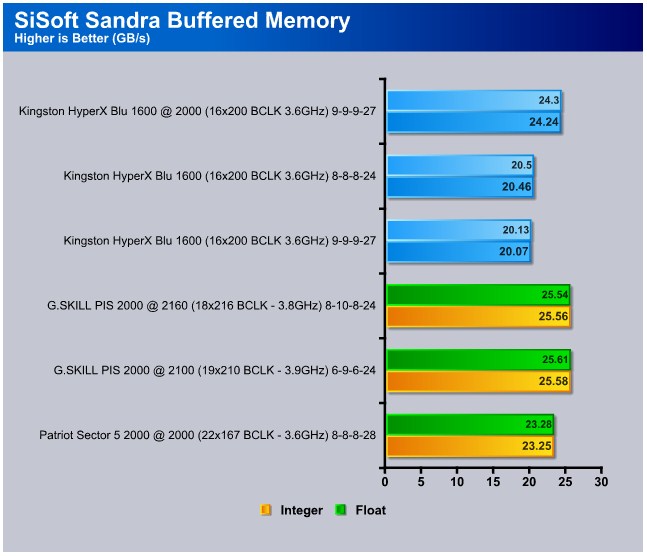
In the SiSoft Sandra Buffered Memory test, Kingston’s HyperX blu kit again showed consistent performance. Easily beating the equally clocked Patriot kit even though it had lower timings. With CPU frequency obviously effecting the results, the G.SKILL kit passes the Kingston kit by about 1 GB/s, but this is only due to having 200-300 more megahertz of CPU power. At equal CPU frequencies however, the Kingston kit is still superior.
Super Pi

“Super PI is the “Gold standard” for many when it comes to judging system performance. We ran 1 Meg and 2 Meg calculations, again running each test three times and reporting the average of the results.”
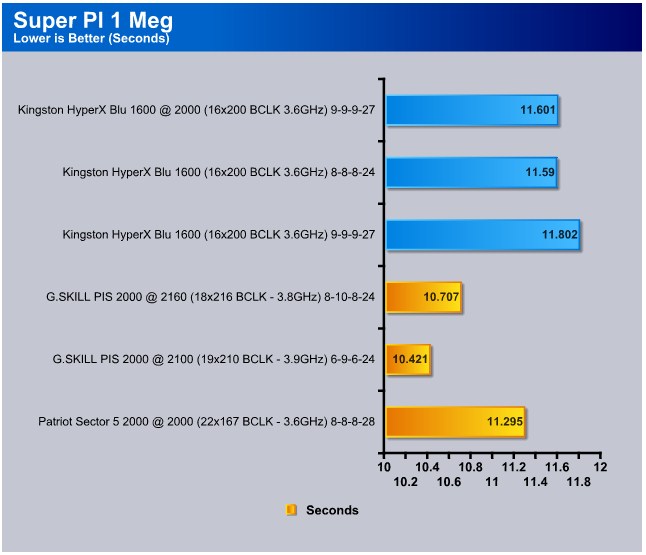
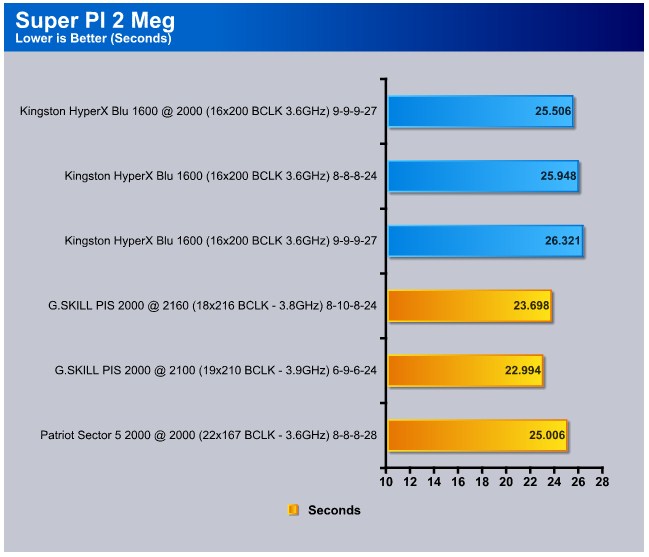
Because Super PI is heavily effected by CPU frequency, we weren’t expecting the 3.6GHz CPU / Kingston HyperX blu combo to surpass the competition, which it didn’t. We use Super PI to check for consistency and the HyperX blu kit is surely consistent. The higher the memory clock, the lower times, the same goes for CPU frequency.
Conclusion
From the numbers we gathered during our review, there is no doubt in our minds that budget enthusiasts will promptly be adding these kits to their favorite e-tailer shopping cart. The mix of affordability and high performance is a hard mixture to accomplish, but Kingston managed to make the perfect recipe. You get a functional, appealing heat spreader, timing adjustability, overclockability, and it doesn’t cost you more than $103 USD shipped.

We highly recommend weighing your memory needs especially if you have a limited budget. If you don’t want to spend a lot of money, but you want quality memory, choices usually become very slim. With Kingston’s addition to the value market however, the choice is much easier to make.
| OUR VERDICT: Kingston HyperX blu 1600MHz 4GB Kit | ||||||||||||||||||
|
||||||||||||||||||
| Summary: If you’re an enthusiast on a budget, the HyperX blu kits might just be the perfect memory solution for your next build. The standard HyperX kits are strong performers but there is no reason to overlook the HyperX blu kits. They are built with high quality, they perform very well, and are very affordable. Why spend more, if you don’t have to? The HyperX blu memory kits are exactly what Kingston claimed they’d be.
|