
Introduction – ASUS Maximus VI Hero
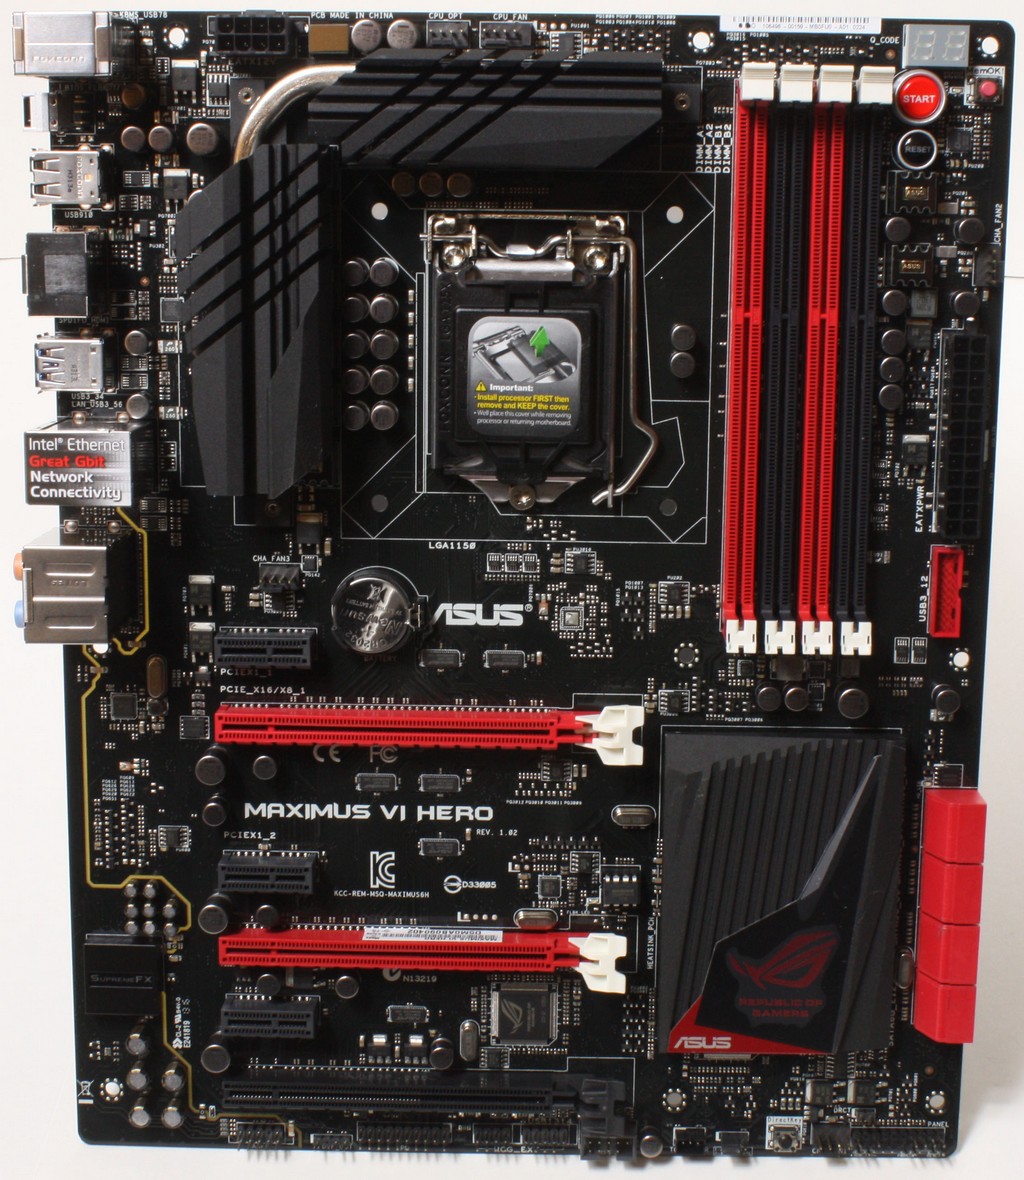
 The Z87 series keeps on trucking along and with this ASUS offers yet another ROG piece to the game with the newly released Maximus VI HERO. The Hero looks very much like a Formula from the Z77 line but without the WiFi or the Liquid cooled VRM and knowing now all of the different models available through the ROG line I am very interested in the innovations included in this board and where exactly it falls into the stack in terms of ROG Z87’s.
Looking at the general overview you can see it has the select VRM features and Supreme FX Audio but lets dig a little deeper into what exactly is the Maximus VI HERO.
The Maximus VI HERO comes to market with a street price of $189.99 directly from Newegg at the time of writing. This price places the HERO in a very competitive group which is great since normally in previous chipset launches ROG have always been a bit higher priced so to see that ROG feature motherboard will now be available at a attainable price will really make for some exciting gamers. Now lets see how much of the ROG DNA has trickled down to this mainstream market monster.
Key Features
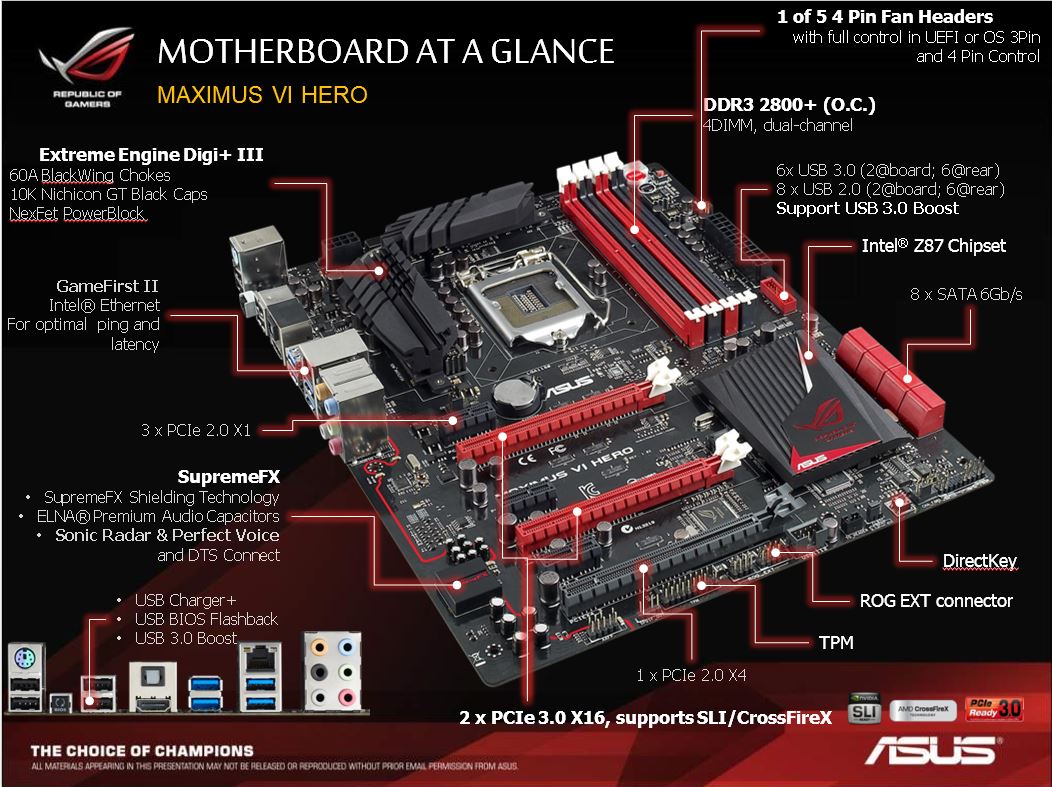
Here is where the real treat comes in as you can see that ALOT of the ROG features come in on the HERO including even a header for the OC Panel so that you can have full Subzero sense and VGA Hotwire compatibility by just plugging into the onboard header. If these inclusions are a sign of what ASUS and the ROG team have in store I think the gaming and enthusiasts side of the market are gonna have a shock coming very soon.
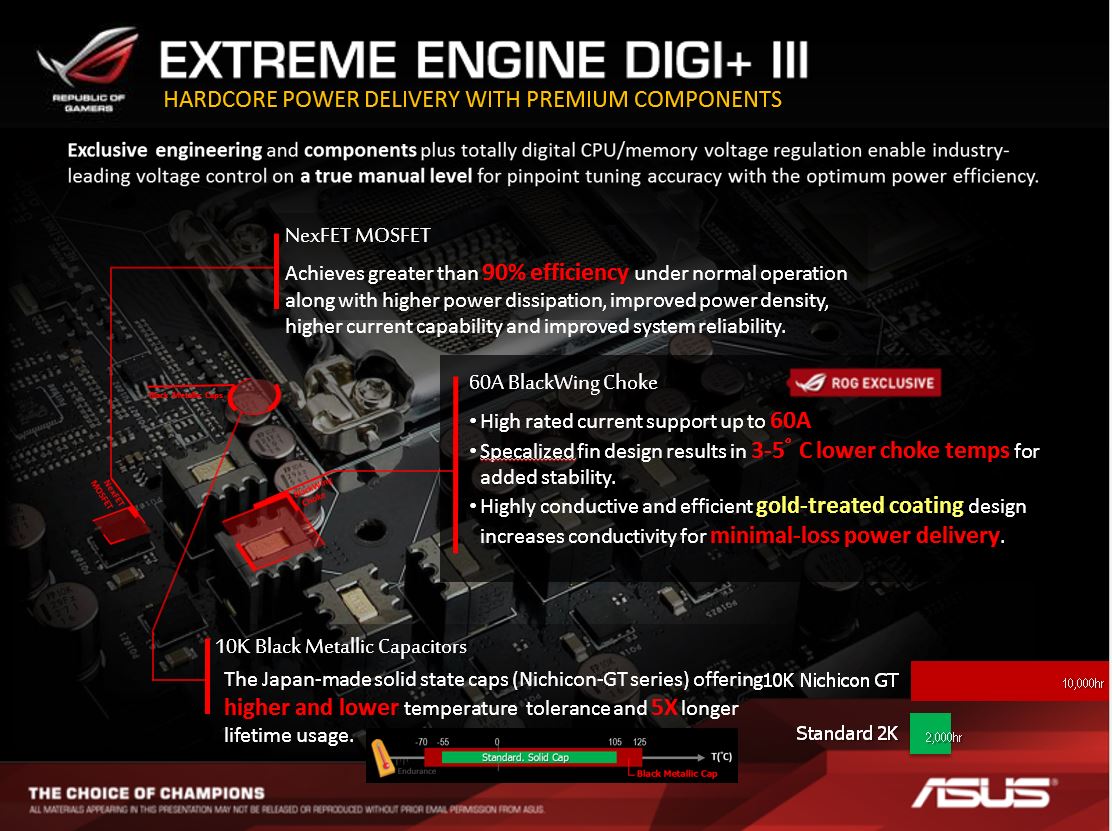
Extreme Engine DIGI+ III
ASUS has been known for some time for their DIGI+ solutions and on the ROG boards they now have the Extreme Engine DIGI+ III designs.
The Extreme engine DIGI+ III design is a direct implementation of the DIGI+ designs designed for optimum performance and efficiency to meet both the extreme gamers needs along with the extreme benchmarkers needs as well. If you have ever heard the term wretched excess, the extreme engine DIGI+ III fits that description quite nicely. We all know that going excessive is not a bad thing but you must keep your goal in perspective, and ASUS did exactly that by building a super robust VRM, but also ensuring the DIGI+ controller was capable of handling the extreme load of benchmarking while also meeting the needs of 24/7 use. This includes such features as demand based switching which throttles the VRM components so that load is shifted back and forth between VRM components so that no single component is in a constant loading state which will allow for much cooler and efficient operation. Also, if the system jumps up to a fully loaded situation the controller can instantly transition to a high power state which kicks on all of the VRM components and ensures your system has the power it needs on tap. This kind of implementation also means that even under significant overclocks you can keep power saving features of the DIGI+ setup active and it will still throttle as seen necessary to keep power on tap but also allow power savings and efficiency in low load conditions. A note to this is that if pushing for extreme clocks the DIGI+ can be set for higher or extreme modes which will keep the VRM at a constant on state and full power will be delivered at all times which is necessary for those running in such scenarios such as LN2 benchmarking.
One important note for the Extreme Engine DIGI+ III design is the components. Here we will look at specific components and what makes them special.
Special attention has been paid to the capacitor choice as they are very highly spec’d units. A standard capacitor is rated to handle operating temps of 105C at up to 2000hr, but the special black metallic Nichicon GT series caps are rated for up to 5x this time at up to 10,000 hours at the same 105C operating temperatures. This is a huge advantage as it allows for a much higher threshold for long term usage along with the durability to handle the severe beating many users will dish out during overclocking expeditions.
Also worth noting is the fact that the Nichicon GT caps are rated for a wider thermal threshold which means that the operating temps it can handle is much better and it is even better at the extreme cold temperatures some extreme enthusiasts subject these boards to.
The Chokes are also worth checking out as they are specially selected “Blackwing” units which have a very unique look with a fin design running vertically on the outer shell of the choke allowing for even better thermal capabilities. Also the gold coating allows for minimal power loss and maximum power delivery.
SupremeFX Audio solution


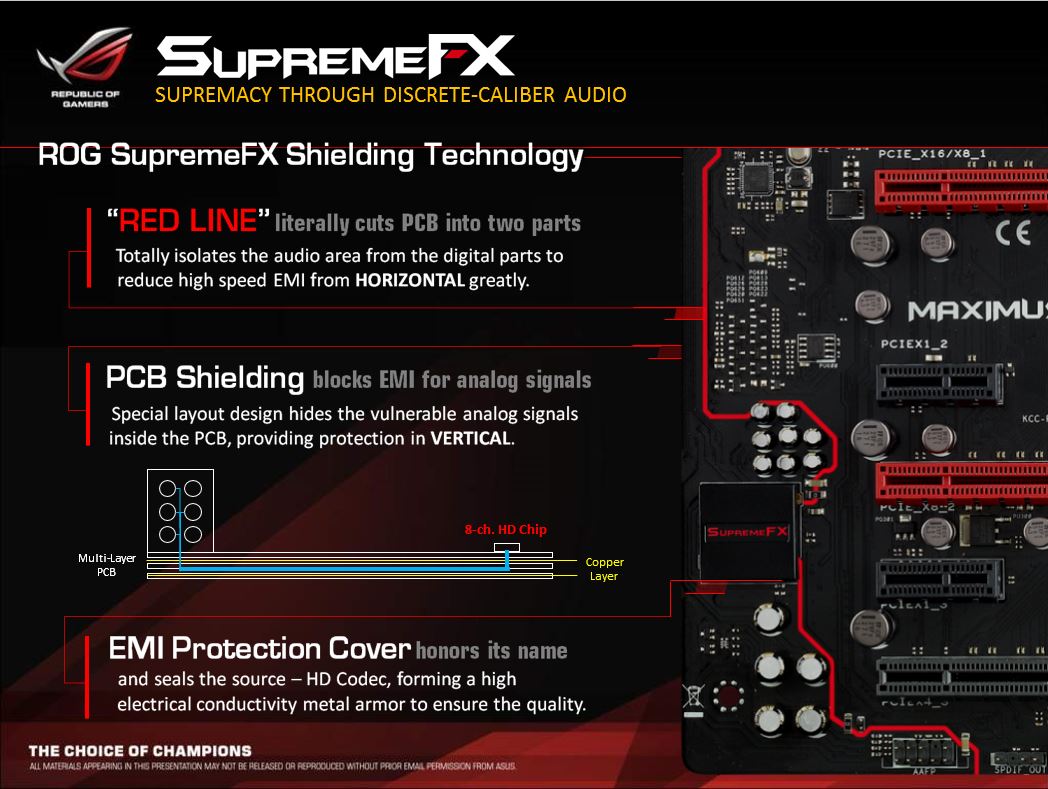
The SupremeFX audio solution is something that we have seen before, the “red line” shielding which is an island in the PCB with blank PCB space separating the audio components from the rest of the board to ensure minimal interference from the digital board components getting into the Analog audio circuits. This blank PCB is also backlit by red LED’s to show off the red PCB separation line.
The EMI protection shield is also backlit and is in place to block EMI from getting to the audio codec and causing stray noise from ruining your audio experience.
Top quality audio caps are used in the SupremeFX audio solution to allow for the cleanest possible audio from the onboard solution. This is all designed around the idea of providing the best possible gaming environment for you the end user. We can say that from our testing the audio quality is very good.
Sonic Radar

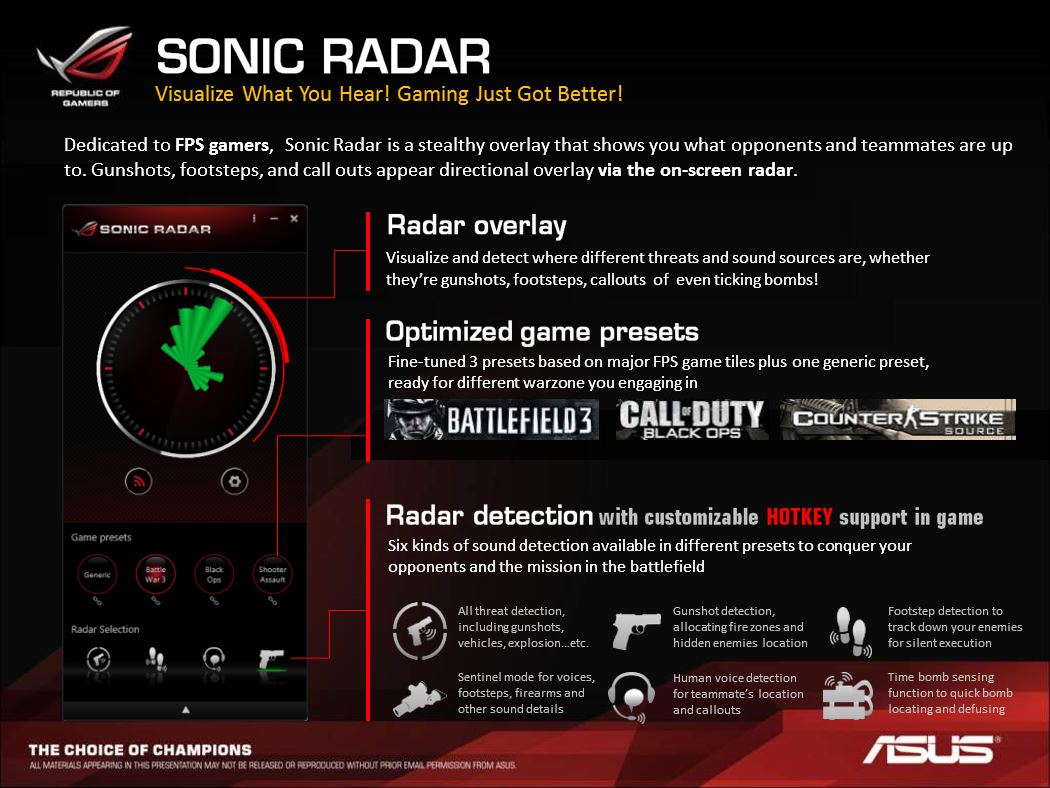
Sonic Radar is a very interesting development in that it offers an on screen overlay to show where noises are coming from which can offer you a competitive advantage in FPS games or other titles as gunshots or foot steps now not only can be heard but seen to allow better strategic positioning against an oncoming enemy force.
I can see where some would consider this cheating and in a way I can agree but hey its still a very cool feature.
One area I can see this being advantageous would be with the hearing impaired as they are at a competitive disadvantage when playing games like FPS where hearing the noises around you can help you get a feel for where enemies may be approaching, and the SOnic Radar could be a solution to a gaming need nobody considered
GAMEFIRST II
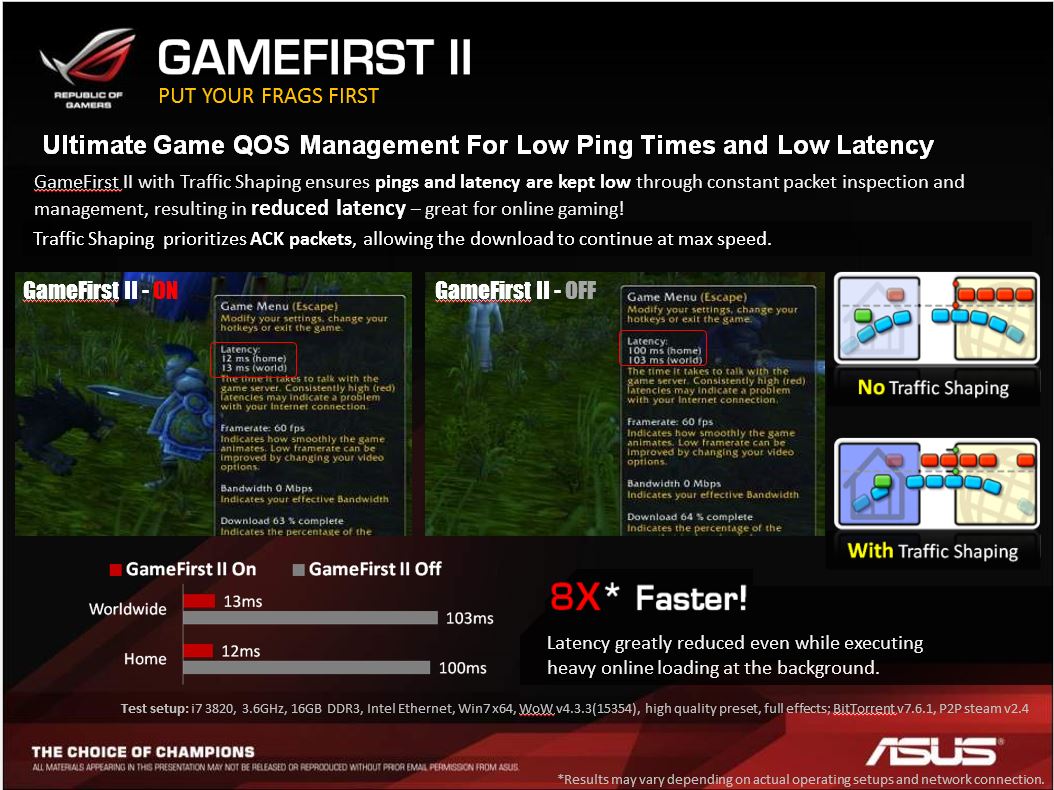
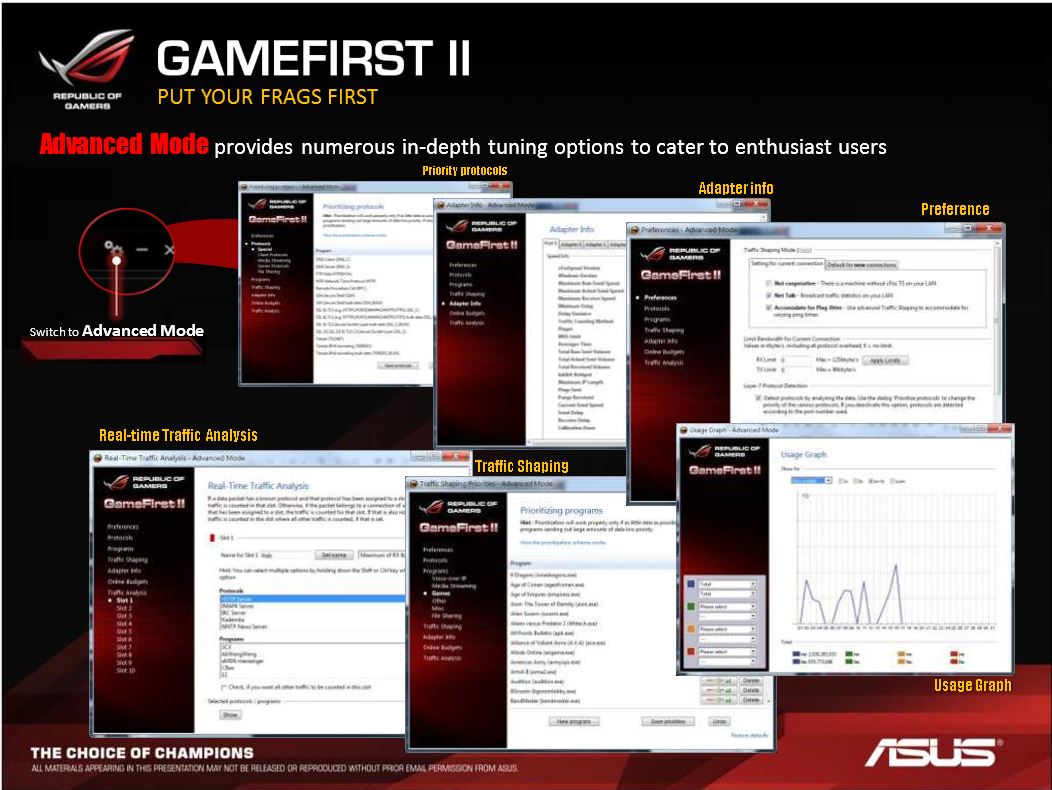
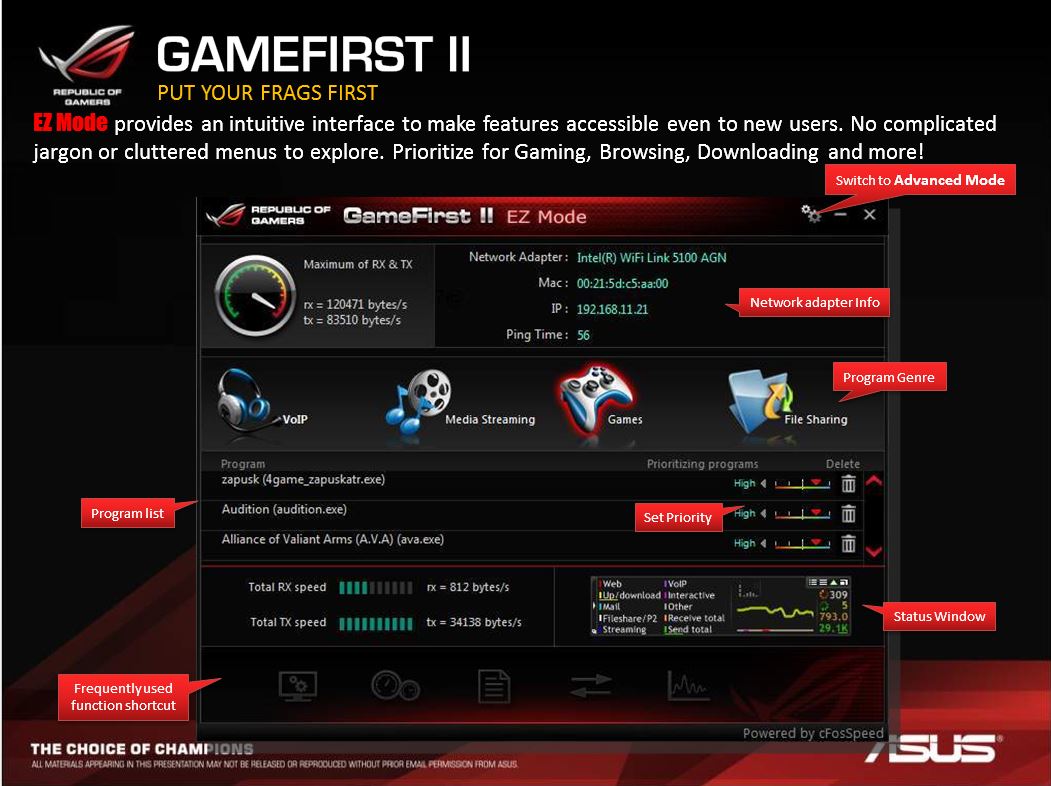
ASUS has pushed the Gamefirst technology even further with its cFos software which now offers a EZ mode to allow even easier tweaking and adjust ability for all end users to increase online gameplay performance. The Gamefirst II technology builds off of the ability to shape the network traffic to better control throughput and packet priority to ensure the program that needs maximum speed and reduced latency such as streaming HD video or simply online gaming is all at your fingertips.
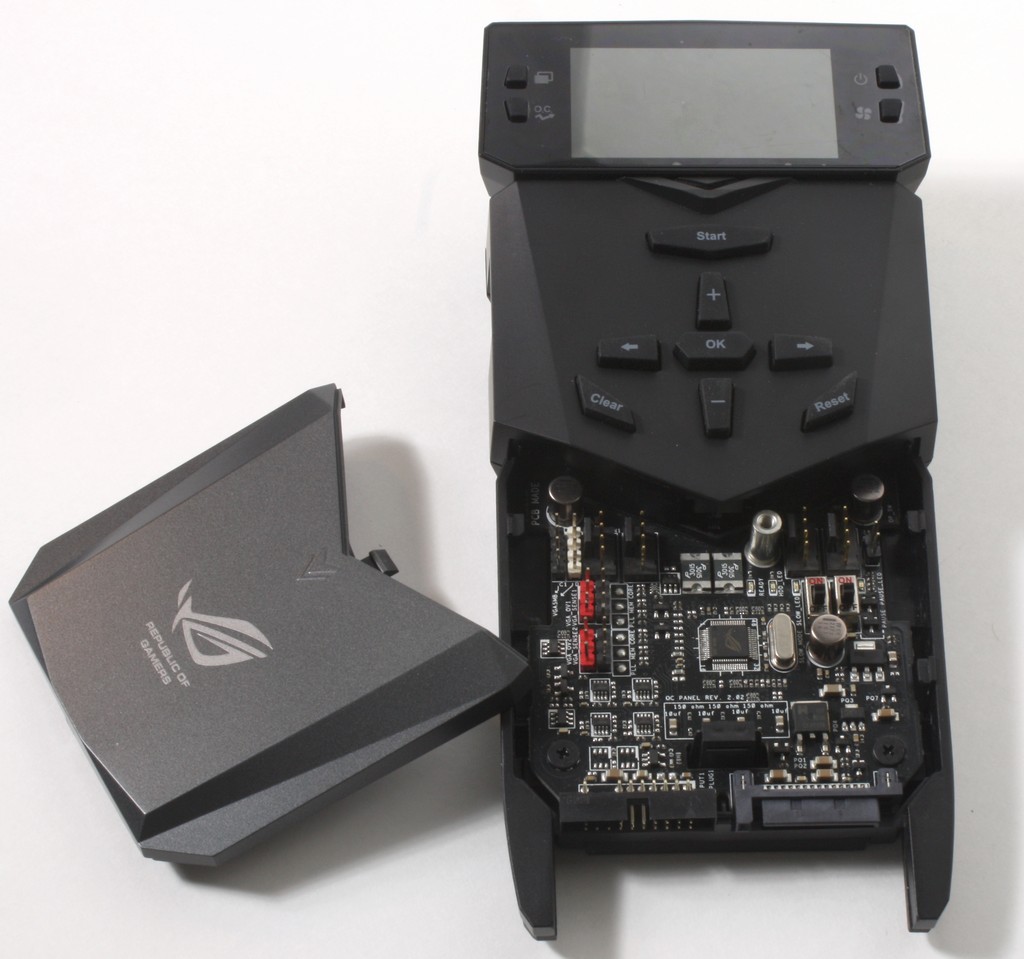
OC PANEL
The ROG OC PANEL is the next new thing as we saw the OCKey introduced on the Rampage IV Extreme then on the Maximus V Extreme, now you see the next step in the evolution of ultimate overclocking peripherals.

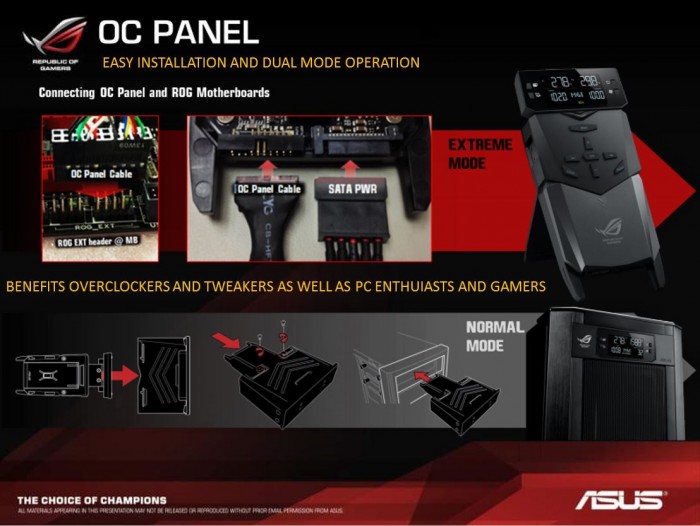

As you can see the OC PANEL resembles a standard stand up K Type thermometer which is very familiar to enthusiasts overclockers. however this device does much more than just read thermals, as it connects directly to a special header on all ROG based boards for Z87 to allow full monitoring and hardware level control of the board to allow no overhead overclocking from the remote device.
One thing worth noting is that the remote fan and overclocking controls work with just the internal header connection, but if you want to get the advanced functionality of the extra overclocking devices such as GPU hotwire and all of the feature built under the cover than you are advised to connect a SATA power connector for the extended functionality which we will look at below.


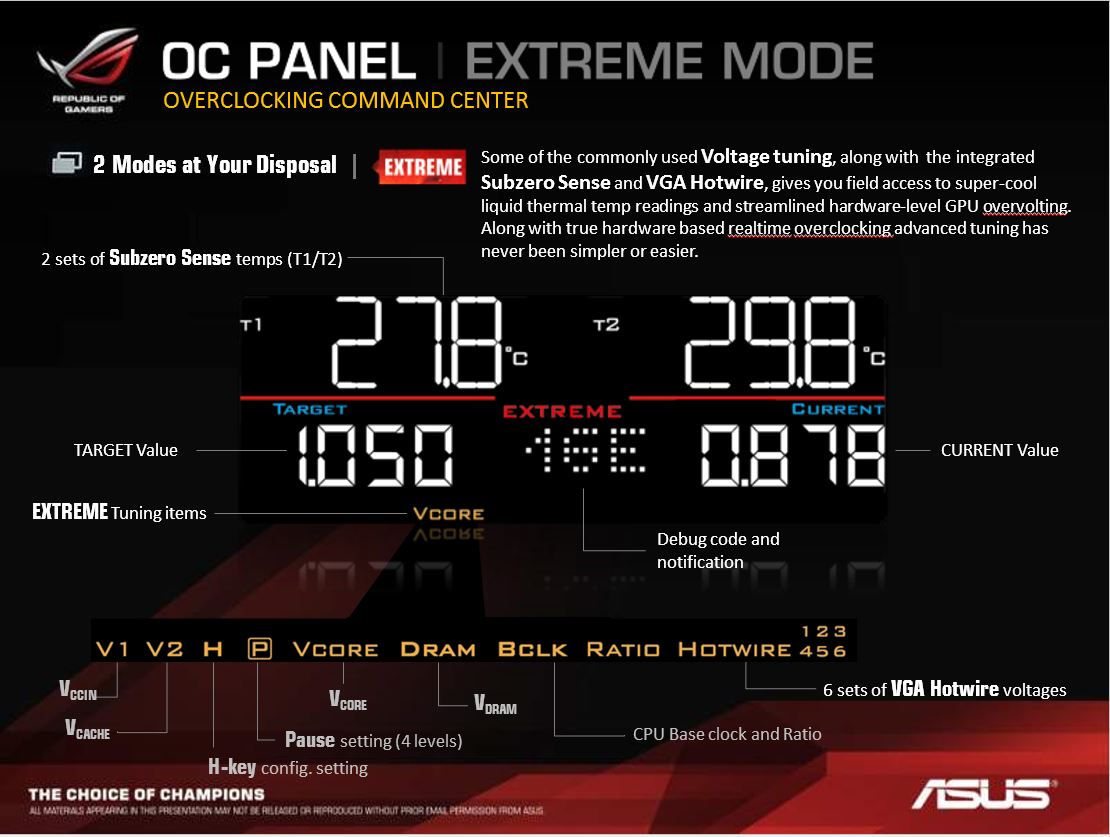
Subzero Sense
The Subzero Sense feature is another that we have seen previously on the Rampage IV Extreme and is based solely on the needs of an extreme benchmarking enthusiast. The Subzero Sense feature is a collection of 2 K type probe connections on a block found on the side of the OC PANEL. These are used to keep track of the pot or LN2 container temperature to ensure your running within desired temps to avoid cold bugs or issues. Normally, when running LN2 or any other kind of sub ambient cooling you would need a external thermometer of good quality to ensure you get very accurate subzero temperature readings. With the Subzero Sense feature you now have 2 ports to which you can install K probe connections to monitor 2 different devices temperatures which means you dont need to spend the cash for those expensive thermometers.
Testing of the subzero sense connection found it to be within a single degree of a expensive Fluke K type thermometer at -170C which means that controlling loaded temps during a benchmark run can be done efficiently and without the extra expense.
VGA Hotwire
The VGA Hotwire feature is a unique one as it allows for hardware level voltage modifications to your graphics cards. Previously in order to have hardware level control over your GPU voltage it would require specific trimmers of the correct resistance or something over then soldering it to correct points on the card so that you could fool the VRM of the card into giving it more voltage as needed for extreme overclocks. Well ASUS knows what its users need so they went ahead and integrated pin headers on the OC PANEL so that the wires can be soldered onto the card then plugged directly into the OC PANEL for hardware level voltage modification and monitoring without fumbling with external trimming devices.
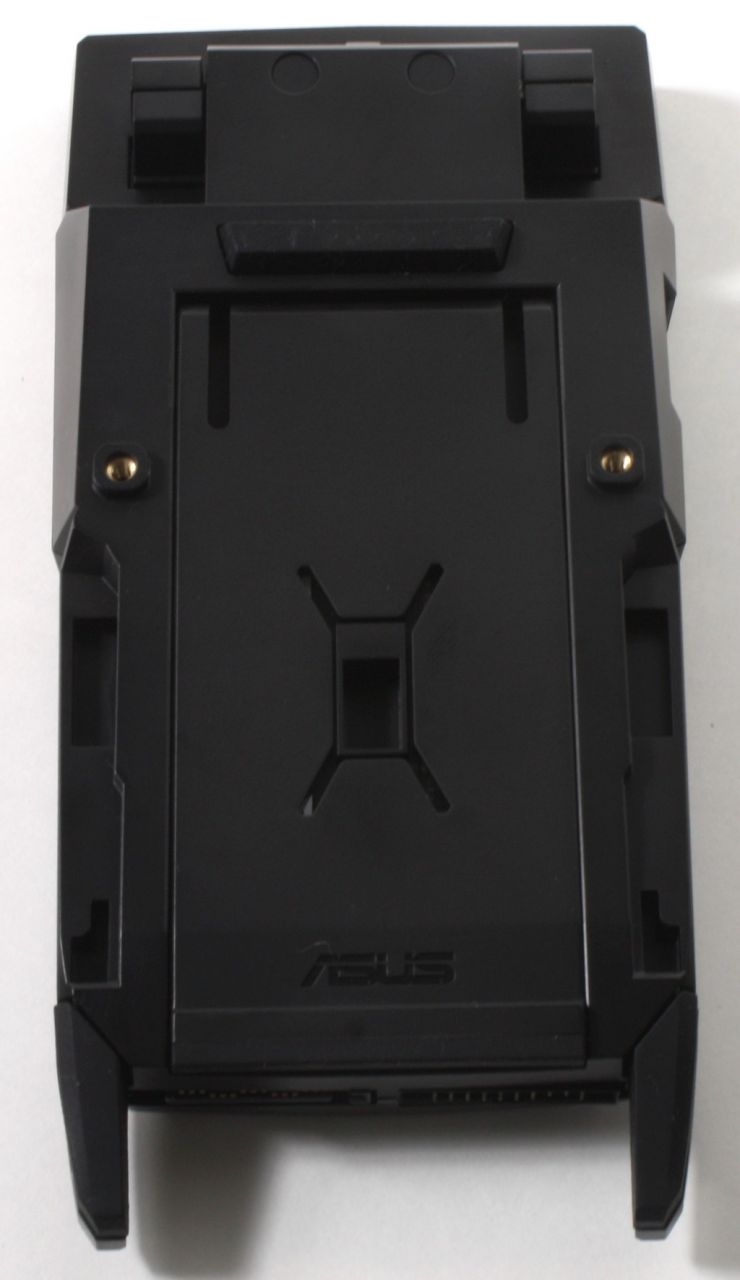
One thing worth noting is that the small lower cover needs to be opened and removed from the OC PANEL in order to expose the multiple extreme overclocking tools and connections hidden below. We will look more at this in the overview images of the OC PANEL device directly.
Slow Mode and Pause Switches
These switches allow for quick interaction to slow down CPU speed to avoid crashing along with pause switches to be able to pause system mid benchmark should any sort of situation come into play such as the need to bring temps up to avoid bugging or anything. These two switches can make huge differences to the performance under extreme benchmark scenarios especially when otherwise you could run into a cold bug which will end your benchmark run and ultimately be very maddening.
4 Extra PWM Fan headers
Below the cover you will find four extra PWM fan headers that can be used to help blow away condensation or keep airflow over your rig during bench sessions since most areas on the board will be covered or not very accessible in those scenarios.
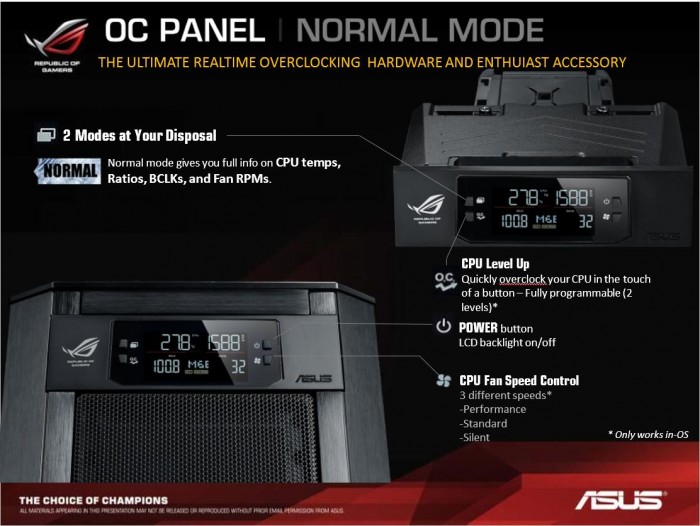
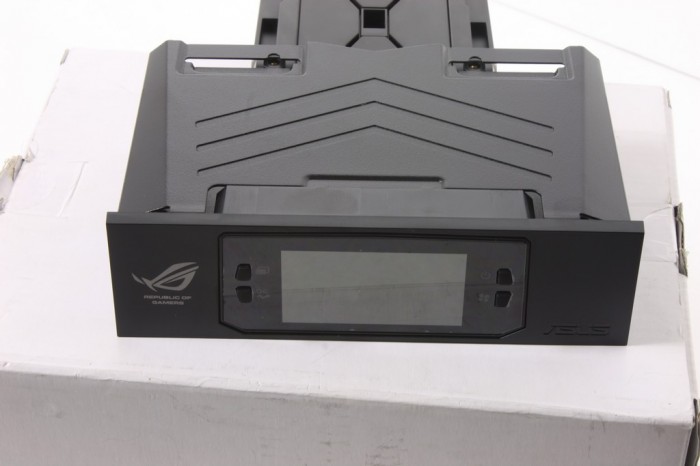
Main interface
After looking at all of the components available under the small cover theer are many main features built into the OC PANEL which I believe will be more commonly used. As you may have noticed the booard comes bundled with a 5.25″ adapter that allows easy mounting of the OC PANEL where only the small face is visible and this allows access to the power button, CPU fan speed control button, mode switch and CPU level up switch all designed to offer hardware level control at your fingertips without the need to escape to the BIOS.
ROG RAMDisk
ASUS has really jumped in deep with this one as some time ago i can remember talking to the ASUS Rep about RAMDisk performance and possibilities for Motherboard manufacturers to bundle it. Well now is that time, and ASUS of course is one of the teams leading the charge. Many may quickly note that in many cases especially previously RAMDisk was simply not feasible due to the low density and high cost to get a decent amount of usable Ram. Recently higher density kits have become much more affordable meaning that now even 32GB 4 DIMM kits are reasonable accessible by common users which means since most systems rarely use over 6-8GB max means you can have a quite sizable RAMDisk ready for super high speed operation for some transfer intensive tasks.
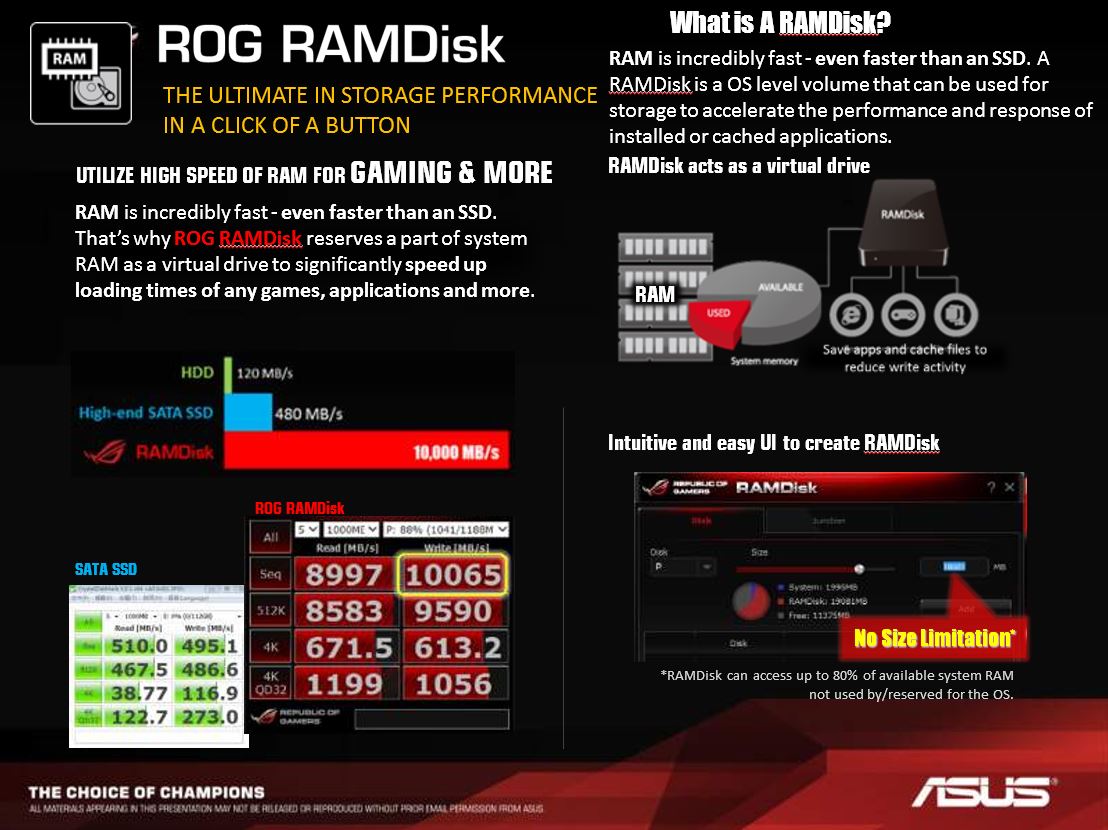
When Creating a RAMDisk there are many things to consider such as possible size limitations, and what data will you keep there? Well a RAMDisk is a huge measure faster than an SSD up to 10X faster in some cases and with RAM it is designed to constantly write and copy data so saving files that are constantly performing write operations can reduce wear on your SSD as well. With this in mind it is smart to look into which cache files are constantly writing, and find a way to migrate those to the RAMDisk. These will not only operate faster but if they are constantly being updated and written to it can save a ton of writes on your SSD. This is of huge importance for SSD longevity, as there are a limited number of write cycles on a SSD, and eliminating unnecessary write operations can actually have a very good result for the durability of your SSD.
The ROG RAMDisk software is designed with a easy to use UI and as you can see there is no size limitation so you can make a RAMDisk as big as your free memory that is available. This is also awesome as DIMMs continue to increase density the size of RAMDisk can grow as well.
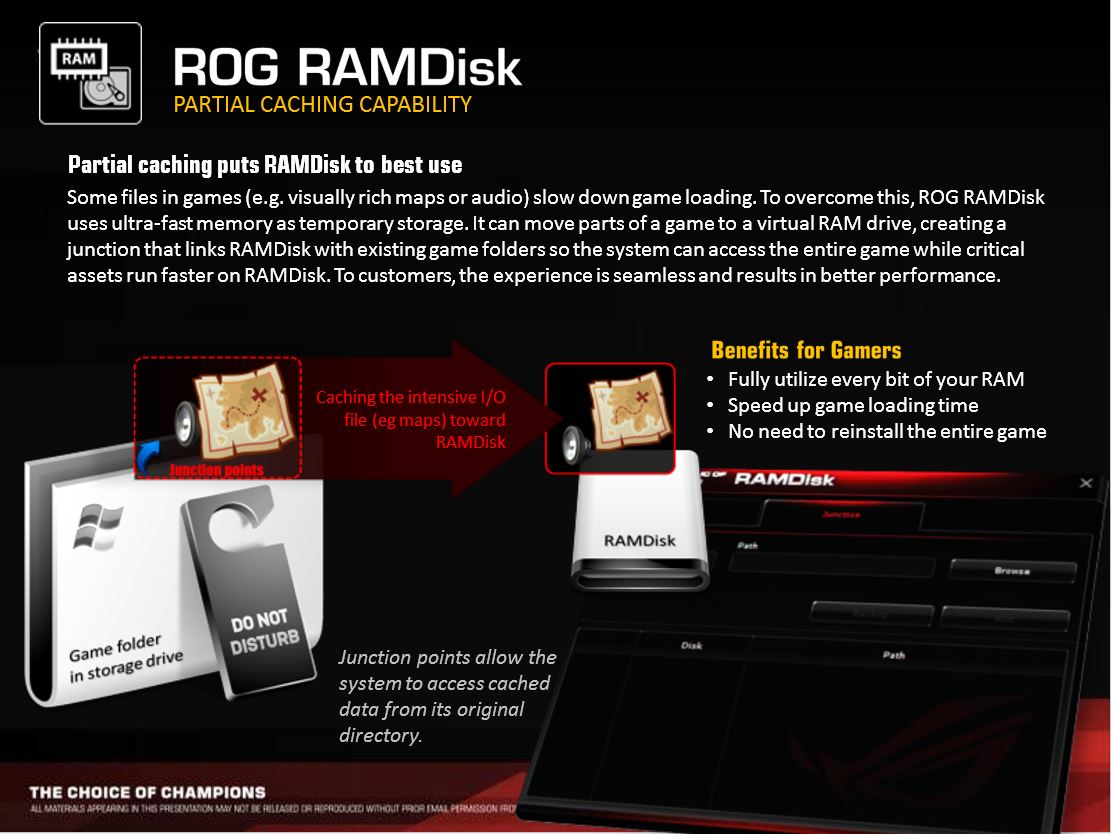
Another cool feature has to do with creating junctions because while loading a whole game on RAMDisk may seem like a good idea it is often unnecessary, so instead let the software create junctions or redirects to the RAMDisk for specific large files or IO heavy files such as maps or large texture files which would normally slow down loads or texture refreshes by having it sitting in the ram.
There are some things you need to know which is that when a system is powered off the Ram is flushed so as the software may hold critical data for you it will need to dump an image of the RAMDisk on to your drive so that next time you start up it can load that image into the RAMDisk and get you back to where you left off. This is not a huge issue but with larger RAMDisk volumes this can add a delay to startup and shutdown operations as time is needed to dump the RAMDisk onto the physical disk during shutdown, or to pull it back on to memory during startup. Expect slightly longer bootup times to perform these duties. All in all that is a marginal expense with the performance improvement you can see from this implementation.
SSD Secure Erase
ASUS has performed a lot of testing when it comes to a high performance machine. One thing that has been noticed is that as SSDs have matured we have seen that over time performance will degrade and drives basically fill up some and rewrite data and basically just start to get junked up and performance starts to fall off. Well the solution has been found to perform a secure erase which writes zeros to the whole disk creating an entirely new fresh disk data area. This is a great solution but the problem is that many users do not know how to burn the Linux live CD or even more how to navigate the many options to perform the secure erase. ASUS once again offers a unique solution via a integrated UEFI software to secure erase an SSD to restore it to like new performance.
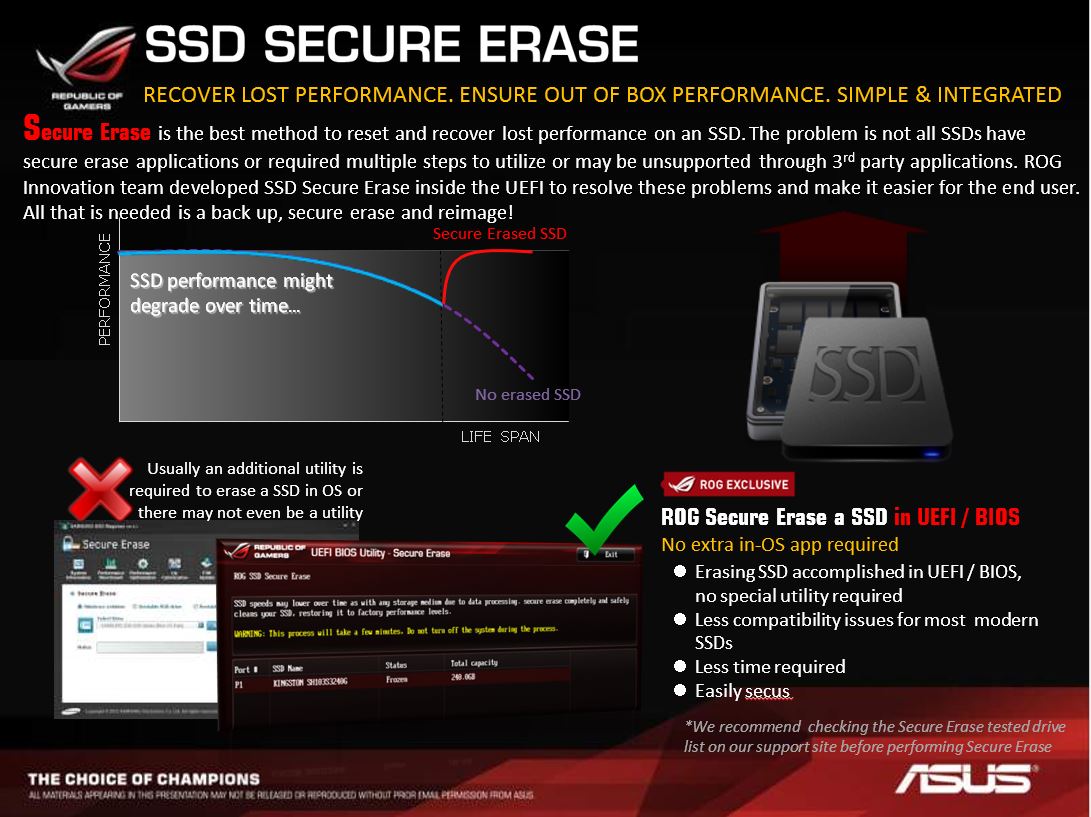
Here you can see the standard falloff of performance simulated on the chart and how the secure erase places it in a like new state. with that considered we know it is a necessary task for optimal performance but with the ROG solution its as simple as going into the BIOS with no extra tools required or software to buy. You get this free with your purchase of the ASUS ROG board.
USB BIOS Flashback
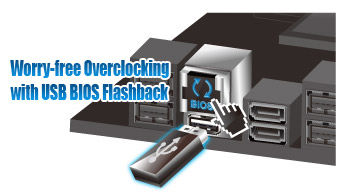
ASUS offers the BIOS Flashback utility which is actually a multi-facet tool and has many capabilities which some may not be aware of. we have had many times where a motherboard did not support a CPU and a frantic search for a supported CPU just to flash the BIOS (ex. Gulftown CPU support on X58). ASUS has eliminated the worry of these kinds of issues by allowing the BIOS flashback procedure which does not require a CPU or memory to flash the BIOS. All that is needed in order to flash the BIOS is to have the desired firmware ROM file on a USB thumb drive and insert that into the ROG connect USB port.
Depressing the ROG Connect button for 5 seconds will start a flashing LED which indicates the firmware is being updated and once the update is complete the flashing will stop. It really is that easy and ensures no matter the condition the firmware can be flashed even if the newest CPU is not supported without the previously mentioned hunt for a compatible CPU.
This may seem like an odd feature but many may buy the newest and greatest CPU on the market while the board could have been shipped with the older firmware which in most cases would leave the user stuck without an option. We have found this useful quite a few times when after running a LN2 cooled system in unstable conditions, a BIOS had corrupted. With the BIOS flashback it was remedied as quickly as we could copy the ROM file from our laptop to the flash drive and get it flashing.
Fan Xpert 2
ASUS has always had Fan Xpert technology as part of its AI Suite utility chest but its always been used for manual adjustments and profiling of the system fans.

The Fan Xpert 2 now comes with a automatic profiling system which we will attempt to demonstrate in the following steps. One thing to note on this is that ASUS Fan Xpert 2 supports full fan control via both 4 pin and 3 pin fan headers even though most ASUS boards now carry all 4 Pin headers.
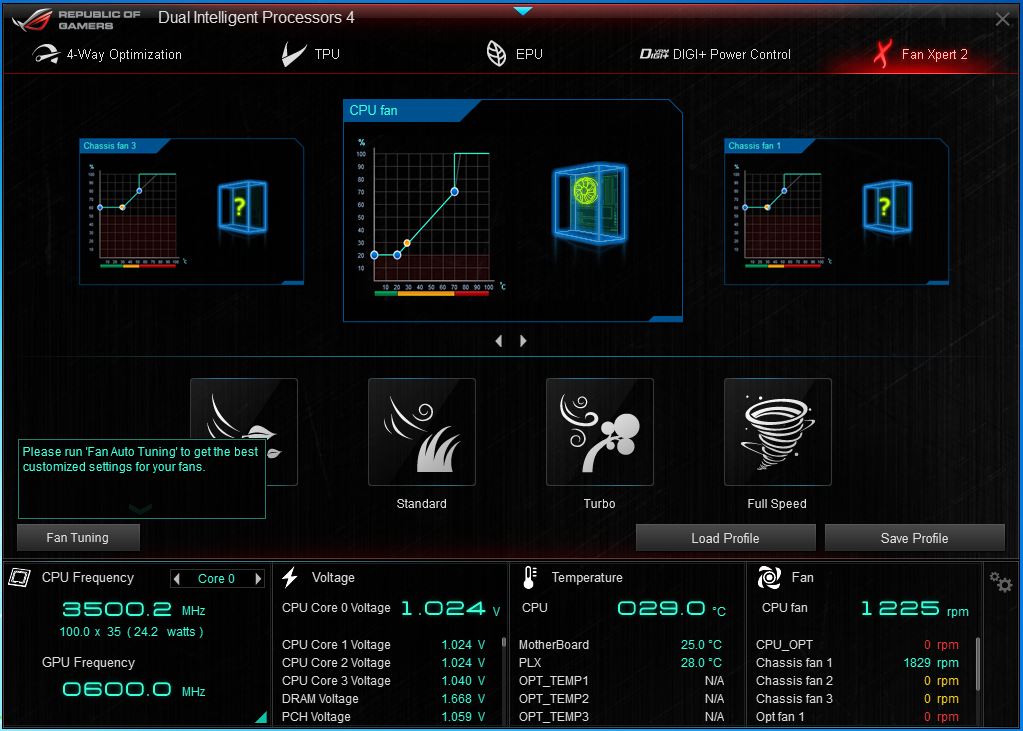
Notice that the new AI Suite software has a much cleaner and I guess I could say complete feel to it as it feels alot more finished, even though the previous software felt fine I must say that after using this one it makes the old one just look I guess old. I like this direction but it does take a bit of getting used to as the interface has changed and so has the menu to get to some of the features.
Review Overview
Performance - 95%
Value - 90%
Quality - 100%
Features - 95%
Innovation - 95%
95%
The maximus VI HERO is a collaboration of everything that makes ROG great, and from it comes an insanely capable gaming board. For this it earns the Bjorn3D Golden Bear Award


The main problem with this board is the pcie 2.0 slot options, you either have 4 x1 slots or 1 x4 slot. There is no need for this restriction either, with 8 lanes available – one is used for ethernet, another for the Asmedia addon, leaving 6 available. Two of the x1 slots could be hard wired allowing the 2.0 x15 slot to opperate as a 1, 2 or 4 lane slot.