Setup the NAS
QNAP provides four ways to setup the NAS. Not only that we can configure the NAS with a browser or a PC like it has always been able to do, it is now possible also setup the NAS remotely or PC-less by connecting a keyboard, mouse, and a display using the QvPC. A noticeably missing is the Touch-n-Go (or PC-less setup) that is found on the TVS-463 where we can use the front LCD panel to configure the NAS. Nonetheless, there are still plenty of ways to get our unit up and running in no time.
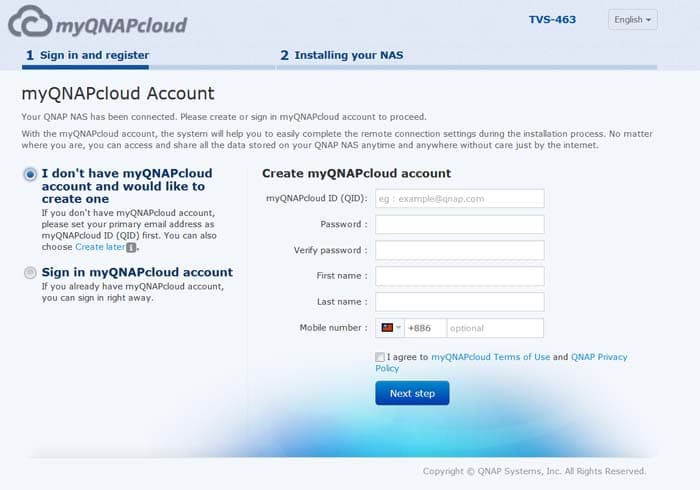
The latest firmware offers the ability to configure the NAS remotely in the cloud. All we have to do is just install the hard drives and connect the NAS to the router, then power up the NAS. Each QNAP device comes with a unique Cloud key that is located on the top of the device. Simply scan the QR code or enter the key at start.qnap.com and we are directed to the site to create a MyQNAPCloud account which would then allows us to remotely log in and manage the NAS. If you already have an existing account, you just log into your account and then register the NAS to your account.
Additionally, if you want to set the unit up without a PC, you can also plug the NAS to a display with HDMI port, a keyboard, and a mouse. QNAP’s QvPC will let you setup the NAS without needing another computing device nearby. Regardless which methods you choose to setup the NAS, QNAP offers a step by step guide that takes you to configure the NAS, setup the administrator account, the RAID level. The whole process is very simple and only takes a couple of minutes to get the unit up and running
QTS OS 4.1.4

QNAP’s latest iteration QTS OS is the version 4.1.4. The overall UI has not changed much since the 3.0. However, the latest edition is much more responsive, probably is helped with improved code and the more powerful hardware on the TVS-471. We think that the QTS UI is still one of the most user-friendly and visually pleasing UI for the NAS devices on the market. QTS offers two modes of operation: Tab and Window. As the name implies, Tab provides better layout for touchscreen devices while Window is meant for precise control with a keyboard and mouse. The biggest difference between the two is that the Tab mode will open every single App in a full screen and you can only use one app at time while the Window will open Apps in separate where you can interact multiple Apps simultaneously as you would be able to do on a desktop PC. Note, the Tab mode does support multi-task except that you would have to click on each open tab that is placed on the top of the screen to switch between the apps.
Regardless of the mode you choose, the overall layout is pretty similar. The UI is icon based that allows users to place commonly used apps and settings on the desktop for quick access. Folders are supported. The left side of the screen is where we would find the list of Apps and the settings available. We have done an extensive overview of the QTS 4.1 with our TVS-463 review so we will direct you there for more information (Storage Manager and Control Panel). Overall, QNAP’s UI is easy to navigate and use. Average user should not have too much trouble navigating around the vast array of settings and features on the unit. It also helps that QNAP’s search (located on the upper right corner) provides the ability find a specific setting, so even if you are lost, it is quite easy to quickly find it.
Temperature
The TVS-471 comes with a simple fan management utility under Hardware. Three profiles are provided: automatic, custom, and manual. Three fan speed are available aptly named low, medium, and high that corresponds roughly to 950 RPM, 1500 RPM, and 1900 RPM. While there is no custom fan curve, we could define the temperature at which we want the fan to rev up. In addition, we can choose to have the NAS running at one of the three fan settings permanently.
The Intel Core i3-4150 is a very efficient processor so it does not need a huge cooler to keep it cool. As such, QNAP only include a single 90nm exhaust fan. Idle with the fan set at low, the CPU is running at 41ºC, system is at 42ºC and hard drives are at 35ºC. When we crank the fan to mid-level, the temperature has not changed much. Set to high and we noticed a couple of degree cooler with the CPU at 39ºC, system at 37ºC, and hard drives at 34ºC. We tested the system running Cinebench R15 under Virtualization and noticed that he system consumes about 41% CPU. At this level, the system is running at 59ºC (CPU), 40ºC (system), and 32ºC(hard drive). With the fan at high setting, the CPU runs at 56ºC, system runs at 38ºC, and the hard drive runs at 33ºC.
Clearly we get about 2-3ºC cooler with the fan set at high setting. Luckily the noise-level at high is not loud at all. We can definitely hear the fan noise but it is not loud to the point that it gets annoying. The low and mid level are very quiet and the default SMART fan seems to optimize for quiet operation since even when we had the processor running close at 59ºC, the fan is still set to run at low setting. We actually would not mind slightly higher noise level for cooler operation given to the fact the unit runs pretty quiet even when the fan is set to mid level.