The Cooler Master Aero 7 Lite is lighter, cheaper, and best of all, actually performs better too! (I was quite surprised by this unit.) Even the stock thermal pad that came with the unit performs like a champ. All in all, it’s hard to believe you could find a better CPU cooler in its price range.
Introduction
The Cooler Master Aero 7 Lite is a large aluminum/copper-core heatsink with a huge, turquoise, squirrel-cage blower on top. Cooler Master’s unique blower design has a couple of advantages: It’s efficient (since there is no “dead-space” underneath) and it’s quiet. This unit also has a manual adjustment knob that can be mounted on either the front or back of a computer case.
Dead-space under a fan is a genuine problem with conventional fans. (That’s why so many high-end video cooler fans are now mounted off-center from the GPU.) Since the Aero design has no dead space, there’s better airflow and the fan can spin at a lower speed and still provide decent cooling. The blower speed is adjustable, and it’s very quiet, especially at lower speed settings.

The Cooler Master Aero 7 Lite is the little brother of the Aero 7+, which I recently reviewed. The Aero 7+ is an all-copper unit and is a bit larger and quite a bit heavier ( 22.3 oz vs. 16.1 oz or 631 g vs. 457 g ). You’d think that a mostly aluminum heatsink could not possibly compete with an all-copper cooler, but you’d be mistaken, just like I was. You’ll read more about that in the Testing section, but next up is a discussion of the features of this unit.
Features
- Innovative fan design eliminates “dead spot” in air flow.
- 2X air pressure “squirrel cage” axial fan.
- Adjustable-speed fan with manual control.
- Copper core with Aluminum fin heatsink for cost-effective cooling.
- Tool-free clip for easy installation. (But I needed a screwdriver!)
The unique Aero blower design really does stand out, but more importantly, it improves cooling efficiency. It just seems to work better, especially under “load” (heavy CPU use). It’s quiet (at low fan speeds), and it moves a lot of air. Also, the sound is lower-pitched than most CPU coolers, so the fan noise is less annoying than most other high-performance CPU coolers.

The Aero 7 Lite has a different clip from the 7+ model, which is a good thing in my opinion. Although the Aero 7+ clip is supposed to be easy-to-use, I’ve had a lot of trouble with it, because the thumb-lever bumps into my power supply. The 7 Lite clip has no thumb-lever and instead appears to have a slot for a screwdriver, which is what I used to install the unit. The Cooler Master website claims that the Aero 7 Lite has a “Tool-free clip”, but I believe that is in error, since I sure needed to use a screwdriver.
Specifications
Heatsink Dimensions: 60 x 80 x 45 mm
Heatsink Type: Aluminum with copper core
Fan Dimensions: 80 x 80 x 70 mm
Rated RPM: 1900~3500 rpm
Air Flow: 10.9~26.9 CFM
Rated Voltage: 7~13.8V
Bearing Type: Dual Ball
Thermal Pad: unspecified

Heres a shot of the bottom, showing the copper core and the thermal pad. The top image is illuminated using a blue LED flashlight (to better show the surface texture), while the bottom half is illuminated with regular room lighting (fluorescent). The bottom of the heatsink has been polished fairly smooth (but not lapped). The bottom of the Aero 7 Lite is much smoother than the Aero 7+ I recently reviewed. (I must point out that I believe my 7+ unit is slightly defective; the bottom appears to be much rougher than the photos in two other reviews of the Aero 7+ that I’ve seen on the ‘Net.)
Bundle
The bundle is nearly identical to the Aero 7+ (which was better than expected, since CPU coolers usually don’t have a bundle at all — unless you consider a packet of cheap thermal compound to be a bundle). The unit came with both front and back cover plates (for mounting the adjustment knob) and also a “Cooler Master Gear” aluminum case badge, which is a nice touch.
The only difference is that this unit has a pre-applied thermal pad, while the Aero 7+ comes with a packet of thermal grease. The pad works as well, if not better than the grease so that’s not an issue. However, thermal pads are for one-time-use only, which may be a problem if you ever need to remove and reinstall the heatsink. My advice is to buy a tube of high quality thermal compound (like Arctic Silver) along with this cooler, if you don’t already have some on hand. (Or you can buy a few spare thermal pads, if you prefer their ease-of-use and extra cushioning properties.)

Installation
The Aero 7 Lite is a large heatsink, but it fits on my Biostar M7NCG PRO Motherboard better than the Aero 7+ all-copper model. That’s because the dimensions of the two units differ in shape: The aluminum unit is longer and narrower, which means that it fits on my mainboard just fine. The Aero 7+ bumps into a capacitor, which I had to bend (slightly) to provide sufficient clearance. Both Aero coolers are fairly difficult to install and remove (because they are so big and theres not much clearance), but the Aero 7 Lite is a definitely easier, since its clip doesnt bump into the power supply in my system and there are screwdriver slots on both sides of the clip. Thats a big plus, since I can attach the side of the heatsink closest to the power supply first and then attach the side facing the center of the motherboard, which is a lot easier to reach.

The Aero 7 Lite is noticeably lighter than the all-copper Aero 7+, which is quite heavy. If you plan to lug your system to LAN parties, you would do well to consider the Lite model, which only weighs 16.1oz / 457g, compared to the 7+ which weighs 22.3 / 631g. (The Aero 7 Lite saves nearly a half pound of extra weight.)
Here’s the procedure I follow when installing CPU coolers: Clean the CPU chip toughly with a isopropyl alcohol on a lint-free cloth. Carefully apply fresh thermal compound. Gently insert it in the CPU socket and lower the lever to lock the CPU into place. Remove any protective film from the bottom of the heatsink. Apply a small amount of thermal compound to the heatsink (in the center, where the CPU touches the heatsink) and smear in the thermal compound with a lint-free cloth, which will fill in any voids in the bottom of the heatsink. Wipe off any excess compound. Seat the cooler on the chip and try mightily to get the clips to lock into place, while the power supply blocks access to the clips thumb lever. Then plug in the wires, install the rheostat into the front panel, and slip the panel into a 3 1/2 inch drive bay.

The wiring that connects the fan to the speed-control knob has one major issue, which (luckily) is easily fixed: There is no quick connect / disconnect. If you ever need to remove this cooler, you will need to remove the mounting plate and unbolt the rheostat. There really needs to be a plug-connector between knob and fan, otherwise you have to uninstall the rheostat whenever you temporarily remove the cooler, like I need to do every time I test another heatsink. (If you don’t remove your cooler or CPU very often, this issue may not affect you.) It’s easy to “mod” the cable with a connector, for further info, consult my Aero 7+ review.
The front panel looks great, but it could not be secured with screws, because the sides of the front panel did not match the mounting holes in my Antec Easy USB front panel, which only has screw holes on the bottom, not the sides, and the Aero 7 Lite front panel only has screw holes on the sides. It’s not a major problem though, I just used duct tape to secure the unit.
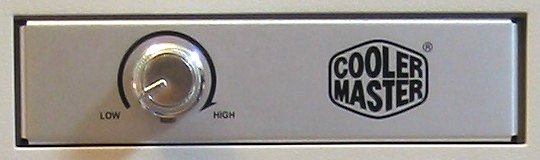
The control knob may be large enough to interfere with some case doors, in which case, you may not be able to mount the knob on the front of your case. Instead, you may be forced to mount the knob on the (provided) back cover plate, which takes up a PCI slot bracket. The control is nice, but it could have been better: It should really have some sort of LED indicator, or (even better) a bicolor LED ring (like some of those fan-controllers use). The chrome knob is hard to read and it’s sometimes difficult to determine the setting, so I’ve painted a black stripe on mine, to improve the contrast.
Testing
The Aero 7 Lite has a manual control knob, which can be mounted in the front or back of your case. I can honestly say that I like having the fan-speed under my direct control. Basically, it lets me make a trade-off between noise and cooling capacity. This cooler is very quiet at the lowest setting; on the highest setting it reminds me of my grandfather’s old 10 horsepower fishing boat motor — it’s much louder than I would like. Basically, the first two-thirds of the range is great-to-acceptable, but the final end of the scale will probably annoy anyone who’s not wearing headphones.
I’ve made a short audio recording, in case you’d like to hear it for yourself. (The recording is actually of the Aero 7+, but its the exact same blower unit.) It sounds identical to the Aero 7 Lite.
I started with the blower at the slowest speed, cranked it to the max, quickly set it back to low, and then set it to 50%, which is quiet, but gives good cooling for my overclocked Athlon. You’ll probably want earphones to listen to this, since the recording is fairly quiet, even though I held the microphone 1/2 inch (10 mm) from the edge of the blower. I had to hold the microphone very close, otherwise it would not pick up the sound at low fan speeds.
My particular Aero 7 Lite blower exceeds its rated RPM (1900~3500 rpm) and actually delivers 1704~3629 rpm. I’ve tested both Aero 7 units at 3 speeds (low, medium, and high), to examine their entire performance range.
CPU temperature measurements were made using my system’s built-in thermal diodes with MotherboardMonitor 5.0. Idle temperatures were taken with no other applications running (other than MotherboardMonitor). Load temps were taken with SETI@home, 3Dmark2001SE, and WinAmp all running at once. Unless otherwise mentioned, OCZ Ultra II premium silver thermal compound was used as the interface between the CPU and the cooler.
A note on the following benchmarks: These benchmarks were taken at a different room temperature than my previous Aero 7+ review and therefore cannot be directly compared to those results, even though the system is exactly the same.
The room temperature was 72.5°F / 22.5°C and the internal (closed) case temperature was 91.2°F / 32.9°C.
Test System:
- Athlon 2500+ @ 2,090 MHz (overclocked), 1.675 Volts (default is 1.650 V).
- Biostar M7NCG PRO nForce2 motherboard
- Corsair 512 MB 3200 CAS2 DDR
- MSI GeForce FX 5600-VTDR128 – 128 MB
- Aero 7 Lite:
- High speed (3629 rpm): Idle: 104°F / 40°C – Load: 105°F / 41°C
- Medium speed (2020 rpm): Idle: 111°F / 44°C – Load: 113°F / 45°C
- Low speed (1704 rpm): Idle: 113°F / 45°C – Load: 114°F / 46°C
- Aero 7 Lite with included thermal pad:
- High speed (3629 rpm): Idle: 105°F / 41°C – Load: 107°F / 42°C
- Medium speed (2020 rpm): Idle: 113°F / 45°C – Load: 114°F / 46°C
- Low speed (1704 rpm): Idle: 114°F / 46°C – Load: 116°F / 47°C (crashed once under heavy load)
- Aero 7+ w/ OCZ Ultra II:
- High speed (3552 rpm): Idle: 105°F / 41°C – Load: 114°F / 46°C
- Medium speed (2008 rpm): Idle: 111°F / 44°C – Load: 118°F / 48°C
- Low speed (1776 rpm): Idle: 113°F / 45°C – Load: 120°F / 49°C
- Aero 7+ w/ included thermal paste:
- High speed (3552 rpm): Idle: 105°F / 41°C – Load: 118°F / 48°C
- Medium speed (2008 rpm): Idle: 113°F / 45°C – Load: 120°F / 49°C
- Low speed (1776 rpm): Idle: 114°F / 46°C – Load: 122°F / 50°C
And for those of you who prefer bar graphs (shorter is better (cooler)):
Cooling Ability
| CPU Cooler | Score |
|
Load (lots of apps running)
|
|
| Aero Lite w/ OCZ Ultra II – High (3629 rpm) | |
| Medium (2020 rpm) | |
| Low (1704 rpm) | |
| Aero 7 Lite w/ included thermal pad – High (3629 rpm) | |
| Medium (2020 rpm) | |
| Low (1704 rpm) (* crashed once) | |
| Aero 7+ w/ OCZ Ultra II – High (3552 rpm) | |
| Medium (2008 rpm) | |
| Low (1776 rpm) | |
| Aero 7+ w/ included thermal paste – High (3552 rpm) | |
| Medium (2008 rpm) | |
| Low (1776 rpm) | |
|
Idle
|
|
| Aero Lite w/ OCZ Ultra II – High (3629 rpm) | |
| Medium (2020 rpm) | |
| Low (1704 rpm) | |
| Aero 7 Lite w/ included thermal pad – High (3629 rpm) | |
| Medium (2020 rpm) | |
| Low (1704 rpm) | |
| Aero 7+ w/ OCZ Ultra II – High (3552 rpm) | |
| Medium (2008 rpm) | |
| Low (1776 rpm) | |
| Aero 7+ w/ included thermal paste – High (3552 rpm) | |
| Medium (2008 rpm) | |
| Low (1776 rpm) |
Both units performed similarly under idle conditions, but the Aero 7 Lite outperformed his all-copper brother while under load. However, theres one thing that doesnt show up on the chart: The Aero 7 Lite took noticeably longer (2-4 minutes, depending on fan speed) to return to idle temperatures, compared to the all-copper Aero 7+. This is the one situation where copper is clearly superior to an aluminum/copper heatsink. Also, the CPU locked up (only once) while using the Aero 7 Lite, when the fan was set to the lowest speed setting and the system was under heavy use (during the load tests). This was while using the included thermal pad; under all other situations, the Aero 7 Lite performed flawlessly.
The extruded aluminum fins are much more widely spaced than the skived copper ones, as you can see in the following photo:

The Aero 7 Lite’s heat sink works just as well as the pricier 7+, as the benchmarks show. One possible reason for my results is that the widely spaced fins allows for better airflow through the heatsink. Another possible reason is that I believe that my Aero 7+ is slightly defective. The bottom of the Aero 7+ was quite rough and appears to have missed a polishing step. (I’m pleased to report that the bottom of Aero 7 Lite has no such issue.) A third possible reason is simply that Windows ME crashes sometimes, for no apparent reason.
Regardless of the reason for the crash, the Aero 7 Lite performed very well indeed. I ran the system for a long time under load with the fan at low and the crash did not reoccur. Still, if you have a high power CPU like my overclocked Athlon, I would recommend running the fan at medium, at least while playing games. Or install it using a high-quality thermal paste. (Or both, for maximum stability.)
Conclusion
The Cooler Master Aero 7 Lite is a much better unit (overall), when compared to the Aero 7+. It is lighter, cheaper, and best of all, actually performs better too! (I was quite surprised by this unit.) Even the stock thermal pad that came with the unit performs like a champ. All in all, it’s hard to believe you could find a better CPU cooler in its price range. Heck, it performs better than some coolers that sell for nearly twice the price!
Good stuff:
- Inexpensive (less than $20 on-line).
- Works as well as some all-copper heatsinks.
- Quiet (at lower speed settings); even at 50%, this unit is quieter than most coolers Ive tested.
- Lighter in weight, so its a good choice if you carry your system to LAN parties.
- The fan noise is lower pitched and less annoying than most other CPU coolers.
- Solid construction.
Not so good stuff:
- Comes with a single-use thermal pad.
- Clip is somewhat difficult to use (and not tool-free, as claimed).
- The bottom is not lapped mirror-smooth (which is no surprise; this is an inexpensive unit).
- Needs plug-connector between knob and fan, otherwise you have to uninstall the rheostat when temporarily removing heatsink.
Final Score
| Performance |
8
|
This cooler is both quiet and powerful. It easily handles an overclocked Athlon 2500+. |
| Features |
8
|
The unique blower helps this aluminum/copper cooler stand out from the crowd and is very quiet at lower speed settings. |
| Bundle |
7
|
The bundle is better than expected for a CPU cooler, but only a one-time-use thermal pad is included, instead of the more common thermal paste. |
| Quality |
8
|
This is a solidly constructed unit, but the base is not lapped (which is no surprise, considering the price). |
| Price |
9
|
I found the Aero 7 Lite on-line for $17.99 (over at NewEgg), which is a great price for a CPU cooler that works as well as this one does. |
| Total: 8 | The CoolerMaster Aero 7 Lite is a good solid performer at an excellent price. | |
Im pleased to award the Cooler Master Aero 7 Lite the Bjorn3D Seal of Approval for its excellent performance at a reasonable price!


