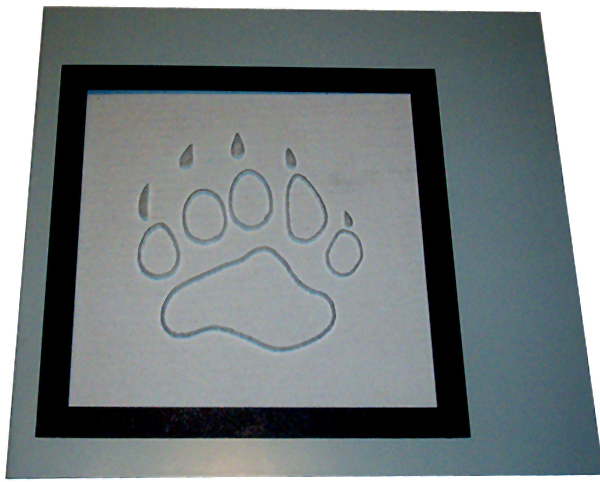
The Bjorn3D paw immortalized in Plexiglas… read the article to check out Kevin’s nice new modded case window.
Introduction
Case modding has become quite common place these days. There are countless case modding sites and just as many sites that make and sell modded cases along with modding supplies. Major case vendors are now selling preinstalled windows, lights, and LCDs. Everyone and his brother has a modded case these days. So how do you make your case stand out? Simple, etch it with your favorite design.
You remember when you were a kid, and you had this toy flashlight thing that had hundreds of plastic strings coming out of the top? Well, we are using that very same principle, and the one used in today’s fiber-optic networks. A highly simplified version of the concept is this — the Plexiglas acts as one big fat channel for the light to travel through. Everywhere a cut is made in the glass, it will cause the light to scatter in all directions. Where there is not a cut, the light will continue straight to the other side of the Plexiglas, and not toward your eye.
Getting Started
Picking the right window for this project is key. Some window kits and preinstalled windows will not work. In this project, we are counting on a fiber optic effect that is created when a cold cathode light is placed on the edge of a piece of Plexiglas.
Side windows that have certain kinds of molding to hold them in place will not work because the edge of the Plexi is hidden by the molding. In order for this to work right, the edge of the window must be exposed to the inside of the case. Most case windows that are riveted in place or that use glue or sticky strips to hold them in place will work fine.
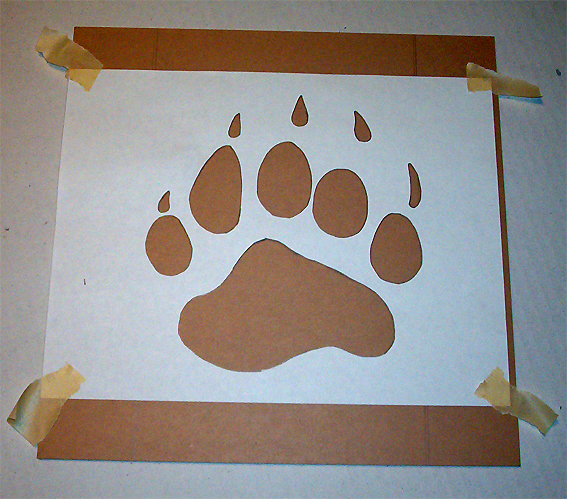
If you’re starting with a case window that’s already attached to the side panel, you will have to do an extra step. Put strips of two inch masking tape over the whole window on both sides. This is primarily for protection from scratches. It is also so you can mark an outline of your design. Try to put each strip of tape right next to each other so there is no gap, and no overlapping. Put a second layer if you like in the same way but run these strips perpendicular to the first layer. You’ll see what I mean later in the artical when I get a side panel ready for cutting.
If you’re like me, you’re using a window that is not installed yet. Mine is an 11x11in window kit from www.coolerguys.com. As long as you don’t remove the protective coating from the Plexiglas, there is no need for tape.
First I printed a copy of this image that was used to create the Bjorn3D site logo. I used Adobe Photoshop to resize the image to be as big as it could be and still printed on an 8.5 x 11in sheet of paper. Next, I got out my cutting board and used an X-acto knife to cut out the black areas. Then I attached the template to the Plexiglas with some tape.
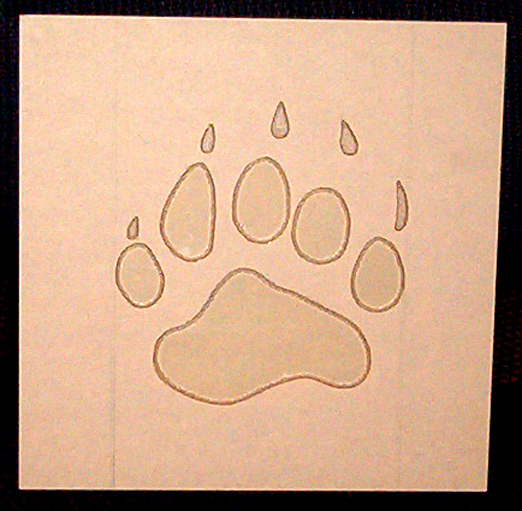
Now you can plainly see from the picture that something is wrong. It’s very important in this type of etching to reverse the image when you tape it to the Plexiglas. If you don’t, when you’re done, your image will be backwards. If you’re working with a preinstalled window, you want to tape the template to the back (or inside) of the side panel. Make sure that is still looks backwards though. When you look from the outside of the case it will look the correct way. Now that your template is attached trace the edges with a pencil, pen, or fine point marker.

Now get the X-acto knife back out and cut along all the lines. Then remove the inside areas that you just cut.
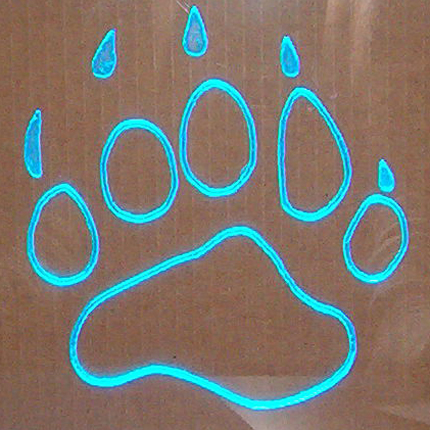
Now you’re ready to start etching, but first make sure you have proper protective gear. With a medium engraving/carving bit (#107 Engraving Cutter) in your Dremel, start by tracing along the outer edge of the cut out portions. It’s best to angle your Dremel so that you cut from the center out. The engraving bit cuts around bends much better this way. If you have an outside bend, cut from the outside. Don’t try to take every thing out in the first pass. Go over the design a few times for best results. Don’t dilly-dally in one place to long or the Plexi will start to melt.
There are two visual styles that you can achieve from this method: One involves cutting out all the material that is inside the area (the claws). The second is done by only cutting a trench around the outside of the area (rest of the paw). Be careful not to cut too deep (you don’t want to go out the other side), and keep a consistent depth so it will light up evenly. If you do the first method, it’s a good idea to go back over the area with a grinding stone (#83322 Silicon Carbide Grinding Stone) to smooth out the bumps. Otherwise you’ll get uneven lighting.
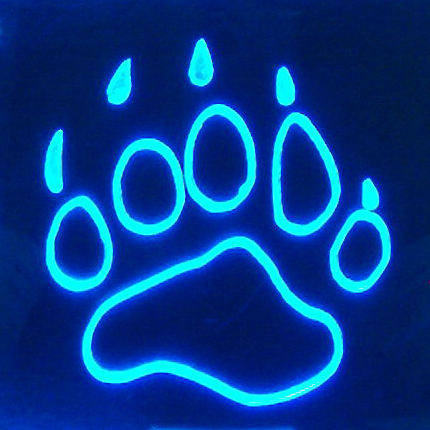
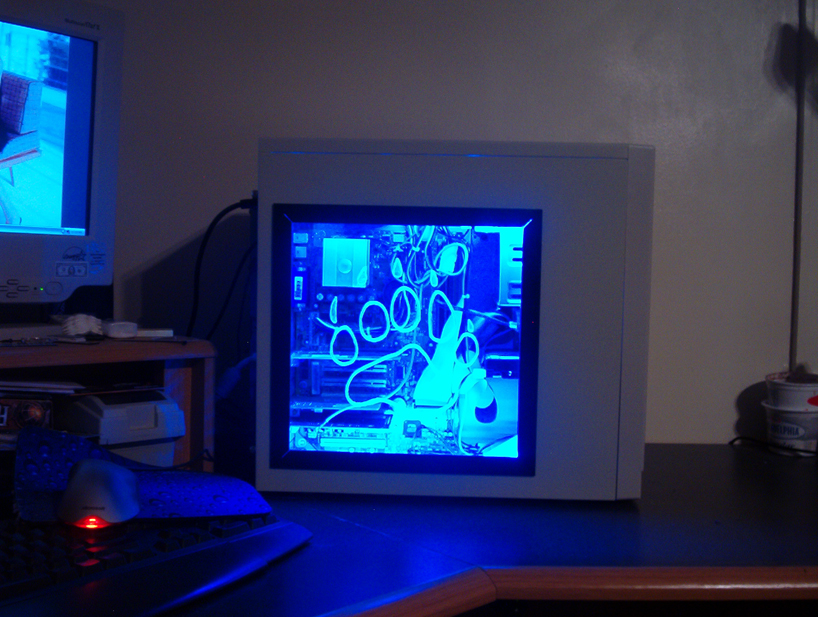
Here are some pictures of the finished project. Top left is with the lights on over cardboard. Top right is with the lights off with cardboard backing. Bottom left is with lights off and white backing. Bottom right is what it might look like with a computer behind it.
 |
 |
 |
 |
Click each one to see larger
Click here to see large side-by-side comparison
Bjorn3D.com and I are not responsible for any damage or injury caused from attempting this type of project. Always wear proper protective gear when using power tools.
Installation
To get the etching to light up well, you need the edge of the Plexi to be exposed and be able to get the cold cathode light to sit on the edge. Best results can be achieved with the use of a dual cold cathode light system. I got this nice blue one from Xoxide.com. Put one light at the top and one at the bottom or right and left. Different effects can be achieved buy putting different color lights in different places. Example: One blue on top and one red on bottom or one red on the right and on green on the top. Even lights that have multiple colors in one tube can be used. Most windows have 4 sides – use them all if you like.
Our patient for this project is my friend’s ordinary beige case. There is nothing special about this case other than the side vent for a fan, but it wasn’t being used anyway, so no one will miss it. Once you have the side panel off you have to prep the surface for cutting. This is what I was talking about earlier with the tape.
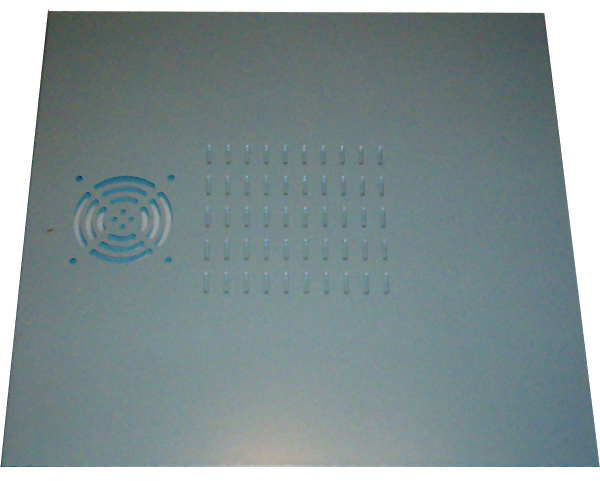
To make sure the window will be square on the case, measure from the one edge of the case (I chose the back and useed 2 ¼”) and draw a straight line. Make at least two marks (I used three) to make a straight line. You’ll want to pick whatever distance works and looks best for you. Just make sure to position the window so that it will not interfere with anything when you’re sliding the panel on or off. You also want to keep in mind that there will be cold cathode lights attached to the side panel too, and they are a little over ½” thick. Once you have your line, place the window on the panel and line it up with the line. Now trace around the out side of the window to get the correct size hole to cut. Make sure to hold it tight so it does not slip. To check your work, take the window off and put it back again and see if it lines up all around, or measure for squareness.

With the outline drawn, it’s time to cut. Since this case is constructed of cheap thin steel, I’m going to cut it using a nibbler from Radioshack. This is a neat little tool that almost anyone should be able to use. However, you do need a strong grip and some spare time, since it only takes out a sixteenth of on inch every time you squeeze the handles. The one advantage this has over using a Dremel is that it does not create any dust. When you’re done all you have are hundreds of little metal chunks, and a center section. If you use the Nibbler, it’s best to have the cutting edge that hits the surface first hit the lines that you made. To get started, take the biggest drill bit you have (3/8″ works best) and drill a hole near one of the corners.
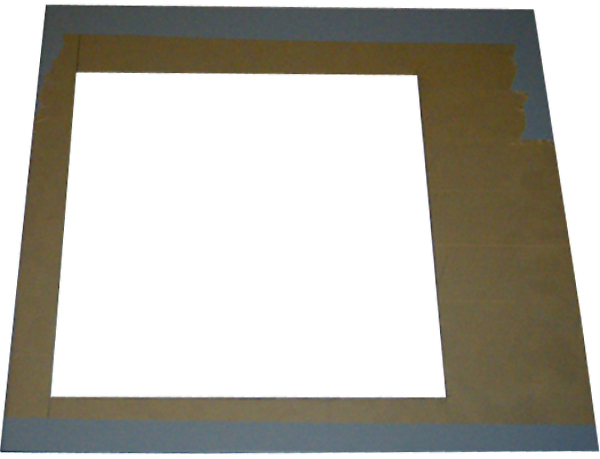
Now that the hole is cut take the window and fit it to the hole. If you’re lucky, it will fit on the first shot. If it doesn’t, take a metal file and file away any of the places where the window is catching. When you’re done, you should be able to set the window in the hole and then pick the panel straight up, and the window will stay where you put it.
The directions that came with the window kit were very hard to read. They looked like a copy from a very bad copier. I could make out what it was saying though. The backing on the molding strips is very sticky, and you only get one shot at getting it right. If you mess up, it’s going to be hard as hell to get the strip back up – if it comes back up at all.
Using the hole as a guide, take one strip at a time, peel off the backing, and place it so that the 45 degree angles meet up with the corners of the hole. Sorry I forgot to take a picture of this when I was doing it (got too carried away). Once all four strips are in place, turn the panel over, and drop in your window. You want to do this on a flat sturdy surface and press hard on the window and around the window where the molding sits on the other side. You may want to get a strong round object to roll over the edges to make it easier. I used my two inch masking tape roll.
Now for the lights. I have found Velcro patches to be the best way to get the lights on the side panel. This way they are easy to take off and put back on when removing the side to work on the computer parts inside. Some creative wire management may be necessary to keep the cords from hanging in the window.

Once you’re all plugged in, it’s time to see the fruits of your labor. In the first picture, I left the lights on so that you can see that even in bright light your design will still be visible with what ever color you have chosen. The second picture shows it in its full glory. Click to enlarge.

Conclusion
This Mod requires a steady hand, patience and proper planning. I would give it a 6 on scale of 1 to 10 (1 = installing a case fan, 10 = installing a full water system). It’s a good idea to go buy some cheap Plexi from your local home improvement store and practice some before cutting into a case window that’s already installed, or even a kit that you bought. Be careful when buying a kit though. Kits that use rubber molding and a lock strip to hold the window will not work as nicely. The molding interferes with the fiber optic effect (since you can’t position the lights on the edge of the Plexi).
Bjorn3D.com and I are not responsible for any damage or injury caused from attempting this type of project. Always wear proper protective gear when using power tools.


