Matrix Orbital has clearly brought to the table one of the most capable multipurpose expansion devices on the market. Far exceeding the capability of most fan controllers and other similar devices, the MX4 series of LCD kits gives plenty of capability out of the box – and beyond. Check out this look at the MX421 and the cool LCDC software that runs the show.
Introduction
What device would a network administrator, an electronics gadgeteer, and a computer enthusiast all find that is useful and maybe even a little fun? Whether you are looking for a programmable device to display status messages, a car stereo, or a downright wicked cool toy to play with (that doubles as a fan controller), the Matrix Orbital MX4 series of LCD kits offers tremendous versatility for just about anyone with an imagination and a purpose.
Within moments of receiving the MX421 from Matrix Orbital (who has made this review possible…thanks!), I was truly impressed with the sheer depth of capability just waiting to be unleashed within the MX421. Rather than rave on and on about the MX421’s features and capabilities, let’s dig in!
Manufacturer Features and Specifications
These are the MX4 general features and specifications (slightly modified) from the Matrix Orbital site. Following these, I will list some important features and capabilities that may not be readily apparent.
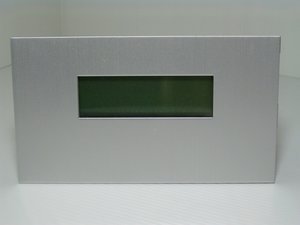
Appearance
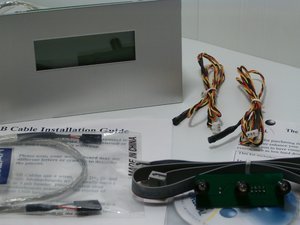
Includes
Interfaces
Speed
Functional Capabilities
Power Requirements
So, What Can It Do?
The MX4’s LK-204-24 LCD is the biggest gem of the MX4 LCD kit. Even though it is limited to only 8 custom fonts, the real source of power and programmability is located within the software running on your computer.
What sort of things can you expect the MX4 to do right out of the box?
- Full-featured, programmable fan controller
Featuring 4 fan connectors that can be given a full 12 volts of power if high-power mode is enabled, the MX4 can easily function as a fan controller when combined with the powerful included LCDC software. Events tied to cpu temperature or high-stress games can enable the fans to spin faster or slower as needed. They can even be controlled by keyboard shortcuts or a matrix keypad connected directly to the controller.
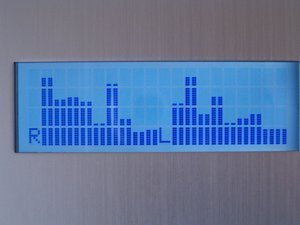
- Music visualization
Winamp2, 3, and 5 all work together with LCDC (when the appropriate plugins are enabled in Winamp and LCDC) to allow statistics of the song currently playing to be displayed. Also, a slick spectrum analyzer may also be displayed if so desired.
- Computer statistics display (temperatures, etc)
Various LCDC plugins allow data like network traffic information, weather, Motherboard Monitor 5 statistics, and hard disk space usage to be displayed.
- Design your own screen!
LCDC allows you to create your own custom screen, displaying whatever you would like. Use the custom font maker to design and upload your own custom font graphics. Construct your screen from a large list of data sources such as plugins and computer statistics.
The included LCDC software is incredibly powerful, but not overwhelmingly so. Even still, the LK-204-24 LCD allows an aspiring programmer to go beyond the box and create his/her own software using Basic or C++ programming. The display’s product manual is the aspiring LCD programmer’s bible.
The MX4 is suitable for more than just an “install and forget”; it also offers an opportunity for those interested in more specialized purposes such as in robotics or in projects such as a car music player. In fact, Matrix Orbital supports a thriving forum community dedicated to such projects and solving the issues that are brought with them. Creativity seems to come hand-in-hand with these products.
LCDC
For many, the piece of software that makes it all work is LCDC. A comprehensive software program that is both unified and extendible through plugins, LCDC exclusively supports Matrix Orbital LCDs and their extensive feature set (along with a few other older displays).

What’s so awesome about LCDC? Well, not only are there lots of plugins available for it (and 3rd party ones being made available fairly often), but by itself it offers a huge amount of control over your Matrix Orbital LCD. The MX4’s features work hand-in-hand with LCDC, allowing you to set up screens monitoring fan speeds and temperatures all the while using the software to actually adjust the fans according to your needs. Other devices such as thermal diodes may be driven with LCDC, basically making the software the central controller for your MX4 kit. You really don’t need anything else.
LCDC Setup
After installing the MX4 unit using the drivers contained on the mini CD-ROM, the next step is to install LCDC. The install of the program was easy (simply running the setup application on the mini CD-ROM and registering the product using the included registration key), and the actual setup of the hardware was almost easier.

Upon first running of the program, an easy 3 part autodetect wizard starts up. Simply keep hitting “next” to continue through it.

The autodetect program scans the com ports for an attached LCD, and upon finding one queries it to determine its type.

The final screen is basically a confirmation screen; make sure the product in the drop down box is yours and then hit “select” to complete the autodetect process.

After detecting the display, the configuration screen should be your next stop. Run through the options to see if there is anything that catches your eye (everything is set safely and usably at default, so you don’t have to do anything if you don’t want to).
Using LCDC
After setting up the display, it’s time to actually see what it is all about. There is no way I could possibly cover all the individual settings and options offered by LCDC here, but here is how I went about making a custom “Bjorn3d” screen for the MX4 (including the custom character set).


The magic is found within the “Screen builder”. This is where each of the displayed screens is put together and customized, and where events are set up. The Screen builder is only available when the display has been stopped (the left image above).

Here you can see that I have selected the Bjorn3d Logo screen. It was remarkably easy to make. Note the the “Custom chrs” section to the lower right, that is the character set used by this screen (one custom character set can be displayed at once). Also notice that I don’t have all of the different screens checked, because I found that I didn’t need all of them for my particular situation.

Line 1 of the “Bjorn3d Logo” screen is fairly simple; it is merely enough “-” characters to fill the screen (fortunately LCDC has a live update features which will display your screen in progress on the LCD, which makes things easier).

Here in line 2 is where things begin to get interesting. You can see that I have everything center aligned. What are those funny characters like “[#$CC0]”, do you ask? Well, each of those is a hexadecimal “code” that corresponds to a custom character. Simply dragging and dropping a custom character into the Text field will give you the appropriate hexadecimal code.

Line 3 is the lower half of the “paw”. You can see that I am repeating the lower half twice, as the upper half is repeated twice in line 2. The block of spaces between the paws is the same number of characters as the ” Bjorn3d.com” block of text in line 2 as well.

Finally, line 4 contains the Bjorn3d.com site “slogan” (check the front page, it displays it in the title bar of the browser window). If you notice, it has “Scroll” set to “Always”, and it is set to scroll “Left” at FPS rate. I had to set it to scroll because the slogan was too long to fit the 20 character wide LCD screen.

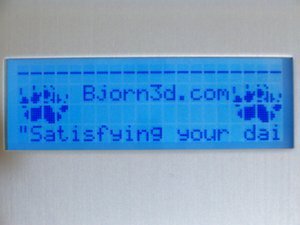
The top image above is LCDC’s software preview window; below is the same image on the actual LCD.
Custom Characters
Since the display can only accept 8 custom characters per screen, it certainly would be good to have a nice application that does the job. Thankfully, LCDC includes such a program, the “Char Mapper”. Char Mapper is basically a simplified “Paint” program that lets you fill in the pixels, with a nice little preview window to the side to give you an idea of how it looks. Char Mapper saves the characters in a proprietory format; they must be placed within the custom character subdirectory within your LCDC installation directory.

Above you can see the Bjorn3d paw that I assembled using Char Mapper; it was fairly easy to do (the hardest part was scaling it down to such a small level). I’m sure someone could do an even better job than what I did, but I thought it looked pretty good for a first try!
Events in LCDC
As if LCDC wasn’t versatile enough, it is possible to set up “events” that trigger various LCD (or other) responses based on certain implied conditions. Different actions that can result from events range from starting an an external program to going to a custom LCD screen. What can trigger these actions? Well, LOTS of things: a temperature being too high, email being recieved, hard disk space being too low, etc. The limit really is your imagination when you consider that you can make your own plugins that may contain new events of their own.

Events are easy to create; when I go over Matrix Orbital’s Indicator LED Bus accessory I will detail setting up an event that lights up an LED as an action.
Indicator LED Bus
Matrix Orbital was kind enough to supply me with their “Indicator LED Bus”, a small PCB with 3 super-bright blue LEDs. These LEDs are driven by the LCD display, and as such their usage is completely customizable.
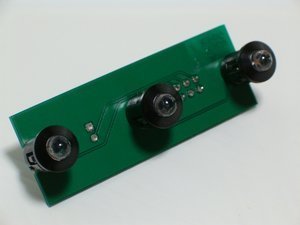
The three LEDs are mounted on a little standard-green PCB, and include mounting hardware (the little black snap-ins around each LED). Included with the LEDs are schematics that may be used to accurately drill holes for mounting.

The LCDC software allows you to set up a screen that shows the status of each LED.

Here you can see that I have LED 1’s status assigned to line 2. LED 2’s status is assigned to line 3, and so on.

There are lots of options for the LEDs in the event builder. You can control each individual LED in this way.

Here you can see that LED 1 will turn on when any account recieves mail. It is very easy to set up the events and make them work with your LED hardware.
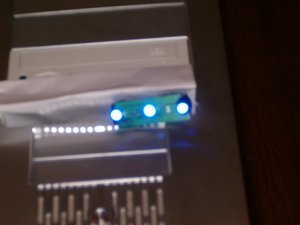
The LEDs are very bright! Unfortunately, as you can see, I haven’t quite decided where to put them yet. This is a good thing, however, as it is better to be safe when you are drilling holes as they can’t be undone!
Temperature Probes
Matrix Orbital was kind enough to supply 2 temperature probes for testing purposes. They are fairly simple and standard probes, which Matrix Orbital says are “highly accurate”. Comparing the internally registered temperatures recieved by the S.M.A.R.T. technology within my Western Digital hard disk with the temperatures recieved by a Matrix Orbital probe showed it to be pretty much on target considering how it was external to the drive. Unfortunately, I don’t have another probe to compare with.
The probes are excellent not only for actually fastening to various devices; they are good for monitoring thermal “zones” within a computer chassis.

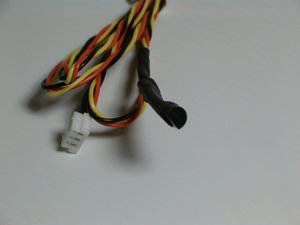
Featuring a simple 3-wire design, the probes attach effortlessly to the back of the LCD unit.

Reading the sensor values couldn’t be easier. It is easy as well to use the values within an event-based setup; you can use the temperatures to control fans as an example.
Conclusion
After all this, Matrix Orbital has clearly brought to the table one of the most capable multipurpose expansion devices on the market. Far exceeding the capability of most fan controllers and other similar devices, the MX4 series of LCD kits gives plenty of capability out of the box – and beyond. Many others on the Matrix Orbital forums will have to agree.
For its included comprehensive software, LCDC, and its raw expandability, the MX4 has a complete and balanced package that can’t be matched. I hereby award it 8.5 out of 10 (very good) and the Bjorn3D Seal of Approval!
Pros:
+Good construction quality
+Available in many styles
+Excellent software package
+Lots of accessories
+Highly programmable
Cons:
–A tad expensive
–Could use more Linux support


