Ever wonder why you are stuck using the same keyboard layout for all of your applications? Check out the Ergodex DX1 for a new perspective on input devices.
Introduction
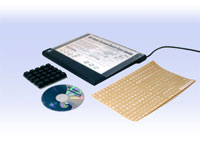
Q, W, E, R, T, Y. W, A, S, D. Ctrl, Alt, Delete. These familiar key-combinations have emerged from years and years of use of the common keyboard. Designed for efficient typing, the standard keyboard serves its purpose well. What the keyboard lacks is the ability to choose where YOU want to put YOUR keys to best suit YOUR hand size or key-placement needs. Alternate input devices have been around almost as long as the keyboard, allowing for a more customized setup, but none has been able to provide this like the Ergodex DX1 Input System. Allowing for custom key placement for up to 50 removable keys, the DX1 has the ability to assign multiple key strokes to single keys and allows for custom profiles for different applications. Scroll on down to read more about the DX1.
Features
- Movable Keys – Allows for custom placement
- Macros – Assign macros to each key, whether they are single-key or multi-key macros
- Total Key Customization – Press and release settings, custom key timings
- Multiple Profiles – Create a different profile for each application
.JPG)
Detailed Look
DX1 Pad
The DX1 Pad is one half of the hardware marvel that makes up the DX1 Input System. There are actually two parts to the Pad that work together to form a single piece. A removable, clear plastic, Key Tray sits on top of the Pad base. By being removable, the Key Tray allows for multiple trays to be used for different applications. For example, you probably would not want to use the same key setup for your FPS games as you would for say your video editing software. This is where the multiple tray feature comes in handy. By having multiple, pre-configured trays available, switching between applications and custom key setups is as easy as removing one tray and placing another in its place.
.JPG)
The DX1 Pad’s base features a full-width wrist-rest that sports the Ergodex name and logo. In the center of the base is a very slightly recessed area that is known as the “active surface.” Keys placed inside this area will be fully functional, no matter their rotation angle. Keys placed beyond the border of the active surface will not work properly. The signal between the keys and active surface is not strong enough for the keys to be placed beyond the edge of the active surface, but the keys will still function when slightly elevated from the surface of the Key Tray. Cool.
.JPG)
.JPG)
Moving up the right-side of the base brings us to a set of two buttons. These buttons are used to assign certain actions to the DX1’s keys, which I will discuss later. Connecting the DX1 to a computer is completed by a six-to-eight foot long USB 2.0 cable. This long cord is great for users that may have their PCs placed on the floor and need that extra length. One drawback of this cable is the very bulky and heavy line-filter that resides about eight inches from the USB plug.
.JPG)
One great feature of the DX1 Pad’s base is the great deal of information on its base. We all have been known to lose instructions and paperwork for our purchases, but Ergodex is here to help. By placing important information on the bottom such as care instructions, troubleshooting information, and contact information, the DX1 Pad’s base almost serves as its own instruction manual. Six small rubber feet keep the DX1 from losing its place on your desk and keep the base from being scuffed, which would obscure the information printed on the bottom.
.JPG)
The only real drawback about the DX1 is its size. With dimensions of 11″ x 9.5″, the DX1 takes up quite a bit of desktop space; about 2/3 that of a normal keyboard. Finding room on my desk for permanent placement of the DX1 was not really possible. I ended up placing the DX1 on top of my PC tower when not in use and then sliding my keyboard forward and to the side when using the DX1. Like the old saying goes, “You can’t have your cake and eat it too.”
DX1 Keys
The DX1 keys are slightly smaller than the keys on my Logitech keyboard, but this does not really seem to detract from their usefulness. Each key base is numbered from “1” to “25.” The tops of the keys are blank, which allows for the included key labels to be used to help identify the custom functions of each key.
.JPG)
The bottom of each key is originally covered with a clear plastic protective film that keeps the adhesive on each key safe and fresh while in the packaging. After peeling this film off, a transparent adhesive material is revealed. This adhesive is just strong enough to keep the keys in place for normal use and even some rough usage that can occur durring gaming. However, if a key needs to be removed, a simple twist and tug of the key will free it from its spot. If after time the keys become dirty or do not want to stick like they did when new, a little water will clean them to a like-new condition.
.JPG)
.JPG)
If the 25 included keys are not enough, Ergodex offers keys 26-50 as an additional option. At the time, the Ergodex only supports up to 50 keys at one time.
Key Labels
Ergodex provides you with 280 pre-printed key labels that simply peel and stick to the keys. Another 292 blank key labels are included in case you want to apply your own custom markings. Awesome idea, Ergodex! Although the pre-printed keys cover many actions for multiple types of software from games to instant messaging, it is nice to have the option to create your own labels.
.JPG)
Installation
Installing the DX1 is very simple. The instructions provided by Ergodex are very easy to understand and follow, which is better than can be said with some manufacturers. After running the DX1 installation program and plugging in the DX1, placing keys and assigning macros to them is the next step.
Testing
I really wanted to use the DX1 for a custom setup for playing Guild Wars. After reading over the included instructions, I was ready to begin laying out my custom setup and assigning commands to each key. I decided to arrange my movement controls in the normal WASD setup, but with a more personalized layout for the distances between each key. The rest of the keys I used each dealt with controlling a certain in-game window, such as my inventory, map, etc. I placed these keys in the same spots that I have these windows layed out on screen so that I could easily learn my new layout.
Once I had all my keys in their spots, I went about assigning them their own functions. This proved to be very easy, thanks to a very simple macro-recording process. With the included Ergodex Manager software running in the background, I started up Guild Wars and prepared to assign all 25 of my DX1 keys their macros. Once in-game, all I had to do was press the “REC” button on the DX1 to start the recording process, then press the keyboard key that I wanted to duplicate, then press the DX1 key I wanted to program, then press the “REC” button again. This simple process was repeated until all of my keys were assigned. The whole process only took a few minutes, and I did not run into a single problem.
.JPG)
My Guild Wars DX1 Setup
While playing Guild Wars using the DX1, I found myself missing many of the keys and stumbling along in battles. Even after re-positioning the keys for an alternate layout, I still felt very clumsy with the DX1. I think this had to do with the fact that my fingers are so used to a standard keyboard that they miss the feeling of the other “un-used” keys that they make contact with. These un-used keys help to guide my fingers in the right direction, and I have grown very attached to having them. Without these un-used keys on the DX1, my fingers were having to re-learn their territory and were struggling the whole time. After time, however, I think that my hand would have grown accustomed to the feeling of the DX1, and I would have actually been able to use the keys more to my advantage.
One application that I really liked using the DX1 for was Winamp. By assigning each key a different control, I was able to easily skip between songs, raise and lower volume, rewind and fastforward, and many other functions that I use frequently.
The DX1’s keys have a very nice feel to them, and are nearly silent when being used. The pressure needed to press each key is very similar to a normal keyboard, and their texture resembles that of a normal keyboard as well.
Conclusion
Although I was a little discouraged with the gaming results that the DX1 provided me with, I think that it is an awesome product. Many manufacturers have come out with many different solutions for custom input devices, but none have ever been as innovative as Ergodex DX1. The DX1 is still a pretty new product, and I think that with more time, it will become a hot commodity in both gaming and work environments. Being able to assign multiple key strokes to a single key can save much time when repeatedly entering repetitive lines of text. The DX1 is really only limited by one’s imagination of how to use it and with which applications.
Pros
- Innovative Product
- Very Easy to Use and Configure
- Great Build Quality
- Virtually Limitless Uses
Cons
- Cost (Approx. $150)
- Large Footprint
After a quick but thorough review of the DX1, I am happy to award it a score of 8 out of 10.


