I had several reviews to do before this product but found myself daily being intrigued by the X-shaped box sitting on the shelf just begging for attention. Today I finally had the opportunity to open that box and dive head first into what turned out to be a very detailed and comprehensive review of the XFX REVO64 SPU, NC3000 Gamer’s Edition.
INTRODUCTION
Being an analyst for Bjorn3D is an exciting job with its share of surprises! Most often the excitement and surprise are propagated by the packages that the UPS driver brings to my doorstep. Such was the case about 10 days ago when I received a package from XFX. I had been forewarned by Scott, our fearless leader, that a RAID controller was coming for me to review but was uncertain of just what to expect. To my surprise, it was a product that was co-produced by XFX, a company known for making superior quality video cards, and Netcell®, a company also known for quality production of RISC-based storage processing units (RAID).
I had several reviews to do before this product but found myself daily being intrigued by the X-shaped box sitting on the shelf just begging for attention. Today I finally had the opportunity to open that box and dive head first into what turned out to be a very detailed and comprehensive review of the XFX REVO64 SPU, NC3000 Gamer’s Edition.

FEATURES & SPECIFICATIONS
Features
- Highly Integrated Storage Processing Unit
- Embedded RISC CPU that manages internal 64-bit data paths to deliver up to 3Gbps (400Mbytes/s) on-chip data rates
- Patented SyncRAID™ technology provides 100% hardware RAID acceleration
- “On-the-fly” XOR calculation
- Enables completely driverless solutions for plug and play designs
- Three internal SATA ports
- RAID 0, 1, 3 and JBOD configurations
- Integrated SDRAM controller for L2 drive cache configurations up to 256Mbytes external SDRAM
- PCI 2.2 32 bit/ 33 MHz or 32 bit/66 MHz interface
Specifications
- Chipset: NC3000
- Processor: NC3000
- Ports: 3
- Drive Interface: 3 SATA
- PCI: 32/66
- Host Interface: PCI 32-bit/66Mhz
- SDRAM Cache (100MHz): 32-512 MB
- Cache: 64MB
- Drive Burst (MB/sec.): 200 (300 SATA)
- Max Drive Transfer 128M: 300MB/sec
- Drive Sustain (MB/sec.): 100+
- Array Support: 2
PACKAGED BUNDLE
Upon opening the X-shaped box and removing the cardboard tray that held the components, I was greeted by the following warning placard that really got my interest peaked about the contents within.

The innards of the package consisted of the SPU card; three neon green, 39.5″ SATA cables; a comprehensive instruction manual; and a CD containing manual configuration software.
 |
 |
 |
Click to Enlarge
INSTALLATION & SETUP
After reading the features, I decided to test the ease of installation by not reading the instruction manual and see if the manufacturers’ claims were really true. When XFX and Netcell® say “completely driverless solutions for plug and play design” they mean just that. I’ve installed a number of different RAID systems over the last few years and I can truly say without reservation none were ever this easy. Simply plug the SPU card in any available PCI slot, connect the card’s internal ports to your SATA drives using one of the supplied cables, and turn your system on, that’s it! Yep, no more F6 and inserting a floppy with the drivers for this baby.
Supported RAID Modes by the REVO64

BIOS Auto Configuration
There are two methods for setting up the REVO64 card, BIOS and software; since the BIOS approach is the first method you’ll experience after installation we’ll discuss it first.
After the card has been installed and the system has been started, a screen will appear during boot up showing the current drives in the array. This screen will show the attached drives with their capacities. It will also recommend an array configuration to the user based on the available drives.
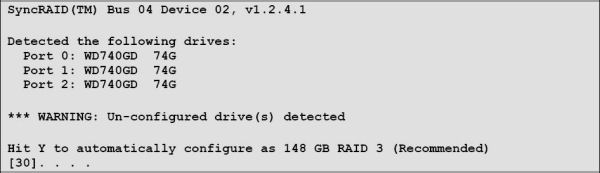
The user will be prompted to press “Y” to allow the utility to configure the array. After a few seconds the array will be configured and the system will continue to boot. Pressing any other key will bypass this option allowing the user to configure the array manually in the Window Configuration and Management Utility or in the Ctrl-N utility as described below.
BIOS Manual Configuration
Shortly after the main system BIOS and graphics cards complete their boot up process, you will see a sign on screen similar to the following:

Hold down the Ctrl and letter N (Ctrl-N or ^N) key at the same time as soon as the prompt appears to enter the BIOS configuration utility. You will see a display similar to that below.
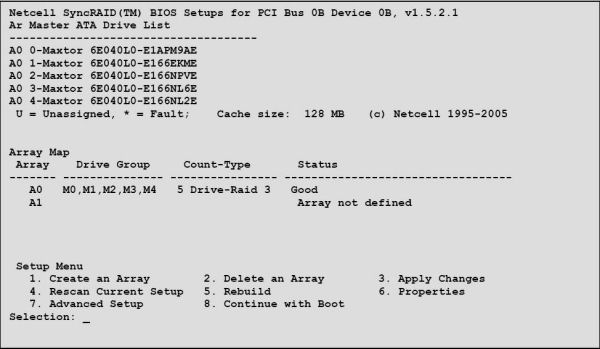
Options 1-3, 6, & 8 at the bottom of the screen are self explanatory. The remainder need a bit of explanation:
- Rescan Current Setup (Option 4): This simply rescans the setup and refreshes the BIOS screen.
- Rebuilding Arrays (Option 5): Failed arrays can be rebuilt following replacement of the faulty drive. This is only available in a RAID 1 or RAID 3 configuration. The failed drive will be indicated with an ‘*’ by the drive that has failed. Identify the actual drive from the physical port number of the failed drive e.g. M2 indicates master drive on port 2 of the card has failed and is currently shut down.
- Advanced Setup (Option 7): Provides the user with the following submenu of options
- Initialize all drives (Option 7): In emergencies it may be necessary to re-initialize all the drives and the card memory. Option 7 (Advanced Setup .. Initialize Drives) will cause the drive’s LOG sectors and the Netcell SPC’s non-volatile memory to be wiped out.
- INT13 enable/disable (Option 7 Advanced Setup .. Interrupt 13): turns off the part of the BIOS that registers the arrays as bootable with the operating system. This can resolve some system boot conflicts, especially with motherboards that employ SCSI drives as the main boot drive.
- BIOS enable/disable (Option 7: Advanced Setup .. Expansion Bios): turns off the BIOS completely, allowing the Netcell SPC to bypass its initialization BIOS and jump straight to the runtime firmware. This saves system resources, and can fix some incompatibility problems when more than one Netcell SPC is installed in the system.
INSTALLATION & SETUP cont’d.
Windows RAID Configuration Utility
A second method of device configuration is provided to the user by installation of the software based Windows Configuration Utility. This utility should be installed after hardware installation is complete. Installation is also very simple, insert the disk into your CD/DVD drive and it will auto start. Follow the on-screen options and install the software.
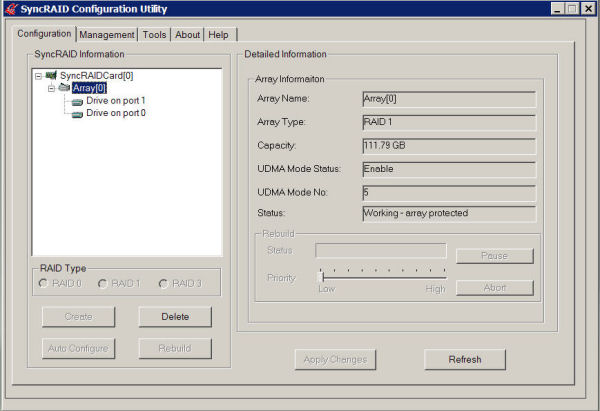
This is the primary configuration screen for the configuration utility, which offers you the ability to configure: RAID 0, RAID 1, RAID 3, or JBOD. It also allows the options of deleting, rebuilding, or auto configuring an array.
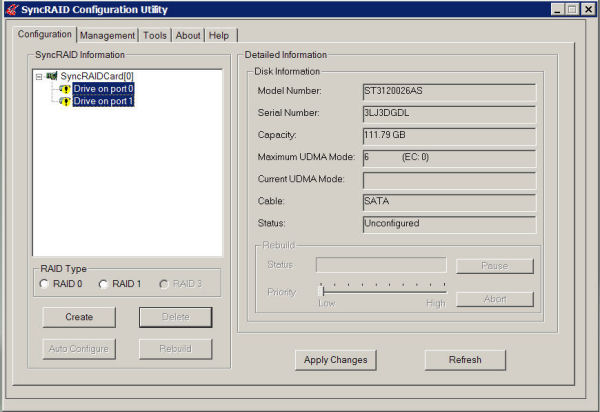
The unassigned drives show up under the Netcell SPC icon with the yellow exclamation sign over them. This indicates that the drives are available and can be included in an array. By Clicking on the Auto Configure tab, the auto configuration will “scan for Netcell SyncRAID change”, and the array will be configured.
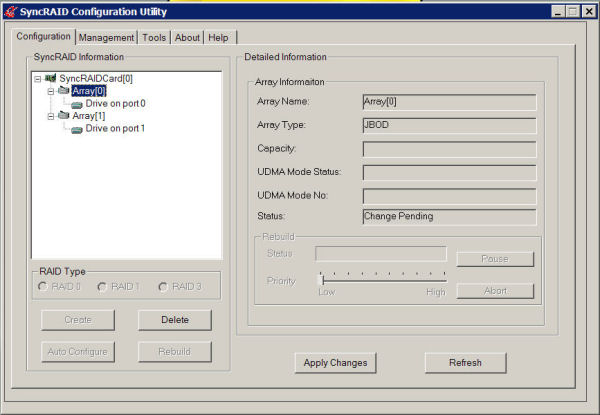
Once changes are made, they remain in a pending state until the “Apply Changes” button is pressed to initiate the change. I was very surprised that I could change to any of the available configurations without even having to reboot the system. It is sometimes necessary when using the Windows configuration utility to reformat the drive or recreate the partition using the Disk Manage feature that Windows provides.
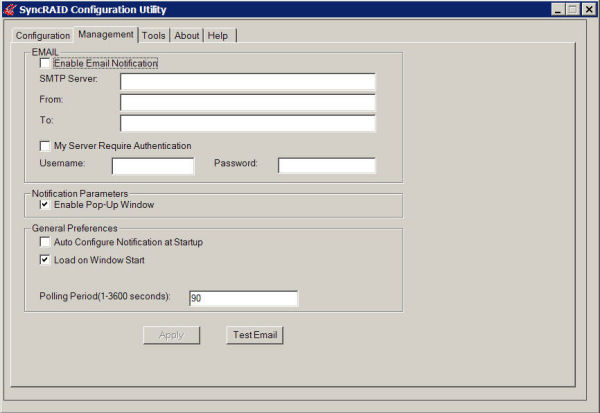
The “Management Section” can be configured to alert the user via email at the first sign of trouble with the system. Various system polling options are also available to regulate the frequency of the system checks.
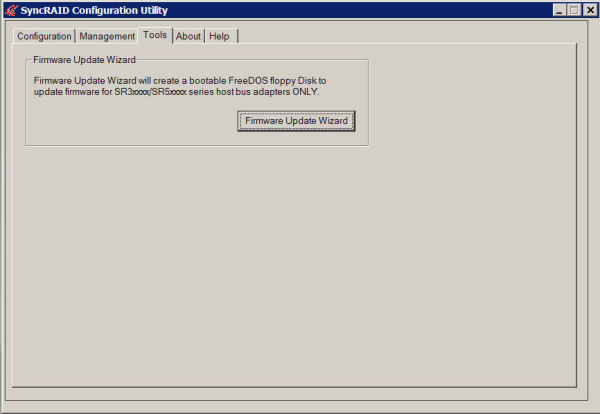
The “Tools Section” will check to ascertain if a firmware upgrade is available for the REVO64 SPU card and if so install it to a bootable floppy drive that you have pre-configured with DR.DOS or a like product. Unfortunately, a floppy drive is required for firmware upgrades.
TESTING METHODOLOGY
Test System
- Motherboard: Intel D875PBZLK
- Processor: Intel 3.4 GHz Northwood run at default speed
- HSF: ZALMAN CNPS7000B-CU
- Video Card: ATI X800XL run at default speed
- Optical Drives:
- Plextor PX-712A
- Lite-On Model 167 DVDROM
- Hard Drives: 2- Seagate Barracuda 7200.7 120 GB SATA drives; 1- Western Digital JB 100 GB PATA drive
- Memory: 1 GB (2- 512 MB sticks) Mushkin 3500 Level 2 DDRAM run at 2.75 volts
- Hard Drives: 2- Seagate 7200.7 Sata Drives (non-RAID)
- Sound Card: Turtle Beach Santa Cruz
- Fan Controller: Sunbeam 4 channel rheobus 17 watts per channel
- Case Fans-P150: Rear: Antec® Triflo™ 120mm; Front: 2- Panaflo™ M1A 92mm fans
- Case Fans-SLK3000-B: Rear: Antec™ Triflo® 120mm; Front: Antec™ Triflo® 120mm;
Test Methodology
I decided to test the REVO64 by comparing its performance to that of the on-board ICH5-R controller on my Intel D875PBZLK motherboard. I thought also to eliminate any overhead on the SATA drives by using the Western Digital PATA drive for OS installation and software installation. The individual drives would be initially tested in a JBOD configuration for each controller. I then would test both RAID 0 and RAID 1 on the REVO64 and the ICH5-R controllers. The following tools were used to benchmark with: SiSoft Sandra, ATTO’s HD Benchmarking Tool, and Simpli Software’s HD Tach.
Despite the fact that the box pictured in the introduction suggested I was testing a 5 port control card, the package contained the 3 port model so I was limited to a maximum of three SATA disks. It was further decided not to test RAID 3 as the ICH5-R on-board controller does not support this form of RAID and thus there would be no data to compare it to. Previous work with several RAID 3 arrays led me to believe that the performance would be slightly inferior to RAID 0 taking into account the overhead of writing parity measures to a drive in the array. Finally a 128kb stripe was chosen for the ICH5-R to correspond with the striping of the REVO64.
BENCHMARKS & PERFORMANCE
ICHR-5 JBOD…Disk 1
 |
 |
 |
Click to Enlarge
REVO64 JBOD…Disk 1
 |
 |
 |
Click to Enlarge
ICHR-5 JBOD…Disk 2
 |
 |
 |
Click to Enlarge
BENCHMARKS & PERFORMANCE con’t.
REVO64 JBOD…Disk 2
 |
 |
 |
Click to Enlarge
For those of you unfamiliar with the term “JBOD” it is an acronym for Just A Bunch of Disks. JBOD refers to any scenario where disks are solely configured in a non-RAID grouping. This would be the same as your computer if you have a separate C and D drive that are individually configured. As one might expect there is almost no difference in the performance of the two drives on either the ICH5-R controller or the REVO64 SPU.
ICHR-5…RAID 1
 |
 |
 |
Click to Enlarge
REVO64…RAID 1
 |
 |
 |
Click to Enlarge
RAID 1 or disk mirroring is one of the safest of the RAID arrays. This RAID configuration simultaneously writes the same information to two or more disks at the same time, this having an almost instantaneous backup. If one of the drives in a RAID 1 array fails the remaining drive(s) takes over operation without any loss of data or efficiency. The bad disk can then be replaced and easily rebuilt. My past experience has shown that depending upon the amount of data on your disk(s) a RAID 1 rebuild is a slow process even for the fastest RAID controllers. RAID 1 does have its drawbacks in that the array is slightly slower than a single disk functioning independently in a non-RAID configuration or JBOD. You should also be aware that if you copy a corrupted file to your drive there is nothing to prevent that corrupted file from being mirrored to its partner drive.
Analysis of the ATTO benchmarks reveal the REVO64 as a winner over the ICH5-R in this testing category with speed gains of as much as 10% in writing data. Read data score differences are unremarkable. Burst scores are also unremarkable. Sandra gives a ever so slight edge to the ICH5-R in the “Disk Index” score. Overall a slight advantage in this category goes to the REVO64. I believe the differences might have been even greater were it not for the obvious bottlenecks experienced using the PCI bus.
ICHR-5…RAID 0
 |
 |
 |
Click to Enlarge
REVO64…RAID 0
 |
 |
 |
Click to Enlarge
This is the arena of testing I’m sure all of you gamers, media hounds, and speed merchants have been waiting to view, RAID 0. RAID 0 is the fastest of all the RAID arrays with data being striped across two or more disks. Much to my amazement the ICH5-R took a convincing win over the REVO64 in this mode of operation with speed margin advantages of 10-15% in almost all areas. I am again reasonably certain that this is again due to the PCI bus and the information log jams that ensue from it’s use. The ICH5-R has it’s own data path that is completely separate from the PCI bus and it is literally the only vehicle on this data Autobahn. It should also be noted that both controllers used very little ( less than 2%) of my CPUs cycles in performing their task(s).
CONCLUSION
The XFX REVO64 SPU, NC3000 Gamer’s Edition is a quality product and by no means a slouch when it comes moving data in its supported RAID arrays. The PCI bus on which it rest was designed for ATA 100 traffic and with the ever increasing speeds of today’s equipment it is certainly no longer ideal. The REVO64 in some areas actually surpasses the onboard ICH5-R controller that it was tested against. It is my understanding that Netcell is currently working on a PCI-Express version of this chipset that will be available in the not to distant future. I will eagerly look forward to reviewing that product when it is released as it should not have the shortcomings that the PCI bus models currently have in random access and burst speed performance.
The REVO64 I reviewed is the NC3000 (3 port) version and it retails in the $125 – $150 price range, it’s big brother the NC5000 (5 port version) retails for about $100 more. Some retailers are also currently offering a $30 rebate on this product. I find this pricing to be in line with other RAID controllers of this type. An area to strongly consider when considering this card for purchase is its RAID 3 capability. With RAID 3 you get virtually the same capabilities as RAID 1 but the security of RAID 5.
The three-port NC3000 Revo64 is supplied in three versions: one for Music Professionals, another for Home Multimedia, and the final version for Gamers. Despite having different model numbers, I was unable to discern an appreciable difference(s) between the models in the research I performed.
My final thoughts are that this product is a generation away from the prosperity it richly deserves. No other RAID card be it on-board or a separate like the REVO64 offers the ease of installation and frees you from the burden of having to use a floppy disk for installation. For a budget system without the addition of on-board RAID this is an excellent choice. The Revo64 further offers features such as auto notification of the system owner that are generally reserved for more expensive enterprise RAID environments. The included SATA cables are some of the best I’ve ever seen and appear to be long enough to solve almost any routing issues associated with the larger tower cases. I believe the next generation of this product will truly be one to be reckoned with in SPU/RAID market.
Pros:
+ Ease of setup
+ Very small CPU utilization
+ Driverless installation
+ Long highly flexible SATA cables
+ Excellent for longer data transfers
+ RAID 3 functionality
Cons:
– Priced slightly out of budget buyers’ range
– Performance is less than stellar in RAID 0
– Inherent limitations associated with the PCI bus
Final Score: 7 out of 10


