Given the sheer scope and magnitude of this task I began to question whether the home version of Acronis True Image would facilitate the imaging tasks I was planning using a number of different RAID formats on several different computers. A short visit to the Acronis website revealed a product in their “Corporate/Enterprise Product” line that appeared to be perfect for the tasks at hand, Acronis True Image Workstation, version 9.1. Please join me today as I test the capabilities of this product to see if it will truly measure up and keep my previous “lily white impression” of Acronis products in tact.
INTRODUCTION
My first associateion with computer imaging software began rather auspiciously five years ago; after I experienced a computer user’s worst nightmare, a hard drive completely seized locking down my entire system; resulting in the loss of all my data. At the time the only decent imaging product on the market was Symantec’s Norton Ghost and then later PowerQuest’s Drive Image, a very good product which has since been purchased by Symantec, and essentially disappeared from the market. These products served me well for a couple of years; but as time moved on my data files once again had become very large and extremely important to me, this coupled with my previous experience made me very anal about the redundancy and backup of my data. I never wanted to experience another catastrophic event as the type described above without being adequately prepared.
Three years ago I began looking for a new tool to image my complete system. This call for change was necessitated as my old standbys: Symantec’s Norton Ghost and Power Quest’s Drive Image were no longer working properly with the new computer I had recently built. I had moved to the then new Intel 875 chipset; more importantly, I began using RAID 0 and RAID 1 arrays based on the Intel ICH5-R controller and SATA drives. The then latest version of Drive Image would not recognize my RAID array and Norton Ghost would go through its DOS based imaging regime without incident only to be unsuccessful restoring my data on a consistent basis. Hence the search began for a new product that would meet all of my detailed imaging needs.
To make an increasingly long story short, after an exhaustive search where I virtually looked at every backup utility and imaging product on the market, I found True Image which is an imaging software product authored and distributed by a company named Acronis. This product which at the time was the newly released version 7 proved pretty much faultless in giving me images from my SATA RAID array. I have used Acronis products religiously since that time in most cases backing my entire system up a couple of times a week and on any occasion that I feel the need to radically experiment with system settings. Yes! There have been a few more occasions where I experienced either major file corruption and/or system issues. The current iteration(s) of the Acronis “home product” has always literally saved my hind parts from the exhaustive process of reinstalling my OS, applications, and data. We’re talking a 15-20 minute restoration of a fresh, unadulterated image as opposed to the 6-8 hour process of manually restoring everything.
About six months ago I began planning to do a recurring series of articles that looked at a complete overview of RAID technology and products for our readers’ workstations and/or small business servers. Given the sheer scope and magnitude of this task I began to question whether the home version of Acronis True Image would facilitate the imaging tasks I was planning using a number of different RAID formats on several different computers. A short visit to the Acronis website revealed a product in their “Corporate/Enterprise Product” line that appeared to be perfect for the tasks at hand, Acronis True Image Workstation, version 9.1. Please join me today as I test the capabilities of this product to see if it will truly measure up and keep my previous “lily white impression” of Acronis products in tact.

FEATURES
Product Components:
- Acronis Backup Server — Ensure optimal usage of storage resources by allowing IT administrators to establish backup policies
- Acronis Group Server — Ease administration by viewing the status of all systems in the network
- Acronis Management Console — Deploy product to remote machines and manage backup tasks remotely
- Acronis True Image Windows Agent — Run backup and recovery tasks on remote Windows servers in your network
- Acronis True Image Local Versions — Backup and recover a local system
For clarification sake the features and specifications captioned below are specific to the entire spectrum of services that this product is reputed to perform on any system ranging from an enterprise level server to a local workstation. We will be reviewing the local installation which limits these capabilities to a single workstation.
Features
- DVD Burning — Save backups directly to DVDs without using 3rd party DVD burning software
- Acronis Universal Restore — Restore to different hardware and recover from any unforeseen event (note: requires separate add-on license)
- Remote unattended restores with the Acronis bootable agent — Recover all systems in the network from a central location
- Modify images — Mount images in read/write mode and apply changes directly
- Boot from an image, using Acronis Snap Restore™ (a patent pending technology) — Decrease downtime by allowing systems to be used during a recovery
- 64 bit Windows support — Use one application for both new and old systems Automatic image verification
- Automatic image verification — Peace of mind by ensuring that images can be used for restoration
- Differential backups — Decrease the number of backups you manage
- File backups, in addition to our traditional image backups — Flexible system protection
- Exclude files from backups — Capture only business data and saves space in storage archives
- Windows Event Log and SNMP support — Plug into your existing network monitoring application
- Custom scripts before/after backups — Facilitate compliance with company-wide backup policies
- Throttling to control hard disk write speed and network bandwidth usage — Minimize disruptions of business operations
- Create CDs with bootable images, PXE packages, and bootable recovery media ISOs — Eliminate the need to have separate recovery media and provide flexibility for application management
- Backup to FTP server — Expand your backup archive options
- Acronis Secure Zone — Save backup image to a special partition, hidden from the operating system for a complete local recovery
- Acronis Startup Recovery Manager — Initiate recovery by selecting the F11 key
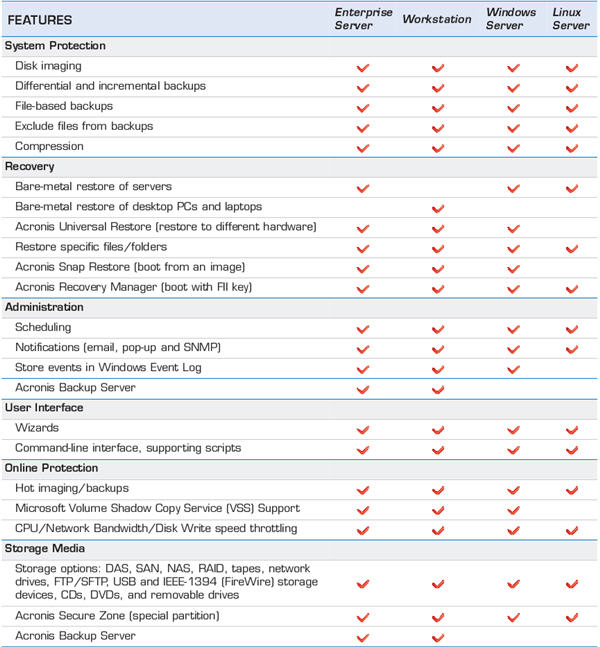
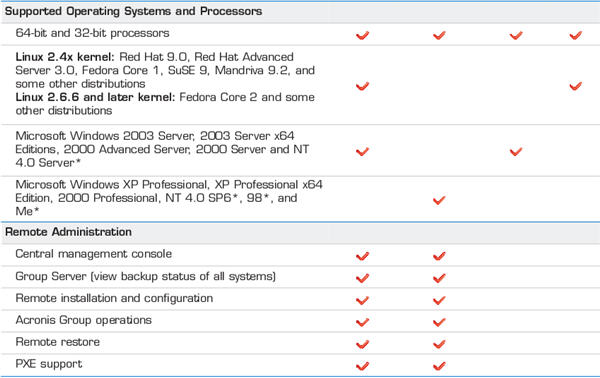
Product Specific Features
INSTALLATION
To install Acronis True Image Workstation components:
- run the Acronis True Image Workstation setup file
- in the Install Menu, select the program to install: Acronis True Image Management Console, Acronis True Image Agent for Windows, Acronis Backup Server, Acronis Group
- Server or Acronis True Image Workstation (local version) follow the Install Wizard instructions on the screen
.
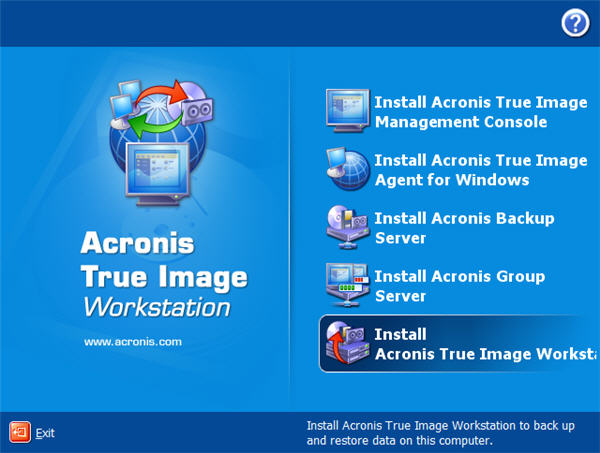
True Image Workstation Install Menu
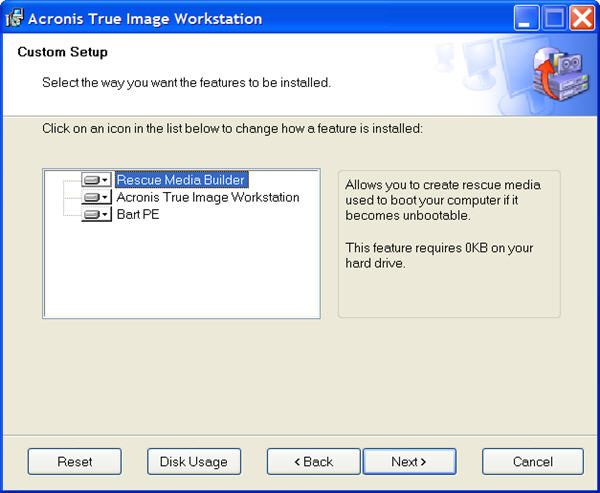
Custom Setup Options
Having chosen to install the True Image Workstation (local version) under the install options, we are then presented with the “Custom Setup Options” screen. Aside from the workstation install option we are also presented the options to install Rescue Media Builder and the Bart PE plug-in. With Rescue Media Builder you can create bootable rescue disks or RIS packages. The well-known Bart PE utility is used to boot into a Windows-like environment from CD. Applications are installed into Bart PE in the form of plug-ins. Choosing Bart PE plug-in installation (disabled by default) provides the ability to include Acronis True Image Workstation into a Bart PE plug-in tab. The plug-in files will be placed into the component installation folder along with other program files.
User Interface & Functionality
After installation is completed a system reboot is required to properly setup components in the Windows’ registry. After completion of the reboot the software package is now available for use. Clicking on the Workstation icon on your desktop will bring up the True Image Workstation primary screen which is the user’s primary interface to all the functions that this package has to offer.
The main program window contains the menu, the toolbar, the sidebar, the Active Tasks pane and the main area. The main area contains operation icons, while the sidebar features Tools and Help panels.
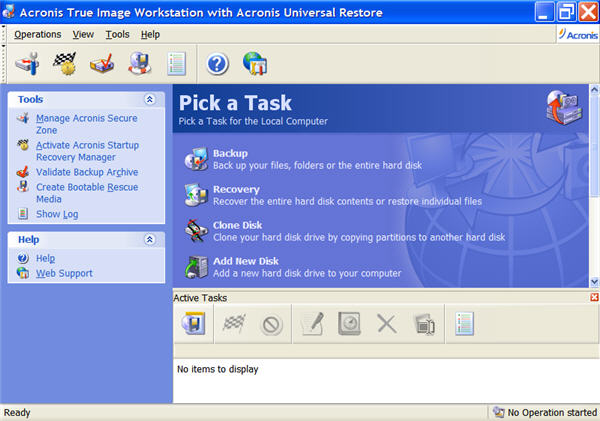
True Image Workstation User Interface
Most of the operations are represented two or even three times in different window areas, providing several ways to select them for more convenience. For example, you can start the necessary operation or tool by clicking its icon in the main area or by selecting the same item from the Operations or Tools menu.

True Image Workstation Task Group
The Task group contains the following operations:
- Backup – create a backup archive
- Recovery – restore data from a previously created archive
- Clone Disk – transfer the OS, applications and data from the old disk to the new one
- Add New Disk – add a new disk for data storage leaving the OS and applications on the old one.
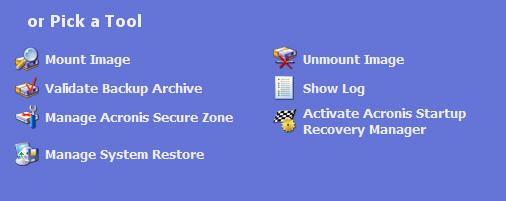
True Image Workstation Tools Group
The Tools group contains the following items:
- Mount Image – connect a disk/partition image as a virtual drive
- Unmount Image – disconnect the connected virtual drive
- Validate Backup Archive – run the archive integrity checking procedure
- Show Log – open the Log Viewer window
- Manage Acronis Secure Zone – create, delete and resize a special hidden partition for storing archives (Acronis Secure Zone)
- Activate Acronis Startup Recovery Manager – activate the boot restoration manager (F11 key).
- Manage System Restore – turn on/off Microsoft Windows System Restore tool and set its options directly from Acronis True Image Workstation
User Interface & Functionality cont.

True Image Workstation Active Tasks
The Active Tasks pane displays the scheduled and currently-being-executed tasks. It features its own toolbar. You can customize this toolbar view by right-clicking on it and selecting the desired options.

True Image Workstation Tool Bar
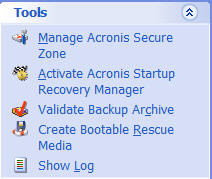
True Image Workstation Tools Side Panel
The “Tool Bar” located below the “Program Menu” and the “Tools Side Panel” are nothing more than redundant locations to implement the functions already discussed. The side bar can be hidden or left visible at the user’s discretion. Acronis gives the user a variety of different mechanisms to implement the same tasks, with the only differences being the visual appeal to the user for how that task should be started or ended.
Local Installation Features
As previously stated we are limiting this review to a local installation of the latest build (3718) of Acronis True Image Workstation 9.1. Lets take a look at the functions at our disposal:
- Backup and restore data, including system disks/partitions: Click Backup or Recovery, then follow the Wizard’s instructions.
- Schedule backup operations: Click the very left button on a tasks pane toolbar, then follow the Wizard’s instructions.
- Set up backup/restore options, such as system/network resources usage, before/after backup commands etc.: Select Tools -> Options -> Default backup options or Default restoration options and choose settings.
- Validate backup archives wherever they reside, be it local, network or removable media: Click Validate Backup Archive, then follow the Wizard’s instructions. .
- Set up sending notifications about Acronis True Image Workstation operation and tracing this operation in Windows Application Event Log: Select Tools -> Options -> Notifications or Event tracing and choose settings..
- Browse logs of Acronis True Image Workstation operation: Click the very right button on a tasks pane toolbar at the bottom of the window.
- Manage Acronis Secure Zone: Click Manage Acronis Secure Zone, then follow the Wizard’s instructions.
- Activate Acronis Startup Recovery Manager: Click Activate Acronis Startup Recovery Manager, then follow the Wizard’s instructions.
- Mount partitions’ images to explore and modify their contents, or to restore individual files: Click Mount image, then follow the Wizard’s instructions.
- Unmount previously mounted partition images: Click Unmount image, then follow the Wizard’s instructions.
- Transfer the system to a new hard disk
- Format partitions on a new hard disk
- Adding a new hard disk
- Turn on/off Windows System Restore tool
- Create bootable rescue media, its ISO or RIS package
Some of the above operations can be executed in command-line as well. Acronis True Image Workstation (local version) supports the command-line mode, as well as the GUI mode, and can be used to execute XML scripts.
SNAP & UNIVERSAL RESTORE
Two of the main selling points to me of the Workstation Edition vs. the Home Edition is a standard feature called Snap Restore and an optional feature called Univerasl Restore. With Snap Restore you can boot the OS on a crashed computer before the system is completely restored from an image, and start work seconds after the restoration is launched. Universal Restore is a $30 option but fulfills one of my dreams for imaging software, it allows you to restore an image not only to the computer hardware the initial image came from but to virtually any system. Yes! I didn’t make a typo, I said virtually any system! Let’s explore how each of these two features work in a little more detail.
Snap Restore
This feature is currently available for images being restored from the Acronis Secure Zone. Acronis Secure Zone is a special hidden partition for storing archives on the computer system itself. Naturally, Acronis Snap Restore cannot be used if the image contains no operating system (a logical partition or disk image) or when restoring file archives. Also, Snap Restore of Windows 98/Me systems is not supported.
When the restoration procedure is started, Acronis True Image Workstation:
- Finds the sectors in the image which contain system files, and restores these sectors first. Thus, the OS is restored and can be started in a very short timeframe. Having started the OS, the user sees the folder tree with files, though file contents still is not recovered. Nevertheless, the user can start working.
- Writes on the hard disk its own drivers, which intercept system queries to the files. When the user opens files or launches applications, the drivers receive the system queries and restore the sectors that are necessary for the current operation.
- At the same time, Acronis True Image Workstation proceeds with the complete sector-by-sector image restoration in the background. However, the system requested sectors have the highest priority.
- Finally, the image will be fully restored even if the user performs no actions at all. But if you choose to start working as soon as possible after the system failure, you will gain at least several minutes, considering that restoration of a 10-20 GB image (most common image size) takes about 10 minutes. The larger the image size, the more time you save.
To be able to use Acronis Snap Restore in case of system crash, prepare as follows (you can do it either locally, using Acronis True Image Workstation local version, or remotely, using Acronis True Image Management Console):
Install Acronis True Image Workstation local version or Acronis True Image Agent on the local computer. Create Acronis Secure Zone on the local computer hard disk. Activate Acronis Startup Recovery manager and create bootable media or RIS package with Acronis True Image Workstation. Back up (image) the local computer’s system disk to Acronis Secure Zone. You can back up other disks/partitions as well, but the system image is mandatory. When performing Snap Restore, the current Acronis True Image Workstation version always restores the entire system disk. Therefore, if your system disk consists of several partitions, all of them must be included into the image. Any partitions which are missing from the image will be lost.
If failure occurs, boot the local computer from the bootable media, or RIS server, or using F11. Start the recovery procedure, select the system disk image from Acronis Secure Zone, choose Use Snap Restore and in the next window click Proceed. In a few seconds the computer will reboot to the restored system. Log in and start work – no more reboots or other actions are required. You can perform Snap Restore running Acronis True Image Workstation in Windows operating systems as well. However, it is mandatory to have bootable media in case Windows cannot boot.
SNAP & UNIVERSAL RESTORE
Universal Restore
A system disk image can be deployed easily on the hardware where it was created. However, if you change, for example, a motherboard or use another processor version, which is likely in case of hardware failure, the restored system could be unbootable. An attempt to transfer the system to a new, much more powerful computer will usually produce the same unbootable result because the new hardware is incompatible with the most critical drivers included in the image.
Using Microsoft System Preparation Tool (Sysprep) does not solve this problem, because Sysprep permits replacing drivers only for Plug-and-Play devices (sound cards, network adapters, video cards etc.). As for system Hardware Abstraction Layer (HAL) and mass storage device drivers, they must be identical on the source and the target computers.
Acronis Universal Restore technology provides an efficient solution for hardware-independent system restoration by replacing the crucial Hardware Abstraction Layer (HAL) and mass storage devices drivers. Acronis Universal Restore allows automatic or manual selection of the HAL and mass storage device drivers to fit the target hardware. It is important to note, that the primary goal of Acronis Universal Restore is to boot the restored system. The current version of this product handles only HAL and mass storage device drivers and does not install drivers for other devices (sound cards, network adapters, video cards etc.).
Once the restored system starts, Windows takes control and initiates the usual first-start process. At this point, you will be able to specify drivers for other devices if Windows cannot find them automatically. Acronis Universal Restore does not conflict with Microsoft System Preparation Tool (Sysprep). If you got accustomed to using Sysprep, you can use both tools on the same system. Acronis Universal Restore is an add-on to Acronis True Image Workstation. It is purchased separately and installed from a separate setup file.
How To Use Universal Restore:
- You can perform the following procedure either locally or remotely, using Acronis True Image Management Console.
- Boot the target computer into Acronis recovery environment from the bootable media, or RIS server, or using F11.
- Start the recovery procedure (see 7.3 Restoring disks/partitions or files from images) and select the image of the source computer for restoration.
- You can specify Hardware Abstraction Layer (HAL) and mass storage devices drivers to be used by the restored system and/or provide a path to a driver repository on the network. Hence, Acronis Universal Restore uses three sources for drivers search: the list of user-specified (enforced) drivers, driver repository, and the Windows default driver storage folders (in the image being restored). The program will find the most suitable drivers of all available and install them into the restored system. However, the user-defined drivers will have the priority. They will be installed, with appropriate warning, even if the program finds the better driver. The Windows default driver storage folders are determined in the registry key: HKEY_LOCAL_MACHINESOFTWAREMicrosoftWindowsCurrent versionDevicePath. Generally, it is WINDOWS/inf folder.
- When the restore process runs, Acronis True Image Workstation will:
- detect the machine type and install appropriate drivers for HAL
- detect IDE and SCSI controllers and install appropriate drivers.
- If no appropriate drivers are found in all three above sources, the user will be prompted to browse the following locations for the drivers:
- Network share drive
- Floppy disk
- CD drive
- The machine reboots.
- Windows takes control and initiates the usual first-start process. The recovery procedure can proceed under Windows as well (for example, if the operating system is loaded from the C: drive, the system partition of the other computer can be restored from an image to the D: drive). In this case, the user prompt for driver search on Network-Floppy-CD will not be issued. If a compatible driver cannot be found, Windows will suggest to ignore it or cancel restoration.
I tested both of these functions and found each of them to work as stipulated. Universal Restore can get a bit complicated when moving from say an Intel based computer to an NVIDIA based computer. When I say complicated, I mean this from the standpoint having to mentally be aware of the necessary drivers to remove and install. Other than this little caveat, I was highly impressed to say the least.
OTHER FUNCTIONS
Acronis Startup Recovery Manager
The Acronis Startup Recovery Manager enables starting Acronis True Image Workstation on a local computer without loading the operating system. With this feature, if operating system won’t load for some reason, you can run Acronis True Image Workstation by itself to restore damaged partitions. As opposed to booting from Acronis removable media or RIS server, you will not need a separate media or network connection to start Acronis True Image Workstation. It is especially handy for traveling users.
How to use
To be able to use Acronis Startup Recovery Manager at boot time, prepare as follows (you can do it either locally, using Acronis True Image Workstation local version, or remotely, using Acronis True Image Management Console):
- Install Acronis True Image Workstation local version or Acronis True Image Agent on a local computer.
- Create Acronis Secure Zone on the local computer hard disk
- Activate Acronis Startup Recovery Manager. To do so, click Activate Acronis Startup Recovery Manager and follow the Wizard’s instructions.
If you try to activate Acronis Startup Recovery Manager while Acronis Secure Zone is missing from the system, you will be prompted to create the zone, then Acronis Startup Recovery Manager will be activated. Otherwise, Acronis Startup Recovery Manager will be activated immediately.
When Acronis Startup Recovery Manager is activated, it overwrites the master boot record (MBR) with its own boot code. If you have any third-party boot managers installed, you will have to reactivate them after activating the Startup Recovery Manager. For Linux loaders (e.g. LiLo and GRUB), you might consider installing them to a Linux root (or boot) partition boot record instead of MBR before activating Acronis Startup Recovery Manager.
If failure occurs on a local computer, turn on the computer and press F11 when you see the “Press F11 for Acronis Startup Recovery Manager” message. This will run a standalone version of Acronis True Image Workstation that only slightly differs from the complete version.
Be careful! Disk letters in standalone Acronis True Image Workstation might sometimes differ from the way Windows identifies drives. For example, the D: drive identified in the standalone Acronis True Image might correspond to the E: drive in Windows.
Acronis Secure Zone
The Acronis Secure Zone is a special hidden partition for storing archives on the computer system itself. For archive security purposes, ordinary applications cannot access it. In the Acronis True Image Workstation Wizards’ windows the zone is listed along with all partitions available for storing archives. Acronis Secure Zone is necessary for using Acronis Startup Recovery Manager and Acronis Snap Restore features.
Acronis Secure Zone is always available for archive creation as long as there is space for the backup file. If there is not enough space, older archives will be deleted to create space.
Acronis True Image Workstation uses the following scheme to clean up Acronis Secure Zone:
- If there is not enough free space in the zone to create a backup, the program deletes the oldest full backup with all subsequent incremental/differential backups.
- If there is only one full backup (with subsequent incremental/differential backups) left and a full backup is in progress, then the old full backup and incremental/differential
- backups are deleted.
- Otherwise, (only one full backup left, and an incremental/differential backup is in progress) you will get a message about space error. In that case you will have to either re-create the full backup or increase Acronis Secure Zone.
Thus, you can back up data automatically on a schedule and not worry about zone overflow issues. However, if you keep long chains of incremental backups, it will be a good practice to periodically check the zone free space, indicated on the second page of the Manage Acronis Secure Zone wizard.
Acronis Rescue Media
You can run Acronis True Image Workstation on a bare metal or on a crashed computer that cannot boot. You can also back up disks on a non-Windows computer, copying all its data sector-by-sector into the backup archive. To do so, you will need bootable media with the standalone Acronis True Image Workstation version.
>If you purchased the boxed product, you already have such a bootable CD, because the installation CD contains, besides the program installation files, the Acronis True Image Workstation standalone bootable version. If you purchased Acronis True Image Workstation on the Web, you can create bootable media using the Bootable Media Builder. For this, you will need a CD-R/RW blank, DVD+R/RW blank, several formatted diskettes (the wizard will tell you the exact number), or any other media your workstation can boot from, such as a Zip drive.
Acronis True Image Workstation also provides the ability to create an ISO image of a bootable disk on the hard disk. If there is a Microsoft RIS server in your local network, an IT administrator can save the bootable data on this server as well. Then any networked computer will be able to boot Acronis True Image Workstation from the RIS package.
If you have other Acronis products, such as Acronis Disk Director Suite, installed on your computer, you can include standalone versions of these programs on the same bootable disk as well.
This feature is available both in Acronis True Image Workstation local version and Acronis True Image Management Console. However, Acronis True Image Management Console does not contain Rescue Media Builder in its own installation. Therefore, to be able to create bootable media/RIS package from Acronis True Image Management Console, you must have Acronis True Image Workstation or another Acronis product including Rescue Media Builder installed on the same computer.
If you have chosen not to install the Bootable Media Builder during Acronis True Image Workstation installation, you will not be able to use this feature.
- Click Create Bootable Rescue Media on the toolbar or the sidebar, or select Create Bootable Rescue Media from the Tools menu. You can also run the Bootable Rescue Media Builder without loading Acronis True Image Workstation by selecting Programs -> Acronis -> True Image -> Bootable Rescue Media Builder from the Start menu.
- Select which components of Acronis programs you want to place on the bootable media.
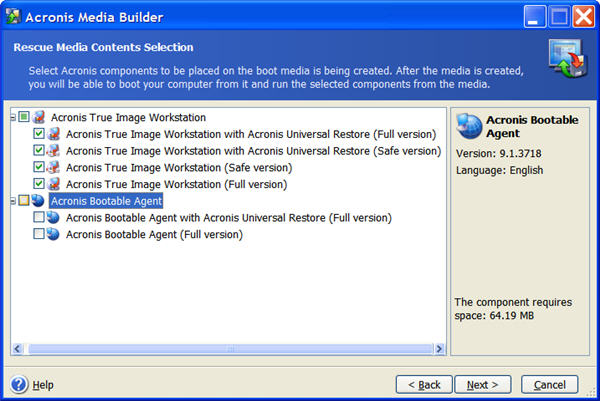
Acronis Media Builder Option Screen
CONCLUSION
I’ll have to admit that when I presented with the option of moving from the Acronis True Image Home product to the corporate True Image Workstation version, I was a bit skeptical. My skepticism was not from a point of doubt or mistrust for the corporate level product, but more from the standpoint of leaving a product that I have used consistently on a weekly or greater basis for over 3 years. I was leaving my “Safety Zone” and was worried about the new product’s learning curve! After playing with the Acronis True Image Workstation version 9.1 for about 20-30 minutes, my fears were sent fleeting. I felt like the best friend that I had known for a number of years had returned with a makeover and was even more spirited than ever.
I have used almost every backup and imaging product on the market both at home and in the corporate environment in which I work, and there’s no doubt in my mind that this product is the absolute best money can buy. In this review I opted not to go into the more simplistic features like backup and restore which are so simple a forth grader could easily use them, yet they are powerful enough to take on any challenge one might imagine. I chose instead to center more on the differences or should I say advances between the corporate and the home product.
I realize that after using a product of this type for as long as I have that I may have developed a certain degree of bias. In doing this review I tried everything possible to put that bias aside and show as my objectivity as my reviewer persona would allow. That being said, I can heartily recommend this product to anyone from the advance home or home office user to the corporate IT mogul who wants the best imaging product currently available. Acronis True Image Workstation currently retails for a price of $79.95 USD with the option Universal Restore product costing an extra $29.95 USD. For the security and peace of mind this product provides I would say this is a very cheap price to pay. These products are about as close to perfect as I have yet to encounter in the software market!
I would like to sincerely thank Stephen Lawton, Senior Director, Strategic Marketing with Acronis for allowing me the opportunity to not only review put personally use this marvelous product. I would also like to give accolades to Acronis Support which over the years has proven to me that they are very customer centered and focused. Should a bug or problem of any magnitude arise with tis software, it was almost always fixed with the next product upgrade, which is very often given a product of this type. Every time I feel they’ve reached a pinnacle when it comes to features I’m totally proven wrong, excellent work, I’d say!
Pros:
+ Ease of operation
+ Strength of performance
+ Highly feature laden
+ Snap Restore
+ Universal Restore
+ Speed of operation
+ Startup Recovery Manager
+ Images completely in Windows
Cons:
– The price may seem a bit high for the home user
Final Score: 9.5 out of 10 and the Bjorn3D Golden Bear Award.


