The personal computer case has been a recent addition to the list of products a computer enthusiast will consider in designing a high-performance system. Not long ago, when everything was beige and cooling meant more internal fans, computer cases were the very last item of consideration in such undertakings. The Tuniq 2 case from Sunbeamtech vows to offer the computer enthusiast and case modder a unique blend of elegant design and performance cooling at the entry-level price of $69.99. Please join me as I put the Tuniq 2 case through a torturous Bjorn3D review.
INTRODUCTION
Launched as a promising new company in 2000, Sunbeam initially specialized in the development of cold cathode fluorescent lamps (CCFL), and was later extended to manufacture various modding equipment. Throughout the years, they have expanded their product coverage to provide pioneering and fancy computer application at all aspects, while focusing on, but not limiting to, cooling systems and computer cases. Sunbeam’s mission is to satisfy PC players all over the world who are tired of boring traditional computer impressions and longing for experiencing the excitements of revolutionary hardware designs.
Sunbeamtech has been around for less time in the computer components industry than many of its competitors. They have managed to build a successful name for themselves through solid engineering and an evolving design. Building an empire in the Asian market is fiercely competitive, but when you produce such famed products as the Tuniq Tower 120 processor heatsink, you can lend yourself to creative divisions. Such creative divisions are where Sunbeamtech parts with tradition and branches out into the stylized design think-tank subsidiary which is Tuniq.
As a division of Sunbeamtech, Tuniq considers itself in the fashion business of the computing industry. “We are committed to bring stylish, durable and high performance equipment to the world of computer modding.” Headquartered in the city of Taipei, the National Taiwan University of Science and Technology campus near our site provides a well nurtured academic environment for Tuniq with easy access to the latest information and trend of pc tech. The members consist of those who have more than 10 years experience in the industry and enthusiastic young designers full of innovative ideas.
At the time of this writing the Tuniq line of products consists of two personal computer cases, and one very well known processor heatsink offering. This is a spartan beginning for a division subsidiary, yet it will allow plenty of room for expansion into other markets. The Tuniq site proclaims this of the new Tuniq 2 case: “The unique VGA-Fan substantially improves the airflow around the video card and will successfully solve the VGA-card overheating problem.” The Sunbeamtech site makes a bold assertion that “the price to feature ratio of the Tuniq 2 is one of the best on the market…” so we will soon find out if any of the marketing hype and media spin really hold a modicum of truth.
The personal computer case has been a recent addition to the list of products a computer enthusiast will consider in designing a high-performance system. Not long ago, when everything was beige and cooling meant more internal fans, computer cases were the very last item of consideration in such undertakings. The Tuniq 2 case from Sunbeamtech vows to offer the computer enthusiast and case modder a unique blend of elegant design and performance cooling at the entry-level price of $69.99. Please join me as I put the Tuniq 2 case through a torturous Bjorn3D review.
FEATURES & SPECIFICATIONS
Features
Grand Air Duct:
- Grand Air Duct directly and efficiently brings fresh air to CPU and achieves excellent cooling performance.
Unique upside-down chassis layout
Plenty of Flexibility:
- 8 Bays for 5.25″ Devices
- 4 Bays for Hard Disk
- 1 Bay for Exposed 3.5″ device
- Screw-less expansion cards installation
VGA-Fan:
- The unique VGA-Fan substantially improves the airflow around the video card and will successfully solve the VGA-card overheating problem.
- Triple Silent 120mm Fans
- 16dB / 1000 RPM
- Front Fan : Intake
- VGA-Fan : Intake
- Rear Fan : Exhaust
Specifications
- Case Type: Mid Tower
- Material: Aluminum front panel / SECC chassis
- Color: Black, Silver / Black
- Motherboard Support: ATX, Micro ATX
- Drive Bays: 5.25″ x 8, 3.5″ x 5 (External x 1 + Internal x 4 )
- Ventilation Capacity: Front (Intake) 120 mm x 1, Rear (Exhaust) 120 mm x 1, VGA-Fan 120 mm x 1
- Expansion Slots: 7
- Front I/O Port: USB 2.0 x 2, Audio and Microphone mini-jack, IEEE 1394
- Net Weight: 8.3 kg / 18.3 lbs
- Gross Weight: 10.1 kg / 22.3 lbs
- MEAS: 3.36
- Dimensions: 430 mm (H) x 198 mm (W) x 480 mm (D) / 16.9” H x 7.8 W x 18.9” D
A CLOSER LOOK
Package
Try not to be too disappointed that I have not included any images of the packaging, as it would not do this review any justice. Instead I have plenty of more useful images of the case and its features because it’s what’s on the inside that counts.
The box arrived to me very worn and tattered, but we can agree that it’s not Sunbeamtech’s fault that UPS throws most boxes around like they are skipping rocks. It seems fitting then that Sunbeamtech surmised its products future and packaged it very well. Two very large Styrofoam ends protected the case from any major impact damage while in transit; which may not be environmentally friendly but appears to have done the job.
First Impression
I was very pleased to remove the case from its opaque bag and protective foam ends to find a perfectly clean and impressively simple case ready to serve a greater good. With a sleek but industrial resemblance, The Tuniq 2 immediately had me thinking of larger commercial servers; the tall ones that fill large cold rooms. To me this was a welcomed departure from the bright red cases that resemble the Transformer Optimus Prime, or the perfectly square brushed aluminum cases that have flood the market.
Overall, the fit and finish of the Tuniq 2 is very nice. The paint seems to protect against smudges and fingerprints, and the case itself is rather short and long. The dark black paint used on the Tuniq 2 is best defined as a semi-gloss with a flat-black feel. In fact, nearly every part of the case is a bit abrasive in look and feel. Let’s continue this review with a more detailed look at the Tuniq 2 from its many views.
A CLOSER LOOK: EXTERNAL
Front View
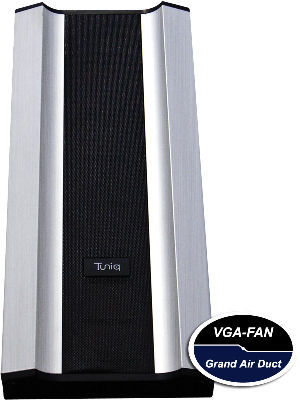
Something which is obvious from the very moment you see this case is how clean and simple the Tuniq 2 has been designed. The front bezel has two aluminum columns spanning the height of the case on each side. These two columns, much like the rest of the case, have a rough sand-blasted finish. Separating the two columns is a fine black steel mesh, which allows for air flow through to the front fan. Let’s see what is behind door number one…
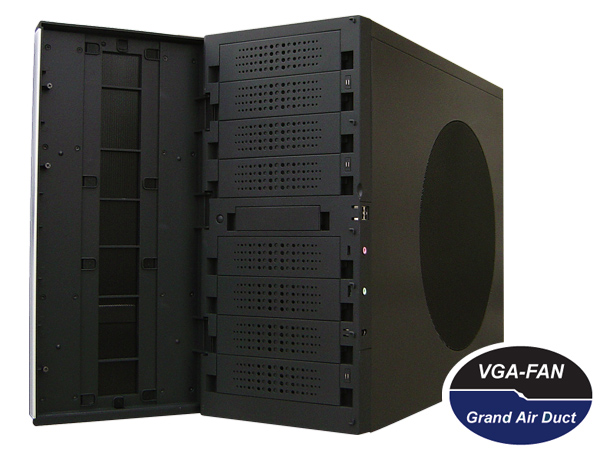
Open Bezel View/em>
The Tuniq 2 continues to redefine simple with the front access to the case. A very strong magnet system holds the hinged bezel securely onto the front of the steel case. The bezel has some heft to it despite the aluminum, and at the same time requires a bit of strength to open it. Most bezels might open if you send an automatic command to eject the tray on an optical drive, but I caution you that this won’t be possible here with the strength of these magnets.
There are eight 5.25” drive bays available, with a single 3.5” bay centered between them. Directly to the left of the 3.5” drive bay is the reset switch, which you would miss if you didn’t look closely. The lower three 5.25” bays are occupied with a supplied black 120mm cooling fan; which I suggest you leave in place since there are no other fans cooling the forward portion of the Tuniq 2. On the front right corner of the Tuniq 2 are the standard I/O ports: two USB ports, microphone and speaker mini-jacks, and a single IEEE-1394 FireWire port.
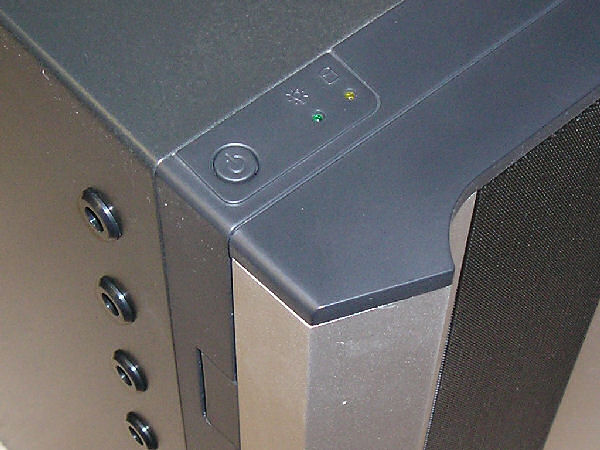
Top Corner Power Switch
One of the interesting discoveries with the Tuniq 2 is the placement of the operating switches. The reset switch is hidden behind the front bezel, and the power switch and activity LED’s are located on the top left corner of the case. I found this odd, since all of the I/O ports were on the right side. This means that no matter where you place the Tuniq 2, you will be reaching around all sides to access its many features. I imagined this might be convenient for users who place the Tuniq 2 on the floor below them, but then the other buttons would be hard to get at; likewise for the power switch if you place it to either side of you on the desk. Sunbeamtech could have placed the operating switches and activity LED’s on the side of the case with the I/O ports and still have been better off.
A CLOSER LOOK: EXTERNAL cont.
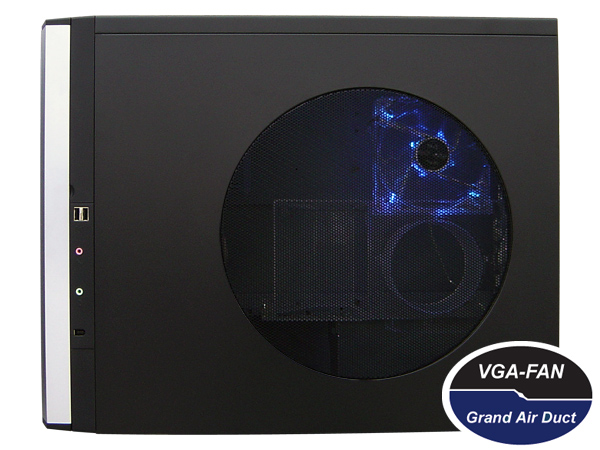
Left Side View
Most users have probably become used to having case access from the left side. This design is practically tradition in the industry. On the Tuniq 2, the only side of the case which can be opened and removed is the right side panel. The US version of the case has a large round black steel mesh grill in place where the Grand Air Duct with breathe from. The round grill is not removable, and a window cannot be installed in its place without modification.
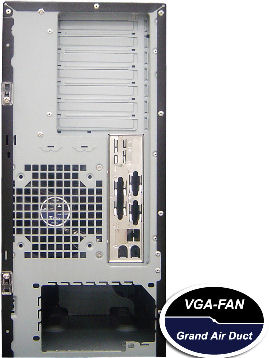
Rear View
At the rear of the Tuniq 2 you will see the most evidence of a case turned upside down. If it weren’t for the unfinished bottom of the case, you wouldn’t know the difference. You can see the included clear 120mm cooling mounted to the vent, which is the only exhaust fan on this case, unless you count the power supply fan. It should be noted that all three 120mm fans included with the Tuniq 2 are not mass air movers, as they emphasize silence at the rated 1000 RPM.
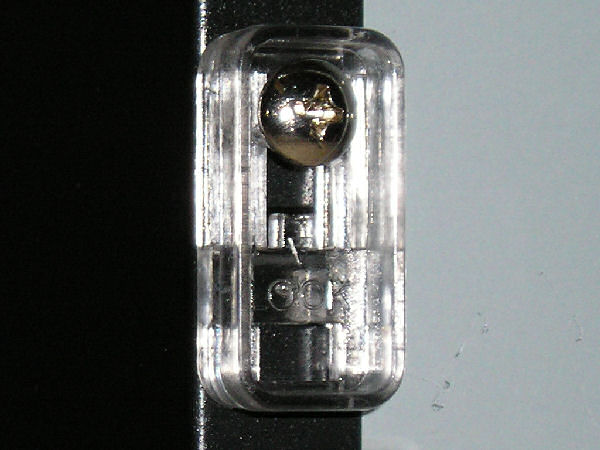
Door Latch Mechanism
The latch system for the access door is nothing spectacular, but it easily achieves its goal. Two clear plastic latches lock in and out of place instead of thumbscrews or spring hinges. While the latches are nice, they won’t exactly add any special flash to the appearance of the case. They cannot be removed, and they cannot be replaced with thumbscrews.
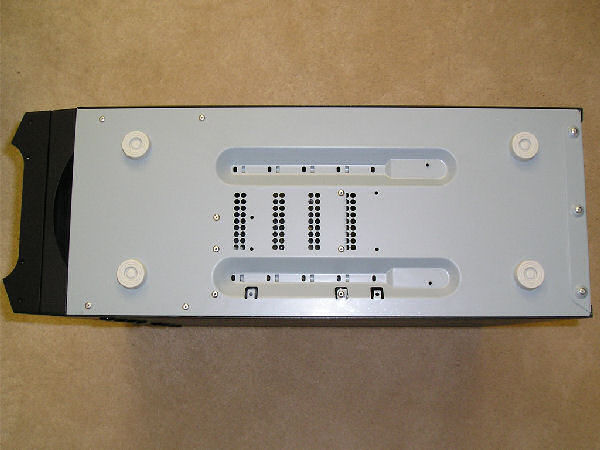
Bottom View
The underside of the Tuniq 2 is a throwback to old beige-box cases. Up to this point, there was something new or something nice at every corner. It seems that Sunbeamtech’s creative think-tank faltered in the design of the cases feet and underside. In place of the hard plastic feet which are prone to loose their retaining pin, I would suggest some nice vibration dampening rubber pads or feet. Anything to replace what is here would be an improvement
A CLOSER LOOK: INTERNAL
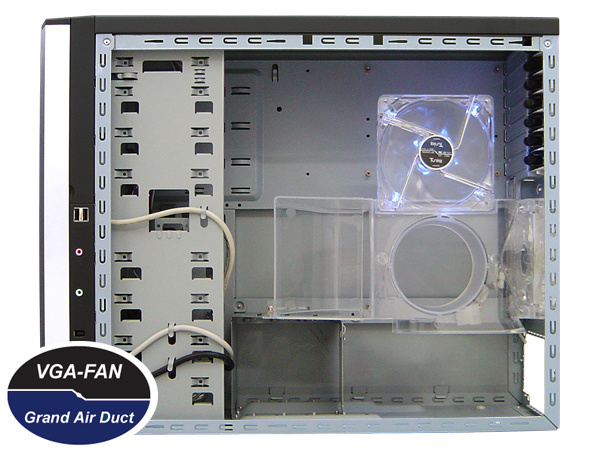
Open Left Side View
The Grand Air Duct is the first thing to greet you when you open the case. The case is spacious enough to work in, but some of the features are a little amiss. The hard drive rack is positioned at the bottom of the case, and configured so that drives must be installed sideways. Next to the hard drive rack at the bottom of the case is the location for the power supply unit. Directly behind the Grand Air Duct is the motherboard mounting location, and at the very top of the case are the expansion bay slots.
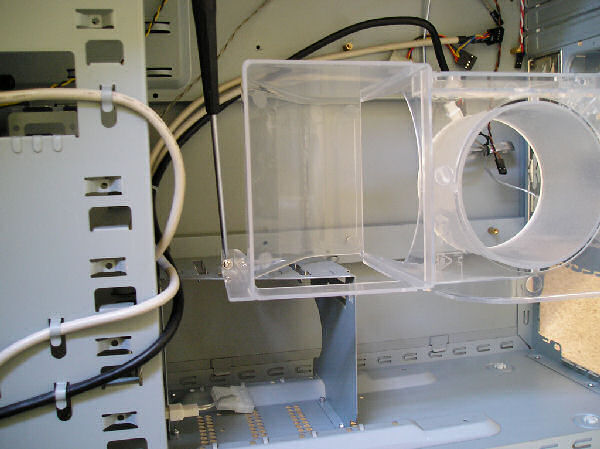
Removing the Grand Air Duct
Before you can begin hardware installation, you must remove the Grand Air Duct. I fault Sunbeamtech with using a single screw on the left end of the unit while the right side fits onto the rear 120mm cooling fan with rocker clips. Had the engineers designed the Grand Air Duct to be removed with the same clips on both sides it would be a tool-less removal. Instead, you will have to use a Phillips head screwdriver every time; replacing the screw with a thumbscrew will not work because of the angle and depth of the location.
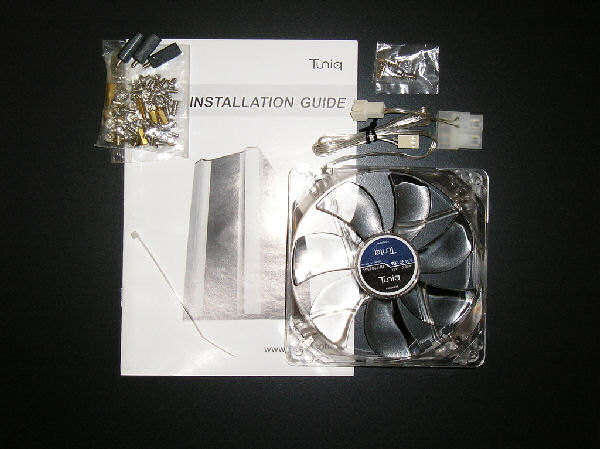
Accessories
The Tuniq 2 comes with a very small pouch of accessories, and some good looking fans. The total kit includes:
- Tuniq 2 Case: (1) Black 120mm fan, (1) Clear 120mm fan
- Grand Air Duct component
- Installation Manual
- Small bag of assorted hardware, screws, and one single zip-tie
- Additional clear 120mm fan with LED’s for VGA cooling
It should be noted that the included accessory fan is to be installed at the top of the Grand Air Duct. This is the only 120mm cooling fan with LED’s installed, which shine a nice shade of blue when powered on.
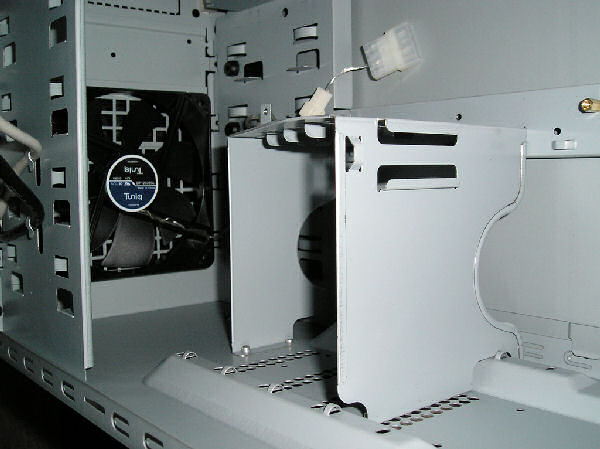
Hard drive rack and cooling fan
From this view we can clearly see that the lower three 5.25” drive bays are completely occupied with a black 120mm fan intended to cool the hard drive rack. If you look closely, you will see that a fourth drive bay is also partially occupied by the fan, which is should not cause any problems because there are still four 5.25” bays above it. Due to the close proximity of each hard drive slot to one another, keeping the fan in place is critical. On a closer examination of the hard drive cage, it appears as though the air flow is going to be blocked by the slightly shorter left wall of the cage.
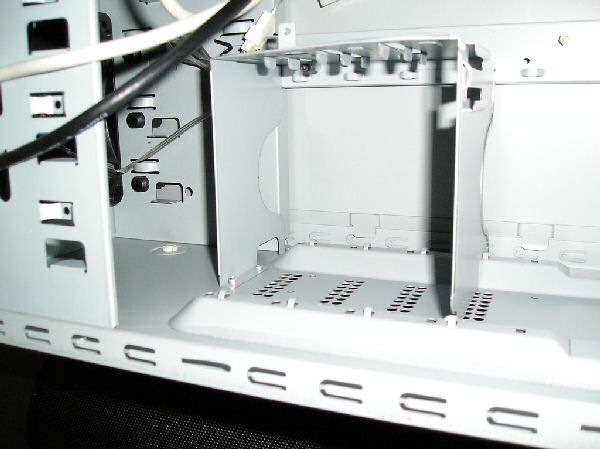
Hard drive rack
Fitting nearly in contact with one another, you can install a total of three hard drives. I installed SATA hard drives into all three slots; but I highly recommend using no more then two hard drives on each end of this cage so that heat does not build up as it did on my configuration. This appears to be another major engineering oversight for the Tuniq 2 and a negative feature for the computer enthusiast or power user with many hard disks.
Installed Hard Drives
With all of the hard disk slots occupied, you can see that this layout will not be conducive to keeping the equipment cool. The hard drives have less then a quarter-inch between them, turning heat management into a nightmare. In addition, the design of the hard drive cage is such that any airflow produced by the front 120mm cooling fan will only be blocked by the left wall of the cage. The Tunic 2 design team should have turned this cage 90° so that airflow could circulate through the cage; and not just against it.
INSTALLATION
Component installation went relatively smooth in the Tuniq 2. Despite the lack of a removable motherboard tray, I was able to easily install the motherboard and expansion cards. While this case is not very tall, the added width was beneficial during component installation. The slide-lock mechanisms for the side door made entering into the case very convenient, but this convenience was nullified by having to unscrew the retaining screw from the Grand Air Duct.
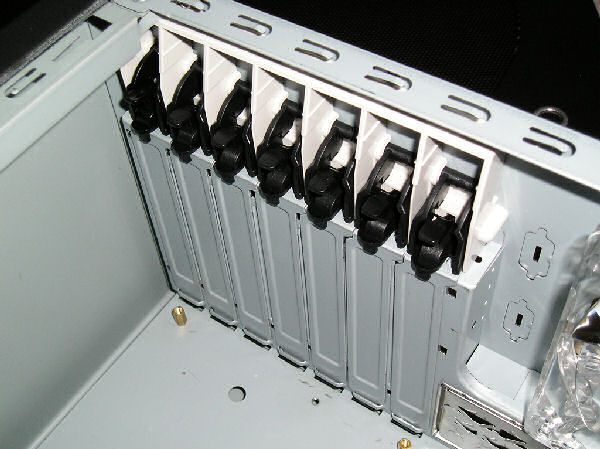
Screw-less expansion card system
There is a split favor among system builders regarding screw-less expansion card systems. Regardless of the materiel: whether it be plastic as in the Tuniq 2 or aluminum like those found in other cases, it all comes down to functionality. In the case of the Tunic 2 (pun intended), the screw-less expansion card system works very well with nearly all standard hardware. My analog PCI card modem fit nicely and the screw-less expansion card system was literally a snap.

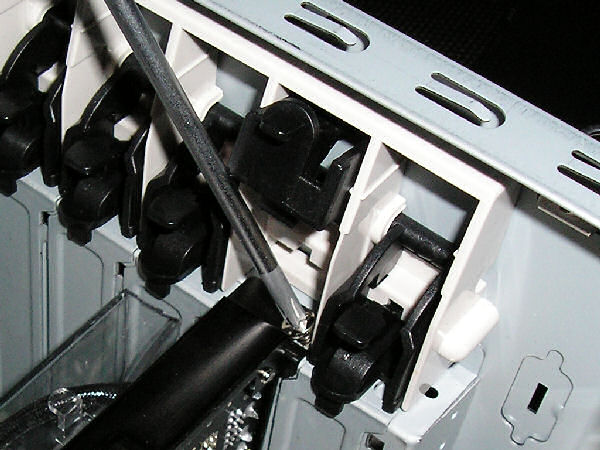
Screw-less expansion card system with XFX
However, and you knew this was coming, not every expansion card fits well with the screw-less system. The Tuniq 2 may not have been designed for function before fashion, as the evidence has started to show, because the screw-less expansion card system was not designed to work with non-standard expansion cards such as the XFX Geforce 7900 GT. The XFX reinforcement blade that runs the span of this video card prohibits the use of the Tuniq 2 screw-less system. No big deal, we can just use a screw then, right?
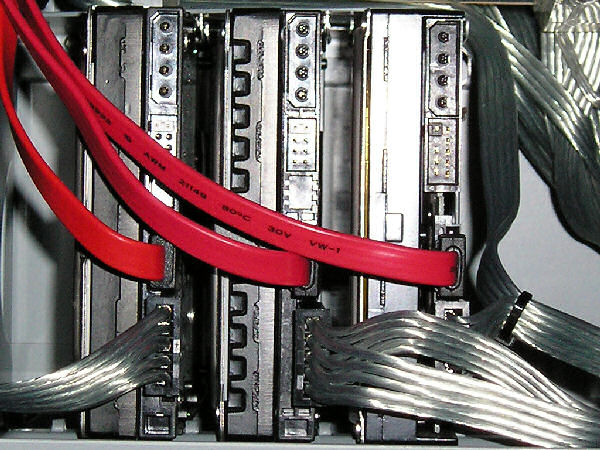
Screw-less expansion card system with XFX
Wrong! Not only does the plastic screw-less expansion card arm get in the way of directly driving in a screw, but the screw hole is well off-center and forced into a corner. Thanks to the poorly though-out screw-less expansion card system which is pop-riveted to the case, you either have the choice of drilling out the rivets and removing the system or just have a lop-sided screw. If I were to keep the Tuniq 2, I would have no choice but to permanently remove the screw-less expansion card system. This problem turns one of the positive features of this case into a negative one, depending on your hardware.
Everything fits nicely
Once the motherboard was in place, I began to notice that there were no support rails or other pieces which would assist me in hiding cable. I returned to the accessory kit and utilized the single included zip-tie to help manage the cable mess which my Ultra X-Finity power supply helped to create. I am certain that some wire looming material along with cable sleeves would dress this case up nicely.
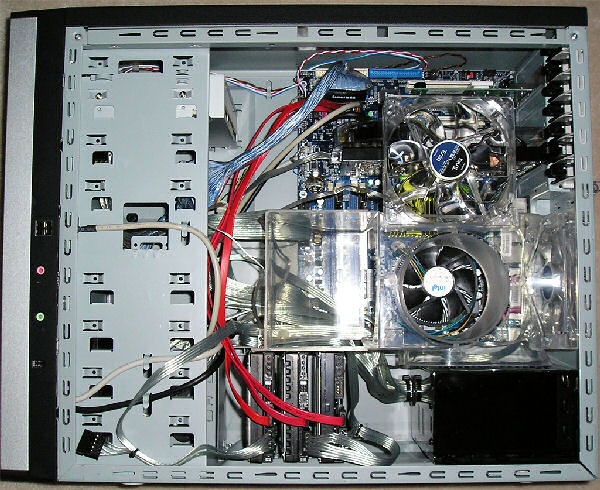
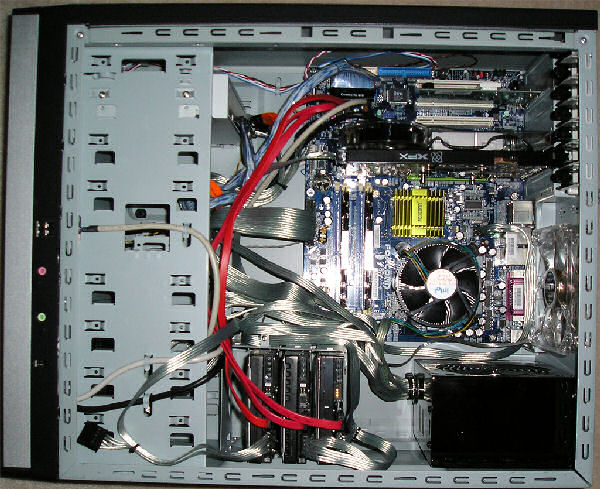
Tuniq 2 completely installed
With everything in place and operational, it was time to see if Sunbeamtech had invested wisely into the design of the Grand Air Duct and VGA cooler. From a overhead perspective I can trace the path of airflow: One 120mm intake fan will draw air in from the front and will push it into the left side of the hard drive cage; not good. The Grand Air Duct will utilize the rear 120mm exhaust fan to draw air in from the right side and channel it into the vicinity of the CPU before it is exhausted out. The VGA cooling fan will either draw air in, or pull air out, depending on the fan orientation. I surmised that it would be best to draw air in to assist the air flow in through the side panel and help cool the motherboard and video card. Reviews of the findings are included in the testing section.
TESTING
Test System
- Motherboard: FOXCONN 945P7AA-8EKRS2
- Processor: Intel D930 3.0 GHz operating at 3.3 GHz (220 MHz FSB).
- HSF: OEM Intel for D930 retail box.
- Memory: 2 GB (1,024 MB x2 modules) PQI PC-2 5400 DDR2 SDRAM operating at 734 MHz.
- Video Card: XFX GeForce 7900GT 470/1700 MHz with Arctic Cooling NV Silencer 5 Rev 3.
- Power Supply: Ultra X-Finity 500W ATX
- hard Disk Drives: (2) Western Digital WD360GD 10,000 RPM SATA-II, (1) Maxtor 6Y250M0 7200 RPM SATA-II
- Optical Drive: Toshiba SH-S162L DVD R/W
Test Methodology: Temperature
In this comparison testing, I measured the ambient temperature along with the system motherboard and CPU temperatures. In all tests two different digital temperature displays were used to correctly record the ambient temperatures. In addition, SpeedFan v4.29 software captured the internal temperatures utilizing the system thermistors on the FOXCONN 945P7AA. Temperatures were then recorded on the Tunic 2 system and an Ultra Aluminus using the exact same equipment. All tests consisted of running two Folding @ Home clients at 100% CPU utilization for a period of ten minutes before a reading was recorded. The Tuniq 2 was equipped with the included three 120mm cooling fans all operating at 1000 RPM, while the Ultra Aluminus used two of the three same fans for front intake and rear exhaust.
Temperatures for the XFX GeForce 7900GT were recorded using ATI Tool v0.25 Beta 14. At no point during the testing did temperatures vary more then 1°C for the video card between these two cases. Because there were no detectable differences in VGA cooling I did not include this data in the chart.
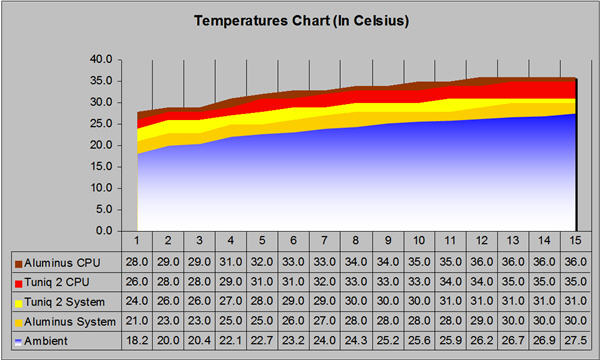
Temperature Comparison
Impression
I approached this review with a certain amount of curiosity towards the inverted case design. At first, I was skeptical: heat rises and all the heat-producing hardware in located at the bottom. To my surprise, the CPU temperatures were consistently 1-2°C lower in the Tuniq 2 with the exact same ambient temperature as tested with the Ultra Aluminus. Alternatively the Aluminus allowed for better motherboard temperatures, which were generally 2-3°C lower at the same ambient readings when compared to the Tuniq 2.
The last set of temperature reading I compared was the individual hard drive readings. It shouldn’t be a surprise to anyone that the Tuniq 2 did not create the best environment for hard drives since the enclosure is so compact; on the average hard drive temperatures were 4-6°C higher in the Tuniq 2. Leaving a space between the hard drives will mean a total capacity of two disks, but the temperatures are then only 2-3°C higher when compared to the Ultra Aluminus.
Aside from slightly better CPU cooling, the Tuniq 2 disappoints in all other areas of temperature control and I cannot recommend it for heat sensitive systems. Even the advertised VGA cooling system performed nearly the same as cases without it. I suspect that if Sunbeamtech produces a revision or engineers a remake of this case, it will include a 120mm cooling fan at the top of the case, and a much better arrangement for hard drives. For the computer enthusiast or case modder, I can take a different position and recommend the Tuniq 2. Because the problems I have encountered are repairable, someone with the time and skill could turn the Tuniq 2 into the case it really should have been to begin with. Such effort would yield not only a great looking case with a unique design, but would also cool the operating components better then the competition.
CONCLUSION
I previously stated both my curiosity and skepticism regarding the case’s inverted design. After spending the time to get familiar with the case and run through some tests, I became quite fond of the case sitting beside me. However, in the end I was sorely disappointed that Sunbeamtech did not spend more time engineering the Tuniq 2 to manage system temperatures and hard disk orientation better. Had Sunbeamtech achieved solid engineering with the Tuniq 2 it would much easier to recommend this case.
For noise sensitive users, the Tuniq 2 is a clear winner. Even with three 120mm fans moving air, the noise levels were so incredible low that the most I could hear was the hard drive being accessed. It seems that using 1000RPM cooling fans certainly paid off for noise control, if not for the sacrifice of temperature management.
The Tuniq 2 demands attention despite its simple design and refined looks. I may not have been impressed with the location of operating switches or activity LED’s, but the overall presentation of the Tuniq 2 has captured my appeal. But looks aren’t everything. The engineering and design flaws which inhabit the inner working of the case are enough for me to avoid keeping this case; at least as-is. I do not recommend the Tuniq 2 for the average user who has neither the time nor skill to modify this case. Conversely, the Tuniq 2 could be a great project case with plenty of liquid-cooling potential.
At the time of this writing, the Tuniq 2 was not easily found for sale on any major e-tailer sites using Price Watch, Price Grabber, or Nextag. Paul Tsai of Sunbeamtech confirmed that the Tuniq 2 is out of stock in the US and is expected as soon as mid-September. In the United States XOXIDE sells the Tuniq 2 for $72.99 before shipping, and in Canada NCIX sells this case for $84.20 before shipping charges. From the price to feature perspective that Sunbeamtech advertises, the Tuniq 2 appears to make great attempts with fewer successes. In regard to available pricing, I would be hesitant to purchase the Tuniq 2 as there are more formidable cases on the market within the same price range
We would like to express our sincere appreciation to Nick Curtiss and his staff at CrazyPC for sending us this product to review. Kudos Nick & CrazyPC!
Pros:
+ Good looking stylish yet simple design
+ Extremely quiet operation
+ Above average CPU cooling performance
+ Built to last: very solid steel construction
+ Includes three silent 120mm cooling fans
+ Screw-less expansion card system (for most standard cards)
Cons:
– Poor design for hard drive rack and hard disk cooling
– Lack of system component cooling / needs top exhaust fan
– Screw-less expansion card system will not accept non-standard cards
– Poor power/reset button locations fan
– Non-removable motherboard tray
– Grand Air Duct system may require modification to be compatible with all motherboards
Nick Curtiss
Final Score: 6 out of 10.
We would like to express our sincere appreciation to Nick Curtiss and his staff at CrazyPC for sending us this product to review. Kudos Nick & CrazyPC!


