Since my current motherboard uses a heatpipe on the chipset, I decided that the cooling solution provided by Asus was sufficient. And since my XFX video cards warranty would become null and void if I modified it by adding a gpu waterblock, I decided that its cooling solution on it was sufficient as well. Finally, keeping in mind that I am lazy and that my primary goal was to cool the cpu that had become unbearably hot, I decided that an external watercooling kit was the best solution for me and that of all of the external kits, the asetek Waterchill Xternal kit would be the one that earned my hard earned dollars.
INTRODUCTION
About a year ago, I put together this little gaming beastie I call Aeryn. At the time, a single-core AMD Athlon 64 4000+ (San Diego) processor overclocked on a 939 motherboard was a good platform to have for a gaming rig. The Thermalright XP-90C heatsink that I got to cool the CPU proved to be efficient and overall, when compared to similar setups such as my own, I was generally pleased with its thermal reduction capabilities. Gaming was good. The CPU, though overclocked 17.5%, performed flawlessly under stress testing and in all gaming activities. She was a rock solid beauty. She was hot!
Winter passed and the days eventually rolled into the hot lazy days of summer. In Central Florida, where I live, summer days are not only hot, they’re muggy to boot. It’s the kind of heat that drags you down and gets you to scrambling just to find someplace that’s cool and relaxing. Sometimes for me, that someplace was my computer room, where the gaming was good and the A/C was cool. Or, at least, it was supposed to be cool. It wasn’t cool though. It was hot!
Although my overclocked AMD CPU delivered all that I asked of it when I gamed last summer, it came at a price. And that price was heat. The innocent little gaming rig that I had put together in the chill of a cold Christmas winter’s night, which now included an XFX 7900GTX video card driving a Dell 24” LCD at maxed out settings with the high resolutions, had become a heat making monster come the middle of last summer’s god awful heat. I turned the thermostat way down on the a/c to compensate for the extra heat being generated by my little beastie, but try as I might, I couldn’t keep up with her. Not when she’s in her full frag glory. She bellows like a furnace. The case that I used for my gaming rig came with two 80mm intake fans and three 80mm exhaust fans, but that just wasn’t enough. I even added a third 80mm intake fan on the CPU side of the case to help with my heat dissipation problem. That helped a little, but not much. I needed more help. Things were too hot. I needed to cool things down.
It was about that time that I started to think about watercooling. Though watercooling wasn’t on the top of my things to do list, I did manage to put some time and effort into it by doing my research as I always do whenever I am interested in something and thinking about tackling the unknown. And for me, tackling the unknown always has a certain fear factor associated with it.
I was a watercooling neophyte and somewhat fearful, so I started out by reading how-to’s and tutorials on watercooling and then reviews on watercooling related products such as waterblocks or watercooling kits. After I got a feel for the basics of watercooling and what it’s all about, I began to frequent some of the hardware forums on the Internet. As my reading continued and I digested the various thoughts and opinions on watercooling techniques and equipment, my own conclusions were formulating.
Since my current motherboard uses a heatpipe on the chipset, I decided that the cooling solution provided by Asus was sufficient. And since my XFX video card’s warranty would become null and void if I modified it by adding a gpu waterblock, I decided that its cooling solution on it was sufficient as well. Finally, keeping in mind that I am lazy and that my primary goal was to cool the CPU that had become unbearably hot, I decided that an external watercooling kit was the best solution for me and that of all of the external kits, the asetek Waterchill Xternal kit would be the one that earned my hard earned dollars.
asetek – The Company’s Overview
Before we get started on this grand adventure, here’s some info on the company the makes the product I’m going to review for you. The following information comes straight from the asetek company website.
asetek is a company that prides itself in a simple. straight-forward approach that is conceptualized in their Mission Statement:
For as long as computers generate heat and noise, there will be a need for asetek and for the products we are developing.
Company Outline: asetek A/S is a world leading manufacturer of vapor phase, vapor chamber and water-cooling solutions. VapoChill® / VapoChill Micro™ / WaterChill™ are designed for PC enthusiasts, gamers and professionals who demand exceptional performance, maximum reliability and low noise. The product lines are sold through a global network of authorized distributors and resellers. asetek works with world leading hardware companies to ensure maximum reliability, compatibility and performance.
“We will develop and market the best and most cost effective cooling solutions for the global channel and small form factor PC market, and continuously improve our technologies to reach market segment leadership”
FEATURES & SPECIFICATIONS
CPU, VGA, CHIPSET COOLING
The NEW powerful WaterChill™ Xternal cooling system and Base Unit incl. software based control panel offers superb cooling performance and flawless control features for anyone interested in water-cooling.
The compact WaterChill™ Xternal system fits perfectly on top of standard ATX cases and is very easy to install – with no need for any case modifications. The unit is available in standard aluminum and black. All fittings and mounting accessories are included.
Maximum Performance
- High Overclocking potential
- Rock Solid Stability
- Easy Installation
The powerful WaterChill Xternal contains the best WaterChill core components, such as:
- Black Ice Pro 120mm Dual Radiator
- 4 pcs. of 120mm Low Noise Adda Fans
- WaterChill Xtreme [12V] pump unit
- 160 cm3 water reservoir with a large viewing glass
- 20 character LCD module
Capable of removing up to 200W of heat and reduce the CPU core temperature by 40-70% the Antarctica CPU cooler is the most powerful cooler on the market. The Chipset and VGA cooler effectively eliminates fan noise and increases stability.
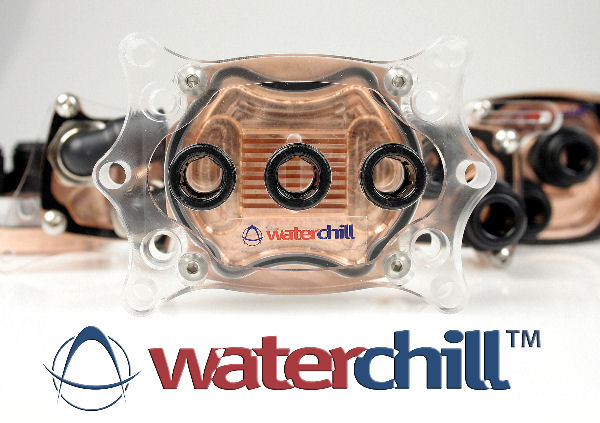
- WaterChill Antarctica CPU cooler CPU01/A supporting Intel S478, S775, AMD S754/S940/S939
- WaterChill VGA cooler VGA01/P1 supporting Nvidia GeForce and ATI Radeon cards
- WaterChill Chipset cooler NB01/P1 supporting Intel, AMD, SIS and VIA etc.
First ever integrated USB/Software based Control Panel including:
- CD-Rom with Software based control unit. Easy on-the-fly configurations
- System and status information
- Temperature monitoring
- Adjustable and automatic fan regulation
Accessories Included:
- Waterchill Tube Set (3.0m)
- PCI Shield and hoses for power extension cable
- ALL fittings and mounting accessories are included
- Waterchill Anti Algae Fluid – WatterWetter (10mm syringe)
- Heat Conduction Compound (2 ml tube)
- Installation manual
>Detailed Information:
- Model: 03-L-7004
- Compatibility: ATX cases
- Materials: Aluminum Chassis
Pump Specifications:
- Pump speed regulation
- Tubing (OD): 10mm (3/8′)
- Power consumption: 7-12W Qmax: 1020 l/hm
- Hmax: 240 cm
Physical Dimensions:
- Width: 182mm (7.17″)
- Length: 480mm (18.90″)
- Height: 102mm (4.01″)
- Weight (non filled): 4.27 kg (9.41 lbs)
A CLOSER LOOK
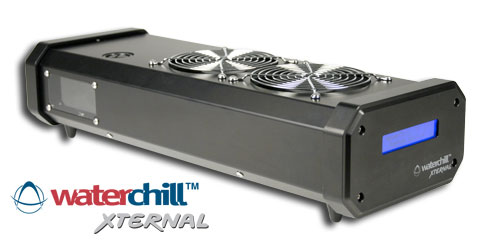
The asetek Waterchill Xternal kit was the perfect choice for me because it contains all of the individual parts I’d have to piece together (such as the radiator, pump, and reservoir) in an external housing. My case was too small to mount all those parts inside anyway. Also, I wanted to make this easy on myself. I figured that a self-contained unit would cut down on my installation time. Even though the kit comes with a chipset, a GPU, and a CPU waterblock, I am only using the CPU waterblock in this review.
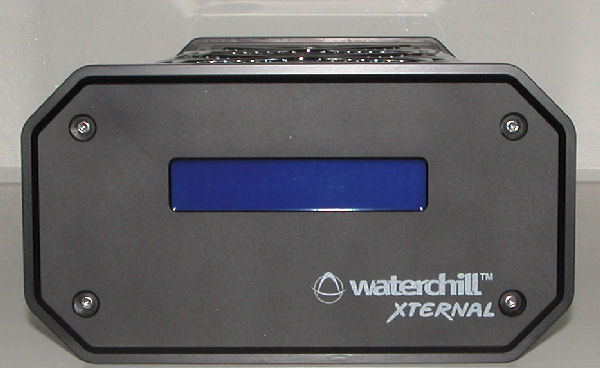
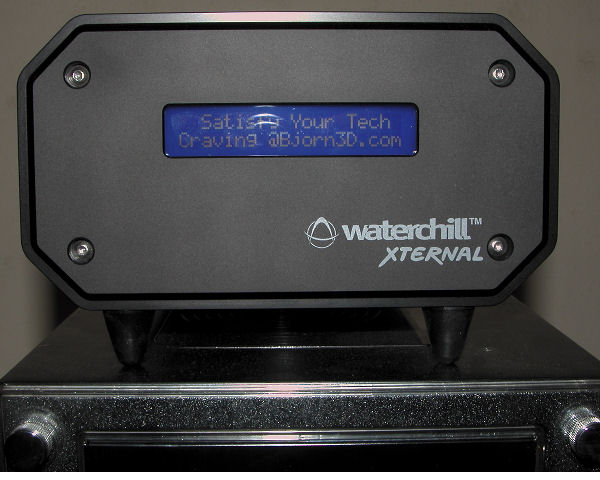
asetek Waterchill Xternal … Front
The Xternal unit itself comes in silver or black but I went with the black one because it matches my case pretty well. The unit is made of anodized aluminum. It’s roughly 7” wide and 4” tall and in the center of the front panel is the LCD display.
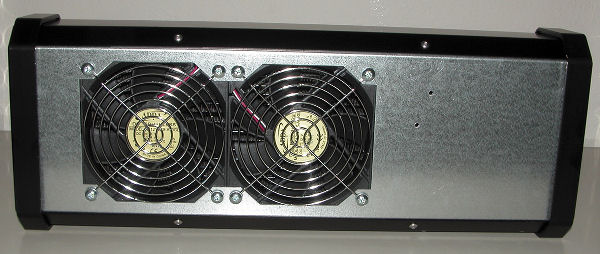
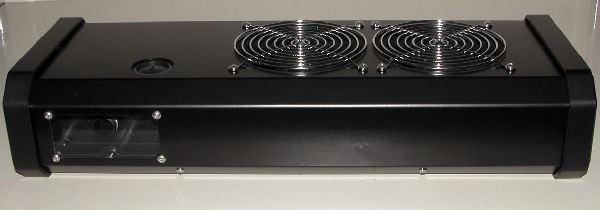
asetek Waterchill Xternal … Bottom
The unit now sits atop of my ATX case on rubber feet that asetek included. The additional height provides better airflow for the two 12CM fans on the bottom of the unit. Two more 12cm fans are on top. The unit looks to be well made and it has a nice heft to it, measuring in at about 10lbs. It’s almost as long as my ATX case at 19” deep
asetek Waterchill Xternal … Side
You can monitor water levels with the see-through widow that asetek has included on the side. Through this window you can see if the pump is working and watch the water flow by. The fill cap is on top and distilled water is recommended by asetek. They include a 10mm syringe of WatterWetter Anti Algae solution with the kit.
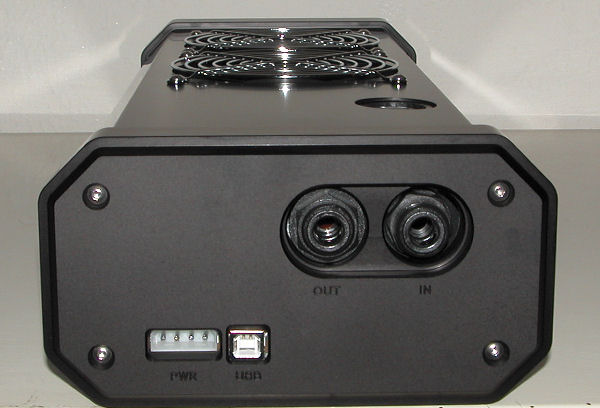
asetek Waterchill Xternal … Back
The back of the Xternal unit is where the connectors for the input and output water lines are located. The watercooling tubings runs into the back of my case from here. There is a molex connector for power here as well. It goes from the back of the Xternal unit into my case and connects to my system’s power supply. Finally, the backside is where the USB 1.1 port resides. Connecting the asetek Waterchill Xternal to my pc’s USB port, I am able to control the unit’s fans, pump, and the LCD display with the asetek Waterchill Control Panel software.
asetek Waterchill Xternal … LCD
INSTALLATION
Mounting the CPU waterblock wasn’t necessarily a chore, but it wasn’t necessarily a breeze either. When tearing apart a box, anything can happen. To attach the CPU waterblock, the motherboard had to be taken out of the case and removed from its tray. Once the AMD retaining mechanism was out of the way, the waterblock fit nicely and was mounted in no time at all. With the motherboard was back in place, I measured the water lines and measured them twice before cutting the tubing. A PCI Shield mounting bracket was included to run my water hoses through into my chassis. The power connector runs through here too. Pushing tightly on all the tubing, I made sure that each connection was secure. It was time to add water.
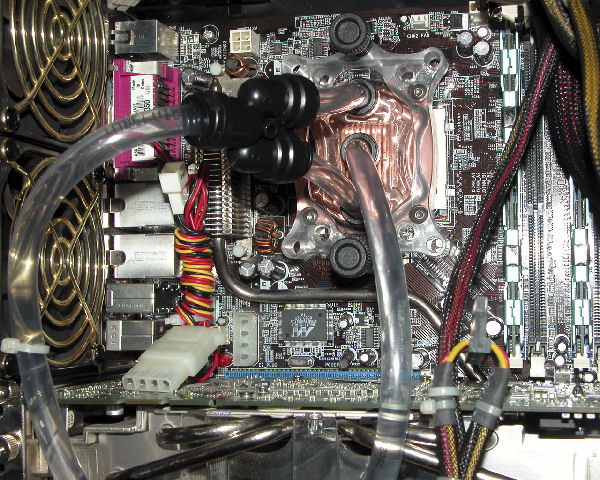
CPU Block Installed
After filling ‘er up with distilled water, I made sure that nothing was connected to the motherboard and that the Xternal was connected to my power supply. I shorted out pins 13 & 14 of my power supply multi-pin connector using a bent paper clip and waited with anticipation for the water to flow as I flipped the power switch on. And flow it did. The water flowed in the opposite direction! But I had read the instructions. Though they were tiny in size (almost Cracker Jack prize size and something asetek needs to address; maybe include .pdf’s on the installation cd) , the instructions most certainly said that water goes in this hole and out that one. I had a drawing. So that’s how I connected it. Yet still, the water was traveling in the reverse direction. At first, I thought that maybe the pump had gotten hooked up wrong at the factory. Then, I turned on the lights, got out my flashlight, leaned way way over, and read the markings on the back of the Xternal unit itself. The markings were exactly opposite what the instruction booklet said. Great Dane! I switched the water lines going in and out and then turned on the pump for a second time. Success was at hand this time. Water was flowing in the proper direction. Over the next twelve hours, I did a leak test and I was pleasantly surprised to find that all of my connections were secure and that no water had leaked.
By the next day, I was unpleasantly dismayed to find that I had no sound. Something had gone wrong. Things were looking so good. I was disappointed, to be sure. I tried moving the X-Fi sound card to a different PCI slot. I tried re-installing the drivers for it. I eventually panicked and fired off an e-mail to Creative Labs telling them that my card was dead dead dead. I was sure it was. It had to be dead. There was only one more day left on the warranty. I needed an RMA. I told tech support in the e-mail that when I tried to use the X-Fi sound card, all that I heard was a thump just before the Windows XP Login Screen, then nothing after that. I told them that I knew it wasn’t faulty speakers because I had enabled my onboard Realtek97 audio device and I could hear audio from the speakers just fine. The day after my warranty expired on the card, I found the culprit. Me. I had failed to provide power to the molex connector on the motherboard. That’s all it took to disable the sound card. I said earlier that “when tearing apart a box, anything can happen.” I plugged a molex power cable into the slot and felt like Chicken Little screaming that the sky is falling. Two days later, I heard back from Creative Labs tech support. They gave me instructions on how to disable my onboard audio device. Nice.
WATERCHILL CONTROL PANEL & LCD DISPLAY
The Waterchill Control Panel is the heart of the system and it’s here where you get to control the fans, the pump speed, and the LCD 20 character display. The top and bottom fans run in pairs and the fan speed can be controlled individually from 0% to 100% in 1% increments. The rpm of the pump speed can be controlled anywhere from 2880rpm to 3780rpm. The control are found here for the front panel LCD display where you can show the temperature, fan rpm, pump speed, pump supply voltage, and user text.
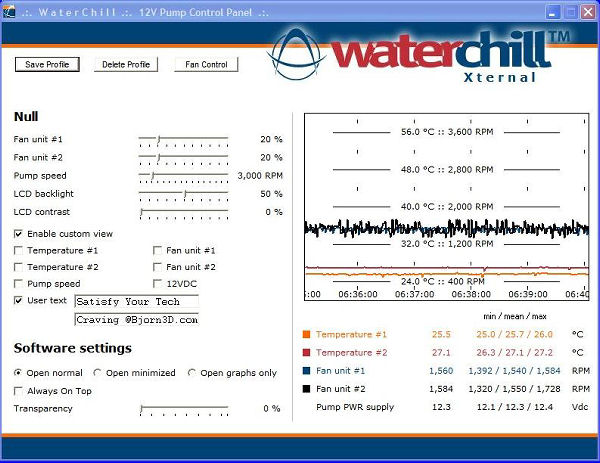
Waterchill Control Panel
Located beneath the Fan Control tab, you have access to setpoints for fan speeds that are activated by the temperature sensors that are located inside the Xternal unit. Once initiated, the Fan Control monitors the temperature and will adjust the fan speed according to the setpoints. It’s pretty cool.
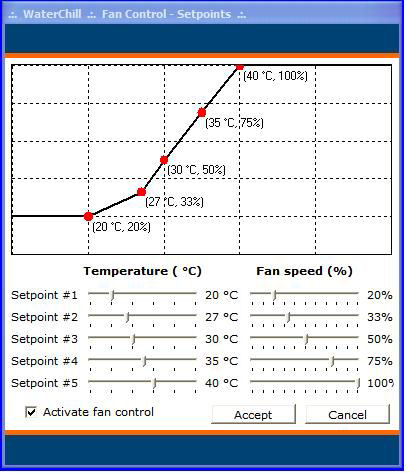
Waterchill Fan Control
By right clicking on the Waterchill Control Panel systray icon, you can set custom profiles. Though I only have one profile for now, I may want to set one up as a gaming profile and run both the fans and the pump faster.

Control Panel Systray
TESTING
|
Test Platform |
|
|
Motherboard |
Asus A8N-SLI Premium |
|
Processor |
AMD Athlon 64 4000+ (San Diego) |
|
Memory |
G.Skill F1-3200PHU2-2GBZX |
|
Graphics |
XFX PV-T71F-YDL9 Geforce 7900GTX 512MB GDDR3 PCI Express x16 Video Card |
|
Sound Card |
Creative Labs X-Fi ExtremeMusic |
|
Cooling |
asetek Waterchill Xternal kit with CPU block |
|
Case |
SuperFlower TT-201BK |
|
Operating System |
Windows XP Pro SP2 |
Test Methodology
The AMD Athlon 64 4000+ (San Diego) 2.4 GHZ processor that I have normally runs 24/7 overclocked to 2.8GHZ instead of its normal 2.4GHz. I like to overclock a processor a little above its rating because I feel like I’m getting more bang for my buck even though it’s probably only one third the cost now almost a year later. I wish that I could squeeze just a little more out that processor, but my 2GB of G.Skill ram is definitely the bottleneck here because it hits a wall at 235MHz and it doesn’t care what’s cooling the cpu. Whether it’s the aircooling power of a Thermalright XP-90C heatsink or the watercooling power of an asetek Waterchill Xternal kit, it makes no difference at all. The ram is what it is and it ain’t no more. But now, knowing that, I can make a difference if I choose. If I want to really make this CPU scream, all I need to do is to put some faster ram in it because I’ve now got plenty of cooling power, and then some.
Testing was done at both stock clocked and overclocked. For air cooling, I used the Thermalright XP-90C heatsink and a no name 92mm fan with pretty red LED’s. For watercooling, only the asetek Waterchill Antartic CPU Cooler was used in the loop. I used a program called Core Temp to take my tempurature readings. Room temperature was 72°F. IDLE temperature reading were taken from a dead stop (meaning that the computer was turned off) into Windows XP plus 5 minutes. None of the programs that I normally have running in systray were disabled as I wanted this to be a real world test. LOAD testing was done from a dead stop as well and the program CPU Burn-in was used for 30 minutes.
Test Results
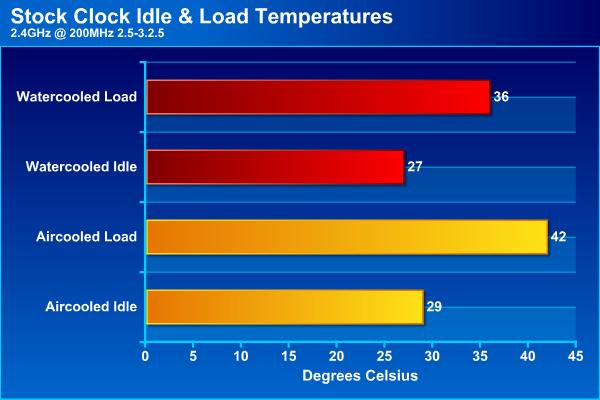
You can see that this processor, when running IDLE at the stock clock speed of 200MHz, benefits slightly from the addition of watercooling by a 2°C difference. However, when the CPU was put under LOAD, the processor benefited from a 6°C drop in temperature when watercooling.
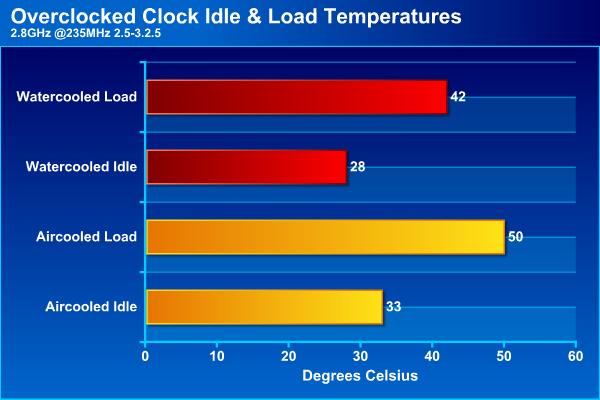
This same CPU overclocked to 2.8GHz really puts out some heat, as I’ve previously noted. Aircooled and stressed out under LOAD, it reaches a peak of 50°C. With the switch to watercooling, a full 8°C temperature drop was realized and the temperature remained a constant 42°C. That should make me very happy come summer.
CONCLUSION
My asetek Waterchill Xternal has been running almost flawlessly for just over three weeks now. I say almost flawlessly because it’s not always recognized as a USB device by my operating system software after a hard reboot and without that recognition, the Waterchill Control Panel is useless. As it is now, I sometimes have to unplug the USB connector and plug it back in. It’s rather annoying and I am investigating the cause of the problem.
Other than that small complaint, the asetek Waterchill Xternal has been an excellent introduction into the world of watercooling. If there were a fear there before, there is not now. The Xternal, overall, was a rather easy unit to setup and it was not the complicated affair that I thought it might be. Adding watercooling to a machine, be it in kit form or not, is really a rather straightforward process and the advantages of watercooling are so apparent to me now that I might never build another aircooled pc again. If anyone else out there is thinking that they might want to try their hand at watercooling, give the Waterchill Xternal from asetek a shot. It will not disappoint you.
Pros:
+ High Quality Construction
+ Looks Great!
+ Kit Includes Everything But Water
+ Easy Installation
+ User Controlled Settings
+ Excellent Cooling
Cons:
– Very Small Instruction Booklets
– Instructions Printed Incorrectly
– Not Always Recognized as USB Device
Final Score: 9 out of 10, and the Bjorn3d Seal of Approval


