Breaking News

Thermaltake Aguila

Aguila is another fine product from Tt’s stable. It’s one of the coolest looking PC cases I had reviewed so far. Although this product brings features found in Thermaltake Armor it comes with its own practical functions such as front panel that can be opened for easier access to your devices. Essentially what you get is a lightweight good looking PC case compatible with Tt’s watercooling and BTX kits

Introduction

We have checked out a handful of cases from Thermaltake here are Bjorn3D. Each review brought up interesting points and facts about Tt products. Mid tower enclosures are still the big thing for the market. Customers appreciate reasonable dimensions, cool interior, useful features and definitely unique look. Thermaltake is all about satisfying your needs. The company makes wonderful PC cases, not to mention cooling solutions and accessories. Before we start off, I want you to take a look at our previous reviews: Thermaltake Mozart TX, Thermaltake Armor Jr and its bigger brother, Armor.

Today I’m checking out another PC case from Thermaltake. Aguila is its name. It’s a mid tower case, all aluminum design with a very unique look. Internal-wise it’s very similar to Armor Jr and essentially comes with the same features.

Features

Thermaltake Aguila parades with a handful of features. Complete list is right below and I will take care of the most important ones on the next few pages so bear with me.
  • Middle tower, all aluminum case
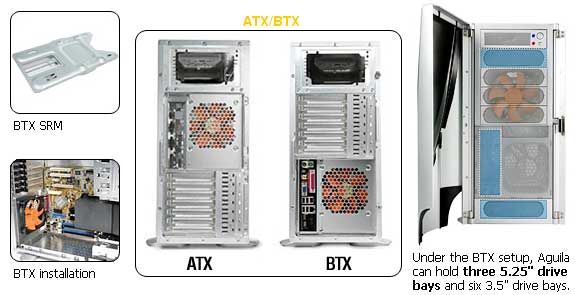
  • ATX/BTX compatible (BTX upgrade kit is optional)
  • Fits up to standard ATX & BTX motherboard
  • Meshed front grill to maximize ventilation performance
  • Dual 120mm silent front and rear fan
  • Liquid cooling system upgradeable
  • Opened front panel design for easy access to drive bays
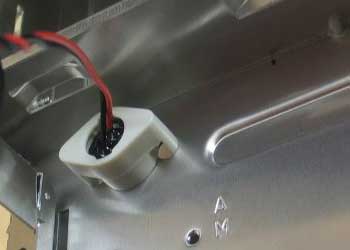
  • Movable Power/Reset switches
  • Switch-able front door
  • 120mm silent fans in both front and rear
  • Front intake fan cools hard drives
  • Ventilation openings enhance CPU heat dissipation
  • Meshed grill for optimal ventilation
  • HDD & FDD rack with power/reset switches
  • Tool free drive rails for 5.25” devices
  • Removable HDD cage for easy installation
  • Screw-less kits for add-on cards
  • Easy access USB2.0 and 1394 ports on top
  • Thumb screws for easy remove
  • Retractable foot stand
  • Front & side panel lock for security

Optional features


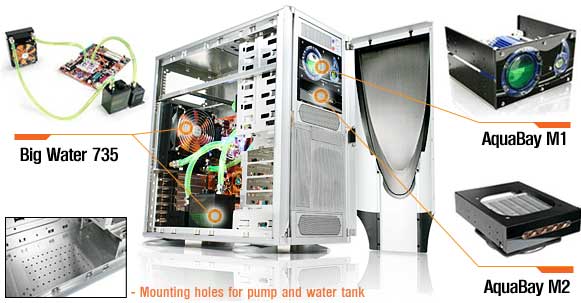
Water cooling upgrade kit

BTX upgrade kit

Specifications

Looking at the above will make you wonder whether or not you’ve seen similar specs before. You did actually on Thermaltake Armor Jr albeit Aguila weighs a little more due to front panel doors.

Package

I’ve waited quite long for the package to arrive. Finally, FedEx dropped the not-so-big box on my front steps. Gross weigh is only around 7 kilos and the case itself is really light — heavier than Armor Jr though. The case has been safely packaged and wrapped around two types of protective covers. The front bezel was given additional protective foam in order to keep it out of harms way. Without the foam it might have been damaged during shipping so a plus here for Thermaltake.

Click a picture to see a larger view


The box shows main case features and specifications. The following accessories were found inside:

  • 5.25″ installation brackets
  • PSU hook
  • Cleaning cloth
  • Locking keys
  • Motherboard I/O plate
  • Installation guide
  • Lots and lots of screws
  • Plastic mylars (polyester film to prevent any short circuit)
A word or two on the accessories. The included mylars are plastic film strips to prevent ATX motherboards from coming into contact with the aluminum. Use it at your own taste as it’s not mandatory. However it will prevent potential short circuit. The included manual is well written. Comes with pictures and laconic descriptions. The other interesting accessory is the PSU support hook for locking up the power supply in place.

External Design

Taking off the packaging (be careful as it’s very static) and foil wrap revealed Aguila’s futuristic looks. The first thing that strikes you is the front panel. Thermaltake has a wonderful designing team. Every new model that comes out looks different — at least the front panels.

Click a picture to see a larger view


The side window is similar to that of Thermaltake Armor Jr. Actually the whole chassis looks just like it except for the above mentioned panel. Case frame is made out of 0.8 mm aluminum components making it very light. Everything, including the front bezel is aluminum — good for carrying the case around. There are two silver models you can pick from, one without a side window and one with window which I’m now presenting.

The case looks very solid though a bit long because of the funky front doors. Notice the lock on the side. It’s used for removing the front panel — that’s right, for more information check out the second page. The case also comes with movable power/reset switch. Inside it you can mount a floppy drive for example. As with Armor Jr, in order to open the door you have to push both buttons and swing the side panel out. Instead of placing the front I/O panel on the side or front, Thermaltake decided to include it on the top of the case. The panel comes with closing hatch to cover it up when not used. The back shows standard PSU horizontal mounting and 120 mm fan (included). Note that the front panel also comes with 120 mm fan. Aguila comes with standard foot stands and two side panel locks (keys on the back).

Internal Design

As already mentioned on the front page, Aguila’s frame is made out of 0.8 mm aluminum composites making it very light yet sturdy. Although the case isn’t as spacious as the super tower Armor model, you shouldn’t complain about this aspect as you can fit a full fledged watercooling system — hence Thermaltake Bigwater or AquaBay. Additionally you will be able to make this a BTX compatible case with optional upgrade available from Thermaltake.

Click a picture to see a larger view


I really can’t grump at the internal structure. There is simply nothing to be picky about. The edges are nicely finished and polished aluminum looks superb. The surface isn’t scratch proof so be careful when working inside the case.

The PSU hole in Aguila is positioned horizontally just like in Armor. Inside we have a 120 mm fan right below the PSU tool-free mechanism for expansion slots such as your video card / sound card. They work okay, but I have never been a fan of those. I always secure my cards with a screw. Next up is hard drive cage. It’s neatly designed  where HDs are mounted facing the side window. It’s a great feature for those that often swap them. One thing I don’t like is the additional (vertical) space dedicated for Western Digital Raptor X hard drive which blocks the other 3.5″ slots. Taking out the cage is a one step move, just unscrew it and slide it outwards.

Opening up the front panel reveals couple of things worth mentioning. First of all is the 5.25″ drive bay covers. In Aguila you have to unscrew them before sliding in a device (do not forget to take off the mesh from the front bezel). Another interesting bit are the front doors. They can be swapped around meaning you can use them on both left and right sides. Going right below reveals 120 mm fan and its mesh filter. Be sure to clean that once in a while.

Installation

Installation procedure was short and with positive experience. From my previous knowledge with Armor/Jr I managed to fasten everything in no time. First of all, if you are a space maniac look elsewhere as you won’t find excess of it.


I wouldn’t recommend making a LAN box out of it because of the unique front bezel — might be just not handy. It’s a good base for watercooling system with minimal 5.25″ devices though. Just like in Armor the external speaker is above the 120 mm fan, not a usual placement, but interesting nonetheless. I’ve actually used the included plastic mylars to prevent any electrical shortages from going off. Fastening the motherboard was an easy task.

Installing 5.25″ devices did not bring any mishaps. A pretty straightforward task and if you get stuck go check out the manual. It might save you some time if you run into any problems.

Final Thoughts

Thermaltake introduces PC / HTPC cases with customers’ needs in mind. New models come with improved features and handful of new ones. Their product line is filled with wonderful designs and thought out features. The best thing is, Thermaltake listens to the community. Aguila is another fine product from Tt’s stable. It’s one of the coolest looking PC cases I had reviewed so far. Although this product brings features found in Thermaltake Armor it comes with its own practical functions such as front panel that can be opened for easier access to your devices. Essentially what you get is a lightweight good looking PC case  compatible with Tt’s watercooling  and BTX kits.

There are really three things that I don’t like about this case. First one has to be WD Raptor X hard drive placement. What happens is when you install it the way Thermaltake wants you to, it will block access to HD cage. Second thing I’d like to whine about is the so called “tool-free” way of installing your 5.25″ devices. My biggest beef is with Thermaltake’s recent line of products which applies to Aguila as well. None of them come out in black and aluminum frame. All you can pick from is the following:

  • Thermaltake Aguila Black Middle Tower with Window (steel frame)
  • Thermaltake Aguila Silver Middle Tower with Window (aluminum frame)
  • Thermaltake Aguila Black Middle Tower without Window (steel frame)
  • Thermaltake Aguila Silver Middle Tower without Window (aluminum frame)
As you’ve noticed only silver models come in aluminum chassis. Time to change that Thermaltake.

Being on the subject I have recently talked to Thermaltake about their current PC case products. They have promised to bring this up right away so if I get any update on that, I will definitely let you all know.

As far as money is concerned, you can get the silver model with window for less than $120 — that’s just ~10 bucks more than Armor Jr (silver).

Pros:

+ Unique look
+ Aluminum frame
+ Very light
+ BTX compatible (needs an upgrade)
+ Ready for watercooling kit
+ Side panel
+ Great airflow
+ 2 x 120 mm fans
+ Removable HD cage

Cons:

– HD cage blocked when combined with WD hard drive kit
– Not so “tool-free”
– Aluminum frame only used for silver models

For its light design and cool features, Thermaltake Aguila gets the rating of 9.0 (Extremely Good) out of 10 and Bjorn3D Seal of Approval Award


Members & non-members alike, we invite you to discuss this and other Reviews on the Bjorn3D Product Discussion forum…

Check Also

Fifine Ampligame A6T

Introduction Much like the webcam, the USB microphone has become a rather indispensable tool in …

Cooler Master Hyper 622 Halo

Introduction The liquid cooling is the go to cooler for the PC enthusiasts who want …

Leave a Reply

instagram default popup image round
Follow Me
502k 100k 3 month ago
Share