While not a company you may be familiar with, Tagan provides high end case’s and PSU’s. Can the Black Pearl make a name for itself or will it get lost in the sea of mediocre cases?
INTRODUCTION
Today’s society demands a high level of versatility. From our phones that can play music and organize our schedule to our computers that can play Hi-Def movies while surfing the web and gaming. So it should come as no surprise that we demand more from a computer case than just a plain beige shell to keep our stuff safe. We want function. We want options. We want style! In the past you were considered lucky if you got 2 of them in the same chassis, but that was the past. Now I give you a glimpse of the future, today. The Tagan A+ Black Pearl full tower case. You want functionality? You have a 4-channel fan controller and temp gauge with LCD readout and evaporate thermal zones. You want options? How about water and air cooling ready. You want style? This case is gorgeous.
Tagan A+ Black Pearl
Tagan
![]()
Our simple reason to give TAGAN’s birth:
We are a group of professional technical guys living in different countries –Germany, Japan and Silicon Valley (USA). All of us have had a couple of negative experience implementing Power Supply (PS) into systems. It is frustrating, time consuming and risky! By a very valuable opportunity, 2001 in Taipei`s Computex show, all of us met each other at a dinner party, we occasionally sat together and discussed about the power supply problems.
Based on our professional background and know-how, we suddenly all decided to study more about power supply and conduct some testing for finding out the best one. After almost a year`s teamwork in discussion, design, and developing, our team of international experts have designed some of the best and reliable power supplies for the PC as well as all the various systems. Consequently, all of us have become the founders of TAGAN. We are more than happy to share these products and experiences with you.
Since the creation of Tagan shortly after the turn of the millennium they have come to be the number one recognized brand in Germany. This is in part to their philosophy. To carry out state-of-art technologies for the best quality power supplies and to offer them to all users. What does it mean to have brand recognition? If I ask you who does the ‘golden arches’ belong to, would you know the answer? If you answer McDonald’s you now have an idea of the importance of brand recognition.
FEATURES AND SPECIFICATIONS
- Brushed metal 1.5 mm aluminum case with acrylic side window
- Blue illuminated A+ logo and backlit power and reset button
- Adjustable 4-channel fan controller with fan speed and temperature display via LCD
- Top mounted ports for easy access
- 2 x USB 2.0
- Audio (Headphone / Microphone)
- 1 x Firewire (IEEE 1394)
- 15 Drive Bays
- External 7 x 5.25″
- Internal 8 x 3.5″ for HDD
- All 5.25″ drive bays incorporate a one side easy snap design, but can additionally be installed with screws
- Two removable hard disk cages capable of holding 4 hard drives each w/ anti-vibration rubber mounts
- Cooling
- HDD cooling provided by the 120 mm front mounted fan
- Two included 120 mm fans, one in the front w/ dust filter and one in the back
- CPU air duct for direct flow of cool air
- Optional cooling includes rear mounts for two 80mm fans and top mounts for two 120mm fans
- Air vents on the bottom for extra ventilation
- Water cooling ready
- RoHS compliant
- Bottom mounted power supply (PSU not included)
- Motherboard support for Micro ATX, Standard ATX and Extended ATX
- 7 expansion slots
- Dimensions (W x D x H) – 9.0 x 24.8 x 24.4 in (22.86 x 62.99 x 61.97 cm)
- Weight – 27.33 lbs (12.39 kgs)
PACKAGING
Anytime I get a new product delivered I always inspect the packaging very carefully. Why, you ask? Well if the company takes extra steps to ensure the safe arrival of its product to you then it tells me they will care about their product and they have good attention to detail. Two traits I highly value.
First off this is by far the biggest box I have ever received. This case could be turned into a castle with little modification it is so big. For reference I included a Logitech mx710 keyboard next to it. As big as this box is it did not stop the delivery company from doing its best to destroy it. This box has seen better days.


Black Pearl packaging – Front
(Click to enlarge)
The box itself has some useful information regarding the features and dimensions of the case. Ordinarily this would not apply so much but this case is very large and very few, if any, desktops will be able to accommodate it. It is definitely designed to sit on the floor and should not be placed on thick carpeting as I will explain on the next page.


Black Pearl packaging – Side & Internal
(Click to enlarge)
Now this is where I normally tell you that despite the best efforts of the men in brown to damage my unit it survived intact. Truth be told it did not fair so well. Two nice cracks in the side glass along with the drive bay covers being scattered around the box. There is little Tagan could do in the face of such mayhem and I was surprised not to find more damage.
CONTENTS
Most cases give you the basic assortment of screws necessary to install a motherboard and little else. This is where Tagan really raises the bar.
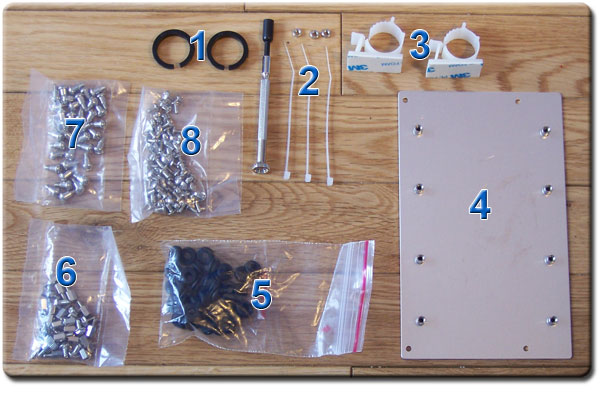
- Molding caps – Used when the covers at the top for watercooling tubes are removed to prevent any sharp edges.
- Zip ties & standoff install tool – Use this tool to screw in the motherboard standoffs and the zip ties to tidy up loose cables.
- Adhesive cable clamps – Able to be placed anywhere you see fit, these help to route cables out of the way of components.
- Xeon extension plate – For users installing an Intel Xeon motherboard this plate will be utilized.
- Rubber grommets – Used for mounting the hard drives, these serve to dampen any vibrations from your disk drives.
- Standoffs & Thumbscrews – These are used to install the motherboard and expansion card should you lose the included ones.
- Hard drive screws – Used in conjunction with the rubber grommets to install your hard drives in the chassis.
- Mini screws – These are used to install your motherboard in the case as well as a floppy drive and optical drive.
This is by the far the most comprehensive inclusion of pieces I have seen come with any case. While not adding much to the cost, the additional items like zip ties and wire clamps go a long way to adding value to the case.
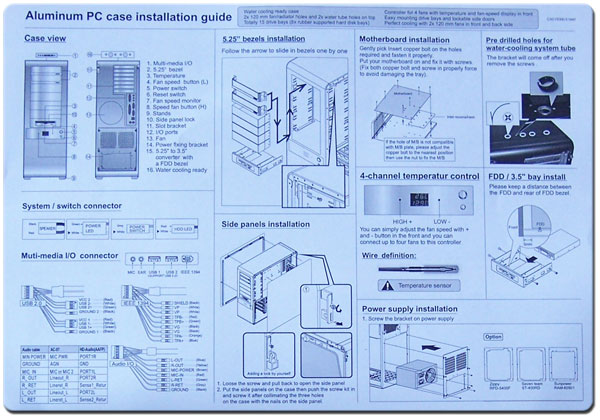
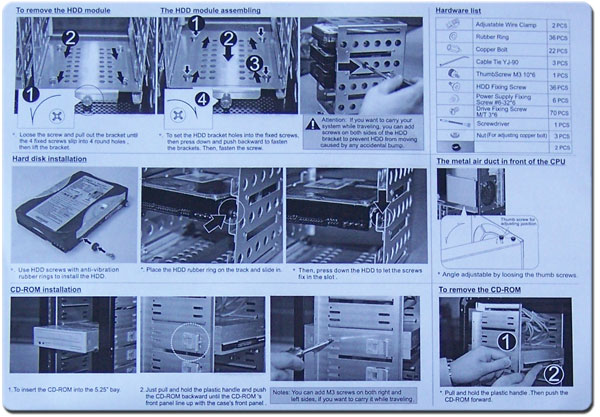
Lastly we have the included instructions for various pieces and areas of the case. While I ordinarily ignore these I found there to be some useful information and was impressed with what this case is capable of.
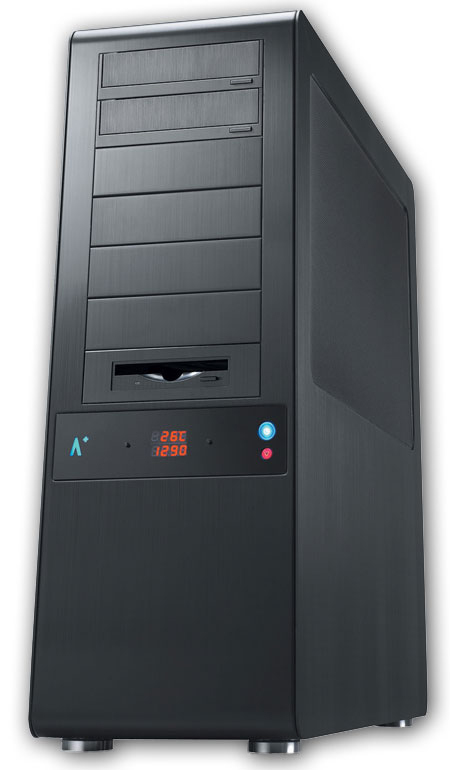
EXTERNAL
Doing a job better then all the kings horses and all the kings men I pieced the unit back together for the photo shoot. The styling of this case is very modern and sleek. Nothing too flashy or in your face. Just high class design.
Looking at the front of the case we see no less then seven 5.25″ external drive bays with the bottom one being used to house a floppy drive if you should so need. The top two bays are designed to ‘ghost’ your optical drive(s) so regardless of their color the case remains all black. A very nice touch. For a video showing how the ‘ghost’ panels work to cover your optical drive click here.
Turning to the rear you’ll notice the odd orientation of the rear I/O and expansion slots. No it’s not a BTX case. It’s an inverted ATX case, designed to place the CPU as low as possible away from the path of rising heat.
Finally looking underneath the unit we see why this case would have some trouble sitting atop thick carpeting as previously mentioned. It uses vents cut out of the bottom to aid in providing air-flow. Placing this chassis on a carpeted floor would at best reduce air-flow and at worst throw tons of dust into the case. For those who will place the chassis on a hardwood floor fear not, the case comes with rubberized feet to prevent vibrations being transferred.


Front, rear and underside view
(Click to enlarge)
Turning to the top of the case we see how the versatility of the case continues. Starting at the rear we see two areas designed to accommodate either two 120mm fans or an external radiator. At the edge of the case you’ll notice the two pre-drilled holes for running your tubes through should you opt for water cooling. It is a brilliant idea in my opinion and to further the cause should you want to go back to air cooling after having tried water you can simply replace the covers and not be left with two gapping holes in your case. Thoughtful.
At the top of the case towards the front we see a basic setup of two USB ports matched up with a Firewire port and audio ports (microphone & headphones). What we see here though is the flap that can be open or closed to hide the ports from sight keeping with the cases’ sleek theme.


Top side – front and rear view
(Click to enlarge)
Turning to the front of the case here is a shot of the 4-channel fan controller and temperature gauge in action along with the cool lights for the power, reset and logo.
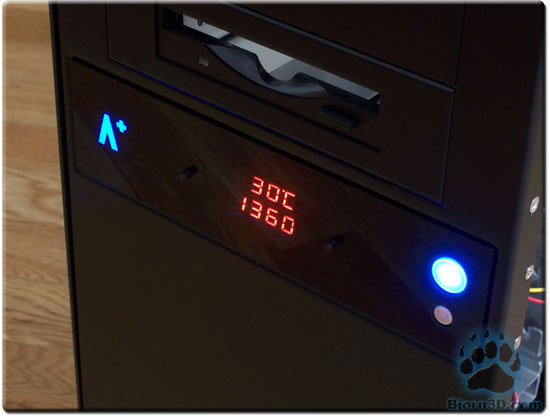
Front lights and fan controller
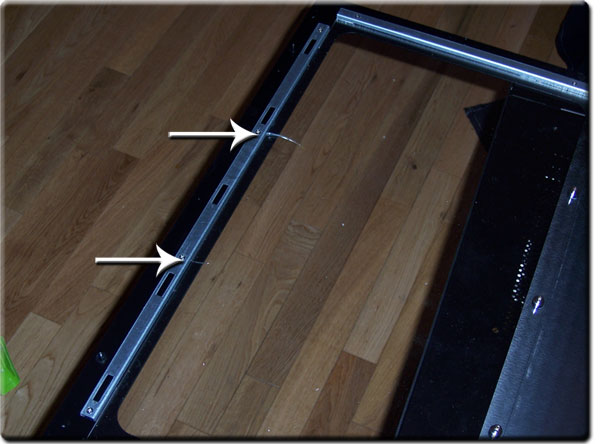
Lastly, I would like to mention the mechanism used to close and open the side panels of the case. From the picture it would appear that Tagan has used thumbscrews to secure the panels to the rest of the case. It would take me five minutes of turning to realize these are not your standard thumbscrews. Turning the screws you’ll notice there is a small spring inside of them and they don’t actually come out of the case. You just turn until the spring pushes the screw out and then pull outwards about one inch which slides a long rail releasing the side panel. It is the same for both side and a very convenient way to hold the panel closed. It also has the option of being locked should you want to bring your rig to a LAN party or such.

Rear locking mechanism
(Click to enlarge)
INTERNAL
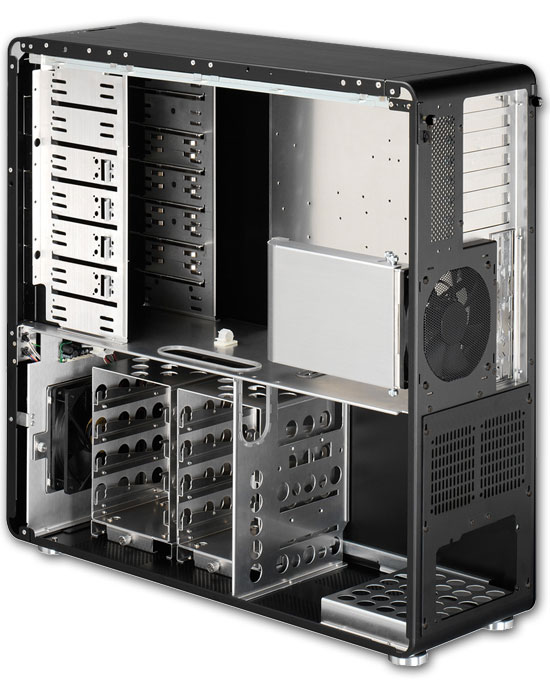
While I enjoy admiring the outside of any case that pays this much attention to detail it is ultimately what’s on the inside that counts. (Right guys?) Removing the side panel this is the view that will greet you. Space so large it will make your motherboard feel very small. Multiple thermal zones to manage heat levels and a plethora of routes you can use to organize your cables for maximum efficiency.
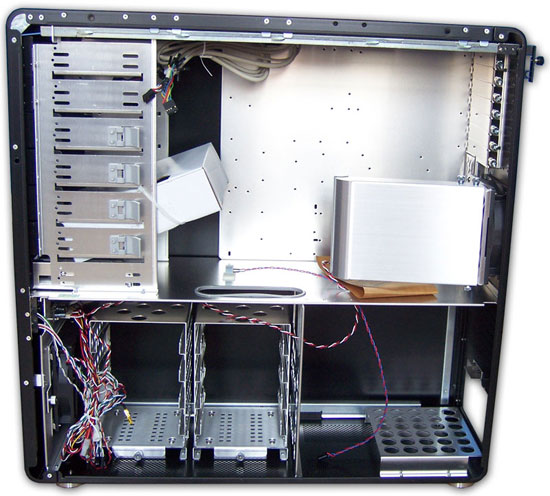
Inside the Black Pearl
Exploring the inside of the case our first stop is the hard drive area. Comprised of two removable cages each housing up to four drives you can be assured you will have ample room for your drives. Just makes sure you bring some extra long cables. With the motherboard being mounted upside down you may run into a problem using the standard length cables that come with many drives.
To illustrate the lengths this case goes to in order to route your cables neatly I took some pictures of the lead wires used to plug in the power switch, reset switch, etc. Turning the case around we can see just how long these cables are and how easy it is to place them out of sight. Tagan has cut out a special area at the top to run your wires through very close to the board’s edge for easy installation.
You will also want to take notice of the cutouts within the case. They have molding installed in them to prevent sharp edges and makes routing cable a breeze with even the messiest of setups.


Extra long lead wires
(Click to enlarge)
Moving up in the case we come to the external drive bay mounting system and front panel connections. First the clamps used to hold devices installed in the 5.25″ are very simple to use and very effective. Simply lift the tab as you slide in your device and when the front of the case lines up with the item in question, release the clamp and it will hold your item in place. If you require further support you are still able to use screws to hold your device in place.
Next are the front panel connections and while there is nothing unique about them I wanted to point out that they do not come labeled. I originally thought there were two plugs for USB connections but seeing as there could only be one (the two top USB ports are fed from one connection) I had to figure out which one was Firewire and audio. This is certainly no deal breaker but it seems odd that such a simple thing would go overlooked. The Firewire plug was not even colored red as is the case in so many other chassis’.
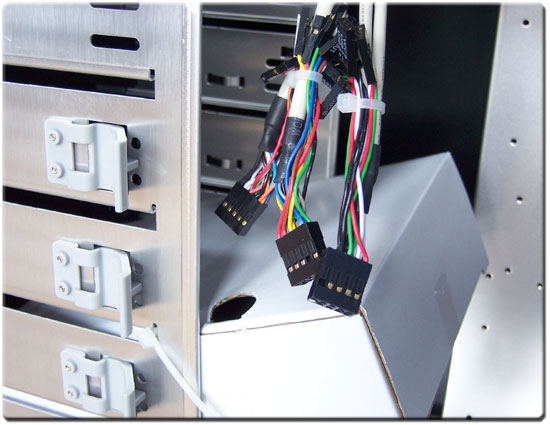
Front panel connections
INSTALLATION
Installing my motherboard was pretty easy in this chassis. I say pretty easy due to the lack of a removable motherboard tray. This is one of those things that once you experience its convenience you never want to go back. The extra large space inside lends itself well for all the areas you will need to access. Situating the motherboard upside down brings with it some interesting points. This is where you will want to take note of the cooling system your motherboard utilizes as the non-standard orientation can wreak havoc on a heat-pipe setup. Having the CPU at the bottom is ideal since hot air rises and will gravitate away from this area. Also, your video card’s cooler will be visible and you can show it off in all its glory for style points. Though due to this orientation you will need to make sure your power supply has enough length to reach the motherboards connectors.
If you intend to install more than one hard drive you are most likely going to need longer cables than what comes with many hard drives. I was using 19″ cables and I was only able to place my drive in the top two spots of the closest cage.


Installed with room to spare
(Click to enlarge)
In order to install an optical drive in one of the top two bays you will have to first remove the top most standard cover which is the third one from the top and then remove the two screws holding the plates on. Slide the ‘ghost’ plate down and insert your optical drive from the front. All the other face plates can be removed by simply pushing them out.
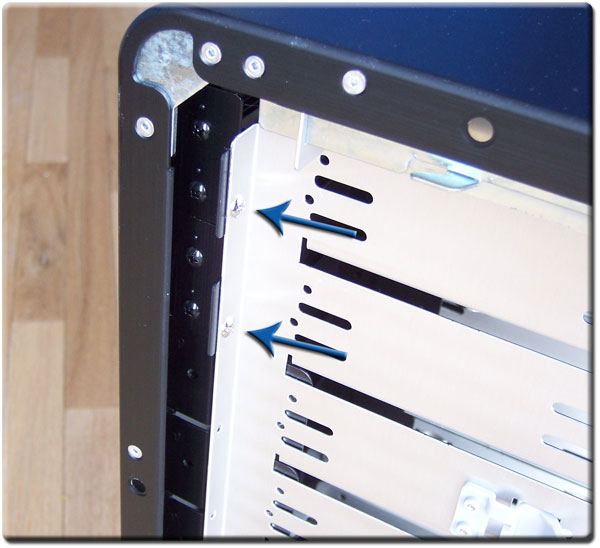
One screw on each side per plate
TEST SETUP
All tests will be conducted on the following platform. As a comparison I will first test the platform outside the case in the open air with one fan blowing over the chipset and one fan blowing over the pwm’s. While this is the best case scenario for airflow it is also rather loud. As such it will be used as the standard which we will test against. It will be interesting to see how efficient the airflow is inside the Black Pearl as well as how well it can dampen the noise of any fans inside.
| Test Platform | |
| Processor | AMD Opteron 165 @ 2.7 GHz |
| Motherboard | ASUS A8N-SLI Deluxe |
| Memory | 2 GB (2 x 1 GB) of Patriot DDR-500 |
| Drive(s) | Seagate 80GB Barracuda SATA |
| Graphics | MSI 7900 GT @ 675/1800 |
| Sound | On board sound processor |
| Cooling | Stock AMD cooler |
| Power Supply | Antec Truepower 2.0 – 430 watts |
| Display | Vison 19″ LCD |
| Case | 1 – No case (open air)
2 – Tagan A+ Black Pearl |
| OS | Windows XP Pro SP2 |
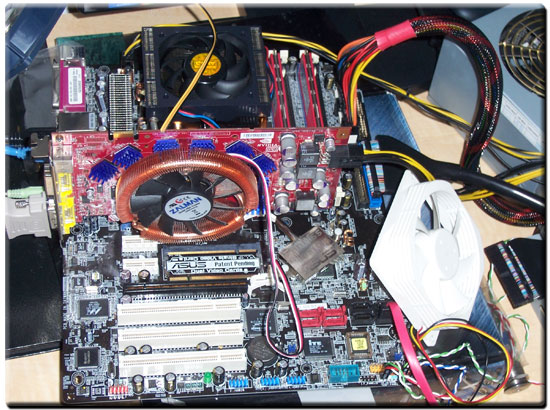
Best (no) case scenario
TESTING METHOD
In order to put the Black Pearl through its paces I will test the case in various configurations.
- Configuration 1: I will test the case with the side panel closed while utilizing the CPU shroud for additional cooling.
- Configuration 2: I will test the case with the side panel closed without the CPU shroud and the fan exhausting to see what impact this has on cooling. This will reflect what many people using larger coolers like the Tuniq Tower may experience.
- Configuration 3: I will test the case with the side panel open for maximum airflow to see if the platform is starved for more air.
All temps are measured with the built in Asus Probe software and double checked with a non-contact infrared thermometer were applicable. Internal case temp and ambient temperature are measured with a digital Radio Shack thermometer.
We will measure the temperature of the CPU, Northbridge, VGA, and the internal temps of the case. We will then measure the delta between ambient temp and the item being measured (Delta = X – ambient where ‘X’ is the component being measured). This can also be expressed as temperature rise above ambient so the lower the better.
While the Black Pearl has many spots to add additional fans we will test the case ‘as is’ with only the fans provided.
RESULTS
I always try to visualize the path air will travel and plan accordingly. To help illustrate my thoughts I whipped up this quick diagram of air flow to show you what I try to create with any case I setup.
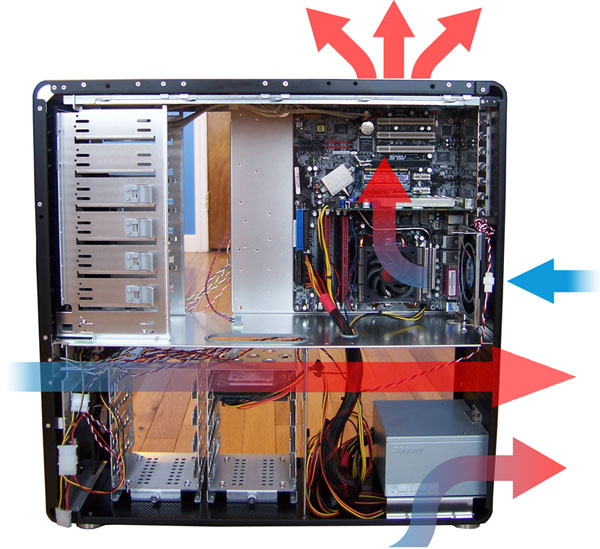
Path of air
Temperature
During testing my area was experiencing a bit of a heat wave and as such the ambient temperature of the room was maintained at 28C.
- Configuration 1: Side panel closed with CPU shroud and the rear fan blowing in for additional cooling.
- Configuration 2: Side panel closed without CPU shroud and the rear fan exhausting
- Configuration 3: Side panel open with CPU shroud and the rear fan blowing in.
| Temperature Results at Idle (Celsius) | ||||||||
| No case | Configuration #1 | Configuration #2 | Configuration #3 | |||||
| Idle | Delta | Idle | Delta | Idle | Delta | Idle | Delta | |
| Processor | 35 | 7 | 34 | 6 | 38 | 10 | 34 | 6 |
| Northbridge | 30 | 2 | 42 | 14 | 43 | 15 | 44 | 16 |
| VGA | 41 | 13 | 47 | 19 | 45 | 17 | 46 | 18 |
| Internal | – | – | 31.5 | 3.5 | 33 | 5 | 30 | 2 |
| Ambient | 28C | |||||||
The first thing to take note of is how high the Northbridge temps rise. The reason for this is the cooling system uses a heat pipe which is intended to draw heat away from the chipset upwards towards the PWM’s where the cooling fins receive some airflow and cool the components down. The problem here is that the motherboard sits in an upside down orientation causing the Northbridge to be the high point in this heat pipe loop. Without direct airflow the heatsink doesn’t have enough surface area to dissipate the heat efficiently and as such causes the chipset temps to spike.
The second thing we notice is that with the shroud on and the fan blowing air inwards it keeps the CPU pretty cool but since the hot air has to go somewhere, it rises thus causing the video card to rise in temperature (Config. 1). This is remedied when we set the fan at the back to exhaust outwards pulling the hot air from the CPU outside the case giving the video card cooler air to work with (Config. 2).
| Temperature Results at Load (Celsius) | ||||||||
| No case | Configuration #1 | Configuration #2 | Configuration #3 | |||||
| Load | Delta | Load | Delta | Load | Delta | Load | Delta | |
| Processor | 51 | 23 | 51 | 23 | 54 | 26 | 52 | 24 |
| Northbridge | 31 | 3 | 45 | 17 | 46 | 18 | 48 | 20 |
| VGA | 51 | 23 | 65 | 37 | 59 | 31 | 64 | 36 |
| Internal | – | – | 37.5 | 9.5 | 36 | 8 | 32 | 4 |
| Ambient | 28C | |||||||
At full load we see the same trends continue. It is worth noting that with the CPU shroud the temperature of the processor is the same as it was outside the case receiving ample amount of cool air. This is a testament to the effectiveness of the shroud to provide cool air. Also, removing the side panel does little to drop the temperatures. This is a good thing in my opinion as it means the components are receiving plenty of cool air and it is just a matter of removing the hot air as quickly as possible to manage thermal levels.
Noise level
Everyone interprets noises a bit differently. What may be loud to me may be perfectly acceptable for you. With that said I will share with you my relative experiences with this case.
Upon first inspection of the case I noticed it had the two pre-drilled areas for fitting fans at the top and at the rear of the case. Anytime you put holes in a case (or anything for that matter) you allow sound to pass through much easier. I was not setting my hopes very high. Once I installed everything and powered up the beast I was pleasantly surprised. While I could hear the sounds of the fans they were most definitely non-intrusive and very easily lost in the background. There was zero vibration noise heard either from the case or the hard drive and this was a big bonus. The fan controller helped to adjust the sound coming from the fans as well but not being able to independently control each fan was a bit of a downer. All in all while not a ‘totally’ silent case its design works very in dampening sound and eliminating vibration.
CONCLUSION
This case has a lot going for it. Besides the fact that it looks very stylish I found it to be very flexible when trying different configurations. Tagan goes the extra mile and includes lots of extras with the chassis including zip ties, cable management caps, a special tool for installing standoffs and extra long front panel connections. I am always wary of any product that tries to be all things to all people but in this one instance I have found the A+ Black Pearl to fit the bill in many ways. Though this case does have some minor issues none of which are deal-breakers in my opinion. A removable motherboard tray would really help with installing a platform but this won’t affect you as much if you only change your system every few years. The four channel fan controller is a nice item until you realize it sets all the fans connected to it to the same speed preventing it from reaching its true potential. These minor annoyances aside I would highly recommend this case to anyone who likes to try different configurations and takes pride in a well set up machine.
FINAL WORDS
Is this case for you? Anytime I’m in the market for a new case I exhaustively read review after review and then mull over the decision for weeks before even thinking about the purchase. Let me save you the headache. If you want a case that can grow with you or if you are considering water cooling in the future this case is a great choice as it can adapt to your needs. If you want a case you can take home and spend 5 minutes setting up then you probably want to look elsewhere. This case really rewards you for taking the extra time to route your cables efficiently and making sure everything is neat and tidy.
Pros:
+ Versatile – water cooling and air cooling ready
+ Extremely lightweight
+ Included 4 channel fan controller and Temp gauge
+ Modern look
+ Lots of space
+ Excellent noise reduction
+ Cool factor
Cons:
– Price may prohibit some people from considering
– No removable motherboard tray
– USB, Firewire and audio cable are not labeled
– Limited options for fan controller
Final score: 9.0 out of 10 and the Bjorn3D Seal of Approval.


