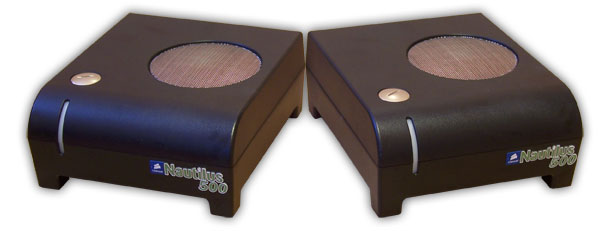
Double your pleasure, double your fun. Just take two Corsair Nautilus 500 kits, install in PC, add some heat and water then let the good times roll.
INTRODUCTION
Anyone over the age of twenty-one might remember a fun commercial for a doublemint gum whose message was double your pleasure, double your fun. It showed two young twin ladies, two young puppies, etc. Basically, things were better in two’s This idea has been adopted by the computer industry with open arms. Two cores in a CPU, two sockets in a motherboard, two video cards in tandem. Heck even hard drives are getting in on the double action with RAID. Sadly though heatsinks have been left out of the party (How would you fit two Tuniq Towers on a CPU anyway?). Well today we are going to have a bit of fun. We are going to see what two Corsair Nautilus 500 kit’s can do for us when it comes time to party. We recently reviewed the Nautilus 500 here and found it to be an exceptionally easy unit to install and offered excellent cooling and value.
Double the fun
Corsair
![]()
In case you have been living under a rock for the last decade I will catch you up to speed. Corsair has become a premier manufacturer of memory and power supplies. The performance of their memory kits is legendary and their power supplies are fast becoming world renowned. So why the watercooling kit? Well, take a look at this excerpt from their website:
Corsair has been a leader in the design and manufacture of high-speed modules since 1994. Our focus has always been on supporting the special demands of mission-critical servers and high-end workstations, as well as the performance demands of extreme gamers. While maintaining this core focus, in recent years, we’ve also brought our expertise, technology leadership and legendary quality and reliability to memory and other technology products for the more mainstream consumer.
That sums up why we have a water cooling kit from Corsair only the voices in my head can explain why we have two.
CASCADING
The idea is simple, if one is good then two must be better. Sounds simple right? This idea has been used throughout the computer industry and when it comes to water cooling things get a bit hairy. You have water flow and restriction to contend with. Will you configure the kits in series or parallel? And least of all, is the space issue. Where will all this stuff go? Despite these hurdles the objective remains the same. Better cooling. So let’s explore the wild world of cascading as we connect two Nautilus 500 units together and see what we get.
Cascade – Noun: A succession of stages, processes, operations, or units.
It is a term that is used in many different fields from biology to web design and even lasers. It is also used when referring to failures as in a cascading failure effect where it means one failure was the cause of the next failure and so on and so forth. When we use it to refer to water cooling it means to feed one system into the next. This is where the true power of cascading lies.
There are different ways to configure a cascading water cooling kit. Some people prefer to use one powerful pump with multiple radiators while others will use two smaller pumps with multiple radiators. Smaller pumps tend to generate less heat which gets dumped into the water. There are pro’s and con’s to each method and going into detail about them is beyond the scope of this article. For more information you can check out these two sites here and here
Series
When we say that we are running the kits in series what we mean is that one unit’s output in connected to the next unit’s input before being fed to the water blocks. In our case since we are running two kits, a CPU block and a VGA block we assemble the system as follows:
unit 1 -> unit 2 -> CPU -> VGA -> unit 1
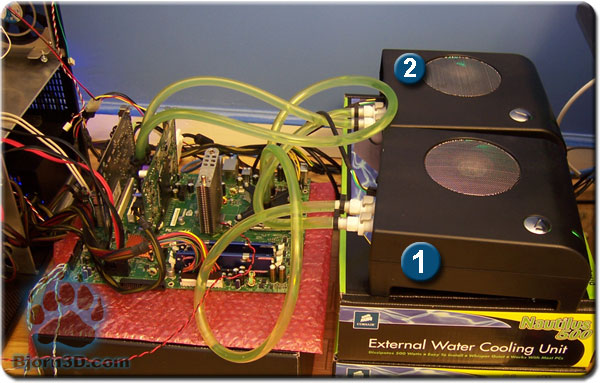
Two Corsair Nautilus 500 units in series
Parallel
When we say that we are running the kits in parallel what we mean is that each unit is operated separate from each other and only connected through the waterblocks. The system is assembled as follows.
unit 1 -> CPU -> unit 2 -> VGA -> unit 1
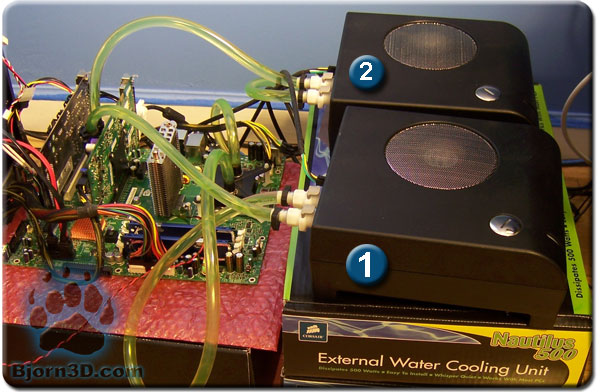
Two Corsair Nautilus 500 units in Parallel
Single unit
For comparison purposes here is how the system is run when utilizing one Nautilus 500 kit.
unit 1 -> CPU -> VGA -> unit 1
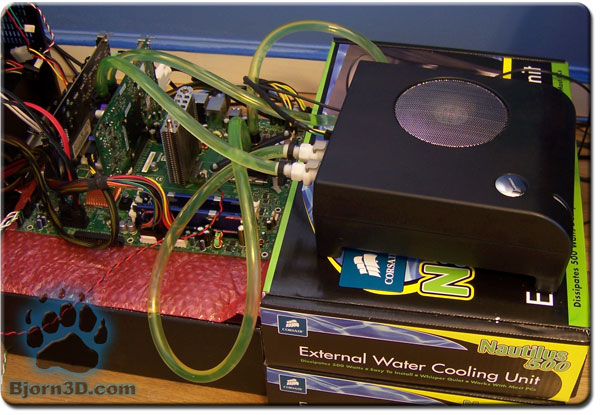
Single Corsair Nautilus 500
TEST SETUP
| Test Platform | |
| Processor | Intel Core 2 Duo E6420 @ 2.1 GHz & 3.4 GHz |
| Motherboard | XFX 650i Ultra |
| Memory | 2 GB (2 x 1 GB) of G.Skill DDR2-800 |
| Drive(s) | 1 – Seagate 7200.9 Barracuda SATA 1 – Samsung HD501LJ SATA |
| Graphics | Albatron 8600GTS @ 675/1000 MHz & 720/1150 MHz |
| Sound | Creative Soundblaster Audigy2 ZS |
| Thermal Paste | Arctic Silver Ceramique |
| Cooling | Setup 1 – Single Nautilus 500 Setup 2 – Dual Nautilus 500 in series Setup 3 – Dual Nautilus 500 in parallel |
| Power Supply | OCZ GameXStream 850 watts |
| Display | Westinghouse 37″ LVM-37W3 |
| Case | Outside case |
| OS | Windows XP Pro SP2 |
Methodology
To determine what impact the GPU and the CPU has on the rest of the water cooling loop we will load up one at a time and then load them both up to see what results we get. Basically we will load the CPU using Intel’s TAT application while the GPU sits idle. We will then load the GPU by looping 3DMark06 and finally we will run both utilities simultaneously and see if we can make the water boil.
We must also be mindful of the specific heat properties of water. Water being more dense than air requires more energy to increase its temperature by one degree celsius if we are dealing with the same volume. Since water has higher specific heat capacity then air we will place the load on the components for a longer period of time allowing the water to reach its maximum temperature before taking a reading.
TEST RESULTS
We have a lot of information here from our testing and I will explain it to make it as clear as possible. We will break up the scores into four sections: Idle, CPU load, GPU load, Both load.
First up is our scores at idle for both the CPU and GPU at stock speeds and overclocked speeds. We see that even with the computer sitting idle that we can lower our temps by running two units in tandem. What I found to be interesting is the temps for running the kits in parallel. I would have thought running them in series would provide better temps since the water passes through two radiators before going out to the CPU and GPU. What this tells me is that the water is passing through the radiator a bit too fast for it to cool the water efficiently and that placing the GPU and CPU on separate units lowers the work each one must do to chill the water.
| Temperature Results at Idle (Celsius) | ||||||
| Single Unit | Cascade Series | Cascade Parallel | ||||
| CPU | GPU | CPU | GPU | CPU | GPU | |
| Stock | 33 | 38 | 31 | 37 | 31 | 37 |
| Overclocked | 35 | 39 | 33 | 37 | 32 | 37 |
| Ambient | 24.5C | |||||
Turning to our load readings, we first started by placing a 100% load on the CPU only to see what impact it has on the rest of the loop. In single kit usage the GPU is receiving warmer water and thus rises a full two degrees celsius at stock speeds and five degrees at overclocked settings. Wow. Running two units together lowers the temps nicely and once again we see by running the units in parallel it lowers the heat load enough for each radiator to work efficiently.
| Temperature Results: Load on CPU (Celsius) | ||||||
| Single Unit | Cascade Series | Cascade Parallel | ||||
| CPU | GPU | CPU | GPU | CPU | GPU | |
| Stock | 45 | 40 | 44 | 38 | 42 | 37 |
| Overclocked | 61 | 44 | 57 | 40 | 56 | 37 |
| Ambient | 24.5C | |||||
Next we set out to load up the GPU and the first thing you’ll notice is the rise in CPU temps. The problem here is that to place any load on the GPU requires some load on the CPU. Whether running 3DMark06 or ATiTool the CPU was always being worked to some degree. We decided using the ATiTool application was a better choice as the CPU load was much more consistent and also lower. 50% compared to 65%-75% for 3DMark06.
Nothing new here as we see the two unit setups out performing the single unit by about three degrees.
| Temperature Results: Load on GPU (Celsius) | ||||||
| Single Unit | Cascade Series | Cascade Parallel | ||||
| CPU | GPU | CPU | GPU | CPU | GPU | |
| Stock | 39 | 43 | 33 | 40 | 35 | 40 |
| Overclocked | 43 | 45 | 41 | 42 | 40 | 42 |
| Ambient | 24.5C | |||||
Now this was really interesting. Trying to place a full load on both the CPU and GPU resulted in lower temps for both components. Looking into the matter it quickly became apparent that loading the GPU would take cycles away from the CPU causing lower temps for the CPU. Also, since the processor was working hard on its own it could not supply the GPU with enough cycles to push it either. Hence, we get lower temps for both pieces.
| Temperature Results: Load on BOTH (Celsius) | ||||||
| Single Unit | Cascade Series | Cascade Parallel | ||||
| CPU | GPU | CPU | GPU | CPU | GPU | |
| Stock | 45 | 41 | 44 | 39 | 40 | 39 |
| Overclocked | 57 | 44 | 57 | 42 | 55 | 41 |
| Ambient | 24.5C | |||||
CONCLUSION
The idea of ‘the more the merrier’ seems to describe nicely what we saw here. Running the GPU and CPU in a single loop kept the temps under control until we started turning up the heat. Once we overclocked the two of them together the heat started to build up and as the water got warmer the radiator just couldn’t keep up. While no lock up’s or crashes ever occurred the CPU temperature started to enter an uncomfortable level for me. Adding a second kit to the mix really shook things up. Whether we ran them in series or parallel we saw a nice drop in temps and having each component on its own kit (parallel) turned out to be the best setup. It was fun to see just what sort of impact could be had by utilizing a second Nautilus 500 not to mention to cool factor of showing it off to friends.
In the end this may not be the most practical approach to increased cooling for your PC but it was a lot of fun. The noise level started to become an issue and the setup took a bit longer as proper planning was essential to a working system. Rather then adding in a second unit I would first look into swapping out the radiator of the Nautilus as a possible solution for increased cooling. As a long time enthusiast I love to try different things just to see what would happen. Sometimes things go awry and sometimes you learn something valuable you can show off. This little experiment falls somewhere in the middle.
Pros:
+ Cooling
+ Cooling
+ Cooling
Cons:
– Noise level
– Setup requires more planning
– Both kits must be at same height


