Foxconn jumped on the band wagon and made their first “overclocking” motherboard in their new Quantum Force product line called Mars. It is based on the Intel P35 chipset, and has been specially tuned for overclocking performance. Let’s see what it has to offer.
Introduction
Foxconn jumped on the band wagon and made their first “overclocking” motherboard in their new Quantum Force product line called Mars. It is based on the Intel P35 chipset, and has been specially tuned for overclocking performance. One reason for the great overclocking potential of MARS is the Gladiator BIOS. It is specially developed for the Quantum Force product series, and is both user friendly and provides powerful OC options. The BIOS features include a voltage multiplier for accessing a much wider range of voltage settings. It is the first one in fact to offer a 0.5 multiplier increment. “The 0.5 multiplier increment will give enthusiasts more flexibility when it comes to overclocking, so we should see higher clock speeds running in a stable environment” says Peter ‘Shamino’ Tan, Technical Consultant for the Quantum Force product line. “Quantum Force is not just about a new product line, it is also a complete philosophy about how we develop our products” stated from Quantum Force product manager Greta Kuo.
“We have developed a design manifesto we call SWORD, which focuses on delivering more performance capability with better value for money, whilst listening to the feedback of real enthusiasts. Quantum-Force.net is going to be a great home for our products on the internet, and a really interesting place for enthusiasts to visit and learn more about our products and philosophy. Whether you are looking for overclocking advice, Beta BIOS downloads, help solving technical problems or you want to show off your own overclocking talents on our Power Wall, I would recommend all enthusiasts to visit this website” claims Greta Kuo. Let’s see if what they say is really true. Time to dig in.
Features
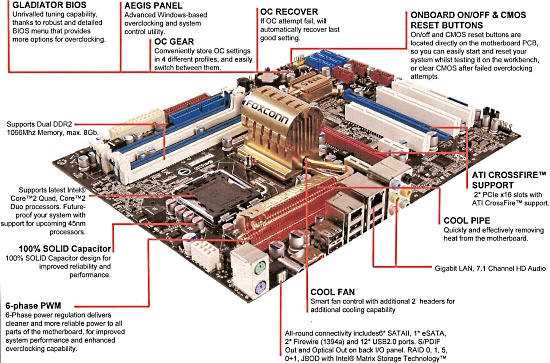
| FOXCONN Mars Special Features |
|||
 |
Aegis Panel | Advanced Windows-based system control utility. | |
 |
Cool Pipe | Quickly and effectively removing heat from the motherboard. Cool Pipe uses a proprietary liquid system to absorb and remove heat from the critical VRM, North and South Bridge chipset areas. By ensuring rapid and effective heat transfer, system performance and overclocking potential is greatly improved. | |
 |
Gladiator BIOS | Unrivaled tuning capability, thanks to a robust and detailed BIOS menu that provides more options for overclocking. | |
 |
100% SOLID Capacitor | 100% SOLID Capacitor design for improved reliability and performance. | |
 |
Cool Fan | Smart fan control for NB, CPU and system fans, adjust | |
 |
OC Gear | Conveniently store OC settings in 4 diferent profiles, and easily switch between them. | |
 |
OC Recover | If the attempt at OCing fails, it will auotmatically recover to default settings, to ensure system protection. | |
Specifications
ATI CrossFire is supported on this board. There are two PCIe x16 slots ( 1 limited to x4 bandwidth) for this purpose. Crossfire harnesses the power of two ATI graphocs cards simultaneously to deliver untra-smooth 3D graphics. This is mainly used be gaming enthusiasts. Some have seen a 62% increase in performance.
| FOXCONN Mars Detailed Specifications |
|
| CPU Support | Socket 775 for Intel Intel® Core™2 Extreme Quad-Core, Core™2 Duo, Pentium® Dual -Core E2xx, Celeron® 4xx, Pentium® D, Pentium® 4 processors; Supports Intel® next generation 45nm Multi-Core CPUs |
| Chipset | Northbridge: Intel® P35 Southbridge: Intel® ICH9R |
| Front Side Bus | 1333 / 1066 / 800MHz |
| Memory | Supports Dual-Channel DDR2 1066/800/667 x4 DIMMs, Max. 8GB |
| Expansion Slots | 2 PCI Express X16 slot(x16, x4) 2 PCI Express X1 slots (Supports 250MB/s (500MB/s concurrent)) 3 PCI slots Lower power consumption and power management features |
| CrossFire | Supports ATI CrossFire™ graphics cards (both at x16 and x4 mode) |
| Storage |
6 x SATA 3Gb/s connectors |
| LAN | Gigabit LAN |
| HD Audio | 7.1 channel High Definition Audio; Supports Jack-Sensing function Supports S/PDIF output |
| IEEE 1394a |
Up to 2 IEEE 1394a ports |
| USB | 12 USB 2.0/1.1 ports (6 X rear panel ports, 3 X onboard USB headers providing 6 extra ports) 480MB/s data transfer rate |
| RAID | RAID 0, RAID 1, RAID 5, RAID 10 with Intel® Matrix Storage TEchnology and Intel® Rapid Recover Technology |
| Back Panel I/O Ports |
4 USB 2.0/1.1 ports |
| Internal I/O Connectors | 6 Serial ATA 3Gb/s connectors 1 UDMA ATA 133/100/66/33 connector 1 FDD connector 2 IEEE 1394 connectors 6 USB 2.0/1.1 connectors (supports 8 ports) 1 audio pin header (supports 8-Channel) 1 S/PDIF In pin header |
| O/S Compatibility | Window XP / Vista |
| Accessories | Motherboard driver disk User’s Manual Quick Installation Guide Intel® LGA775 CPU Installation Guide One IDE cable and one floppy disk drive cable Four SATA 3Gb/s cables One SATA bracket I/O Shield 2-port USB 2.0 bracket A case badge |
| Form Factor | ATX form factor, 305 x 244mm |
Foxconn’s 100% SOLID capacitor design improves component reliability, by replacing electrolytic capacitors with solid versions; this removes the risk of capacitor failure damaging the PCB and surrounding components. Solid capacitors are much more durable than standard electrolytic versions, and typically last around 6 times longer and are able to withstand higher operating temperatures.
Quantum Force
This was taken from Foxconn’s Quantum Force site to help explain what Quantum Force is, and what they stand for. I actually used this site to figure out how to overclock the motherboard to its full potential. Here is a link to the online tutorials.
Quantum Force Manifesto Performance, without compromise; Foxconn Quantum Force products are engineered to maximize computing power, providing only what you need for break-through performance. If you want to build lean, mean machines with more bang for your buck, come join the force. Designed for extreme overclocking performance with rock-solid reliability, Quantum Force products are enjoyed by enthusiasts, gamers and power users around the world. More than just a series of products, Quantum Force represents a way of thinking for computer enthusiasts, and a sacred guideline for our engineers and product designers. We call this design process “SWORD”, and every engineer and manager working on Quantum Force products is bound by this philosophy.
SWORD

Speed and stability at the centre
To wield a sword as an effective weapon you must have speed, but also stability; balance is crucial both in the sword and with the user. In the same way, Quantum Force products are built for speed but also designed with stability in mind. Without a stable platform, extreme performance is not possible. This is the very core of our design philosophy.
Working in partnership with enthusiasts
More than any other manufacturer, we are listening to end users, and working together with enthusiasts to develop and test our products throughout the development process. The result is a better product, more suited to the needs of the enthusiast community. We hope you enjoy our efforts so far, as we continue our drive for ever-improving products.
Offering value for money
Ultimate performance doesn’t necessarily mean an ultimate price tag; being the most expensive product doesn’t make it the best! Quantum Force products are priced fairly, and because every component and feature is assessed for its real benefit to the end user, you’ll be getting the best possible value for money.
Rejecting false innovation
Some manufacturers include additional ‘features’ of limited use, which do not add to the performance capability, but are designed to increase the price of the product; Quantum Force products avoid unnecessary ‘innovations’ which don’t deliver any real benefit. We will only develop features which actually deliver real improvement to the performance, reliability or convenience of our products. With this in mind, we won’t be distracted by false innovations; instead we will focus all our efforts on real product development.
Driving product development
Despite popular belief, product development is not just about delivering new innovations, and it doesn’t end with a product launch either!
Although our engineers are constantly working on new ideas and technologies to deliver performance or usability innovations, they are also committed to getting the basics right. Many manufacturers try to develop advanced features, without first taking care of the basics. Take PCB layout for example… one of the most fundamental elements of motherboard design, but so often neglected by manufacturers! How many times have you seen great motherboards spoilt by poor placement of connectors which makes them difficult or sometimes impossible to use?! We take PCB layout very seriously, and consider as many possible usage scenarios for our product as possible.
Our engineers are committed to driving through new innovations, and constantly improving our product, even after launch. For instance, our BIOS development is not driven by the need to fix bugs and compatibility issues; instead it is based on a commitment to increase product performance throughout the life cycle, which means your product will stay at the top of the performance envelope for as long as possible.
Closer Look
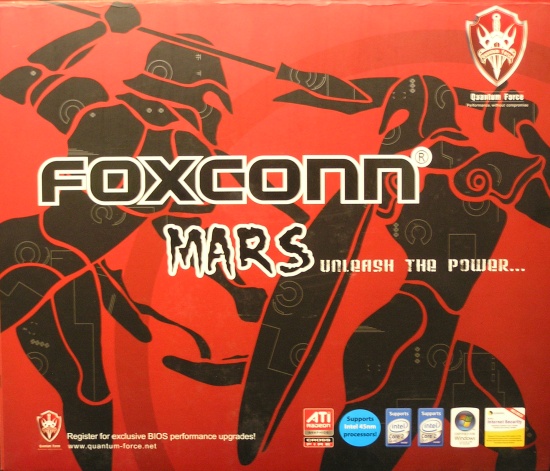
Mars, the Roman God of War, was one of the most worshipped and revered gods throughout ancient Rome. He was the son of Jupiter and Juno and according to legend, fathered Romulus and Remus, the founders of Rome. Hence the front of the box. The design of the box is like a scene from Troy or Gladiator.
The inside cover has cut outs showing some of the special features of the motherboard and the descriptions of what they are. I thought that was pretty creative. 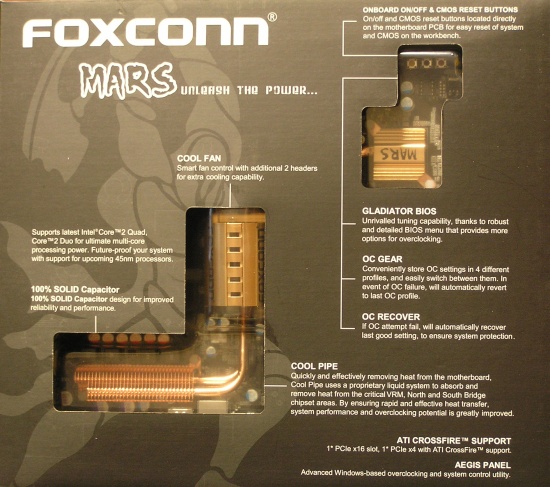
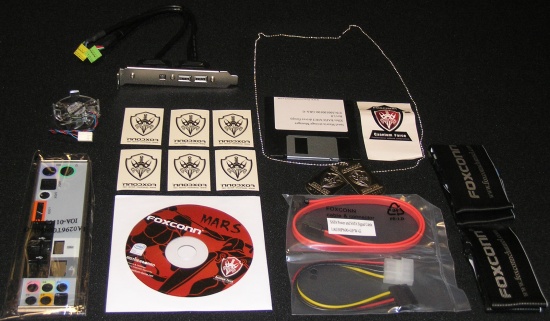
Next is the package contents. There were actually 6 SATA cables and power cables that came with it but I decided not to clutter the picture with them. It came with an expansion card, dog tags, I/O plate, an IDE cable and floppy cable, a manual and cd, and a heat pipe fan and plenty more stickers.
Closer Look
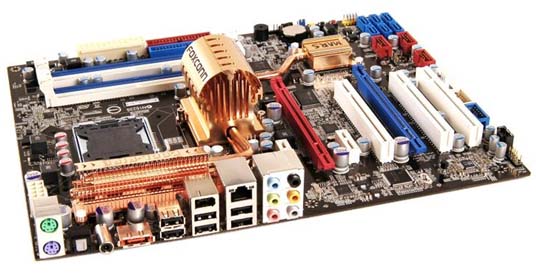
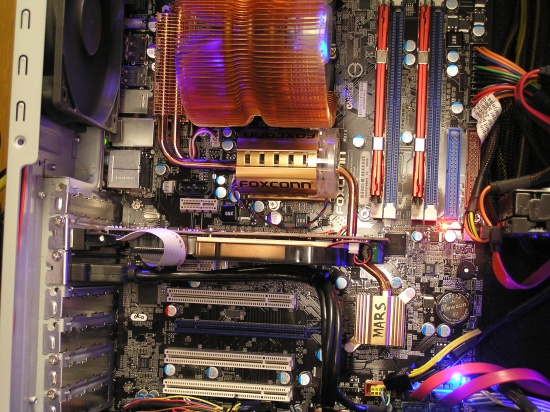
And now for the actual motherboard. The first thing right out of the box you will notice is the color choice Foxconn used- red, white and blue. Ya got me.
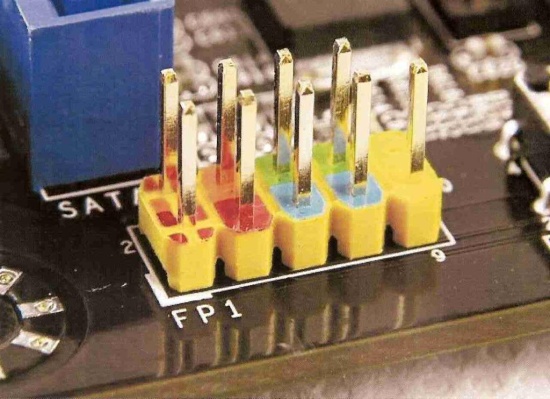
There are several nice features about this board I would like to go through. The “Easy Pin” for instance. Color-coded pin headers enable quick and easy connection of internal devices. This is explained in the manual.
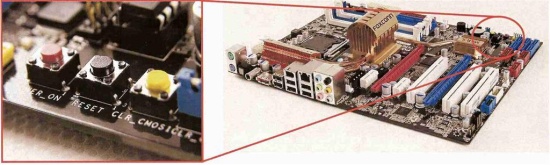
Onboard On/Off & CMOS Reset Buttons are located directly on the motherboard so you can easily start and reset your system while testing it outside of a case. CMOS can also be cleared after a failed overclocking attempt.
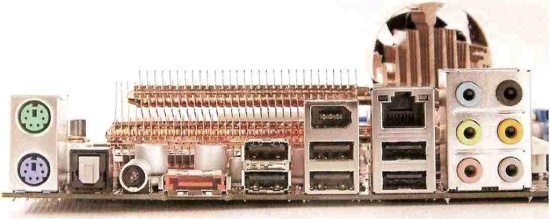
The setup of the I/O panel is pretty similar to all other motherboards. This view shows the ps/2 ports, optical and coax out,external SATA, the 6 USB ports, 1 1394a port, 1 gigabit lan port, and the 7.1 channel audio jacks.
BIOS
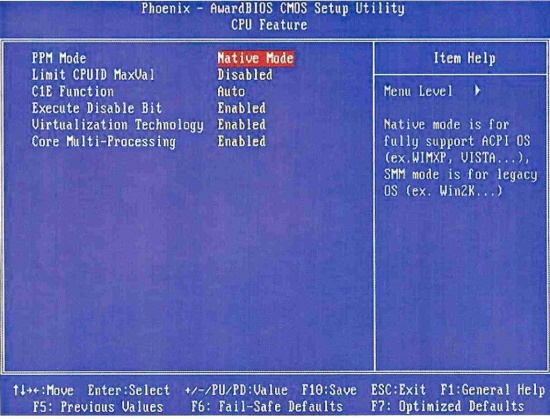
Usually a BIOS is a BIOS unless it has an overclocking feature. This BIOS has all the typical BIOS features every other BIOS has. Just to name a few, Standard CMOS Features, Advanced BIOS Features, Advanced Chipset Features, blah blah blah. Lets get to the good stuff.
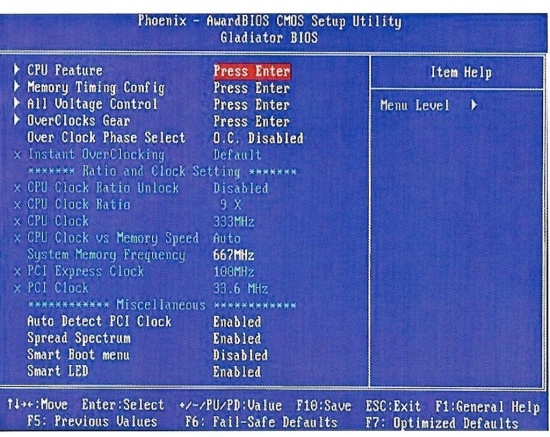
Foxconn developed a new OC BIOS for this board named Gladiator BIOS, which I guess was to go along with the Roman or Greek theme. The Gladiator BIOS includes all overclocking related settings, and is designed to make overclocking more convenient. It offers pretty much every setting under the sun. Over the sun for that matter. This BIOS is impressive. It starts off with menu options all overclockers are familiar with. It looks pretty vanilla, underneath those menus though lies crazy options.
Settings in here will not need to be changed if you are running Windows XP or Vista.
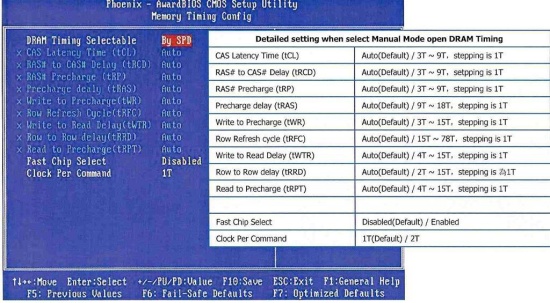
Here memory timings can be configured manually as shown below. During testing I changed my timings on my Gskill memory to 4-4-4-12T. This resulted in a nice stable overclock.
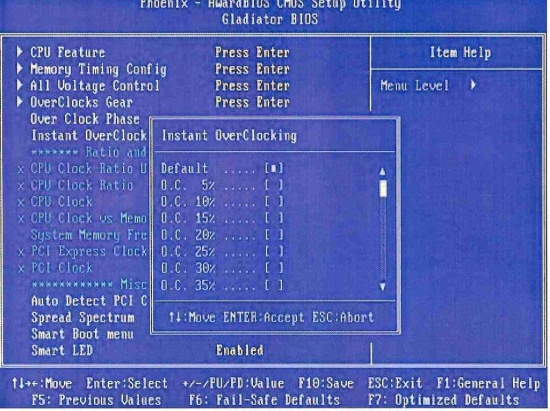
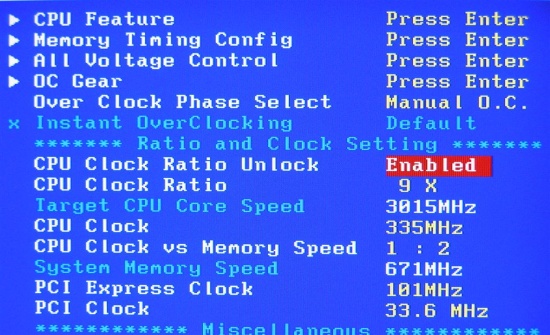
Scrolling down to “Over Clock Phase Select” allows a person to enable overclocking with the options of (O.C. Disabled, Manual O.C. and Instant O.C.). Selecting Instant Overclock allows the person to OC by percentage rather than manually changing every option. If you are a novice, this would be the way to go. I chose manual O.C. for my testing.
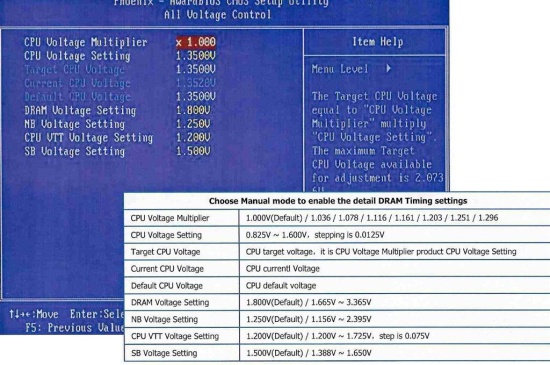
Choosing “Manual O.C.” on the “Over Clock Phase Select” unlocks a wide range of detailed overclocking options for advanced users. “All Voltage Control” is pretty self explanatory. Voltages for the multiplier, DRAM, NB, CPU VTT, and SB are all done here. See what I mean about crazy options. Foxconn has gone above and beyond in their Gladiator Bios. One example of this is the DRAM voltage settings. Below it shows the ability to change from 1.800v to 3.365v. This was unheard of previously. The most a person could hope for was 2.45v. During my testing I did change some of these settings. CPU Voltage Multiplier (x 1.116), CPU Voltage Setting (1.3000v), NB Voltage Setting (1.500v), CPU VTT Voltage Setting (1.500v), SB and CPU PLL VOltage (1.800v). These were changes that were recommended on the online tutorial I found on www.quantum-force.net.
Take time to carefully look through the BIOS and keep track of what changes are made. Overclocking can be dangerous if you do not know what you are doing. These are the other settings that I changed below. I wanted to clock close to 3GHz so I made the “CPU Clock” 335MHz and changed the “CPU Clock vs Memory Speed” 1:2. That is what the online tutorial suggested. It also suggested changing the “PCI Express Clock” to 101MHz instead of 100MHz. I will speak on the results later in the test results pages.
AEGIS Panel
This was taken from the Foxconn Site. It explains the AEGIS panel and how to use it. It worked very well for me.
 The AEGIS panel is a Windows-based desktop application which allows you to monitor your hardware, and control fan and alarm settings. This software utility works with both Windows XP and Vista operating systems. After installing and running AEGIS Panel on your desktop, you will see the following user interface:

You can click the green and red buttons to open the control and monitoring panels…

By default it will enter “Hardware Monitoring” mode, or “HWM Info”. In this mode you can monitor the current CPU clock speed, temperatures and voltages of your system in real-time.
Fan Control
You can configure the fan controls by pressing the fan icons which will then display detailed configuration settings…

You can set fan control in one of four modes…
1) FullSpeed – this leaves the fan running at full speed all the time
2) DutyCycle – set fan speed as a percentage
3) Temperature – set fan speed based on 4 different temperature settings
4) SmartFan – allow computer to automatically control fan speed according to system loading and temperature
Alarms
You can set alarms for all of the Hardware Monitoring items. Simply click the Alarm tab at the bottom of the AEGIS Panel and you will see the following…

Check the box next to the item you want to set the alarm for, and set the upper and lower limits. If that item operates outside those limits, the alarm will sound, and a visual warning will appear on your desktop…

Configuration
You can configure general settings by selecting the “Config” tab. Options include external/onboard speaker for alarm sounds and the refresh cycle for data….

One important setting is the action the computer should take when an alarm is set off. You can select….
1) Ask Me: when alarm is set off, just show the visual/audio alarm
2) Ignore: just mark the item in red when alarm is set off, but not other visual warning
3) Disable: no warning at all
4) Shutdown: shutdown the computer after 10 seconds if no other action is taken
This completes our overview of AEGIS Panel. Look out for future software updates to the AEGIS Panel utility in the near future!
Installation
Installation of the motherboard was fairly painless. Everything was situated on the board in a nice, spacious, orderly placement. I especially liked the placement of the cool fan and the heat pipes for the north bridge. They are placed directly in front of the exhaust fan. Also, if you had a CPU heatsink like mine (Zalman CNPS9500 92 mm fan), it helped to keep air flowing over the heat pipe fins. The other thing I enjoyed about the board was that everything was placed in a way that would make cable management nice and clean.
Test Configuration
|
Test Platform |
|
|
Processor |
Intel E4300 Core 2 Duo at 1.8GHz and OC’d 3.0 |
|
Motherboard |
Foxconn Mars |
|
Memory |
G.SKILL 2GB (2 x 1GB) 240-Pin DDR2 SDRAM DDR2 800 (PC2 6400) |
|
Drive(s) |
Western Digital Caviar SE16 250GB (WD2500KS-00MJB0) |
|
Graphics |
Visiontek HD2600XT 256mb PCIE |
|
Cooling |
ZALMAN CNPS9500 LED 92mm 2 Ball Cooling Fan with Heatsink |
|
Power Supply |
Antec NEO Power 650 Blue |
|
Display |
Dell 2007WFP |
|
Case |
NZXT HUSH |
|
Operating System |
Windows XP Professional |
|
Synthetic Benchmarks |
|
PCMark 05 v. 1.2.0 |
|
3DMark06 v. 1.1.0 |
|
SiSoft SANDRA 2008 XI Professional |
|
Cinebench 9.5 (Daylight) |
| Everest Ultimate Edition 4.20.1180 Beta |
|
Games |
|
Company of Heroes DX9 |
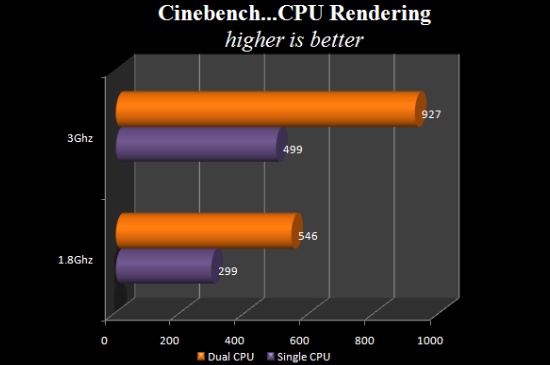
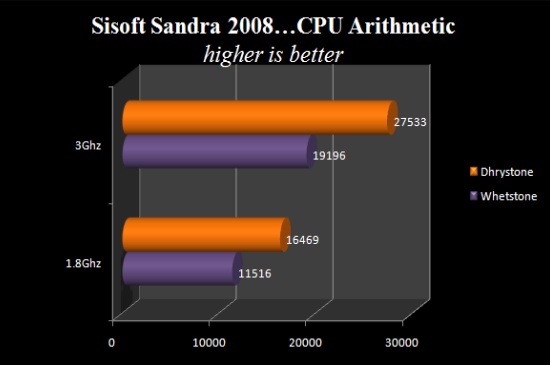
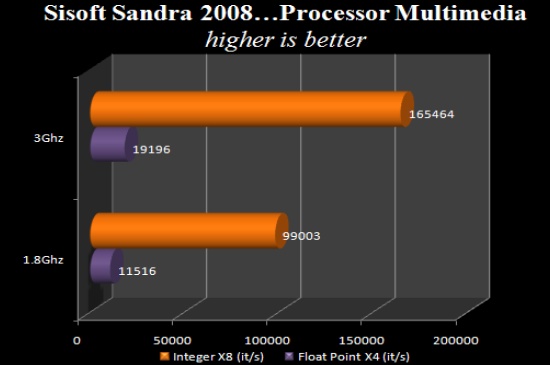
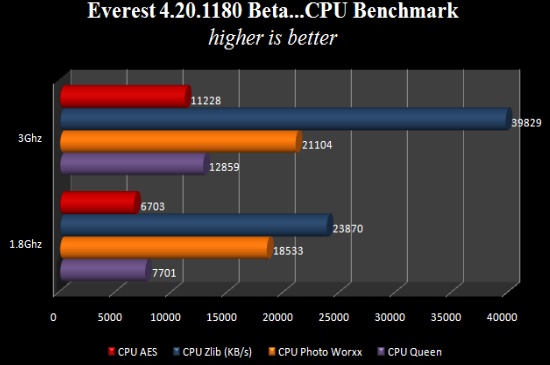
TEST Results – CPU
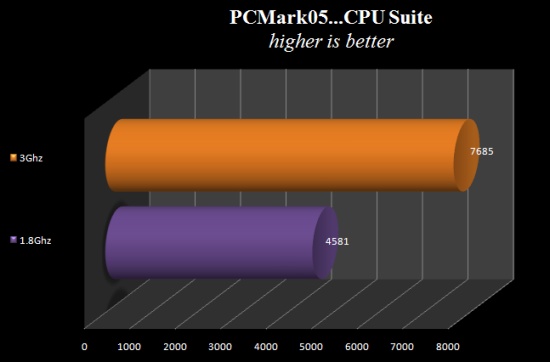
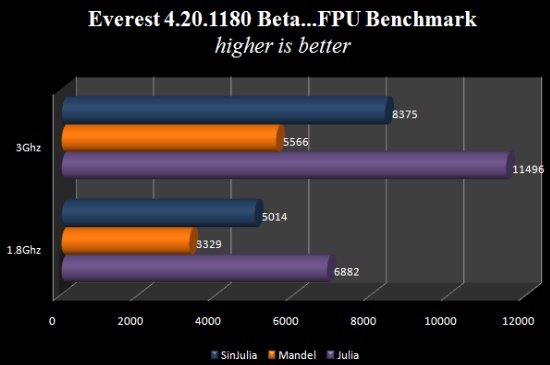
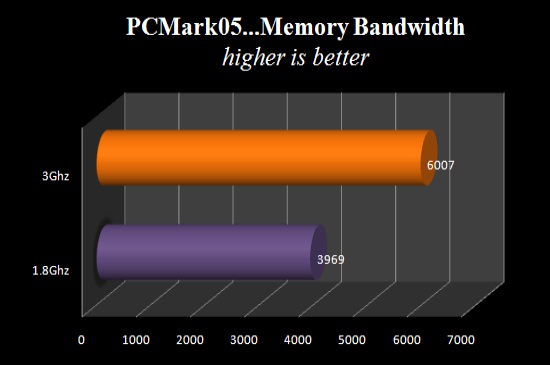
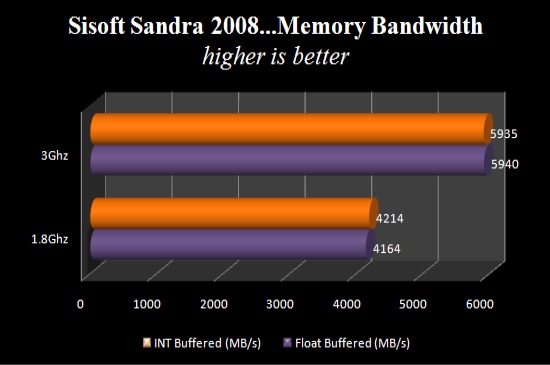
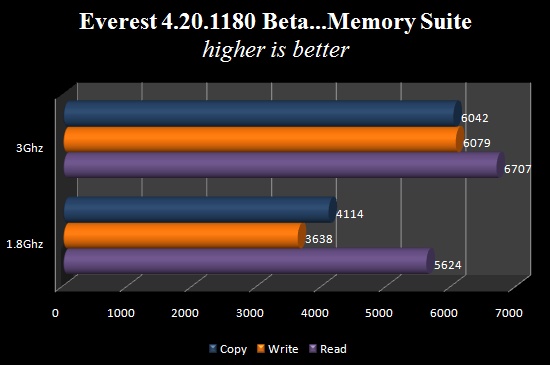
The test results will show the difference in overclocking the E4300 Intel® processor on the Mars board from 1.8Ghz to 3.0Ghz. Synthetic benchmarks will be used in the testing. These test applications include PCMark05, SisSoft Sandra 2008, CineBench 9.5, and Everest Ultimate Edition. A game, Company of Heroes v1.7, was also chosen to show result of real world application.
As you can see there is a pretty large difference in the two results here. I was pleasantly surprised to find such a large difference in the two results.
Memory
For the 1.8Ghz test I stayed with the default 5-5-5-15T timings. I overclocked the memory for the 3.0Ghz test to 4-4-4-12T. Again I was surprised and impressed with the overclock. It was substantial. I will definitely keep the timings overclocked.
Storage
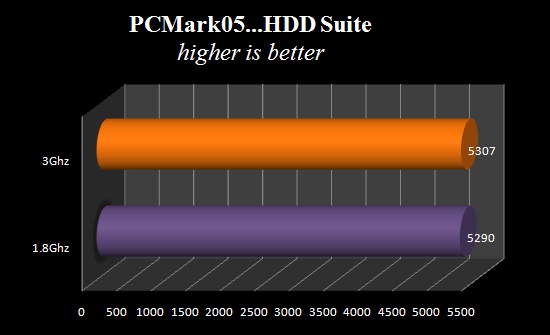
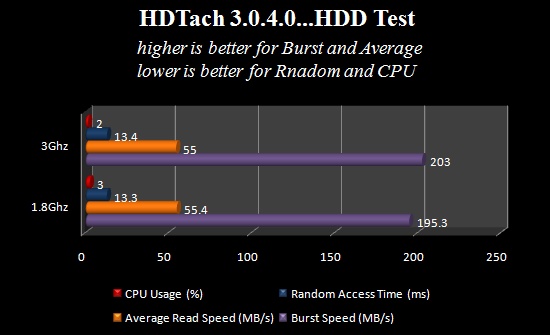
Both PCMark05 and HDTach showed that overclocking the motherboard had no effect on the speeds of the hard drive.
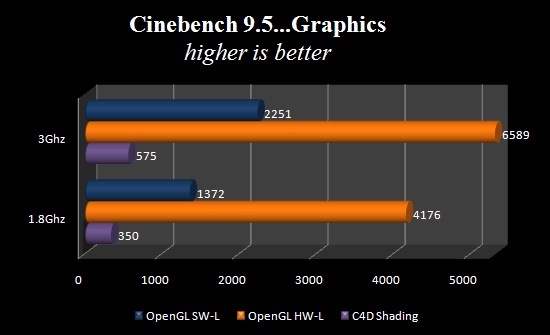
Graphics
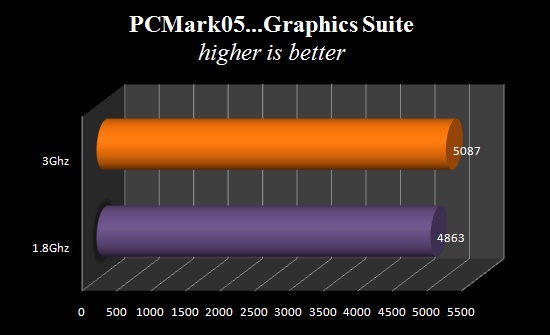
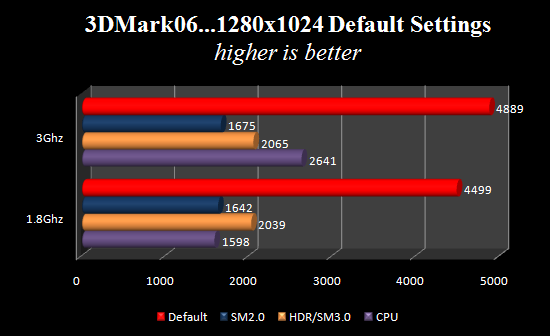
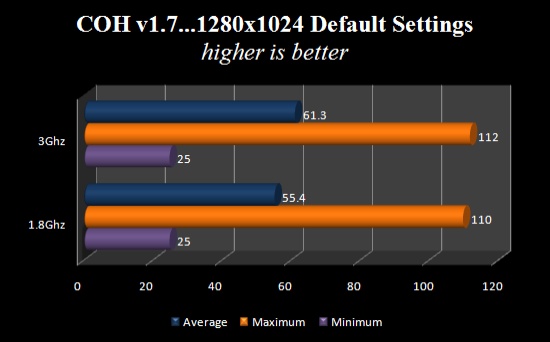
The gaming tests of 3DMark06 and Company of Heroes v1.7 were eye openers. My thought before this test was that there would be a significant difference between the two settings. This was not the case. 3DMark06 did show a difference in the results only because the CPU was the major component affected by the overclock not the graphics card. Had I changed the PCI-E bus I would have achieved higher results but I have been told by many that that is a bad idea. The test results of Company of Heroes was not what I had expected either. I assumed their would have been a much larger gap between the two clock speeds but was wrong. This game relies heavily on graphics rather than cpu usage. And that makes the difference.
Overall System Performance
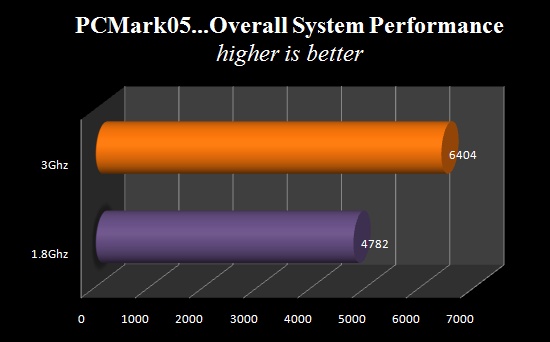
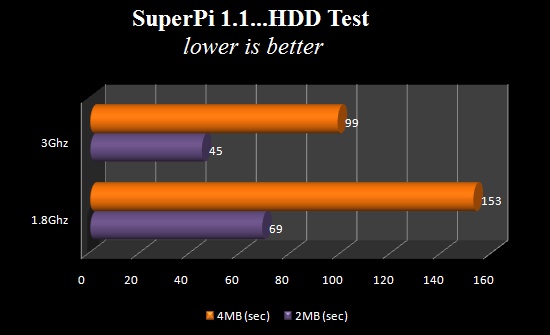
PCMark05 and SuperPI were both used in the overall system performance tests. PCMark05 tested the system as a synthetic test and SuperPI was used as a real world test of the motherboard. Both showed vast improvement in overclocking as opposed to default bios settings. SuperPI calculates PI from 16K to 16M of PI. The shorter the time it takes to complete the task the better.
Conclusion
I had a fun time doing the review on this motherboard. It took me a while to get the overclocking figured out. I was able to go to their website, www.quantum-force.net, where I found a video tutorial of how to successfully overclock it. I thought this was a very smart and helpful way to instruct someone on how to overclock this motherboard. And the fact that the tutorial is specifically about this board’s “Gladiator Bios” makes it all the easier. I decided to see how far it would go and achieved 3.4GHz but decided to keep it at 3GHz. Newegg has this board for $189.99. I would have to say that this board is worth every penny. It comes with a great set of accessories, has a great layout, and an efficient fan-less cooling which does have a fan that can attach which I recommend. Overclocking was a little tricky for me, but watching the tutorial eased the issue and made it possible to get a great overclock.
The only negative thing I can think of is that X38 boards will be out soon and of course will have better technology.
Pros:
+ Price
+ Gladiator BIOS
+ Crossfire capability
+ Silent heat pipe
+ Multiplier 0.5 increments
+ All solid capacitor
Cons:
– X48 coming out soon
I am giving the Foxconn Mars board a 10 out of 10. The X48 has nothing to do with how good this board is. It is not out yet so this ranks high on my list of performance boards.


