Are you running out of space to store your music, videos, and photographs on your PC? Do you have a home network and interest in serving up media to all of your computers? Would you like to share a printer over your network – without the requirement of having any other PCs running? If you answered “Yes” to any of these questions, then you really need to check out the latest Network Attached Storage (NAS) enclosure from Icy Box. See how the IB-NAS4220-B stacks up by reading on…
INTRODUCTION
Network attached storage. Storage that is attached to a network. NAS. Don’t these words just send shivers up your spine? Is there anything more exciting in the world of computers and technology? Well, truthfully most things out there probably are more exciting…until now.
OK, so most of you probably don’t go running to the local electronics store to check out the latest in network storage devices. I’m also guessing that a lot of you don’t even think about owning one. I know I didn’t – but that was before I received the Tagan Icy Box IB-NAS4220-B to review. Having owned several external hard drive enclosures, I’ve been perfectly happy with my single-drive boxes with pretty blue LEDs that easily connect to a single computer. After all, about the only use for an external hard drive is for backing up critical data on my PC, right? Not so, as I think you’ll agree after taking a closer look at the latest Icy Box provided by Tagan.
ABOUT TAGAN
Tagan started out with a group of technology professionals from different countries (Germany, Japan, and the United States) who met in 2001 at Taipei’s Computex show. They quickly realized that they had something in common – frustration with the existing design of PC power supplies. With their combined experience and expertise, the group set out to develop the best devices available. After more than a year of extensive research, design and testing, this team of international experts produced some of the best and most reliable power supplies for the PC and other systems. Ultimately, they became the founders of Tagan.
Since it’s birth, Tagan’s spirit and philosophy has been to produce the best quality power supplies using state-of-the-art technologies and make them accessible to all users. They’ve taken this same approach to expanding the product line, which now includes computer cases and storage devices. For more on this innovative company, please visit www.tagan.com.
One other point worth mentioning – Tagan and RaidSonic work together in providing International coverage. RaidSonic owns the Icy Box line and is the primary distributor in Europe, while Tagan handles the market in North America. For more information on RaidSonic visit www.raidsonic.de or www.raidsonic.de/en/pages/home/home.php (English version).
FEATURES AND SPECIFICATIONS
The Icy Box IB-NAS4220-B is much more than an external hard drive enclosure. Not only is it a “NAS” device (Network Attached Storage) capable of providing extra storage capacity to all computers on the network, but with an embedded Linux operating system and ARM9 processor, this unit is a very capable server with open source potential for those wishing to do a bit of coding. Let’s take a closer look to get a better understanding of some of its capabilities and applications:
Features:
• For home and office networks
• Unlimited number of users and groups
• Easy configuration via web browser
• Supports two 3.5″ SATA HDDs of any size
• Gigabit Ethernet network
• 2x USB client interface for printer, HDDs, USB Sticks
• One Touch Backup
• 7 Servers in one:
- Samba Server (for Windows network shares, MAC OS X)
- NFS Server (for Unix, Linux)
- FTP Server (remote access for file transfer from internet)
- DHCP Server (automatic network configuration)
- UPnP-AV (Twonky Media Server, 30 days test version)
- ITunes Support
- Print server (share printer via network)
• Quiet case – temperature controlled fan
• Low power consumption
Technical Specifications:
|
Feature/Specification |
Tagan Icy Box IB-NAS4220-B |
| Processor | ARM9, 400MHz |
|
System Memory
|
64MB SDRAM
|
|
Flash Memory
|
8MB
|
|
Max HDD Bay / Type
|
2 X 3.5″ SATA HDDs of any capacity
|
|
Max Storage Capacity
|
Unlimited
|
|
RAID Level
|
RAID 0, 1, Span (NRAID), JBOD
|
|
Supported File Systems
|
EXT2, EXT3, FAT32
|
| Supported File Transfer Protocols | SMB (SAMBA), NFS, FTP, UPnP-AV, BitTorrent Protocol |
|
Interfaces
|
Gigabit Ethernet, 2 x USB 2.0
|
|
Color
|
Black
|
|
Material
|
Aluminum
|
|
Power
|
AC 100~240V, 57W. 12V /3A, 5V/4,2A
|
| Dimensions | 9.4″ X 5.3″ X 3.1″ (LxWxH) |
| Net Weight | 3.5 lbs |
| Gross Weight | 5.4 lbs |
PACKAGING
I have to admit, I was a little surprised when I received the test unit and saw the graphic design of the Icy Box container. As you can see by the picture below, the box is black and hot pink. Yes, hot pink. Not that there’s anything wrong with that, just not what I expected for some reason. Bright colors aside, the box does provide several good pictures of the unit and is actually very informative. It’s also built very well and does a fine job of protecting the product within. There’s even a handy little carrying handle built into the top. The last picture below features the open box to illustrate how everything is packed inside. The foam inserts do an adequate job of holding the contents in place, and since the unit ships without any hard drives installed, they more than suffice for the purpose. And yes, the installation CD comes in a nice pink sleeve to match!


CONTENTS
Having browsed images of the Icy Box IB-NAS4220-B on the Web prior to receiving it, I wasn’t sure what to expect regarding size of the unit. Many of the pictures I’ve seen make it appear to be somewhat short and a little wide. I was pleasantly surprised when I pulled it out and saw how slim and petite it actually is, which you’ll see more clearly in subsequent pictures later in the review. As you can see below, the contents include:
- IB-NAS4220-B
- Installation/Application CD-ROM
- User Manual
- RJ-45 Network Cable
- Power Adapter
- Screws

All that is needed to get this thing up and running is a SATA hard drive or two. Let’s first take a closer look at the Icy Box and then move into the installation stage.
CLOSER LOOK
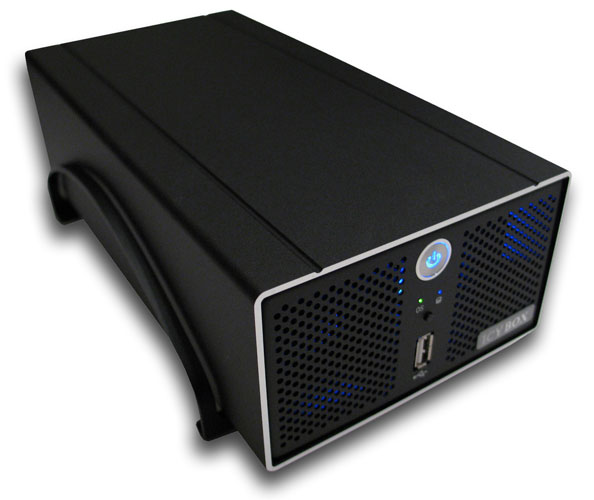
As I mentioned earlier, I was pleasantly surprised by the dimensions of this unit. It’s only 9.5″ long and the front faceplate is a mere 2.75″ x 4.75″. I guess I just hear “network attached storage” and immediately start picturing big boxes in temperature-controlled server rooms. This is definitely not that type of NAS and fits in easily among my home network equipment and peripherals. But enough talk, let’s take a closer look:
Starting with the front of the Icy Box, I was very pleased with the clean lines and sleek styling. Sometimes less is more, and in this case, it works well. The sides and top are fairly nondescript, with just two shallow grooves running the length of the top panel. The color is something of a flat black matte finish, giving it a bit of an industrial feel. I thought this was fitting considering the unit is extremely well built and very solid. As you’ll see more clearly in later pictures, the outside case is made from one piece of metal so there are no seams or screws to mar the clean finish. The legs are also single pieces with thick rubber bottoms, allowing for easy placement without worry of the unit moving around or scratching up whatever surface you choose to place it on.


Taking a closer look at the front, we see a fairly simple layout with the power button at the top and a USB 2.0 port on the bottom. The power button has a solid feel and response to it when pressed. Nestled right in the middle between the USB port and the power button is a tiny black button, which is nearly invisible in the picture. In fact, it’s nearly invisible in real life too!

This little nub is responsible for activating a cool feature called “One Touch Backup”. Deviating slightly from what one might expect with a simple external hard drive enclosure, “One Touch Backup” in this case means that when an external storage device (such as USB hard drive or USB Flash Drive) is plugged into the USB port and this button is pressed for 2 seconds, the contents of that same drive are backed up to the system disk of the IB-NAS4220-B. Alternatively, a printer plugged into this USB port becomes available to all computers on the network capable of connecting to the NAS, effectively turning it into a print server. Finally, the small labels (OS, HDD Access Indicator) in the middle of the unit sit just beneath tiny LEDs indicating power and hard drive activity. Frankly, the lights are so small that they really don’t seem to serve any purpose – especially since the grilles on each side are illuminated with a soft blue glow from inside. These vents help to cool the unit by allowing air to flow through with help from the rear mounted fan.
On the back of the IB-NAS4220-B, there’s another USB 2.0 port which functions in much the same way as the one on the front with the exception of the “One Touch Backup” function. This particular feature only works on the front port. The rear port is ideal for connecting a printer and enabling the print server function of the box. This functionality alone had me thinking of the IB-NAS4220-B as a good investment since you can easily share a printer throughout your home network without requiring any other PCs to be on.
In the picture below, I labeled all of the features on the back of the unit including the USB port. Other features include: Gigabit network interface, reset button, reboot button, plug for power supply, internal cooling fan, and Kensington lock port (for securing the device). The one concern I have about the layout on the back is that the reset button and the reboot button are right next to each other and could be easily confused with potentially disastrous results. The RESET button actually resets the unit to all factory default settings, effectively wiping out any configuration in place. The REBOOT button simply reboots the system, which is necessary when loading new software or changing settings. The one saving grace is that the reset button must be pushed for 5 seconds for it to activate. Luckily the IB-NAS4220-B can also be rebooted through software, which I think I would prefer to use so that I don’t accidentally hit the wrong button!

INSTALLATION
OK, now that we’ve taken a good look at the outside, let’s open up the unit and take a peek inside. Since it’s not that complicated inside, let’s go ahead and set it up as we do.
First, remove the 4 screws from the bottom of the IB-NAS4220-B. These hold the internal tray in place where the hard drives will go. Once the screws are out, slide the tray out (either front or back, it doesn’t matter) and flip it over.


Here’s a close-up view of the inside bay where the hard drive(s) will go. Surprisingly not that much to look at, is there? The key items are pretty easy to spot: the 2 red SATA data connectors and the 2 SATA power connectors (black, red, yellow wires). The second picture below shows a closer view of the circuit board and the SATA data connectors. That white wire in the middle with the blue tip is a temperature sensor. It controls the internal fan to cool the drives properly while minimizing noise.


The next step is very simple – connect a SATA hard drive to one SATA data connector and one power connector. The drive should be label side up so that the screw holes in the sides align with the holes in the tray. Also, if you plan to install 2 drives in the unit, use the power connector at the end of the cable, not the one in the middle. You’re basically going to bend the cable over and plug in the end connector, leaving the one in the middle of the cable positioned just above the drive. This will allow for easy connection of the next drive should you decide to install a second. Using the included special screws, secure the drive by inserting the screws through the blue rubber washers and tighten. These washers provide a nice bit of dampening and keep vibration noise down to a minimum. When the drive is installed, place the white wire with the temperature probe on top of the drive and secure it with the include thermal tape. Make sure it’s in a spot where the next drive won’t crush it. I set my second drive on top and rearranged the wire until I found a good spot. If you do choose to put in another drive like I did, it installs much like the first one.


Finally, with both drives installed, simply slide the tray back into the body of the enclosure. Secure it using the 4 screws removed at the beginning of the process and connect the power supply and Ethernet cable. Plug the other end of the Ethernet cable into your network switch or router. All that’s left to do now is turn it on and start configuring the device.


INITIAL SETUP
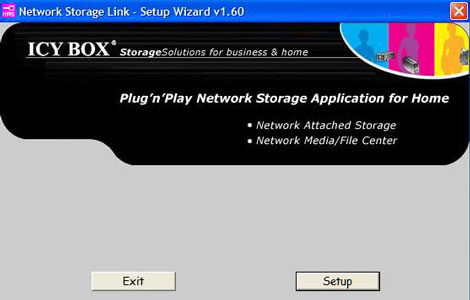
Initial setup of the device requires assignment of an IP address so that it can be found by other computers on the network. The whole process is extremely easy and for the most part automatic. Simply pop in the installation CD and select “Setup”.
Step 1. The device is discovered.

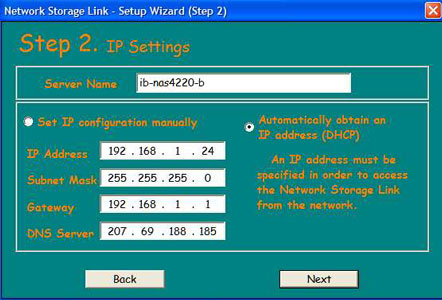
Step 2. Set IP configuration manually or allow it to automatically obtain an IP address.
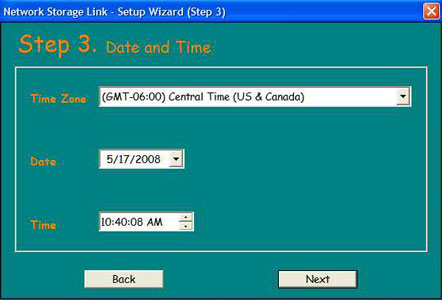
Step 3. Set the date and time.
Step 4. Confirm settings and save. DONE!

Now that the IB-NAS4220-B is visible on the network, we can continue with the configuration stage. Among other things, this involves formatting the drives, setting up RAID, and configuring user access.
CONFIGURATION
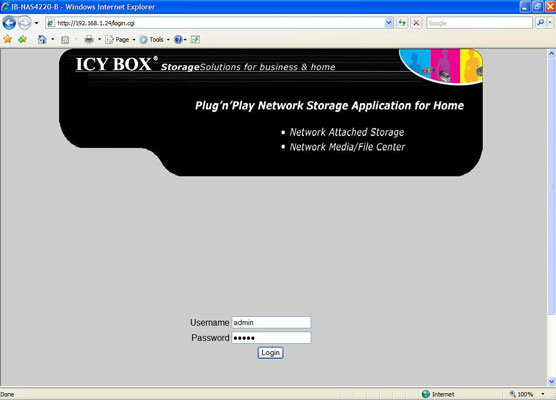
To access the management interface, simply open your Web browser and point it to the IP address of the device as specified during the initial setup stage. In this case, it’s “http://192.168.1.24”. The default username and password are both “admin”. Unfortunately there’s no way to change the username (or at least none that I was able to find). However, changing the password is easy and HIGHLY recommended since this is a network device and could leave you vulnerable to attack over the Internet. In order change the password, you must first configure the IB-NAS4220-B. Once that’s done, a “Personal Info” tab appears and all you have to do is enter a new password in the “Change Password” section, confirm it by typing the password again, and then click on “Save”.
Rather than posting hundreds of configuration screenshots, I thought I would focus on a few key areas. Below is the introduction/login screen accessed by typing the IP address of the device in your Web browser as explained above.
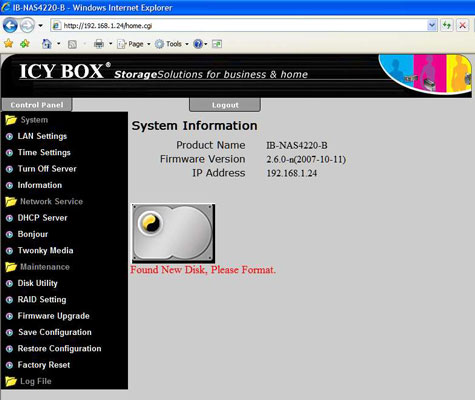
Once logged in, the first thing required is to format the drive(s) and if you so choose, set up RAID configuration. The screen shot below illustrates what comes up after logging in. To format the drives, click on the Disk Utility option in the Control Panel menu on the left side of the screen.
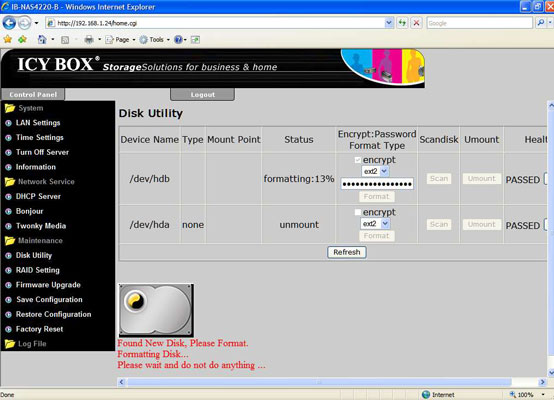
Here’s the Disk Utility section for formatting the drives. In this example, you can see that I have two hard drives and have chosen EXT2 format, mainly to demonstrate the encryption feature. Choices include EXT2, EXT3, and FAT32. Also, I planned to set up the disks as NRAID (also known as SPAN) and that requires an EXT2 or EXT3 file system.
Why NRAID (SPAN) and not RAID 0? Great question and I’m glad you asked! Let’s quickly review the choices:
RAID 0 splits data into blocks and writes to both drives at the same time. For drives installed inside of a computer with a fast bus, this can greatly improve performance. However, in this case, transfer rates are limited by the Gigabit network connection and could never reach full potential. In fact, even the user manual clearly says RAID 0 is not recommended for the IB-NAS4220-B. Since data is split between the two drives, if one drive fails, all data is lost. So, in a nutshell, there’s no benefit to using RAID 0.
RAID 1 writes the same data to both drives, creating mirror images of each other. This is a great solution for critical data since each drive contains the exact same information. If one drive fails, you still have the other one. I simply chose not to use RAID 1 because the drives I had were not equal size. In fact, one is only 320GB and the other 750GB. In a RAID 1 scenario, the drives would have been formatted based on the size of the smaller drive – in this case 320GB. I chose to avoid this configuration in order to maximize the available storage and take full advantage of my larger drive.
NRAID or SPAN is not actually a true RAID mode, but it could be viewed as one. It adds the capacity of the second drive to the capacity of the first, making one big drive (1 TB in this case). The user manual advises “Because RAID 0 does not offer a real speed increase SPAN should be preferred.” So preferred it became and that’s the mode I chose!
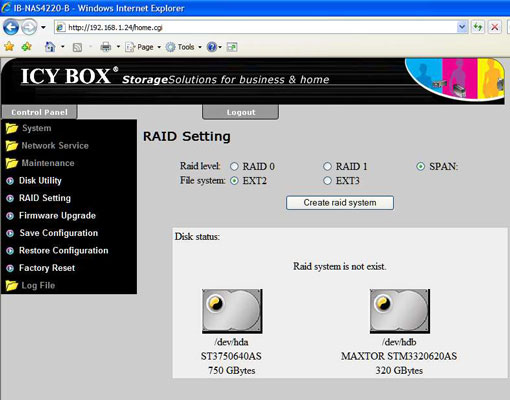
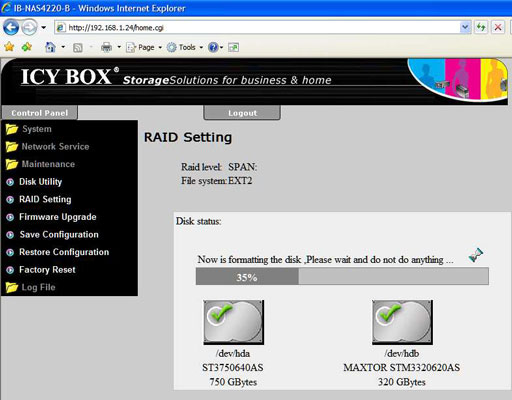
Here’s the configuration screen for setting up RAID. Notice that “RAID system is not exist.” To make it exist, click on the RAID level (SPAN in this example) and select a file system (EXT2 or EXT3) and click on “Create raid system”. Very simple and fairly quick.
Now for the tricky part, according to the disk status report “Now is formatting the disk, Please wait and do not do anything…” I complied and sat perfectly still for the next ten minutes for fear of getting another message like “all your base are belong to us“. I’m glad to report that the process went very smoothly and my base still are belong to me! (OK, shoot me! I just couldn’t resist taking a little dig at the recurring broken English used in the software and the manual. My apologies, but this is quickly becoming a pet peeve of mine.)
Finally, in a salute to Microsoft, the IB-NAS4220-B must reboot for settings to take place. I have to admit that the whole comment about pressing the login button if the page doesn’t refresh in 3 minutes and the onscreen countdown intrigued me. I found myself watching the minutes and seconds tick by to see if it would refresh before time ran out! (I can see it now, the next trend in Las Vegas – name the exact amount of time the ICY BOX takes to reboot! Get your bets in now!) Alas, I digress. The bottom line is that the system consistently rebooted in about 2 minutes. I say “consistently” because a reboot is pretty much required after every major setting change. A minor annoyance, but only during the configuration stage. Once it’s up and running, rebooting is not an issue at all.

CONFIGURATION (Cont.)
With the Icy Box up and running, I tackled the remainder of the configuration fairly quickly. The interface is very user friendly, and the manual walks you through the rest step by step. Although I joke about the improper English at times, the documentation does the job. As an excellent foreign language teacher I had in high school once said, “as long as you get the point across, you’re speaking the language.” With good illustrations and an intuitive approach, configuration really was quite simple. And on that note, let’s jump to a few more screen shots of some key settings. If you don’t mind, I’ll skip such topics as setting the clock.
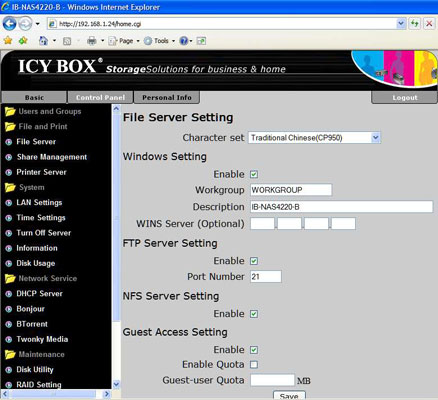
Since a big selling point to the IB-NAS4220-B is it’s multiple server capabilities, let’s explore these first. The picture below illustrates the file server configuration. Turning each one on or off is as simple as checking/unchecking the “enable” box. Just remember to hit “save” at the bottom of the screen to activate settings. I turned everything on for the sake of testing and demonstration, but some users might want to turn off certain features. For example, the Icy Box is a network device and can be configured to be accessed over the Internet. “Guest Access” could allow anyone to access certain specific sections of the data available on the IB-NAS4220-B while making other areas private. Should you want to keep everyone out, simply disable this feature by unchecking the box.
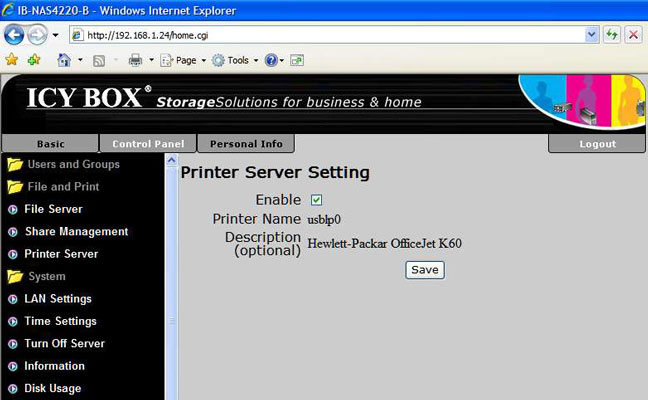
The next section is one of the more simple features, but one that I absolutely love. The Icy Box IB-NAS4220-B can be set up as a print server simply by enabling the function and then plugging in a printer to the back or front USB port. Since the front port has “One Touch Backup” capability for an external drive plugged into it, I highly recommend using the rear port for the printer connection. Setting it up was way too easy: 1.) Enable print server, 2.) plug printer into USB port, 3.) printer is recognized and configured. It’s literally that easy! Now to qualify that, I already had the printer set up on my main computer. Basically I just changed it from a local printer to a network printer, so the drivers were already loaded. If you’re setting up a brand new printer connected to the Icy Box, you’ll probably have to follow the steps in Windows to configure a network printer. It might take an extra step or two, but shouldn’t be any more difficult that connecting a printer directly to your computer.

Again, don’t forget to hit “Save” to lock in the settings. By the way, notice the “Personal Info” tab above? This shows up after configuring the hard drives, and it’s where you change the login password. Make sure at some point that you do this since “admin” isn’t really a very secure password!
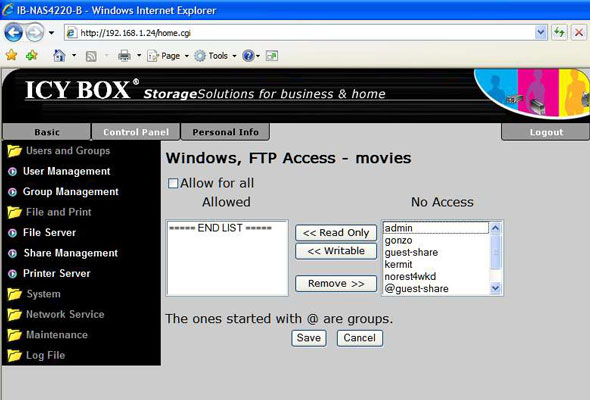
The remainder of the configuration greatly resembles everything I’ve shown already. It’s mostly a series of check boxes and saves, and as I mentioned earlier, the user’s manual does a good job of walking you through each step. I was a little intimidated at first, but as soon as I saw how simple it was, I got the Icy Box IB-NAS4220-B set up and running in just minutes. This includes setting up several “Shares”, which are basically just folders. In the example below, I created one called “Movies” where I planned to store my collection of ripped DVDs for viewing on any computer connected to my network. Notice that I typed “Movies” in the “Share Name” box. To create it, I simply hit “Save”.
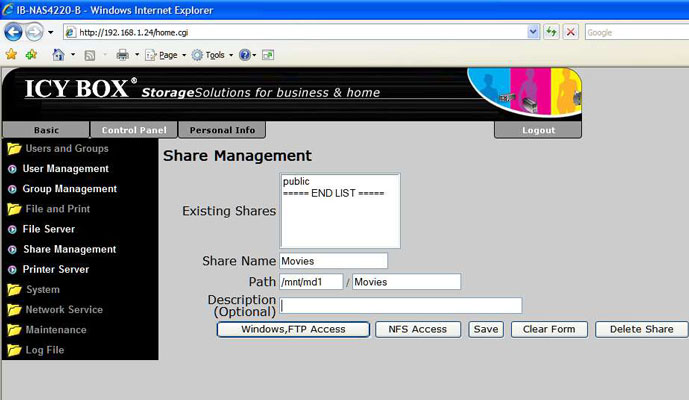
After creating the share, the next step is to decide which users should have access to it. It’s just a matter of highlighting the existing share “movies” and clicking on “Windows, FTP Access”. (I know, I know – only “public” shows up above because I haven’t hit “Save” yet, but for the purpose of avoiding yet another screen shot, imagine if you will that “movies” is in the existing shares section right above “public”!) ANYWAY, the picture below illustrates the next step which is simply moving users from the right “No Access” column over to the left “Allowed” column. As an alternative, simply clicking on “Allow for All” will give all users access to the shared drive called “movies”. Make sense? Good, because that’s basically the same logic for adding users and groups of users. It’s all very simple and intuitive.
For those interested, below are a few additional screen shots illustrating how easy it is to set up server settings such as DHCP, Bonjour (including iTunes support), BitTorrent, and Twonky Media. One notable feature is that the Icy Box IB-NAS4220-B is a smart little box and can take over downloading a file using BitTorrent protocol even after your PC is turned off.


CONCLUSION
Once setup was complete, I began a series of tests to check out the performance of the Icy Box IB-NAS4220-B. Being rather practical myself and more interested in “real world” performance than a bunch of statistics, I decided upon a fairly practical method of testing. Here’s how I set it up:
- I connected the IB-NAS4220-B to a Gigabit Ethernet switch (Zonet ZFS3108)
- I also connected my main system (Abit IP-35 Pro with Intel E6750 Core 2 Duo processor and 2GB of PC-6400 DDR2)to the Gigabit Ethernet switch via an onboard Gigabit Ethernet connection.
- Additionally, I connected two older computers to the Gigabit Ethernet switch via Linksys 10/100 Ethernet cards. One system is a P4 3.06 GHz with 512MB of RDRAM. The other is a P4 Celeron system running at about 1.5 GHz with 512MB SDRAM. These were thrown in to add network traffic and were set to download large files from the Internet during testing.
- Using my main system, I transferred 2 large files to the IB-NAS4220-B and then transferred them back from the NAS to my PC. I did this 5 times and averaged the results.
- All PCs used in the test were running Windows XP so results may vary with Vista users.
Here’s what I found:
- Transferring a 105MB file from NAS to PC took an average of 5 seconds (21 MB/s)
- Transferring a 664MB file from NAS to PC took an average of 33 seconds (20.12 MB/s
- Transferring a 105MB file from PC to NAS took an average of 7 seconds (15 MB/s
- Transferring a 664MB file from PC to NAS took an average of 51 seconds (13.02 MB/s)
Interesting results! Sending a file to the IB-NAS4220-B actually takes longer than pulling it back up. With an average speed of about 20.56 MB/s from NAS to PC, this Icy Box should have no issue acting as a media server or other network storage device on any modern network. And with an average rate of about 14 MB/s, sending large video files to the IB-NAS4220-B is definitely a tolerable and worthwhile endeavor.
For the last little bit of testing, I tried an even more unscientific experiment. I ripped a copy of the DVD “The Descent” and copied the files over to the Icy Box. I then launched a software-based DVD player on 3 computers at the same time and played the same movie file on each simultaneously. Even serving up the exact same file to 3 different systems, the Icy Box performed flawlessly. Playback on all systems was smooth and continuous, as if the DVD were actually playing directly on a local drive on each system. It was at that point that I realized just a fraction of the potential for this device and decided it would make an excellent foundation for a home entertainment system.
Final Thoughts
My initial thought when I found out I was going to be reviewing the Icy Box IB-NAS4220-B was that it was going to be very similar to some of the external storage solutions I’ve used in the past. I was at first disappointed that it only had a USB 2.0 interface and not ESATA, but again, I guess I was thinking about simple external drive boxes that attach directly to a PC – not Network Attached Storage (NAS). Since the Icy Box attaches to a network (hence the whole Network Attached thing!), it wasn’t until I received it that it hit me – this thing uses a Gigabit Ethernet connection for communication. The USB ports are really for getting data into the NAS rather than out. Their other purpose is to provide a port for setting up a print server.
Anyway, my point is that I had to rethink the design and purpose of the Icy Box, and I realized that the people at Tagan really did know what they were doing when they built this thing! I was very impressed and the more time I spent with it, the more ideas I came up with as how to use it. The Icy Box IB-NAS4220-B is a well constructed and versatile device with a ton of functionality. I highly recommend it for home users looking for a better way to store and serve data of any type, whether it be movies, music, photos, or just data files.
Pros:
+ Solid construction
Cons:
Final Score: 9 out of 10 and the Bjorn3D Seal of Approval.


