Though the corporate environment has been the main domain of network storage devices, the Thecus N3200 NAS Server is designed with the home user in mind.
INTRODUCTION
Even for the home user, if “in today’s networked world, digital content is truly the most precious asset”, then perhaps protecting that content and providing easy access to that content is second on the list. The Thecus N3200 is a Networked Attached Storage (NAS) device that proposes to do just that by providing complete data redundancy using RAID 5. Or as Thecus puts it, “RAID 5 Comes Home”.
Though the corporate environment has been the main domain of network storage devices, the Thecus N3200 NAS Server is designed with the home user in mind. But that doesn’t mean that the N3200 wouldn’t feel equally at home in a small business (or SOHO) as well. As the need to store and share information ever increases, so does the need for a means. And Thecus thinks it has just that.
The Thecus N3200 has been designed for ease-of-use – from the installation of hard drives using their completely tool-less design to the ability to configure and manage the unit through any web browser using their web-based management tool. Small, yet feature ladened, the Thecus N3200 hopes to help propel Thecus to the top of the heap when it comes to NAS solutions.
About Thecus
Thecus focuses on hardware and software integration and development, and the core protocols of digital media storage. The result is products that are easier to use and can offer greater connectivity to consumer devices. Thecus envisions greater integration of data storage for both home and office environments, and we strive to be a pioneer in these fields and provide our users with the products that are second-to-none.
To develop optimal storage solutions for such a wide range of users, Thecus has assembled a best-in-class development team with extensive experience in both storage hardware and software development. By combining engineering expertise with a keen focus on the end-user experience, Thecus builds products that are not only powerful but easy-to-use, making advanced storage products accessible to users of all skill levels. Thecus’ mission is to transform the most sophisticated technology into easy-to-use solutions to introduce comfortable network storage environment to people’s everyday life. By crafting technology that is transparent as possible, Thecus continues to bring exceptional data storage solutions to advanced users and organizations around the world.
Core Value
Thecus Brand – committed to establish Thecus as “NAS Export” and entire corporate
pursuing the meaning and characteristics behind Thecus brand name.
Innovation – investing vast resources in research and development to provide
high performance and easy-to-use solution.
Quality – top quality is the primary value for Thecus. We give our promise to
bring most prompt and satisfying solutions and service.
Integration – understanding consumers’ need thus bringing the most complete product
line to serve various type of application environment, especially to mid
and high end market.
Reliability – bringing most secured easy-to-use, and reliable storage solution.
Expanding service and product coverage worldwide, Thecus mission is to establish international service network. Committed to Thecus core value, the entire corporate members, research and development, sales, and technical support teams, are firmly standing by this commitment of service. We put words into actions to convince our clients that Thecus is the No. 1 choice with it comes to network attached storage solution. We promise to deliver innovative solutions that empower users reaching full capacity of network storage and become the best brand name for NAS solution.
Thecus on the N3200
The digital age has arrived, and users from around the world are looking for ways to store, share, and secure their movies, videos, photos, and music. The need for digital storage solutions in the home is higher than ever, and with this in mind, Thecus Technology has created its most advanced home NAS device yet – the N3200. Featuring three SATA hard disk bays, an array of friendly features, and stylish design, the N3200 brings the security and performance of RAID 5 to a unit perfect for the home.
Small yet powerful, this 160 x 170 x 215 mm unit comes with some of Thecus’ most advanced features. Headlining is its three SATA drive bays, which not only give the N3200 up to 3TB of storage capacity, but also gives users the option of RAID 5. With RAID 5, home users can enjoy the speed of a striped array with the security of complete data redundancy, ensuring that their precious memories will stand the rest of time. The N3200 has also been designed for total ease-of-use. With a completely tool-less design, installing and removing disks is a snap, which means that users can spend more time enjoying their digital media and less time setting things up. A handy LCD display informs users of system status, and enables easy system management in dimly-lit environments. Thecus’ web-based management system makes a return to the N3200, allowing users to configure and manage the unit through any browser connected to the network, and with USB wireless dongle compatibility, users can even connect to the N3200 without being tangled up with wires.
As a NAS for the home, the N3200 also comes with a selection of friendly features that enable the digital lifestyle. A built-in iTunes® Server makes it easy to stream an entire music library over the network, while a Photo Web Server enables users to share and enjoy photos with friends and relatives. A DLNA-compatible Media Server is also included, making the N3200 an ideal device to stream digital content to DLNA-compatible devices. The N3200 can also keep an eye on things at home with its Web Surveillance Server. Just plug in a compatible USB webcam and the N3200 can take scheduled snapshots – all without having a PC turned on!
FEATURES
N3200 RAID 5 security and performance
Our most advanced home NAS yet. The N3200 is the first of its kind that offers RAID 5, offering a perfect combination of data security and performance. Enjoy the speed of a striped array with the security of complete data redundancy. What could be better?
The N3200 is perfect for the home. Its Media Server allows easy connections to DLNA-compatible devices. The iTunes® Server offers music streaming throughout the entire home, while the Photo Web Server enables users to share their precious photos anywhere on the network. With the N3200, the digital lifestyle can be fully realized.
Featuring clean lines and sophisticated styling, the N3200 is equally suited for the study or the living room. It’s distinct design makes it an appliance that users will want to show off.
Thecus is known for making things simple, and the N3200 is no exception. With its uniquely-designed disk management system, installing and removing disks is a snap, which means that users can spend more time enjoying their digital media and less time setting things up.
The handy LCD panel makes managing the N3200 easy, even in dimly-lit environments like a living room during a movie screening.
Optional wireless connectivity via compatible USB dongle allows users to access their media files all without the need for cumbersome wires.
SPECIFICATIONS
Hardware Specifications
|
Network Interfaces
|
|
|
WAN
|
1 x 10/100/1000 Mbps Ethernet Port
|
|
LAN
|
1 x 10/100/1000 Mbps Ethernet Port
|
|
Wireless (optional)
|
IEEE 802.11b/g (using approved USB Dongles)**
|
|
Storage
|
|
|
HDD Bay
|
3 x 3.5″ SATA HDD
|
|
HDD Capacity
|
80/120/160/200/250/300/400/500/750/1000
|
|
IO Interfaces
|
|
|
PCI Interface
|
For proprietary Thecus application
|
|
eSATA Interface
|
1 x eSATA port (Back)
|
|
USB
|
2 x USB 2.0 ports (Front x1, Back x1)
|
|
IR receiver
|
For future options
|
|
System Information
|
|
|
LED Indicators
|
1 x Power LED
2 x Network link + activity LED
3 x Hard drive power + activity LED
|
|
LCD Module
|
For basic configurations and status display
|
|
Power Supply
|
|
|
External Adapter
|
AC 100 ~ 240 Volt, 50/60 Hz, auto detection
|
|
Environment
|
|
|
Safety and Environment
|
CE, FCC, BSMI, C-Tick, VCCI, RoHS Compliant
|
|
Temperature
|
5°C to 40°C
|
|
Humidity
|
0 ~ 80% R.H. non-condensing
|
Software Specifications
|
Network
|
|
|
Configuration
|
Fixed IP address, Dynamic IP address, PPPOE, DDNS
|
|
Network File Protocols
|
Microsoft Networks (CIFS/SMB)
Apple Filing Protocol (AFP 3)
File Transfer Protocol (FTP)
WebDisk through Hyper Text Transfer Protocol (HTTP) or Secure Hyper Text Transfer Protocol (HTTPs)
|
|
Network Client Type
|
Microsoft Windows NT/2000/XP/2003/Vista
Unix/Linux/BSD
MAC OS X, OS 9, OS 8.6
|
|
DHCP Server
|
Assigning IP address on LAN/WLAN ports
|
|
Disk management
|
|
|
RAID
|
RAID 0, 1, 5, and JBOD
Auto Rebuild
Hot Swappable
Hot Spare
Disk Roaming
|
|
Power Management
|
Disk idle spin-down
|
|
External USB
|
HDD/Flash disk support
|
|
Multimedia Support
|
|
|
Media Server
|
Works with DLNA-certified players.
Supported File Types: MPEG, RMP, WPL, PLS, M3U, ASX, WAV, PNG, BMP, AVI, WMV, WMA, MP3, LPCM, JPEG
|
|
iTunes Server
|
Supported File Types: AAC, MP3, WAV
|
|
Photo Web Server
|
Supported File Types: GIF, JPG (JPEG), BMP, PNG
Support EXIF display
Support slide show
|
|
Web cam
|
Support Capture, preview, schedule
Support image size : 160 x 120, 320 x 240, 640 x 480
|
|
Share Management
|
|
|
User Authentication
|
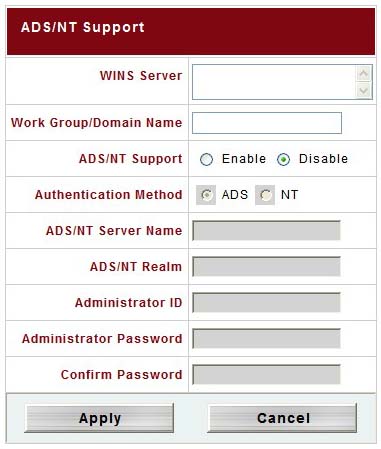
Microsoft NT Domain Controller (PDC)*
Microsoft Active Directory Authentication (AD)*
Supports built-in user accounts Supports built-in user groups |
|
Folder Management
|
Share Folder Level Permission
Public Folder
|
|
File System
|
|
|
File System Type
|
Journaling File System
|
|
Language Support
|
Unicode Support
|
|
Authorization
|
Read, Write or Deny options on individual users or groups
|
|
Administration
|
|
|
Multi-Lingual Web-based Administration
|
Web-based server management Interface Supports English, Traditional Chinese, Simplified Chinese, Japanese, Korean, French, German, Italian, Spanish
|
|
Setup Wizard
|
MS Windows, MAC OS X device discovery and setup utility program
|
|
E-mail notification
|
Send system message via e-mail to specified e-mail accounts
|
|
NTP support
|
Network Time Protocol support
|
|
Backup
|
|
|
Thecus Backup Program
|
Thecus Backup Utility (Client backup utility; supports Microsoft Windows XP/2000 /MAC OS X)
|
|
USB copy
|
Copy USB Mass storage device contents to specified location to NAS
|
|
Misc.
|
|
|
Print Server
|
Network printing through Internet Printing Protocol (IPP) using USB printer
|
|
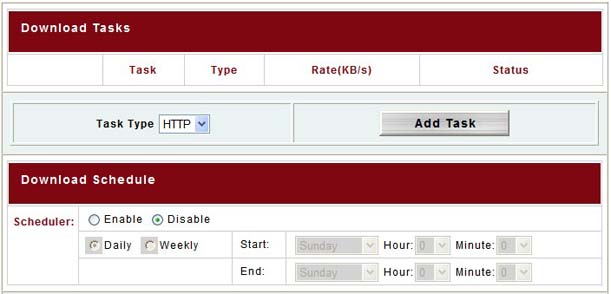
Download Manager
|
Support BT, FTP, HTTP schedule download
|
|
Schedule on/off
|
Schedule on/off form power saving
|
PACKAGING
I arrived at home one evening to find a FedEx note stuck to my door. A delivery attempt had been made and I was not there to sign for it nor would I be able to do so on the next two and final attempts. I called FedEx and learned that this was FedEx Residential delivery and that I could stop by on the following Saturday and pick up my package. The Thecus N3200 was packed inside of an N4100 box but, at first, I didn’t know that and I thought that Thecus had sent me an upgraded unit. There was a bit of panic there mixed with delight because I only had three hard drives for testing, not four. But four is usually better than three so I thought that if I needed to get a fourth drive, so be it. However, upon opening the N4100, I found an N3200 tucked tightly inside. Panic attack adverted and wallet intact.
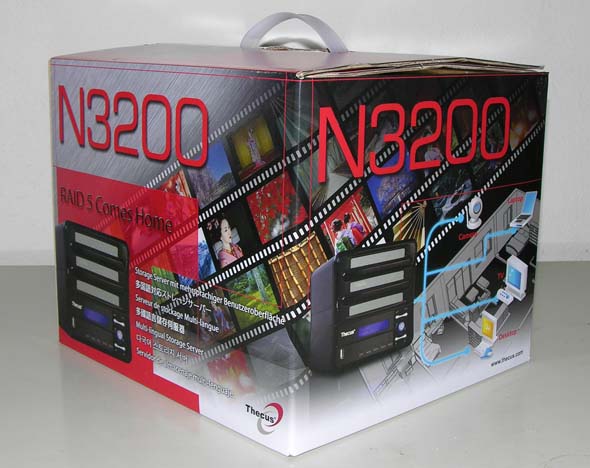
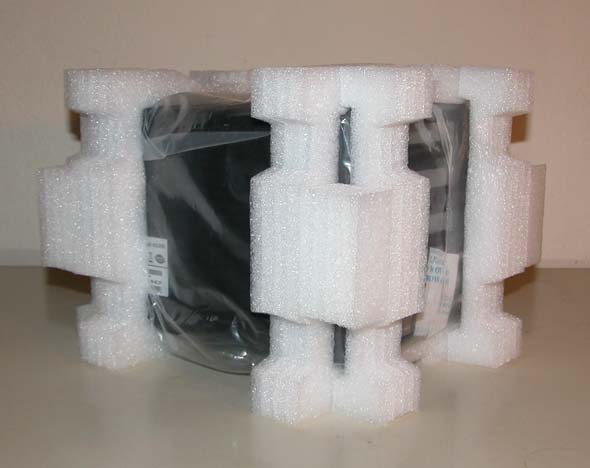
The box that the Thecus N3200 comes packed in is very colorful and very multi-lingual. Thecus has aimed this product towards a very large market as evidenced by their inclusion of support for nine different languages with their Multi-Lingual Web-based Administration. The unit inside is wrapped nicely in plastic protected by mushy type foam pieces. I guess this kind of foam could be used as a kind of shock absorber if the unit was to get dropped in shipping. In any case, this unit was well protected and arrived safely.
BUNDLE
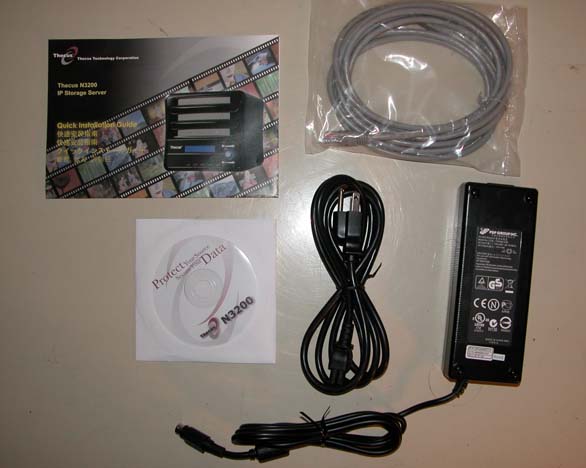
The Bundle is sparse yet adequate. It basically has everything that is neccessary to get you up and running without any of the additional frills. There is a power brick with din connector and power cable for juice, a network cable for your router or switch, and a CD-Rom. Though the CD-Rom includes a .bin file for a firmware upgrade and a utility called Thecus Backup, these are best to be gotten directly from the Thecus web site because you’ll want/need the latest version. Alas, with the bundle, a Quick Installation Guide is included to help you get up and running as fast as possible.
INSTALLATION
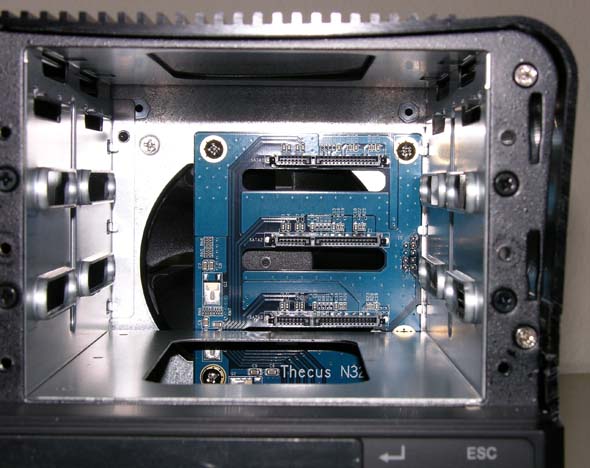
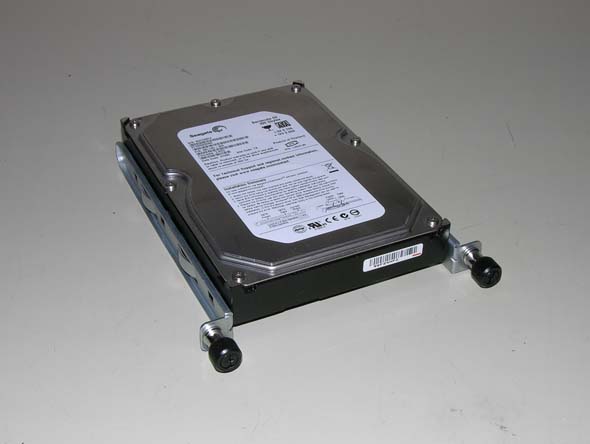
The Thecus N3200 is a nice compact little unit constructed mostly of lightweight aluminum that packs in lots and lots of features but does not include any SATA hard drives. You’ll have to purchase those on your own – up to three of them. And you might as well fill it up, as I did, to reap all the benefits that this network attached storage device has to offer. This unit supports many of the most commonly used operating systems including:
Microsoft Windows NT/2000/XP/2003/Vista
Unix/Linux/BSD
MAC OS X, OS 9, OS 8.6
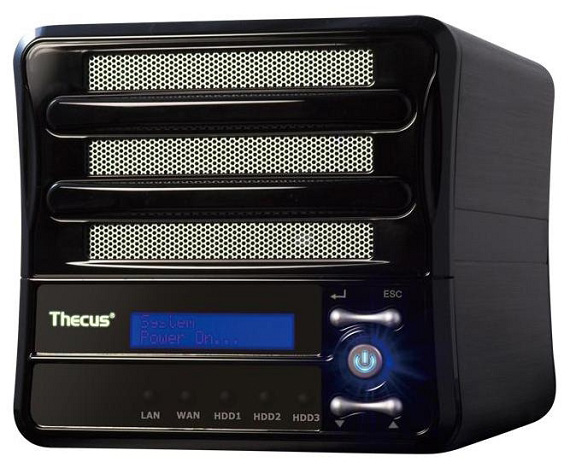
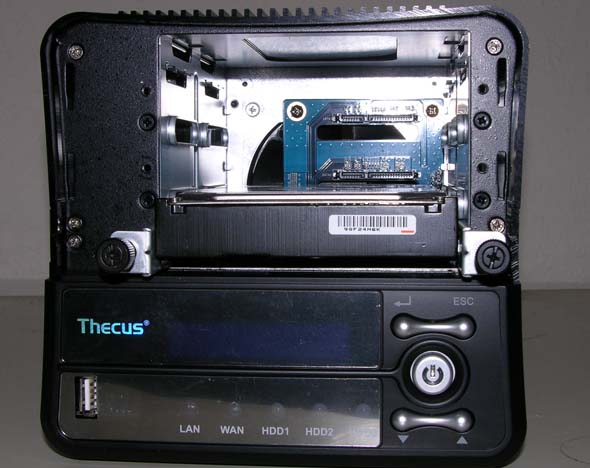
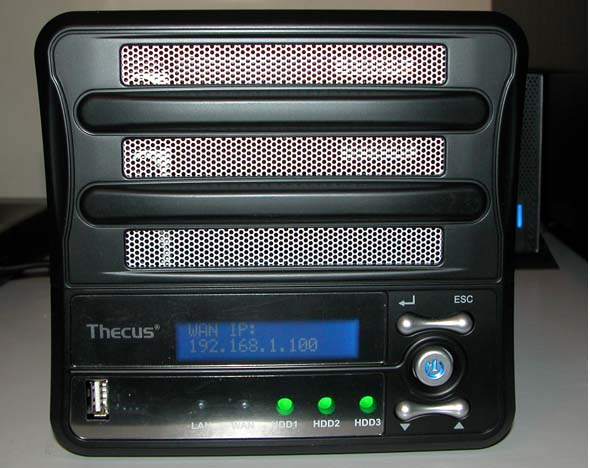
The front panel includes an USB port for the Thecus USB Quick Copy function, LAN and WAN indicators, as well as indicator lights for HDD1, HDD2, and HDD3. Above the Power Button sits the Enter button and Escape button and below the Power Button sits the Up and the Down Button that allows you to scroll though the various Thecus status indicators on the LCD Panel.
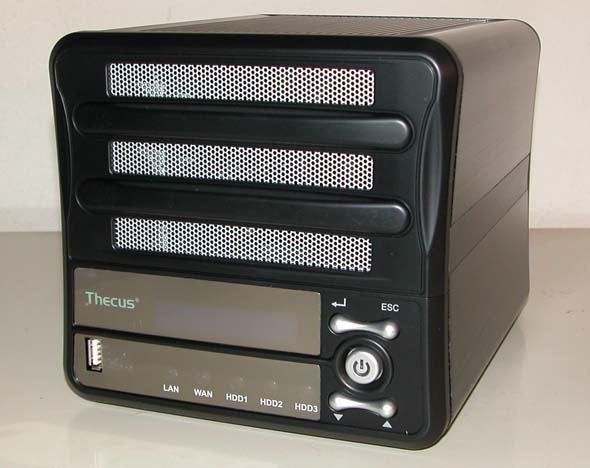
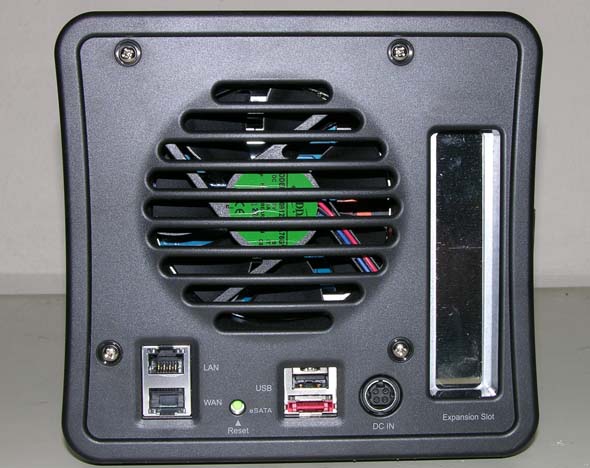
The rear panel exhaust fan keeps things cool and quiet. The fan doesn’t make much noise and the unit itself doesn’t exhibit any warmth to the touch. There are additional connections on the rear that help make use of the Thecus N3200’s full functionality.
The Thecus N3200 is equipped with an LCD on the front panel. During normal operation, the LCD will be in Display Mode and will rotate the following messages every three seconds:
| Display Mode | |
| Item | Description |
| Host Name | Current host name of the system |
| WAN | Current WAN IP setting |
| LAN | Current LAN IP setting |
| RAID | Current RIAD status |
| USB | Current USB status |
| System Fan | Current system Fan status |
| Temperature | Current system temperature |
Note: If the RAID array is in a degraded state, the LCD display will be stopped in display mode and show which disk is degraded in the array: RAID: Degraded
SETUP
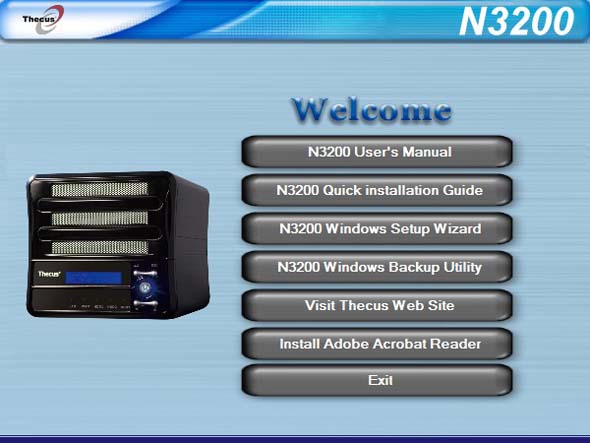
Once the hard drives have been installed and the network cable has been attached (mine connects to a D-Link DSG-1008D Gigabit Switch), it’s time to pull out the Thecus CD-Rom. The Welcome Screen shows many options, but the one we’re looking for is the N3200 Windows Setup Wizard.
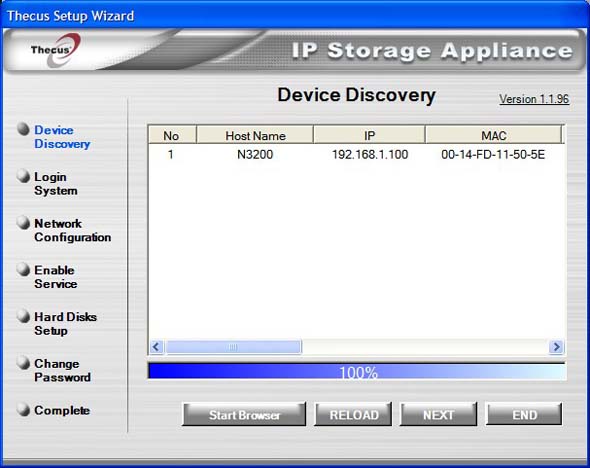
The first step in the Thecus Setup Wizard is the Device Discovery routine. It finds IP Storage Appliances on the network – their Host Name and IP and MAC Address. Clicking on Next takes you to the login screen where you type in the default username and password that is provided by Thecus.
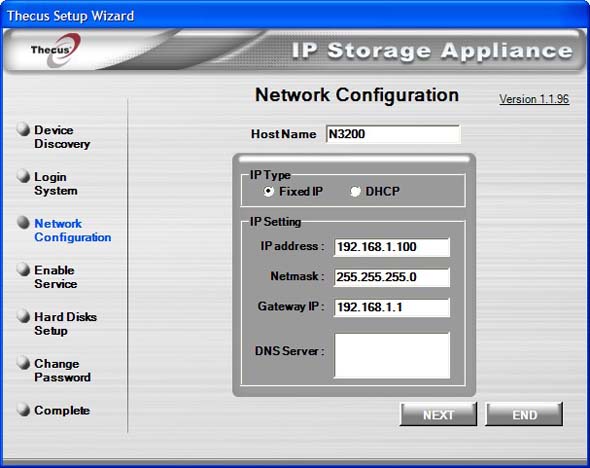
Once logged in, it’s time to setup the Network Configuration. You have your choice of DHCP or Fixed IP. I use a fixed (static) IP scheme on my network for better control. And though, for now, I am leaving the IP address of the N3200 at it’s default IP address of 192.168.1.100, I may want to change that at a later date. But be sure, I’ll be sure to write down that IP address someplace for safe keeping.
I skipped over the Enable Service portion of the Thecus Setup Wizard. The service that can be enabled or not is the FTP Server. I did enable it later on to see what it was all about and to make sure that I understood how it functions and to make sure that it was functioning properly. However, since this system is for me and me alone and I alone have singular access, I did not see the need for it. By the way, it works just fine.
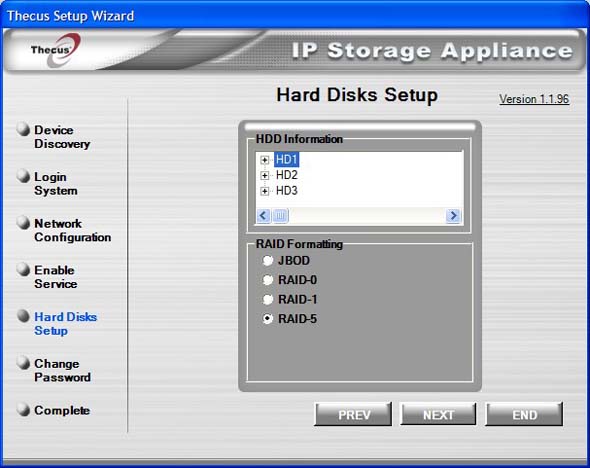
Hard Disk Setup provides information on the number and type of hard disks installed. This is where you determine the type of RAID operation that will be used. I’m going to use RAID 5 to start out with but the Thecus N3200 provides four different levels of RAID:
| RAID Levels | |
| Level | Description |
| JBOD | The storage volume is a single HDD with no RAID support. JBOD requires a minimum of 1 disk. |
| RAID 0 | Provides data striping but no redundancy. Improves performance but not data safety. RAID 0 requires a minimum of 2 disks. |
| RAID 1 | Offers disk mirroring. Provides twice the read rate of single disks, but same write rate. RAID 1 requires a minimum of 2 disks. |
| RAID 5 | Data striping and stripe error correction information provided. Excellent performance and good fault tolerance. RAID 5 requires a minimum of 3 disks. RAID 5 can sustain one failed disk. |
Now that the hard drives have been setup in their RAID array, it’s time to change the password and exit the Thecus Setup Wizard. To continue, open up a web browser and type in the IP address of the N3200 (in this case 192.168.1.100). This brings up the Thecus Multi-Lingual Web-based Administration tool where you log in using your newly created password. The username remains the same. From there, goto Storage, then RAID. The RAID array will start building and the formatting process begins. Time for a nap.
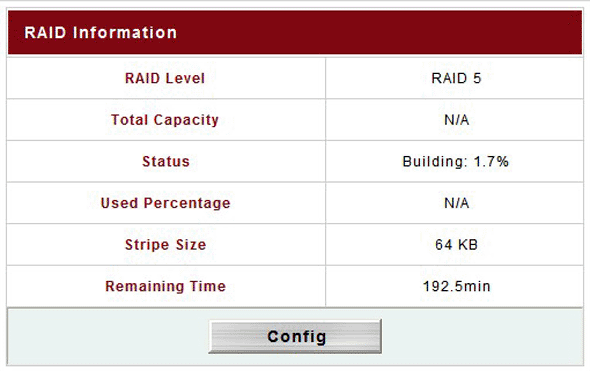
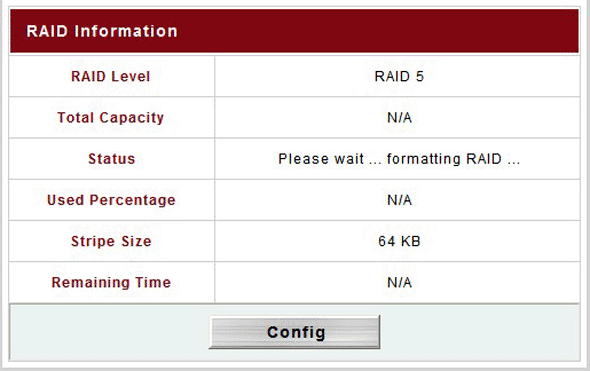
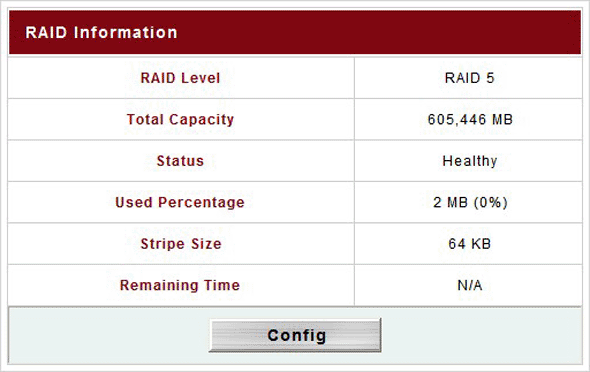
After the array has been built and formatted the information is displayed. You can see below that the RAID array is healthy and gives me a total capacity of just over 600GB. The smaller Stripe Size of 64KB is better suited for smaller files where a larger Stripe Size would be better suited for larger files (such as larger media/movie files).
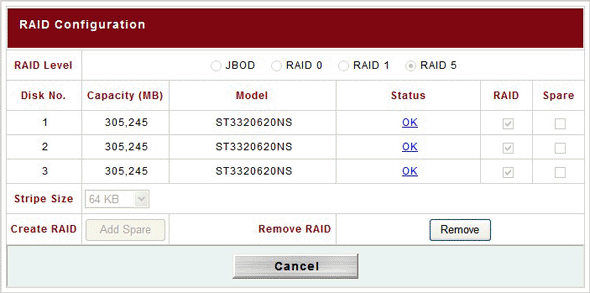
The RAID Configuration Screen shows you just what’s what. It provides you with the RAID Level, Disk No., Capacity, Model, and Status, as well as Stripe Size. You can remove hard drives from the RAID array or add drives or change the array itself to another type if you desire.
If you’re satisfied with the array itself, all that’s left to do is to create Users or Setup Authentication and to create Folders and setup ACLs with the Web-based Admin tool. I setup myself as the solitary user and let it create a default folder for me (called chuck), but I later changed that to “Home”. Also, I gave myself full rights to everything (imagine that!).
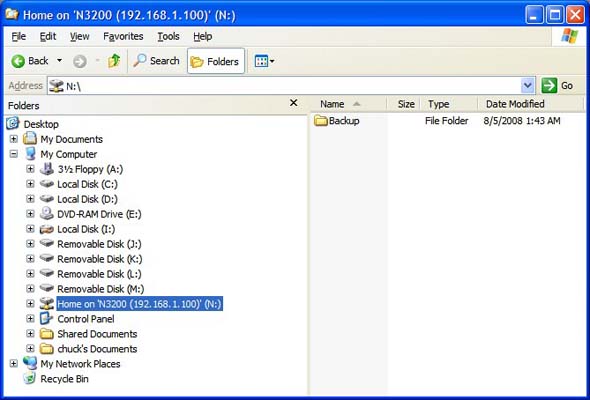
To make things easy on myself, I mapped the “Home” folder in Windows and made it my N: drive. As you can see below, I’ve already made use of the Thecus N3200 in my backup routine. Hopefully, it will become a routine with me and I will no longer require medical assistance when I find (or don’t find) that a file is missing.
FIRMWARE UPDATE
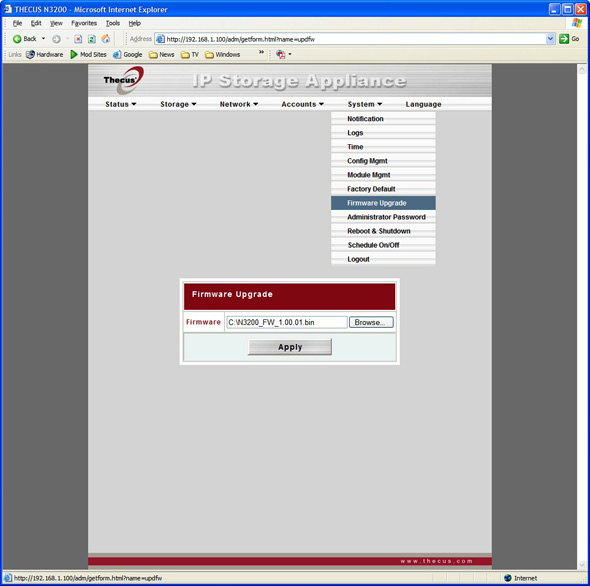
There are certain features of the Thecus N3200 that are not available until a firmware upgrade is performed. I’m not sure why Thecus chose to implement this in such a way, but updating firmware always makes me nervous. Though I’ve never had a firmware update go bad, it can happen. Fortunately for me, the biggest problem that I had with the update was that the .bin file on the Thecus CD-Rom was a bit outdated and I had to go to the Thecus web site and download the newest version. Once the firmware update was performed, the additional features were unlocked. Note that once the firmware update is in place, it cannot be downgraded.
Installing the firmware will open up the following features:
Status
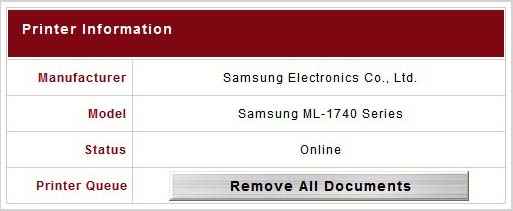
Print Server
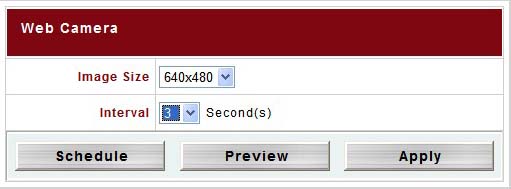
Web Camera
Network
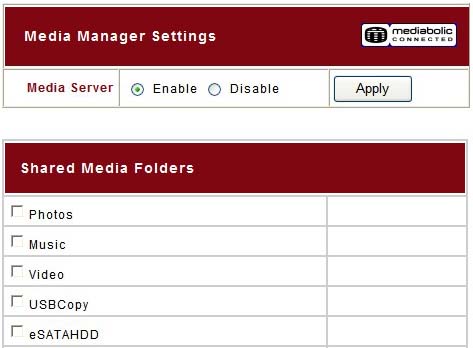
Media Server
Download Manager
Apple Network
NFS
Accounts
Authentication
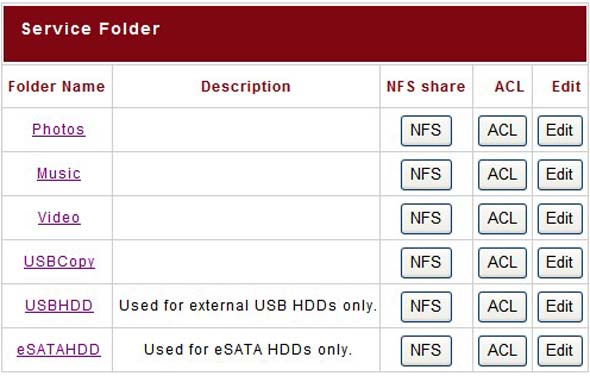
The following service folders shown below were created by default and NFS Share can be configured to determine which hosts on the network are allowed to access folders using NFS. These folders are public by default and anyone can access them. This can be changed using the Edit button. Futhermore, access can be controled by the ACL button. The Access Control List allows specific users or groups rights and privileges.
UNLOCKED FEATURES
The unlocked features can be pretty handy if you have a want or need for them. Sadly, With no web camera, Apple Network, Digital Living Network Alliance (DLNA) standard appliance, or Active Directory Service (ADS), I was not able to test some features. However, including them with the Thecus N3200 makes for a well-rounded full-featured unit.

TEST SETUP
All tests were conducted on the following test platform. There was no format of the hard drive and I did not use a fresh install of the OS. That means that I used an already formatted drive with the OS installed and that I didn’t wipe the drive and reinstall the OS prior to testing. Kinda. What I did was to ghost the image (using Norton Ghost 8.0 – DOS based) of my C: drive so that I could free up two of the three Seagate 320GB hard drives that I needed for testing. They were in my system as a RAID 0 array and I wanted to transfer the data from them onto a Western Digital 200GB to make it my new boot (C:) drive. The image went smoothly and all was well. Or so I thought.
When I booted up the Western Digital 200GB I got into Windows XP and a lot of trouble. My new Western Digital 200GB drive with the OS showed up as the F: drive and not the C: drive as I had expected. The two Seagate 320’s in RAID 0 showed up as the C: drive. Oops. I had forgotten to unplug them before I booted up. So, I shut down, unplugged them, booted back up, logged into Windows and it immediately logged me off. It did that time and time again. Very frustrating, indeed! When I plugged the Seagates back in, viola! I could log in. But I still the same problem. The Western Digital 200GB boot drive still showed as F: and I could not change that to C: in Windows because Windows would not release the two Seagate 320’s in RAID 0 array from their C: drive duties. Crap. It’s all a learning experience, I guess.
So, after spending quite some time on the Internet researching the issue, I found out that I could probably fix this by going into the Window’s hive and changing the information using one of a couple of different methods. Though I probably could have learned something, I was very tired and opted for the easy way out. My learning experience window had passed. I re-imaged the Western Digital 200GB in 28 minutes and this time I was very careful to make sure that the two raided Seagate 320’s were unplugged. When I started the OS, it picked up everything that it needed and all was well. My Western Digital 200GB was now my C: drive.
| Test Platform | |
| Processor | Intel Core 2 Duo [email protected] |
| Motherboard | XFX MB-N680-ISH9 |
| Memory | 2 GB (2 x 1 GB) G.Skill DDR2 1066 |
| Drive(s) | 1 – Western Digital 200GB SATA 1 – Western Digital 250GB SATA 1 – Seagate Barracuda ES 400GB eSATA |
| Graphics | (2) XFX Geforce 8800 GTX |
| Sound | Creative Labs X-Fi ExtremeMusic |
| Power Supply | Thermaltake Toughpower W0133RU 1200W |
| Display | Dell 24″ 2405FPW |
| Case | Koolance PC4-1036BK Watercooled Case |
| OS | Windows XP Pro SP2 |
| Network Device(s) |
D-Link DGS-1008D – 8 Port 10/100/1000 GIGABIT Desktop Switch |
| ThecusN3200 | |
| Drives | 3 – Seagate Barracuda ES 320GB SATA |
My Intel Core 2 Duo E8500 has a stock speed of 3.16GHz but I overclock it to 4.0GHz and it runs pretty stable 24/7. I also fold 24/7. If you don’t know what folding@home is, you can read about it in our forums here. It’s for a good cause and we at Bjorn3D.com would welcome your participation. Just remember that we are team #41608. And by the way, if you stop on in at our forum, why not go ahead and join. It’s simple. It’s easy. And it’s free. We give away prizes (shameless plug).
TESTING
For testing, I copied a single large file from my system to the Thecus N3200 and back again. Each time I copied it to a different location. I did this three times and then I took the average time for the file to get there and then I took the average time for the file to get copied back to my system. I did the same for a large file folder containing over 12,500 files and just over a 1000 folders. Once again I took the average time for each operation to complete. I also tested to see if there was a difference between RAID 0 and RAID 5. There was.
Raid 0 vs. Raid 5
Large File
1.74 GB (1,876,957,454 bytes)
Raid 0 –>N3200 2:06 minutes/seconds
Raid 5 –>N3200 2:29 minutes/seconds
Raid 0 <–N3200 1:13 minutes/seconds
Raid 5 <–N3200 1:26 minutes/seconds
Raid 0 vs. Raid 5
Large Folder
14.5 GB (15,626,348,136 bytes)
12,557 Files – 1,002 Folders
Raid 0 –>N3200 19:57 minutes/seconds
Raid 5 –>N3200 24:56 minutes/seconds
Raid 0 <–N3200 19:30 minutes/seconds
Raid 5 <–N3200 19:31 minutes/seconds
Key
–>N3200 – file or folder copied to the Thecus N3200
<–N3200 – file or folder copied from the Thecus N3200
In every single case, RAID 0 was faster than raid 5; sometimes by a significant margin and sometimes just barely. This is really what I expected. Though it takes longer to write the information to the RAID 5 disk array because of the third hard drive and extra stripe, reading that information is a lot quicker. So, is it RAID 0 or RAID 5 that gives you the best performance? On straight performance, it’s raid 0. But if it’s redundancy that you require, then RAID 5 is the way to go. Either way, the Thecus N3200 has you covered. And if it’s ultra-redundancy that you crave, the Thecus N3200 can also be setup with two hard drives to use RAID 1 (mirrored array) with a third tucked away as a spare and the ability to automatically rebuild the previous RAID set if one of the disks gets degraded.
CONCLUSION
The Thecus N3200 is a fine example of what a home networked area storage device should and can be. With features galore, it packs quite a punch. While many users may not need or use all of the features that that this unit has, it’s nice to know that they’re there should the need arise. And the N3200 can support just about any need that the home user (or even small business user) might have. RAID 5 data redundancy will be highly prized by many a user who may want to protect their most precious assets – their digital content, be it their family photos, their music or movies, or anything else that they cherish or deem saveworthy. The Thecus N3200 is up to the task.
Pros:
+ Small compact unit
+ Easy to setup
+ Easy to use
+ Quiet
+ Supports RAID 5
+ Supports multiple OS’s
+ Can support up to 3TB
+ Feature laden for home user
+ Gigabit NIC
Cons:
– Thecus Backup Utility could use some improvement
The Thecus N3200 is an excellent solution for the home user that wants or needs a network attached storage solution for file sharing and the security of data redundancy. It’s ease of use and solid performance earn it the Bjorn3D.com Seal of Approval and a score of 8.5 out of 10 (Very Good).


