OCZ Technologies has been making one of the fastest memories in the world. For these last few years OCZ been tring their hand on power supplies, and CPU cooler’s. Today we going to look at their newest addition to their CPU cooler’s line up. The Gladiator Max.
INTRODUCTION
We all know OCZ Technology for being one of the fastest memory manufacturers in the computer market. Over the last few years though, OCZ Technology has started including other computer components to their product line such as power supplies & CPU coolers. Today I am going to show you one of their newest additions to their line-up of CPU coolers, the Gladiator Max, which uses a newer method of utilizing copper heat pipes, by making the heat pipes contact the CPU directly, that’s dubbed HDT (Heatpipe Direct Touch). Let’s go see how this cooler performed.
About OCZ Technology
Entering the memory market in August 2000, OCZ Technology was built around the determination to manufacture the best high speed DDR and RDRAM. OCZ was founded by enthusiasts, for enthusiasts, and our commitment to the end-user has not digressed. OCZ Technology has been an innovator in many areas. We were the first manufacturer to make Dual Channel optimized memory available to the public, which originally took advantage of nVidia’s Twinbank or Dual DDR architecture, found in their nForce chipset. We have now taken that technology and tailored it for the Canterwood, and Granite Bay chipset’s. OCZ developed and was the first to implement ULN technology, which has been a critical element in our manufacturing process for some time. We at OCZ diligently work to improve communication with CPU and motherboard chipset manufacturers prior to the release of their products. Only in this manner can we fine-tune our memory’s SPD settings, ensuring a synergistic relationship between the memory module, memory controller, and microprocessor. In today?s rapidly evolving semiconductor industry, such communication is not simply research, but a necessary component of our manufacturing process.
Our Goals:
At OCZ we have one primary goal, and it is to make sure that every customer is 110% satisfied. Every employee at OCZ is dedicated to accomplishing this goal. Our engineers are constantly developing the fastest and best performing products. Our finance department works every angle to bring customers our product at the best price. Our marketing department ensures all the information needed to make an informed purchase is available and presented in an easy to understand format. The technical support department constantly studies and tests the latest hardware to be as informed as possible to help you with any issue you may have. Our customer service department is filled with customer satisfaction fanatics who will refuse to let you be unsatisfied.
SPECIFICATIONS, PACKAGING, & INSTALLATION
Specifcations
| OCZ Gladiator Max | |
| CPU Socket’s Supported | AMD 754/755/939/940/AM2, Intel LGA775 |
| Cooler’s Sink Base and Fin’s | Open Copper Heat Pipe Base and Aluminum Fins |
| Cooler’s Dimensions | 63mm(L) x 120mm(W) x 165mm(H) |
| Cooler’s Weight | 780 Grams (With Fan) |
| Fan Size | 120mm(L) x 120mm(W) x 25mm(H) |
| Fan RPM’s Range | 800-1200 RPM’s |
| Bearing Type | Rifle Bearing |
| Noise Level | 19.6-26.4 dBA |
| Fan Connector | 4-pin PWM (Pulse Width Modulation) |
| Fan Life Expectancy | 40,000 hours |
Now we’ve gotten the specifications over and done with, let’s look at how this product was packaged and what came in the box.
Packaging

Looking the front of the packaging, up on the upper left corner of the box has OCZ Technology written here. Then, as we look towards the center of the packaging, we notice a small window on the box displaying the fan. To the lower portion of the box we have the product’s name, Gladiator Max. Finally, looking over to the far right, we see High Performance Cooler.

Turning the box over to one side, the key features are listed for this CPU cooler.

Flipping the box over on to its back side, we see an image of the Gladiator Max in the center and towards the bottom of the box we have the contact information for OCZ Technology.

Finally, turning the box over to its last side, we see the Gladiator Max’s applications & the specifications of the CPU cooler and the fan.

Now we can open up the box to see what goodies OCZ included. Right off the bat we see that OCZ made sure this cooler was well protected by using foam to completly encase the CPU cooler plus the fan. There was not much in the way of components. We have the CPU cooler to the left, the 120mm fan right next to it, and right below the CPU cooler we have the mounting hardware in a plastic bag. Included are mounting brackets for Intel’s Socket 775 CPU’s, AMD mounting hardware, a little package of silicone thermal paste, four rubber isolation mounts for the fan, plus two screws for mounting the Intel mounting brackets. OCZ also includes an installation guide (not shown in picture).

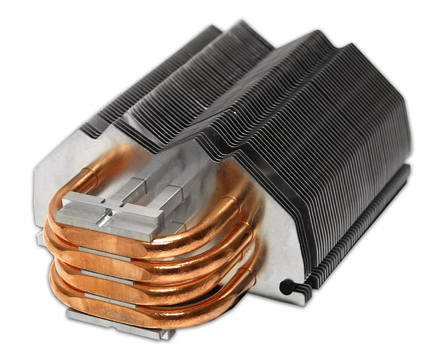
Here is the bottom of the CPU cooler’s base. We can see all four (8 total for CPU cooler) of the heat pipes exposed which make direct  contact with the CPU. If you notice, the heat pipes used on this CPU cooler are slightly larger than the average heat pipes used on other CPU coolers.

Here is a picture looking at the front of the Gladiator Max.
Installation
Lets’ see how this gets mounted to our CPU.

Starting off with the fan mounting hardware, installation was fairly simple. Insert the long pointed side of the isolation mounts through the fan and pull till they stop. Repeat that until all four isolation mounts are on. Oh, so that’s where the installation guide wondered off to. Looking up at the top of the picture we see the installation guide.

Now it’s time to mount the Intel Socket 775 mouting hardware. As far as installation goes, the Gladiator Max was really simple. All that was needed to put on the 775 mounting brackets was to place them on the top side of the CPU cooler’s base, line up the holes (the CPU cooler’s base and the mounting bracket’s holes), insert the screws through the bottom side of the CPU cooler’s base and tighten them with a phillips head screw driver. See the protective sticker on the CPU cooler’s base? Make sure it’s removed before placing the CPU cooler on your CPU.

Here’s another picture looking at the front of this CPU cooler with the Intel mounting brackets. Notice what OCZ used on the Intel mounting brackets. They used the standard push pin clips that Intel uses on their stock coolers.

This is the Gladiator with fan installed, looking from the side. Installing the fan was not very difficult either. Line up the ends of the isolation mounts of the fan to the front side of the CPU cooler and carefully slide over to the notch of the CPU cooler.

Looking at the Gladiator Max from the front again, after the fan been mounted.

Top view of the Gladiator Max with fan mounted. If you look towards the front of the CPU cooler you will see the notches used for mounting the fan to this CPU cooler.

I pulled off the protective cover to do a reflection test. As you will notice, we can barely make out a ghost image of the memory on the base of the CPU cooler. While looking at the CPU’s IHS, we can clearly see the memory’s reflection on it. This would be the prefered method of smoothness we like to have on a CPU cooler base.

After trying different methods of applying the thermal paste (anywhere from using 3 drops across the center, spreading the thermal paste evenly across the IHS of the CPU, to using a line right down the center of the CPU’s IHS), I ended up using 5 small drops of thermal paste in the center of the CPU’s IHS as this gave me the best dispersion that I was looking for.

Here’s a quick test fit of the CPU cooler to my Motherboard (Please Note: this was not done with a full install yet. All I did was line up the 4 push pins of the CPU cooler’s mounting hardware to my motherboard’s socket mounting holes, then I placed my hand underneath of the motherboard’s CPU Socket, placed the CPU cooler on top of the CPU, put a little bit a pressure on the top of the CPU cooler pushing down towards the CPU, counted to 30, and then removed the cooler). So the actual thermal paste dispersion will be diffferent during an actual install. If you look closely to the IHS of the CPU you will see three raised portions of thermal paste. Nope, this was not cause by the amount of thermal paste I used, but instead by the CPU cooler itself. I will cover these raised spots of thermal paste in a little bit.

The thermal paste spreaded evenly across the Gladiators Max’s base.

Now, time for mounting the CPU cooler to my motherboard. Again, it’s a real simple install. Line up the holes of the motherboard’s CPU mounting holes to the CPU cooler’s mounting pins, then push down on the top of the pins until they make a clicking sound. Repeat until all four push pins are secured. Pay close attention to the side view. Notice how it bowed my board after all the push pins were secured.

This is a sneak peek of the CPU cooler after I installed it on the motherboard. Notice that while using this CPU cooler the North Bridge fan is not fully on its cooler.

A picture of the CPU cooler and motherboard mounted on to the motherboard’s back plate (side view) shows you that this CPU cooler did bow my motherboard during installation. Yes, there are other uses for empty Mountain Dew bottles.

Here is a comparsion view of the Gladiator Max’s size in comparison with the video card.

This top view of the the CPU cooler shows its size, width, and depth.
These next couple of pictures are from when I removed the CPU cooler from my motherboard after testing it for a couple of days. I started re-installing the hardware that I use for my water cooling setup when (after removing the Gladiator Max from my CPU) I thought to myself, “CRIKEY! I’d better get a picture of this after testing it and after it’s removed from my CPU.” That’s why you see the four bolts coming on through the motherboard.

Looking at the bottom of the CPU, notice that the thermal paste has spread not just evenly, but thinly across the base of the CPU cooler.

Here’s the thermal paste dispersion across the CPU’s IHS. Remember when I mentioned raised portions of thermal paste? Well, here’s a picture better showing you what I was talking about. Notice the three lines running across the CPU’s IHS. This shows us that there are small gaps between each of the heat pipes on the CPU cooler’s base. Considering the three raised portions of thermal paste, the thermal paste dispersion was even and thin.
Let’s move over to the Testing Methods that I used and the results of the testing performed on this CPU cooler.
TESTING METHODOLOGY & RESULTS
Testing Methodooogy
| Test Setup &Testing Methodology | |
| CPU | Lapped Intel Core 2 Quad Q6600 2.4 Gighz G0 @ 1.3 Volts |
| Motherboard | Abit IX38 Quad GT |
| Case | Open Bench Testing Case |
| Memory | G.Skill 800 PI Black Series |
| Video Card | Sapphire 3870×2 |
| Hard Drives | 3 x 160 Gig Sata2 Western Digital, 2 in raid 0, 1 back up |
| CD-Rom Drive | Lite On Sata1 DVD Burner |
| Power Supply | Coolermaster U.C.P. 900watt 80+ Silver |
| Type Of Cooler’s Used | OCZ Gladiator Max, Swiftech Apogee GTX (Custom) |
| CPU Frequencies Used | 2.4 GHz, 3.2 GHz |
| Operating System Used | Microsoft Windows Vista 64 bit Ultimate |
| Type of Software Used During Testing | 2 Instances Of Orthos for 45 minutes x 2 runs |
| Tempature Monitor Used During Testing | Real Temp Version 2.60 |
I used two instances of Orthos to load all four cores of my CPU for 45 mins. x 2 runs for full load testing making sure that my results were consistent with Real Temp 2.60. The ambient temperature during testing was around 22°C. For idle temps I allowed the CPU to cool down for 20 minutes after each run of Orthos, then recorded the hottest core temperature. The hottest core tempature reached was the tempature I recorded for both idle and full load temps. I used an Open Bench Test case during testing. The Q6600 CPU has been lapped with 1500 grit sand paper. All the fans that I used were at maximum speed to ensure the best results for both idle and load testing. The Gladiator Max fan was extremely quiet during testing. Your results will vary greatly from my personal results shown here. I also like to try and keep my CPU at an operating temperature of around 60°C +/- a few degrees if at all possible. I am unable to compare this CPU cooler with any other CPU coolers at this time, mainly because I do not have any other air type CPU coolers on hand. The only CPU cooler I can compare with is the Swiftech GTX water block.
Results
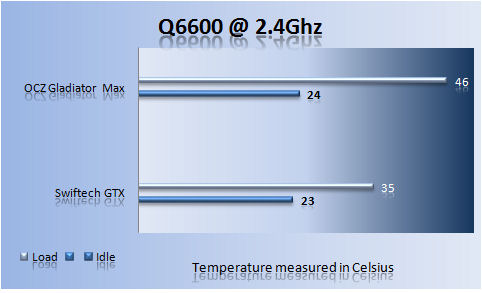
Well, as always, we need to start some where. Let’s start off at the CPU’s stock frequency of 2.4GHz. Here we see how this CPU cooler handles the Q6600. Having an idle temp of 24°C is a good place to start off and shows us that the exposed heat pipes of this CPU cooler’s base are working efficiently. As I put a full load on all four cores we see the temperature starts to rise to 46°C (still a good place to keep your temperatures at). Let’s move the CPU speed up to 3.2GHz.
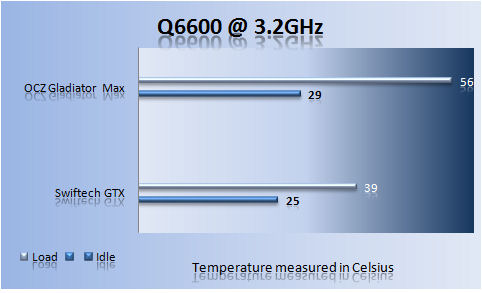
As I bring the CPU’s frequency up from 2.4GHz to 3.2Ghz, we quickly start to see the limitations of this CPU cooler. Idling at a temperature of 29°C shows that this CPU cooler is very capable of handling the heat output of the CPU. Once I start to load up all four of cores of the Q6600 CPU, we see a different story. Climbing to a temperature of 56°C full load, I felt this to be a good place to stop the testing.
Since all the testing is finished, let’s move over to Thoughts and Conclusions.
THOUGHTS & CONCLUSIONS
Thoughts
The Gladiator Max CPU cooler from OCZ Technologies performed fairly well during testing, (even though it was a short lived testing) making this product a mainstream user class. I feel this product would have performed better if it included or used a retention plate to help keep the motherboard from getting bowed during mounting, as well as having a smoother, more polished surface on the CPU cooler’s base as most CPU cooler’s perform better once a retention plate is used and also have a lapped base. The fan that was used on this CPU cooler was extremely quiet, almost to the point where I wanted to put my fingers on the blades to make sure that they were even spinning at all. The weight of the Galdiator Max CPU cooler was pretty light considering its size.
Update: The OCZ Gladiator Max cooler can be bought for around 45-55 US dollars. Which makes this cooler fairly priced for the mainstream user class.
Conclusions
Pros:
+ Fairly lightweight design
+ The use of slightly larger heat pipes for this CPU cooler’s construction
+ Extremely quiet fan
+ The ease of installing the CPU cooler to the motherboard
+ Anti-Shock rubber isolation fan mounts
Cons:
– No retention plate, resulting in the motherboard getting bowed
– Standard push pin mounting system used
– Rough feel of the CPU cooler’s base
– Small gaps in between each of the heat pipes on the CPU cooler’s base
Final Score: 7 out of 10 and the Bjorn3D Seal of Approval


