The Thermaltake Toughpower 850 ESA (Enthusiast System Architecture) PSU marks a marriage between hardware and software providing the end user with unheard of system information.
Introduction
With the introduction of Enthusiast System Architecture (ESA), enthusiasts have been offered a chance to marry hardware and software like never before. Currently, on Nvidia based chipset motherboards, you can connect various components to the motherboard and through the Nvidia System Monitor the connected devices can be monitored through an easy to use customizable 3D interface.
Thermaltake has been a leader in producing innovative hardware over the years. ESA hardware is no exception to that innovation. Partnering with Nvidia to create a symbiotic relationship between hardware and software where devices like the chassis, the water cooling kit, and the PSU all report to the Nvidia System Monitor and can be monitored and controlled from there, freeing the end user from unreliable 3rd party software for many of the commonly monitored hardware components and providing a level of monitoring and control we’ve never seen available before.
Starting with the Thermaltake Toughpower 850 ESA Power supply, we’ll be bringing you a series of reviews based on ESA architecture to see how far this emerging technology has evolved. We’ll be reviewing the Toughpower 850 ESA power supply, Thermaltake Armor ESA Chassis, and the Thermaltake Bigwater 850I water cooling kit (ESA compatible). We’ll be hooking it all together on an EVGA 790i Nvidia based SLI motherboard which will be running some OCZ DDR3 2000 Nvidia Edition SLI compatible RAM and a couple of sweet GTX-260’s running in SLI.
Welcome to the revolution, the Enthusiast System Architecture revolution.

About Thermaltake
We live in a world where most things seem to move at the speed of light. At Thermaltake, we feel the same way and that is exactly how Thermaltake conducts itself to deliver innovative, reliable and customer-centric solutions to the worldwide market.
Since the beginning of Thermaltake in 1999, it has been at the forefront of creating new and exciting products at a time where most computer users were provided little to no choices for components that may seem irrelevant, but in reality crucial to the performance of a PC.
Thermaltake Server Series solutions, with years of thermal experience and industry leadership, sets its goal on reforming total thermal management in server segment by formulating the perfect mixture of versatility, efficiency and thermal management with each respective server product category: Rackmount Chassis, Server Fixed & Redundant Power Supply and Server CPU Cooling Management Solutions.
With its comprehensive line of products available, it enables Thermaltake’s core customers to enjoy a one-stop-shop experience, reduce product design-in evaluation period and most important of all, flawless integration process. Each of Thermaltake’s strengths enables its customer to focus on their core business while taking advantage of the skills and efficiency of a single thermal management solution partner.
Values & Principles
– While still a relatively young company, established in 1999, Thermaltake is built on unwavering will and dedication to address issues and innovate at the same time for computer enthusiasts and corporate users worldwide .
– With strong support of Research & Development team standing behind the brand, Thermaltake is committed to never-follow but always-lead.
– In past decades, the industrial and technological advancements in different fields have shaped the world we live in today and have also made a big impact on the environment. Thermaltake takes great measures to ensure the product that we produce relieve these impacts by being first to act on 80 PLUS® specification for computer power supply that greatly reduces the amount of electricity that a computer consumes.
– Always striving to be the best, we continuously benchmark our performance against the very best internally and externally.
– Customers are our greatest asset and Thermaltake does not take that for granted. That is why Thermaltake is the industry leading in customer service and customer support with around-the-clock automated product return service.
FEATURES & SPECIFICATIONS
Features
- Supports NVIDIA ESA technology: maximize your PC’s performance with ESA, complete real-time PC performance management and optimization
- Supports NVIDIA ESA software to monitor fan speed, current, voltage and temperature
- Stable 850W continuous output (at 50°C operating environment)
- Supports Dual Core CPU / Quad Core CPU / Nvidia SLI & Quad SLI and all Multi-Core GPU technologies
- Four +12V rails provides superior performance (combined loading of 62A)
- Built in two 6-pin and next generation two 8-pin PCI-E connectors for Multi-GPU Graphics Cards
- Strict voltage regulation (±3%): provides steady voltage for system
- Active Power Factor Correction (PF>0.99) and high efficiency (up to 87%)
- Quiet and reliable 14cm ball-bearing fan
- Protections: Over Current, Over Voltage, and Short-Circuit protection
- Safety / EMI Approvals: CE, CB, TUV, FCC, UL, CUL, and BSMI certified
Supporting ESA technology to monitor fan speed, current, voltage, and temperature, you’ll have information about the current status of your PSU that you’ve never had available before. Operating at a continuous 850 watts spread across 4 independent + 12v Rails with a combined total of 62 amps you’ll be able to drive four single connector GPU’s or two dual connector GPU’s.
The Thermaltake Toughpower 850 ESA power supply supports all modern desktop processors, and multi-Core GPU technologies. Even though current standards allow for up to 5% variation on any given rail, Thermaltake has tightened that standard on this ESA wonder to 3%, and we all know that the tighter the voltage the better it is for those expensive components.
We also see that the Toughpower 850 ESA uses Active Power factor Correction, the latest technology for for up to 87% efficiency which means that it exceeds the currently accepted 80+ efficiency standard. Boasting a whisper quiet 140mm fan to ensure quiet operation riding on a reliable ball bearing system you should enjoy silent and reliable operation for many years to come.
AC Input Specifications
| Thermaltake Tough Power 850 ESA AC Input Specifications |
|
| Input Voltage | 115VAC – 230 VAC |
| Input Current | 10A / 5A |
| Input Frequency Range | 47 ~ 63 Hz |
| MTBF | 120,000 hours |
| RFI / EMI | CE, CB, TUV, FCC, UL, CUL, BSMI |
| All information provided related Thermaltake products and plans is preliminary and subject to change at any time, without notice. | |
General Specifications
| Thermaltake Tough Power 850 ESA General Specifications |
|
| Wattage | 850 Watt |
| Fan | 140 mm 2300 RPM ± 10% |
| Efficiency | 87% + |
| PFC | Active PFC (PF > 0.9) |
| Hold-Up Time | 16 ms |
| Switches | ATX Logic on-off additional power rocker switch |
| Motherboard Connectors |
24-pin Main Connector 8-pin Power Connector 4-pin Power Connector |
| Power Good Signal | 100-500 ms |
| Form Factor | ATX 12V 2.2 |
| Dimension | 6.3 x 5.9 x 3.4 inch (L)x(W)x(H) 160 x 150 x 86 mm (L)x(W)x(H) |
| Warranty | 5 Years |
| Certifications | nVidia SLI Certified 80 Plus Certified |
| All information provided related Thermaltake products and plans is preliminary and subject to change at any time, without notice. | |
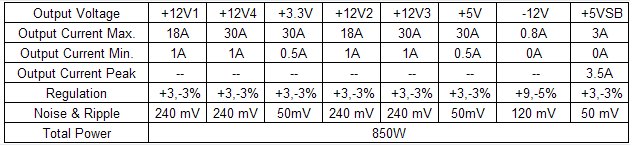
Power Output Specifications
PACKAGING, PICTURES, IMPRESSIONS & BUNDLE
Packaging


The Thermaltake Toughpower 850 ESA comes in an attractive sturdy box that has enough information and specifications on it to help inform the consumer about its purchase.


Inside the box you’ll find find the Toughpower 850 ESA safely packaged in bubble wrap envelope and nestled in thick foam. Despite the best efforts of the shipping company, it arrived in pristine condition.

Pictures & Impressions
Looking at the top of the Toughpower you get a good look at the 140mm fan that actively keeps the PSU cool during operation. The PSU will adjust the speed of the fan as load and heat increases. During our testing of the PSU including under load from the SLI setup the fan operated whisper quiet the entire time.

From the top angle view you can see the overall look of the Toughpower 850 and you can tell that it not only looks nice but manages to extrude a feeling of reliable clean power. You can also see the front panel connectors.
Even though the Toughpower looks silver in the pictures it has more of a brown tint to it, looking rather muted military in appearance. On the front panel you can see the CPU power connector, the two 6-pin PCI-E connectors and the four peripheral (Molex and Sata) connectors.

Noticably absent from the back of the Thermaltake Toughpower 850 ESA is the little orange switch used to determine 115/230 power selection. That’s because with Active Power Factor Correction the PSU will detect the incoming current and adjust accordingly. You also get a look at the on/off power rocker switch, power indicator LED, and some of the large interior components.

Then the label side shows the Toughpower name, ESA logo, and wattage of the power supply. You can tell by the weight, look, and feel of the Thermaltake Toughpower 850 ESA that it’s not your typical power supply and is well constructed (of course, the OEM is Channelwell, one of the most respected manufacturers of high quality power supplies in the world).

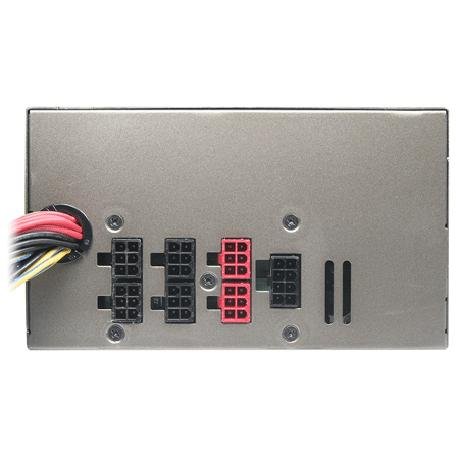
Here’s a look at the 24-pin motherboard connector and the two 8-pin PCI-E connectors. Don’t worry though, in the bundle we’ll look at in a minute, you’ll find two 8 to 6-pin PCI-E adapters in case you’re going to run four 6-pin GPU’s or two dual 6-pin GPU’s.

Then, there are the connectors that set this PSU apart, the ESA connectors. The white connector goes to the ESA PCB, and the black connector goes to a expansion port bracket so you can connect it to a USB port.
The Bundle

In the bundle you’ll find:
- 1 – Manual
- 1 – Case Badge
- 1 – Expansion Slot bracket for the ESA USB connection
- 2 – PCI-E 6-pin cables
- 2 – 8 to 6-pin PCI-E adaptors
- 2 – Sata Cables (8 total sata connectors)
- 2 – Molex Cables (8 molex 2 floppy)
- 1 – CPU Power Connector Cable (4 or 8-pin)
- 1 – Spare cable Bag
There should be plenty of cables and connectors for most enthusiasts but in this configuration you won’t be able to drive two dual 8-pin PCI-E GPU’s without purchasing a couple of adapters. That’s really not much of an issue because if you need four 8-pin PCI-E connectors to drive your GPU’s we suspect that you’d have a larger wattage PSU.
ESA
Enthusiast System Architecture (ESA) is a blending of hardware and software that allows you to monitor and control aspects of ESA supported hardware in an easily customizable 3D interface. Giving you system information and control of individual components like you’ve never had. Currently, it’s specific to Nvidia based chipsets and in order to use it fully you’ll need an ESA capable chassis and ESA capable components.
Fortunately, our friends over at Thermaltake kicked in a Thermaltake Armor ESA Chassis and this Toughpower 850 Watt ESA power supply for us to take a look at in conjunction with the EVGA 790i Nvidia based chipset motherboard.
For now, we are going to deal with the ESA related software and what it can do for you. Once you’ve downloaded the ESA software from Nvidia and installed it, you’ll find new entries in the Nvidia Control Panel.
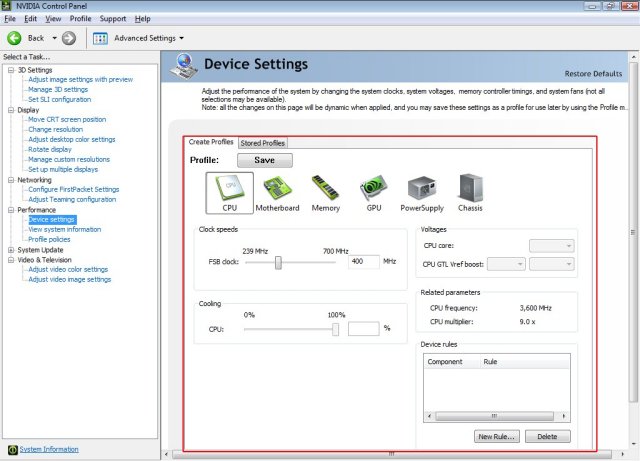
Highlighted there on the left you’ll see the new entry, “System Settings”. It’s a little hard to read, but that’s where it’s at. If we went much larger on the image it would run off the screen. This screen is the CPU screen of the ESA capable software. From here you can change the FSB within the software and, if we weren’t using a water cooling kit, we could also adjust the fan speed.
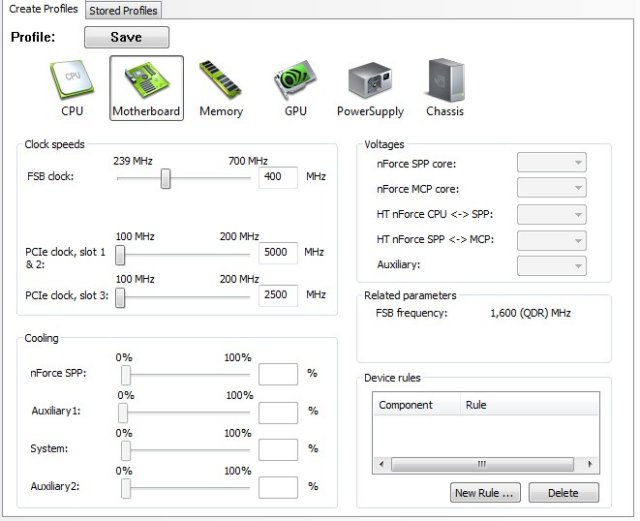
From the Motherboard screen you can adjust the FSB speed, PCI-E clocks, and the fans attached to the motherboard. In this chassis our fans aren’t connected to the motherboard so they are greyed out. The Voltages section was also greyed out but we weren’t much concerned with that. You’ll see why later. At its current infant stage, we’re looking at the ESA software more for informational purposes than actual adjustments inside the OS. We tried the FSB adjustment and most of the other settings inside the panel and they all worked without error, but still we prefer handling things in BIOS.
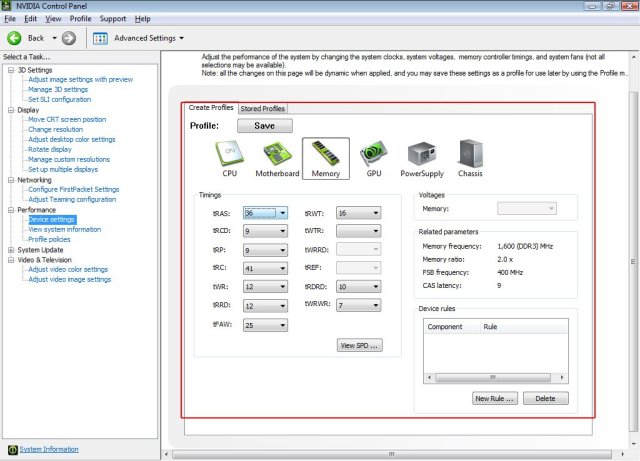
On the Memory screen you can change the memory settings and test them inside the OS without rebooting and going into BIOS. It also shows you the current settings for the memory over on the right.

On the GPU screen you can adjust the speed of Nvidia GPU’s. We are running in SLI mode and you let the drivers handle the speed of the GPU’s in SLI (we tried adjusting the speed of one GPU, it didn’t work). If you’re running a single card it’ll adjust the speed for you. We took one card out and adjusted one of the GTX-260’s we were running in the 790i from 576 to 655 with no ill effects.
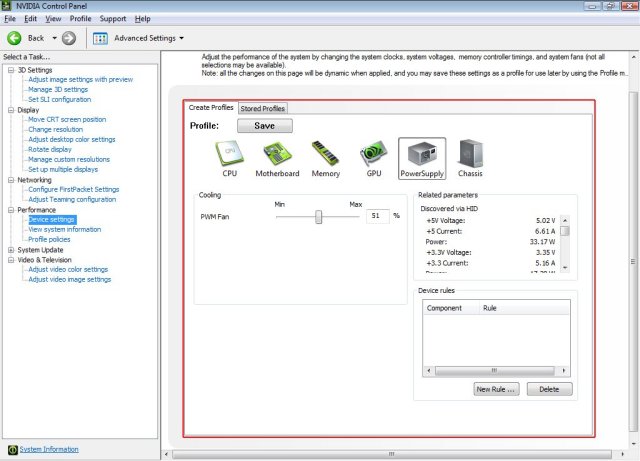
On the PSU screen the only adjustment is fan speed and that’s for ESA capable PSU’s like the Toughpower 850 ESA we’re using. It also shows you the voltages it’s reading from all the various rails. A little later on you’ll see that the voltages we read with a multimeter and a PSU tester were a little different, but in most cases within .10 Volts. One tenth of a volt is pretty good for software reporting.
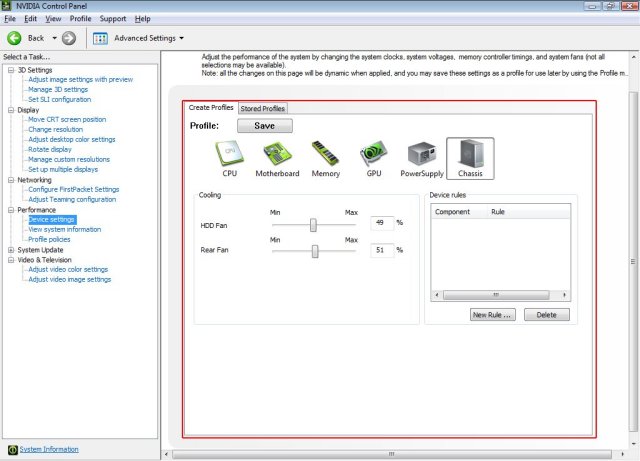
On the Chassis page you can adjust the fan speed of the front and rear fans. If you look back at the Motherboard screen section you can see that any fans that are on motherboard headers can be controlled from the Motherboard screen. You have complete control of the system fans without having to wire in a fan controller. In the ESA chassis we’re using, the fans wire through the ESA panel in the chassis itself, so it’s a little different.
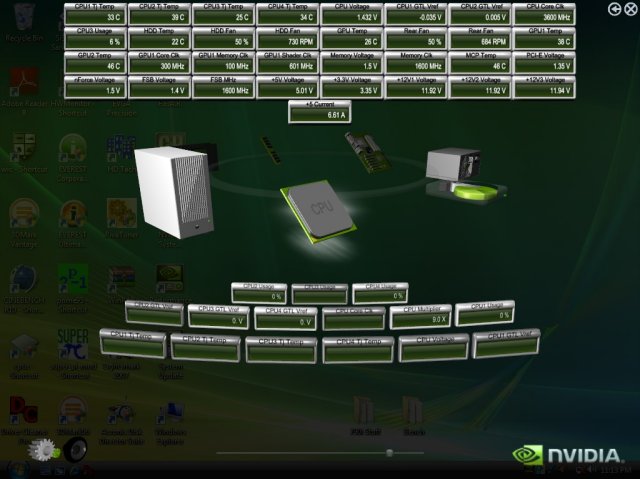
From the Nvidia Monitoring software you can select the monitors you want to see, and if you want them to be displayed on top at all times or not (you probably don’t want them on top at all times, it’s kind of annoying). We selected a bunch of sensors to display and got a shot of what it looks like from the desktop.

When you’ve got all your sensors selected they will display on your desktop, giving you access to more information in one spot than you’ve ever had access to from a single piece of hardware.
On a side note, that’s what a freshly loaded machine’s desktop looks like when it’s ready for testing. In total, there’s about 76-100 GB loaded, depending on if Demo or full games are loaded for testing.
In all, we found the ESA software and Monitoring component to be easy to use and had no problems with the system settings we changed with it, but believe that it could use a little maturity before it’s completely reliable. The monitoring portion was our favorite because instead of using four or five pieces of software to accomplish monitoring we can get it all in one place. Since we were testing the ESA software, we used both 3rd party software and hardware to check it and eliminate any chance of bias on the part of the software itself. With extended testing we’ve come to the conclusion that it reports accurately in most cases but we can’t account for the discrepancy between hardware reported voltages and software reported voltages, other than to say that software reported voltages are notoriously incorrect.
TESTING, METHODOLOGY & RESULTS
Test Methods
To test the Tough Power 850 ESA, we ran it on our 790i platform with two GTX-260’s running in SLI. Voltages were measured in the ESA monitoring software and checked against a Voltmeter and Coolmax Digital LCD PSU tester. Voltages with the Coolmax PSU tester were taken with a 24-pin PSU splitter that allows us to run the machine and test the voltages with the PSU tester while the machine is running. Then, we take the Multimeter readings and the PSU tester voltages and average them, and the average is reported. The differences between the two devices used for measurement are usually no more than .01-.03v apart and mainly used for redundancy testing. Three hundredths of a volt is pretty close when measuring power supplies and differences of that magnitude are hardly worth even mentioning. Complete system voltages were read with a Kill-A-Watt power measurement device and read at Idle and Load.
Testing Equipment
| Thermaltake Toughpower 850 ESA Testing Equipment |
|
| Multimeter | Craftsman |
| LCD Voltage Tester | Coolmax Digital LCD PSU Tester |
| Thermometer | Micro Temp Digital Infrared Thermometer |
| Connectors | 24-Pin Motherboard Connector Splitter |
| Wall Voltage | Kill-A-Watt Voltage Measurement Device |
Test Rig
| Test Rig “Quadzilla” |
|
| Case Type | Thermaltake Armor ESA |
| CPU | Intel Q6600 @ 3.6 Voltage 1.4875 vcore |
| Motherboard | EVGA 790i |
| Ram | OCZ DDR3 2000 MHz |
| CPU Cooler | Thermaltake Bigwater 760i |
| Hard Drives | WD 250 Gig Sata 2 Two Maxtor 160 Gig Sata2 |
| Optical | Sony DVD R/W |
| GPU | Leadtek GTX-260 BFG GTX-260 OCX MaxCore In SLI |
| Case Fans | Two 120mm Thermaltake Front/Rear Push/Pull 250mm Side fan 90mm Rear Exhaust 90mm Top Exhaus |
| Docking Stations | Tagan IB290 W/Deskstar 2 1/2 Inch 80 Gig Sata 2 Tagan IB390 W/Maxtor 160 Gig Sata 2 Thermaltake BlackX USB W/Seagate 80 Gig Sata 2 |
| Testing PSU | Thermaltake Toughpower 850 ESA Modular |
| Legacy | Floppy Drive |
| Mouse | Razer Lachesis |
| Keyboard | Razer Lycosa |
| Gaming Headset | Razer Piranha |
| Speakers | Logitec Dolby 5.1 |
| Any Attempt Copy This System Configuration May Lead to Bankrupcy | |
While we ran the tests we continuously looped 3Dmark06, let Prime95 drive all four cores as hard as it could, used a variety of software to keep the hard drives spinning, and let Windows Media Player loop a song continuously.
Power Test Results
The current ATX 2.2 specifications allow for the following variation in voltage outputs:
- 3.3 Volt Rail: 3.135V – 3.465V
- 5 Volt Rail: 4.75V – 5,25V
- 12 Volt Rail: 11.4V – 12.6V
|
Power Output Results(V) |
||||||
| Power Rail | Thermaltake Toughpower 850 ESA |
ESA Software Reported | ||||
| Idle | Load | Idle | Load | |||
| 3.3v | 3.31 | 3.32 | 3.34 | 3.34 | ||
| 5v | 5.03 | 5.04 | 5.06 | 5.08 | ||
| 12v1 | 12.05 | 12.07 | 12.11 | 12.18 | ||
| 12v2 | 12.09 | 12.10 | 12.13 | 12.19 | ||
| 12v3 | 12.12 | 12.12 | 12.15 | 12.18 | ||
| 12v4 | 12.11 | 12.09 | 12.08 | 12.07 | ||
| 5vSB | 5.02 | 5.03 | 5.03 | 5.06 | ||
| Wattage Used | Idle Power: 320 Watt(± 5%) Load Power: 596 Watt(± 5%) |
|||||
Power Factor Test Results
|
Power Factor Percentage |
||
| Power Supply | Idle | Load |
| Thermaltake Toughpower 850 ESA | 98.1% | 98.7% |
Tempreture Results
|
PSU Tempreture Results |
||
| Power Supply | PSU Temp. | |
| Thermaltake Toughpower 850 ESA | 55°C | |
| ESA Software Reported | 54°C | |
| Ambient | 22°C | |
|
Ambient Measured Inside The Case |
||
CONCLUSION
Keep in mind that we aren’t judging the performance of the ESA software, merely reporting it. Our judgments are based on the performance of the Thermaltake 850 Watt ESA PSU itself. While we were satisfied with the performance of the software and hardware combination, we would have to judge it based on the software, motherboard, and all the ESA involved software and hardware. That’s beyond our scope, so we are only judging the Power Supply itself.
The Thermaltake Toughpower 850 Watt ESA drove our GTX-260 SLI setup and a heavily overclocked Quad like it owned them. Voltages remained stable from idle to load in all testing conditions and remained well within our somewhat tight standards of three percent. Thermaltake has a lot of faith in it’s Toughpower 850 Watt ESA because it advertises it to be within 3% on the box and website. Most power supply manufacturers will only say their power supplies are within 5% of the rated specifications. We prefer our power supplies to remain within 3% and won’t recommend any that don’t stay within that.
The modular design of the PSU made it easier to get a clean professional look inside the case even though we are somewhat cabling impaired. We found the Thermaltake Toughpower 850 Watt ESA had plenty of power connectors for a heavily loaded system chocked full of goodies.
Really, the only thing we found that we didn’t like was having only two 8-pin PCI-E connectors and not four. You can drive an SLI setup with two 8-pin and two 6-pin connectors, or one having four 6-pin connectors, but you can’t drive an SLI setup that requires four 8-pin PCI-E connectors without purchasing adapters. We do suspect that if you were driving a Dual GPU setup requiring four 8-pin connectors that you’d probably be choosing a PSU with more available amps on the 12v rails, so it’s not much of an issue.
We are quite pleased with the Toughpower 850 Watt ESA power supply and truthfully, we are quite pleased with the ESA software that we looked at. It provided good clean voltage, plenty of it, and left us to enjoy the system without worrying about a PSU that was going to kill our expensive test rig.
Pros:
+ 850 watts of clean, solid, and stable power
+ Active PFC
+ Efficiency rating > 80%
+ Dual SLI/GPU ready
+ Compact case dimensions for its output
+ Dual Core/Quad Core CPU ready
+ 8-pin PCI-E connectors
+ Well sleeved cables with plenty of connectors
+ Quiet operation
Cons:
– The main power connection cables are a little short
– Only two 8-pin PCI-E connectors
The Thermaltake Toughpower 850 Watt ESA is another great power supply from the legendary Toughpower lineup. It held true to the Toughpower Legacy and blew us away with it’s rock solid rails.
Final Score: 9 out of 10 and the Bjorn3D Seal of Approval.


