We all know ECS for there cheap, stable, rock solid performance Motherboards. Also, we know ECS for their limited overclocking capabilities as well, but not anymore. Today I bring you the ECS P45T-AD3 Black Motherboard, lets turn the page and see how this Motherboard handled itself.
INTRODUCTION
It’s good to see OEM motherboard manufacturers breaking away from their normal everyday routine of building motherboards with little in the way of features and absolutly zero or, at best, extremely limitied overclocking capabilites. ECS brings us their new line-up of motherboards, the “Black Series”, giving us users more flexibility and added features, while at the same time making their products still affordable. I bring you today the ECS P45T-AD3 Black Series motherboard, being armed with an already proven chipset for overclocking (Intel’s P45) and including support for DDR3 1333 (natively) and up to DDR3 1600 support (overclocked). Also, it fully supports Intel’s 45nm CPU’s (Yorkfield and Wolfdale CPU’s). Does the ECS P45T-AD3 Black Series have what it takes to keep up in marketplace already dominated by great manufacturers like Asus, Gigabyte, and MSI? Let’s see what this motherboard can do, shall we?
About ECS
ECS, the Elitegroup Computer Systems (TSE: 2331), has been a pioneer in designing and manufacturing computer motherboards since 1987. It was the first motherboard maker in Taiwan to be listed on the Taiwan Stock Exchange in 1994. Today, the company also designs and manufactures barebone and complete systems, such as notebook computers and high-end servers, for distributors worldwide.
Headquartered in Taiwan with business partners and distributors in over 60 countries, ECS has ISO 9001:2000 and ISO 14001:2004 certified manufacturing facilities in China, capable of producing over 2.5 million motherboards and 200,000 notebook computers every month. The company currently has branch offices throughout the world in Americas, Europe and the Pacific Rim. To further extend its quality products and services, ECS plans to open additional branch offices in the new emerging markets including Brazil, India and Russia.
With its 20 years of experience in designing and manufacturing motherboards, the building block of many of today’s personal computers, ECS is expected to remain as one of the major contributors in the IT industry. The company is very fortunate to work very closely with many major chip designers in the PC industry on the design, development and manufacture of future IT innovations. Together with its business partners and its team members around the world, ECS is ready to provide a rich variety of new products and great services to its customers in the years to come.
For many years, ECS has been making complex design simple and simply designed products smart. The company engineered smart ideas into unique products while keeping the design simple. Its Simply Smart philosophy in design helped ECS won over 150 awards and recognitions worldwide. Today, the design philosophy has evolved, extended and become a part of the company’s corporate culture. Generating smart ideas to simplify work for increasing productivity has become an everyday task at ECS. It is through this practice, the company believes it can continue to bring its customers the best products and services.
Simply Smart
FEATURES & SPECIFICATIONS
Features
|
|
||||||
|
|
||||||
|
|
||||||
|
|
||||||
|
|
||||||
|
|


SPECIFICATIONS
|
P45T-AD3 Specifications |
|
| CPU Support | LGA775 socket for latest Intel Yorkfield/ Wolfdale/ Core 2 Quad/ Core 2 Duo/ Pentium Dual Core/ Celeron Dual Core/ Celeron 4xx processor FSB OC1600/1333/1066/800MHz |
| CHIPSET | Intel Eaglelake P45 ICH10R |
| MEMORY | Dual-channel DDR3 memory architecture, 4 x 240-pin DDR3 DIMM socket support up to 8 GB, Support DDR3 OC1600/1333/1066/800 DDR3 SDRAM |
| EXPANSION SLOT | 2 x PCI Express x16 slots (When using two VGA cards, the bandwidth is x8 badnwidth; when using one VGA card, the bandwidth is x16.), 2 x PCI Express x1 slots, 2 x PCI slots |
| STORAGE | Support by Intel® ICH10R, 6 x Serial ATAII 3.0Gb/s devices,(Supports RAID 0, 1, 5, 10 ICH10R), Support by JMB 361 1 x IDE channel support 2 Ultra DMA133/100/66 devices, 1 x eSATA |
| AUDIO | Realtek ALC883 7.1 Channel High Definition Audio codec |
| LAN | Gigabit LAN, Athlos L1 PCIe GigaLAN controller |
| REAR PANEL I/O | 1 x PS/2 keyboard & PS/2 mouse connectors, 6 x USB ports, 1 x RJ45 LAN connector, 1 x Audio port, 1 x Serial port (COM1), 1 x Externel SATA connector |
| INTERNAL I/O CONNECTORS & HEADERS | 1 x 24-pin ATX Power Supply connector, 1 x PWR_FAN connector, 1 x CPU_FAN connector, 1 x SYS Fan header, 1 x IDE connector, 1 x SPEAK header, 1 x SPDIF out header, 1 x Serial ATA connectors, 1 x Front panel switch/LED header, 1 x Front panel audio header, CD in header, 3 x USB 2.0 headers support additional 6 USB ports, 1 x Clr_CMOS button, 1 x Reset button, 1 x Power on button |
| SYSTEM BIOS | AMI BIOS with 8Mb SPI Flash ROM, Supports Plug and Play, STR/STD, Hardware monitor, PCI interrupt selection, ACPI & DMI, CPU FSB adjustment (increase of 1MHz), Audio, LAN, can be disabled in BIOS, F11 hot key for boot up devices option, CPU voltage adjustable, Memory voltage adjustable, Support over-clocking |
PACKAGING
Lets take a quick look at what comes in the box before we go over the layout of the motherboard itself.

Here’s the top of the box. There’s an image of a Dragon in the center and off to the right of the Dragon we see “Dual DDR3 Support”. Then, right below the Dragon we have the actual motherbords name, Black Series P45T-AD3 .


Now it’s time to open the box up and see what kind of goodies we get. Starting from the left, there’s the back IO plate cover, one IDE ribbon, four SATA cables, and the instruction manual with the driver CD (not shown).

Now, once the the little cardboard insert is removed we get to see the motherboard, wrapped in an anit-static bag.

Here is everything laid out. The driver disc (not shown) was placed in the instruction manual.
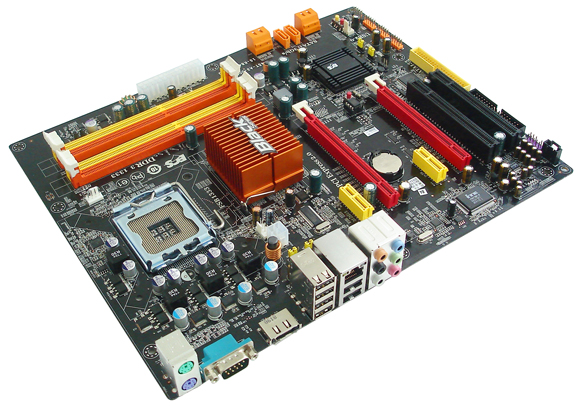
BOARD LAYOUT

Starting off with the rear IO connections, it’s time to see how the components of the P45T-AD3 were laid out. The P45T-AD3 includes two PS/2 Ports, one Serial port, one e-SATA port, six USB ports, one Gigabit ethernet port, and finally, the 7.1 channel audio ports.

Now lets move over to the SATA ports. ECS used six SATA 3GB ports. Four are 180° and two are 90°. This is what I don’t quite understand. Why does ECS have only four SATA ports at 180° and not all six of them? Fortunately, the two center 90° SATA ports are out of the way of the video card slots and shouldn’t be much of a problem using them with larger video cards. If you look off to the left side of the SATA ports we see two buttons (one red, one yellow). These are On-Board power and reset buttons ECS included.

Looking at the bottom side of this board, we see ECS placed the front IO ports (power, reset, and front LEDs) near the bottom edge corner (near the SATA ports) and then included 3 x 2 sets of USB external connectors (giving us 6 more USB ports). Moving towards the back of the motherboard, ECS included an IDE (the JMicron 361 controller) and the ever aging floppy connector. These are in an awkward position and for those still using IDE/floppy drives and may have issues using these connectors. Right above the IDE and floppy connectors we still have two PCI ports (keep in mind, if you are using two video card’s for Crossfire X, one of these PCI ports will be blocked, the one closest to the 2nd PCI-E x16 port).

Here’s a picture of the 2 x x16 PCI-E graphic ports. Looking at the front of these peticular ports we see the Anti-Burn locks on them where you slide these up and lock your video cards into place. Once locked, these Anit-Burn locks might be fairly difficult to unlock if you are using large video cards, or using larger video card coolers. I just ended up leaving mine unlocked. As we move to the front of the PCI-E x16 ports we see another red button. This is the clear CMOS button. It’s in a rather odd spot, situated between the video cards (at least its not the old style jumper). I would like to add this. After having to clear the CMOS after I powered down the system, when I pressed on the clear CMOS button, upon releasing it the system would power it self back up (now that was rather strange). Moving towards the back of the motherboard we see the AMI BIOS chip ECS used. Right below the first PCI-E x16 port we have the CMOS battery. And finally, right above the second PCI-E x16 port we have a 1x PCI-E port.

Moving now towards the North-Bridge. Above the first PCI-E x16 port there’s a 1x PCI-E port. We see the P45 North-Bridge heat sink. Look closely, as ECS decided to use the old-fashioned wire clip hold down. Right next to the North-Bridge we see a 4-pin PWM fan header and the 4-pin CPU power plug.

Towards the CPU socket now. On the backside of the motherboard we see the power modules for the CPU. Going towards the front of the CPU socket we see another 4-pin PWM fan header.

Here are the memory slots. This motherboard uses DDR3 1333 (1600 OC) x 4 ports x 2 GB’s per port giving us a total of eight gigabytes of memory we can use on the P45T-AD3 motherboard. Just in front of these memory ports is the 24-pin main power plug.


I wanted to see what ECS used on the North-Bridge heatsink and the South-Bridge heatsink for thermal paste.


BIOS PART 1
Now it’s time to show you what’s in the BIOS and all of its adjustments.

To enter the BIOS, you need to press the delete button on your keyboard upon start up of the motherboard. The ECS P45T-AD3 uses the standard BIOS layout we see in most motherboards. To move through the BIOS, all we need to do is use the arrow keys to highlight the area we want to look at, then press the enter key. This will allows us to view each of the sub menus. To exit each sub-menu, pres ESC once to bring you back to the previous screen. All I am going to show you here is each one of the sub-menu’s and what they look like.

We can also adjust the time and date in this screen.


I turned them on and off and it made no difference that I could tell.

Or you can tell the motherboard if you want to use raid or normal SATA ports.


Now, since we’ve gotten the basic BIOS setup out of the way, it’s time to move over to the M.I.B. portion. This is where we can adjust clock speed and voltage of the CPU.
BIOS PART 2
This is the M.I.B. portion of the BIOS. This is where we can overclock our CPU’s, adjust voltages, and also adjust our memory speeds and/or timings. I will explain briefly each one of these screens. Also, note that on the right hand side of each screen shot is information on the particular adjustment.


What you place here, the NB will use. We can go from 1.11 volts to 1.26 volts.
This motherboard does not really have fine tuning voltages. So we have to be real careful on what to use and what not use.
TESTING METHODOLOGY & OVERCLOCKING RESULTS
Testing Methodology
| Test Setup &Testing Methodology | |
| CPU | Lapped Intel Core 2 Quad Q6600 2.4 Gighz G0 @ 1.3 Volts |
| Motherboard | ECS P45T-AD3 Black, Abit Ix38 Quad GT |
| Case | Open Bench Testing Case |
| Memory | G.Skill DDR2 PI Black, Mushkin DDR3 |
| Video Card | Sapphire 4870×2 |
| Hard Drives | 3 x 160 GB SATA II Western Digital, 2 in raid 0, 1 back up |
| Cdrom Drive | Lite On Sata1 DVD Burner |
| Power Supply | Coolermaster U.C.P. 900watt 80+ Silver |
| Coolers | Swiftech Apogee GTX (Custom) |
| CPU Speeds | 2.4GHz and Maximum Achievable |
| Operating System | Microsoft Windows Vista 64 bit Ultimate |
| Testing Software | Everest, SiSoft, POV Ray, CineBench, 3DMark06, 3Dmark Vantage, Crysis, Assassin’s Creed |
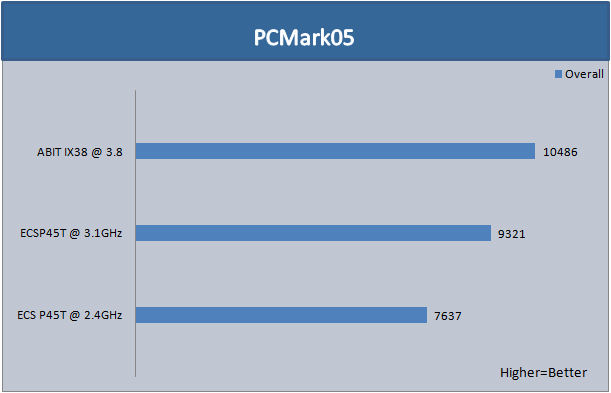
On the ECS P45T-AD3 Black series motherboard, I first ran the Q6600 CPU @ 2.4GHz, then I overclocked the CPU to its maximum achievable frequency that the ECS P45T-AD3 would allow. For the Abit IX38 Quad GT, I just used its maximum CPU clock frequency. This review is not based on a comparison. Therefore, the Abit IX38 is only there for a visual reference. With the programs I ended up using, I ran each one two times on both default and maximum CPU clock speeds, verifing times and or scores, while also making sure that there were no erroneous readings and that stability was present during testing. For 3DMark06 and 3Dmark Vantage I did not list the overall score as I felt that by only listing the individual points it would better demostrate this motherboard’s potential. PCMark05 is the only test I will list with the final score as there are way too many tests this program uses to list them all. With POV Ray I set the resolution to 1280×1024 with AA 00.3 for all four tests. With Crysis I used 1680×1050 with very high visual quality and I with HOC Benchmark and with Assassin’s Creed I used 1680×1050 with max visual settings.
Please Note: I was unable to get Super Pi to work properly on the ECS P45T-AD3 Motherboard at either a speed of 2.4GHz or at 3.1GHz. So I left that test out.
List of Programs I used for testing.
|
Synthetic Benchmarks |
|
Everest Ultimate 4.60 |
|
POV Ray |
|
SiSoft SANDRA 2009 |
|
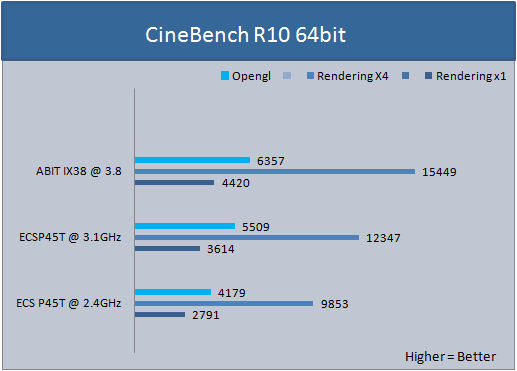
Cinebench R10 64 Bit |
|
3DMark06 |
|
3DMark Vantage |
|
PCMark05 |
|
Games |
|
Crysis v. 1.02 64 bit |
|
Assassin’s Creed |
Overclocking Results
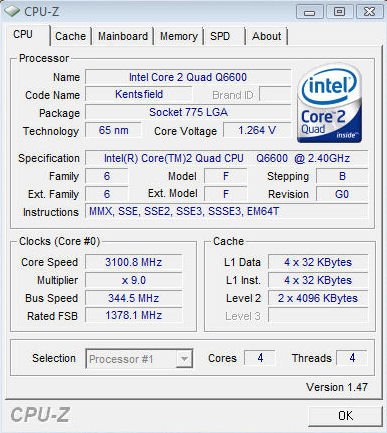
I was only able to get a mere 3.1GHz out of my Q6600 when using the ECS P45T-AD3 Black motherboard. The max FSB achieved was 344 FSB with a CPU multiplier of 9, a memory speed of 1378MHz with 7-8-8-18 timings. I tried just about every combination I could possibly think of, from increasing the CPU voltage to 1.5 volts, setting the memory divider to the lowest possible divider of 800mhz, to loosening the memory timings to 9-9-9-24, to maxing out the chipset voltage to 1.26 volts, and dropping the CPU’s multiplier to 6 (while still keeping the voltage @ 1.5). Every setting I tried ended up with a no post. I decided to let the BIOS control the memory’s voltage, timings, and the divider (by setting it to auto or enabled). I left the voltage on the CPU @ 1.5 volts (1.3v and using +282mV). This time, instead of going straight to 400 FSB, I went to 300 FSB x 9, giving me a 2700 MHz CPU core speed. I then set the FSB to 333 then exited while saving changes. Upon reboot, I gotten a strange error, “Your CPU FSB is 266 and is not offically supported“. What was that all about? Even with this error I was still able to post and boot into Windows. Once Windows booted, I restarted the PC and I recieved that same error I previously had during posting. Upon re-entered BIOS, I adjusted the FSB to 344 (just keep going until it fails to post) and the motherboard posted again. I re-entered the BIOS, tried for 350 FSB, which ended up being a no post. I was getting a little tired of having to reset the BIOS everytime this motherboard failed to post. (The BIOS that ECS uses does not have the ability to store profiles). If you clear the CMOS, you start all over again from square one. After about seven hours of clearing the CMOS and re-setting it, I decided to leave everything on Auto execpt for the CPU FSB. I managed to get back to 344 FSB on my CPU’s default voltage of 1.3 volts, giving me a grand total of 3.1GHz. I tried a couple more adjustments dealing with the memory, and what did I get? Failed post. I gave up on trying to go any farther than my current overclock and making any more attempts at fine tuning the motherboard. I still kept getting this error, “Your CPU FSB is 266 and is not offically supported“. So I decided to, “OFFICALLY GIVE UP” !!!!
Here is a CPU-Z screen shot of my impressive 3.1GHz overclock.
SISOFT & POV RAY
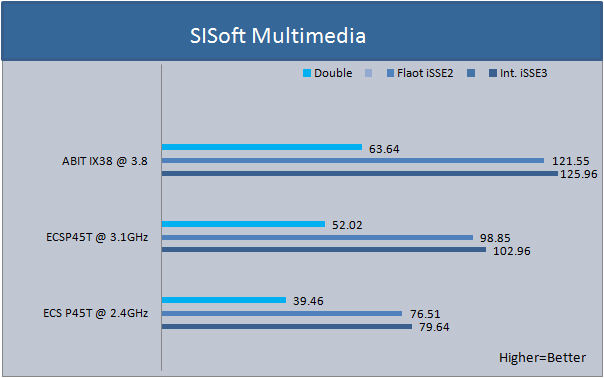
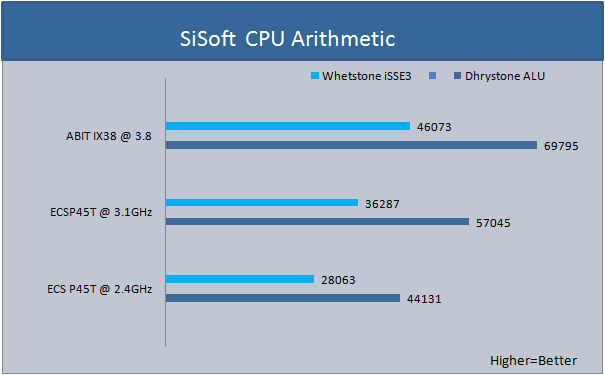
Sisoft
SiSoft has always been at the forefront of the technology arena, being among the first providers of benchmarks that show the power of emerging new technologies like multi-core, GPGPU, AMD64/EM64T/x64, IA64, NUMA, SMT (Hyper-Threading), SMP (multi-threading), AVX, FMA, SSE4.2, SSE4.1, SSE4A, SSSE3, SSE3, SSE2, SSE, MMX, Java and .NET
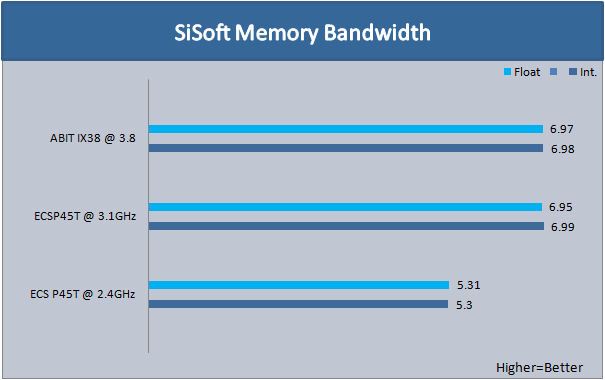
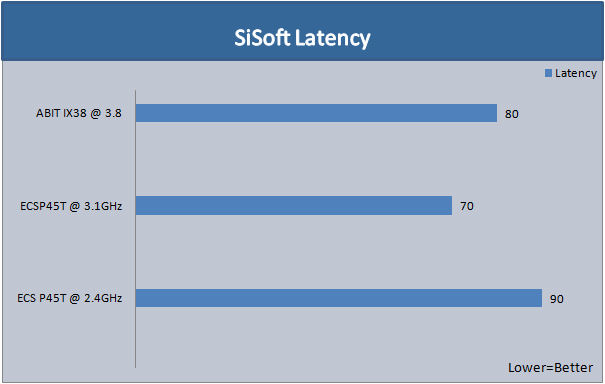
The ECS P45T-AD3 did pretty good, only having a memory speed of 1378MHz.
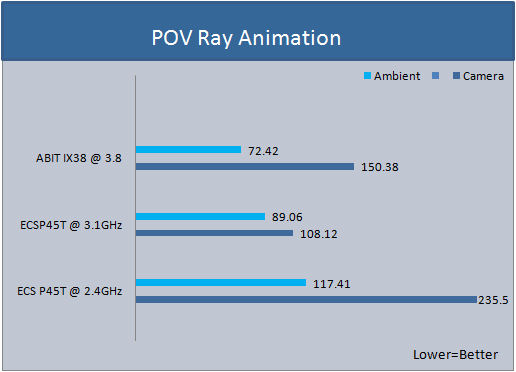
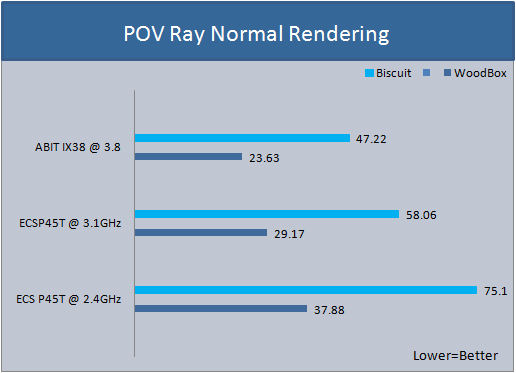
POV Ray
The Persistence of Vision Raytracer is a high-quality, totally free tool for creating stunning three-dimensional graphics. It is available in official versions for Windows, Mac OS/Mac OS X and i86 Linux. The source code is available for those wanting to do their own ports.
EVEREST & CINEBENCH
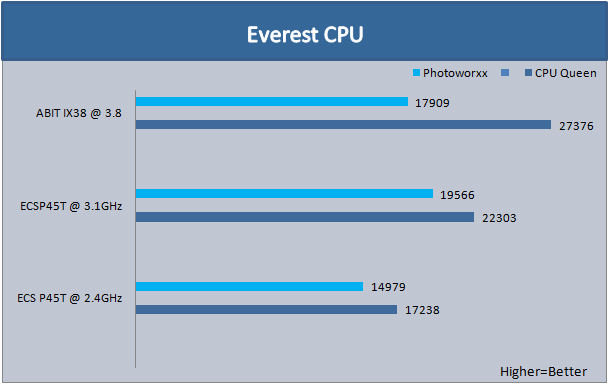
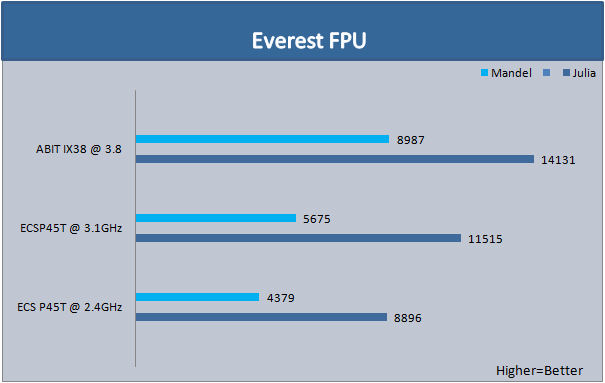
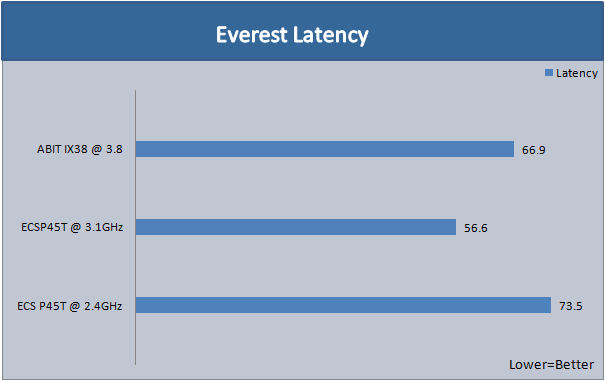
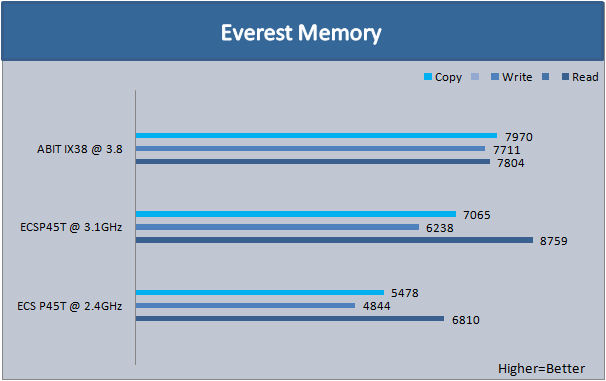
Everest
EVEREST Ultimate Edition is the cutting-edge benchmarking and diagnostics tool to maximize security, performance, and trouble-shooting capabilities for home and home office PC environments, PC Professionals and consulting firms as well as OEM partners and Configuration Centres worldwide.
CineBench
CINEBENCH runs several tests on your computer to measure the performance of the main processor and the graphics card under real world circumstances. The benchmark application makes use of up to 16 CPUs or CPU core.
3DMARK06, 3DMARK VANTAGE, & PCMARK05
3DMARK06
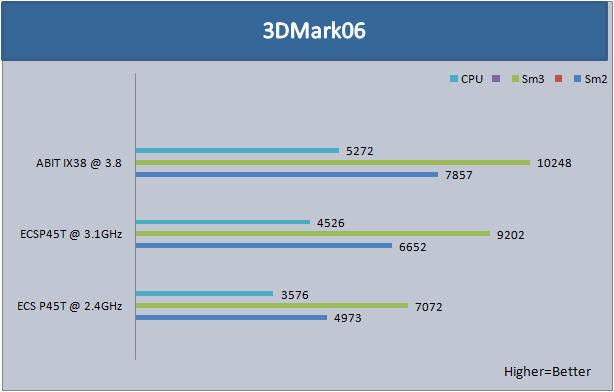
3DMark06 developed by Futuremark, is a synthetic benchmark used for universal testing of all graphics solutions. 3DMark06 features HDR rendering, complex HDR post processing, dynamic soft shadows for all objects, water shader with HDR refraction, HDR reflection, depth fog and Gerstner wave functions, realistic sky model with cloud blending, and approximately 5.4 million triangles and 8.8 million vertices; to name just a few. The measurement unit “3DMark” is intended to give a normalized mean for comparing different GPU/VPUs. It has been accepted as both a standard and a mandatory benchmark throughout the gaming world for measuring performance.
3DMark Vantage
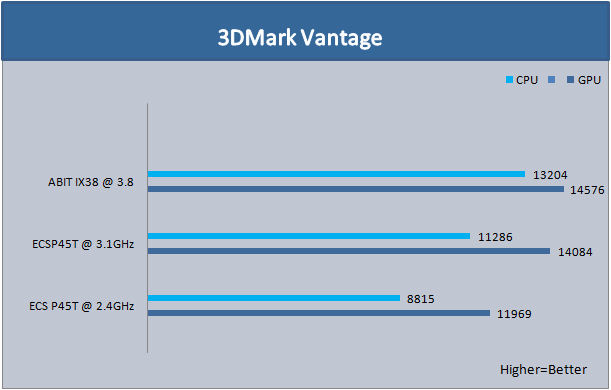
3DMark Vantage is a PC benchmark suite designed to test the DirectX10 performance of your graphics card. We’ve been making 3DMark for over 10 years, with each new edition using the latest 3D technology to determine real-world performance.A 3DMark score is an overall measure of your system’s 3D gaming capabilities, based on comprehensive real-time 3D graphics and processor tests. By comparing your score with those submitted by millions of other gamers you can see how your gaming rig performs, making it easier to choose the most effective upgrades or finding other ways to optimize your system.3DMark is widely used by the PC industry, press and media as well as individual users and gamers, for comparing performance levels between whole systems or even specific components.
PCMark05
PCMark®05 is everything you need to reliably and easily measure the performance of your PC and determine its strengths and weaknesses. With PCMark05, you will be able to select the optimal upgrades for your existing PC, or choose the right new PC that fits your specific needs. This easy-to-use product gives you the same tools and knowledge that virtually every professional tester in the industry uses.
ASSASSIN’S CREED & CRYSIS
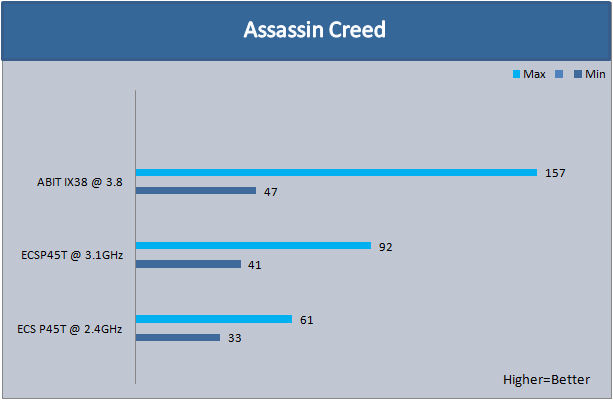
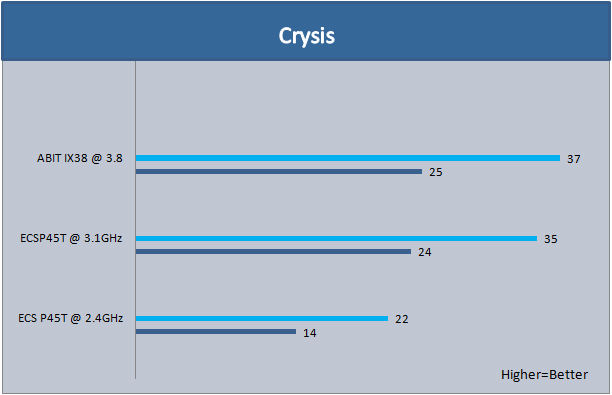
For testing Assassin’s Creed and Crysis, I used 1680×1050 resolution, also adjusting to the highest visual quality in each game.
Assassin’s Creed
Crysis
CONCLUSIONS
Did ECS deliver a motherboard capable of some decent overclocking capabilities? In my opinion, I will have to say yes. Despite the lack of support for my Q6600 CPU, the P45T-AD3 motherboard performed quite well actually. ECS managed to keep the P45T-AD3 motherboard fairly simple and easy to understand as far as what goes where. In addition to the layout of this motherboard I personally liked not having a bunch of heat pipes running all over the place and crowding areas which need to have as much room as possible, for instance areas such as the CPU socket area or on or around the North-Bridge, and near the memory area. The only real complaints I had with the layout was the clear CMOS button is in a awkward spot and the board having two of the six SATA ports at 90 degrees when they should have made them all at 180 degrees. Also, not using all solid capacitors on the P45T-AD3 motherboard will hurt its performance on the long haul and will hinder its longevity. The BIOS was real simple to navigate through and all of the major adjustments were in one place and not scattered about here and there. The BIOS should have included a re-load function or some form of profile saving so that those of us who are constantly tweaking our motherboards can always have a point to go back to just in case we might go just a tad too far. Having to reset every setting every single time the BIOS got cleared did get a little tiresome. The voltage settings could use a bit more fine tuning and they could be less cumbersome, instead of having large jumps from one voltage setting to the next, because sometimes we may not need to go from 1.4 volts to 1.5 volts. Having a more refined voltage adjustment would allow users to make more precise adjustments. If ECS allowed better support for an already proven, yet still very popular the Q6600 CPU, I would have given this mother a better scoring. But even so, I still have to consider this motherboard, for a motherboard being on or around the 100 U.S. dollar mark, will most likely catch the eyes of those looking for a cheap motherboard with a decent layout desgn and decent capabilities.
Pro’s
+Motherboard layout was simple and easy to understand on what goes where.
+Not being completely inundated by a heatspipe cluttering up the motherboard.
+Solid perfromance.
+Enough voltage adjustments to cook a CPU and or memory.
+Utilizing push button’s for CMOS clearing and power/reset.
Con’s
– Bad CPU support. Not able to offically support my CPU (as this is a BIOS limitation and not the chipset).
– The two middle SATA connectors are at 90 degrees and not 180 degrees.
– PCI-E x16 port’s anti-burn locks could present a problem if you are always removing your video card.
– The clear CMOS button is in an unusual place, being right in between the PCI_E x16 ports. If you are using large video card coolers it may present a problem if needing to clear the CMOS.
– No CMOS reload or profiles to save for quick reference.
Final Score: 7.5 out of 10 and the Bjorn3D Seal of Approval


