With the introduction of Intels X48 chipset, overclocking records previously set on the X38 have been shattered. DFI has long been known as one of the top motherboard makers, if not the best one. With DFI’s good record, and the best Intel chipset currently on sale, you cant go wrong.
INTRODUCTION
When the X48 chipset came around we all questioned if it would be able to surpass the already supreme X38 chipset. Those doubts were immediately put to rest when overclockers were able to reach record CPU speeds. The X48 chipset itself, still supports 16x Crossfire just like on the X38 boards, yet doesn’t offer any benefits in the way of features over the X38 chipset, even though if you were to dig deeper you might find a list of fancy features on the X48 that really just make the board seem better. Today, DFI sends us their LanParty LT X48 board to see if it can deliver the performance and overclocking that comes with the X48 chipset.
There are also many more advantages which will give it a performance edge over many motherboards on the market today. These include it being an Intel socket LGA775, which currently supports some of the most powerful CPU’s on the market. The board has an X48 chipset, and currently the premier gaming chipset. There is also support for DDR3, the fast growing standard in RAM. DDR3 can hit much higher speeds than DDR2 memory, making it far superior. With all these specifications, this board easily classifies itself as a high end gaming board. It should compete with the best gaming boards out there, giving you unparalleled performance.
Lately, the Asus ROG (Republic of Gamers) line of motherboards have been able to keep up with, and in some cases surpass DFI boards. And it seems as if DFI is becoming more of a second class board compared to the pure level of Asus’s resources in making more advanced motherboards, though DFI should not be counted out if you are in the market for an X48 platform motherboard. Despite Asus being at DFI’s heels lately, the DFI LanParty LT X48 T3RS should still prove to be a great gaming motherboard, along with providing a high overclock.
About DFI
DFI is an international IT expert based in Taiwan locating our Headquarters in Hsi-Chih City. DFI was established in 1981 under Mr. Y.C. Lu’s principal. Dedicating to servicing customer with high technology, DFI has been earning a worldwide reputation for quality owing much to the continuing support from our customers, suppliers and affiliates as well as our own efforts over the past twenty years. With more than 20 years of computer product developing and manufacturing, our team of highly skilled engineers helps DFI position ourselves as the standard setter of price-performance solution in the manufacturing and marketing of computer products.
SPECIFICATIONS
Here is some basic information that you will need before deciding to purchase this board.
|
DFI X48 Specifications |
|
| CPU Support | LGA 775 socket for: Intel® CoreTM2 Quad and Intel® CoreTM2 Duo, Supports Intel Enhanced Memory 64 Technology (EMT64T), Supports Enhanced Intel SpeedStep Technology (EIST), Supports Intel Hyper-Threading Technology, Supports 1600/1333/1066/800MHz FSB |
| CHIPSET | Intel® chipset, Northbridge: Intel® X48 Express chipset (with Intel® Fast Memory Access technology), Southbridge: Intel® ICH9R |
| MEMORY | Four 240-pin DDR3 DIMM sockets, Supports DDR3 800/1066/1333/1600MHz, Delivers up to 21.3Gb/s bandwidth at 1333MHz,(25.6GB/s bandwidth at 1600MHz), Supports dual channel (128-bit wide) memory interface, Supports up to 8GB system memory, Supports unbuffered x8 and x16 DIMMs |
| EXPANSION SLOTS | 2 PCI Express (Gen 2) x16 slots (PCIE 1 and PCIE 3), 2-way CrossFire at x16/x16 bandwidth, 2-way CrossFire + Physics at x16/x16/x4 bandwidth, 1 PCI Express x1 slot (PCIE 2), 1 PCI Express x4 slot (PCIE 4), 3 PCI slots |
| BIOS | Award BIOS, 8Mbit flash memory, CMOS Reloaded |
| AUDIO | Bernstein audio module, Realtek ALC885 8-channel High Definition Audio CODEC, Center/subwoofer, rear R/L and side R/L jacks, Line-in, line-out (front R/L) and mic-in jacks, 2 coaxial RCA S/PDIF-in/out jacks, 1 optical S/PDIF connector, 1 CD-in connector, 1 front audio connector, DAC SNR/ADC SNR of 106dB/101dB, Full-rate lossless content protection technology |
| LAN | Marvell 88E8052 and Marvell 88E8053 PCIE Gigabit LAN controllers, Fully compliant to IEEE 802.3 (10BASE-T), 802.3u (100BASE-TX) and 802.3ab (1000BASE-T) standards |
| STORAGE | Intel ICH9R chip, Intel Matrix Storage technology, Supports up to 6 SATA devices, SATA speed up to 3Gb/s, RAID 0, RAID 1, RAID 0+1 and RAID 5, JMicron JMB363 PCI Express to SATA and PATA host controller, Supports up to 2 UltraDMA 100Mbps IDE devices, Supports 2 SATA devices, SATA speed up to 3Gb/s, RAID 0 and RAID 1 |
| 1394 | VIA VT6307, Supports two 100/200/400 Mb/sec ports |
| REAR I/O PANAL | Mini-DIN-6 PS/2 mouse port and PS/2 keyboard port, 1 IEEE 1394 port, 6 USB 2.0/1.1 ports, 2 RJ45 LAN ports |
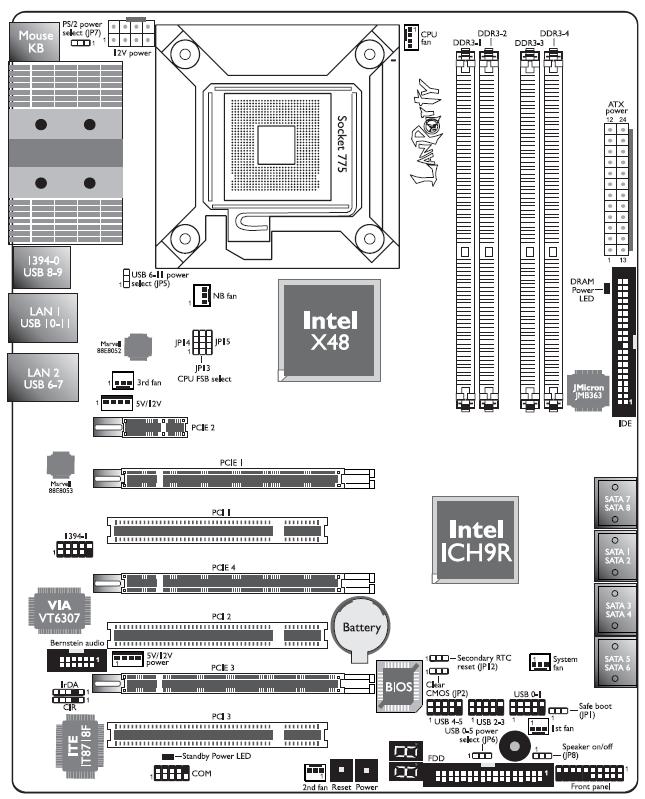
| Internal I/O | 3 connectors for 6 additional external USB 2.0 ports, 1 connector for an external COM port, 1 connector for an IEEE 1394 port, 1 connector for the Bernstein audio module, 1 front audio connector (on the Bernstein audio module), 1 CD-in connector (on the Bernstein audio module), 1 S/PDIF connector (on the Bernstein audio module), 1 IrDA connector, 1 CIR connector, 8 Serial ATA connectors, 1 40-pin IDE connector and 1 floppy connector, 1 24-pin ATX power connector, 1 8-pin 12V power connector, 2 4-pin 5V/12V power connectors (FDD type), 1 front panel connector, 6 fan connectors, 1 diagnostic LED, EZ touch switches (power switch and reset switch) |
| POWER MANAGEMENT | ACPI and OS Directed Power Management, ACPI STR (Suspend to RAM) function, Wake-On-PS/2 / Wake-On-USB Keyboard/Mouse, Wake-On-LAN and Wake-On-Ring, RTC timer to power-on the system, AC power failure recovery |
| HARDWARE MONITOR | Monitors CPU/system/Northbridge temperature and overheat alarm, Monitors Vcore/Vdimm/Vnb/VCC5/12V/V5sb/Vbat voltages, Monitors the speed of the cooling fans, CPU Overheat Protection function monitors CPU temperature and fan during system boot-up – automatic shutdown upon system overheat |
| PCB | 6 layers, ATX form factor, 24.5cm (9.64″) x 30.5cm (12″) |
This is pretty standard for an X48 board. This board has all of the big name features that a high end board should have. So now that we have the basic specifications, let’s go on to what’s included in the package.
PACKAGING & CONTENTS


- Owners manual
- Driver CD
- Driver Floppy
- Thermalright installation manual
- Rear I/O shield
- IDE & FDD cables
- Four SATA cables
- Two Molex to SATA power adapters
- Thermalright HR-05 SLI/IFX
- Thermalright fan clips
- Bernstein Audio Module
- Smart connectors

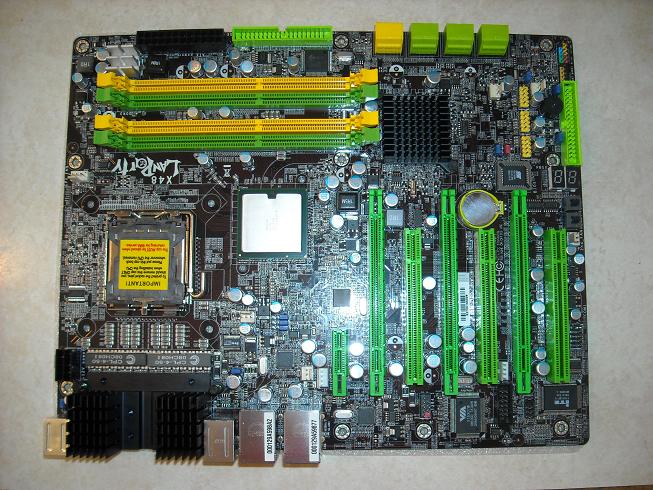
LAYOUT
This boards layout has a few issues that I would like to point out now. One thing that this picture does not show is how close the RAM slots are to interfering with a longer graphics card. This would present a big problem to someone who has a card with something that extends past the PCB. Another design flaw is there are caps that can interfere with the heat pipe on the chipset cooler. The last issue I saw was with the chipset cooler and its size. If you are currently using a RAM fan, such as one for Corsair Dominator modules, you won’t be able to use it with this chipset cooler attached.
On the bright side there are a lot of good things about this motherboard. One nice feature is that each PCIE slot has a regular PCI slot right underneath it. That means you can easily run three video cards with dual slot coolers. The switches on the motherboard also make this easy to be a bench machine, if you change components a lot. All the SATA connectors for the board are in a very good place for cable management. The battery is in a little bit of a tight spot, but it’s not the worst I have seen. This board will clear the CMOS and the BIOS settings if both the Power and Reset switch are pressed at the same time, so that shouldn’t be much of an issue. Finally, one of the best parts about this board, all of the caps are solid state and made in Japan. It is well known that the Japanese make the best caps, so this should help improve the stability and overclockability of the board along with improving the life span.

The CPU socket is an LGA775. Make sure that you have the right processor before installing. Unlike some older motherboards, the pins on LGA775 are on the motherboard and not on the physical CPU. If you see a bent pin on this motherboard, DFI says to contact the seller. Do not attempt to fix the pins as you may do more damage than good. The LGA775 uses the ZIF (Zero Insertion Force) socket, so you only need to apply a very slight pressure to get the CPU into the socket. Then, you push the clip down, which secures the CPU. This is significantly better than AMD sockets and older Intel sockets. The pins on old CPU’s could be very easily broken, especially if one was slightly bent. This type, with the pins on the motherboard, is much more up to the task at hand. They have a much better design, and don’t break nearly as easy as old pins from the past.

The RAM layout is pretty standard with any other motherboard. For your RAM to run in dual channel, you will have to put two modules in the same colored slots. If you have four dims, then it does not matter which dim is in which slot. DFI has also included a nice DRAM power LED so you know if your RAM is getting power. This can help when you are troubleshooting your system. It is certainly a good move by DFI. You could spend hours wondering why your board won’t boot, only to realize that your RAM isn’t clipped in quite enough. This LED could potentially save hours of troubleshooting.
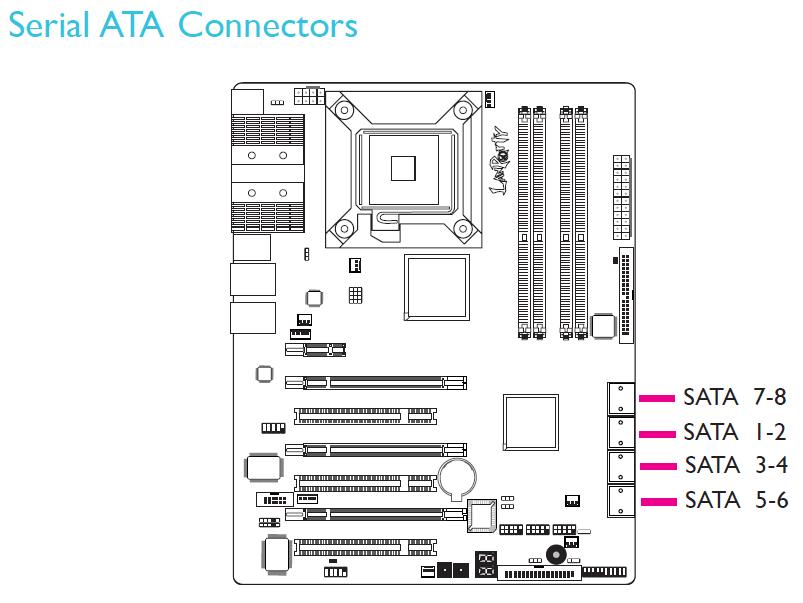
As you can, see SATA 1 and 2 are not at the very top. It is personal preference, but I prefer to use SATA connectors in order, though you can use any SATA port you want without consequence. Eight SATA ports should be more than enough for everyone, since most cases only have four to six HDD’s in the HDD cage. I like seeing more than enough SATA connections, but I am not very happy about having only one IDE connection. Call me old school, but I still use an IDE disk drive because, honestly, there is no reason to have a SATA drive when I still have a perfectly good IDE drive laying around. I also have an old 160GB IDE HDD that I keep important files on. It is hard to connect it into the disk drive cage. I know this won’t be an issue for pretty much anyone who picks up this board, but it’s a little bit of a hassle for me.
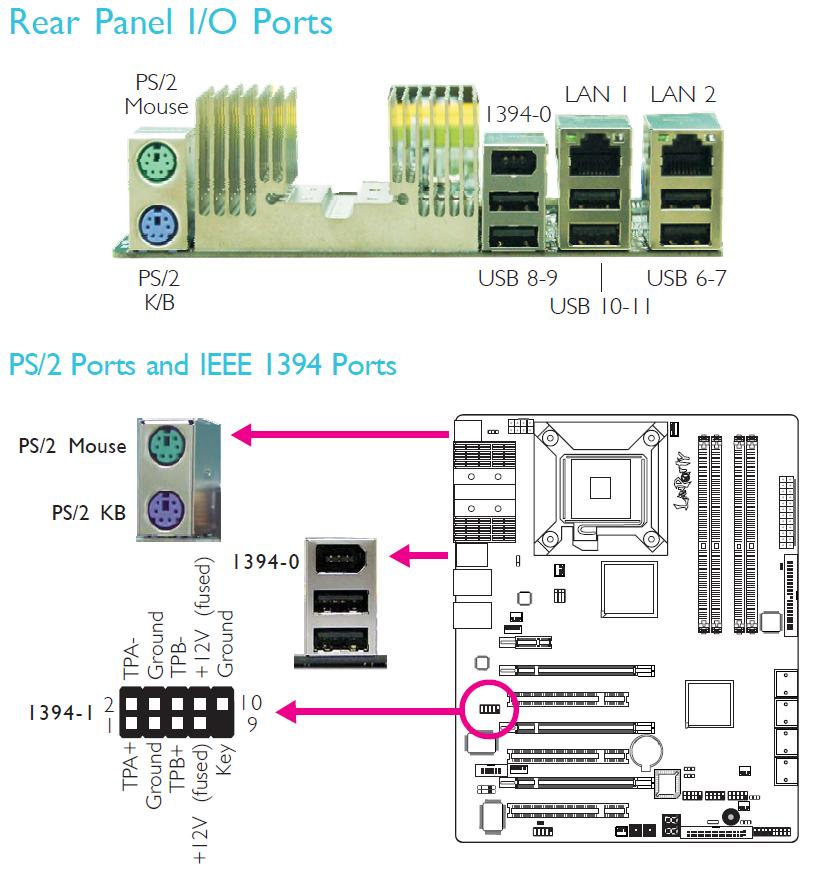
One weird thing about this board is the heat sink on the Rear I/O. Generally, motherboard manufacturers try to maximize I/O space, and to me this seems like a big waste having this heat sink extend out this far. I have seen pictures of this with a fairly large cooler coming out, and there seems to be a place were it would fit, but it is not included. There are standard PS/2 ports for anyone with an older mouse or keyboard. There are a total of six USB inputs and one 1394. There is a connection on the board were you can connect another 1394 port if you wish to do so. A nice thing about the LAN ports is they can be doubled up to increase transfer speeds. This will be great for someone who transfers a lot of files between computers and wants to save time.


BIOS

This is the main BIOS screen. From here you can get to all of the BIOS options. I am sure that no one will want to see the basic functions of the BIOS, so I will jump right into the good parts, mainly the overclocking screens.
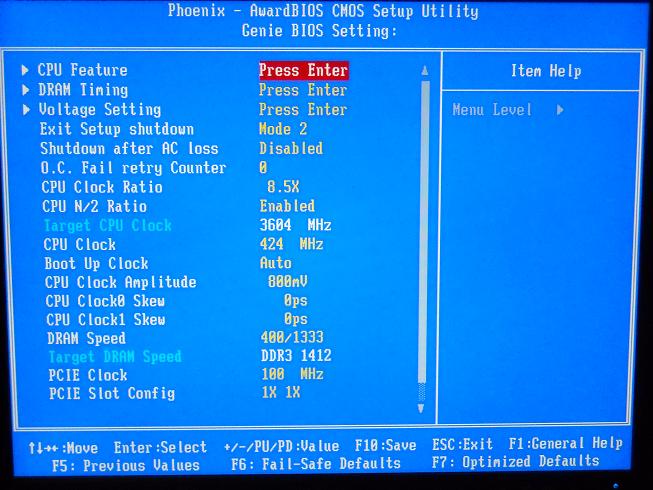
From the Genie BIOS settings menu you can change just about everything dealing with overclocking. You can access other sub menus like DRAM timing and Voltage settings. This is the screen were you adjust the FSB speed. On this, BIOS FSB is worded into CPU Clock.
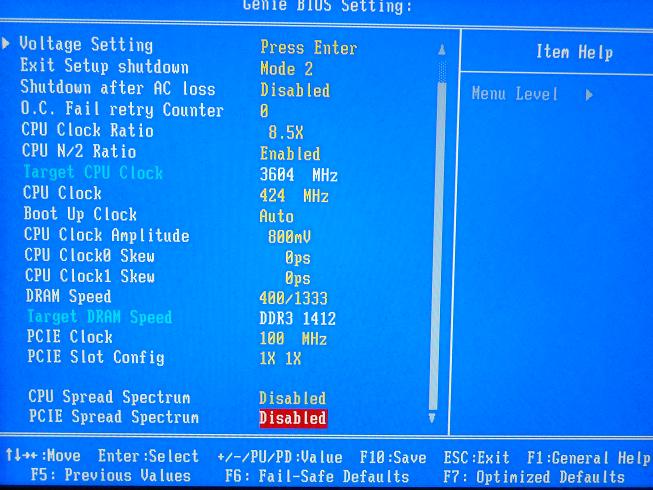
This is a continuation for the Genie BIOS settings. You can choose to have either the CPU or PCIE Spread Spectrum enabled from here. I recommend leaving this set to Disabled.
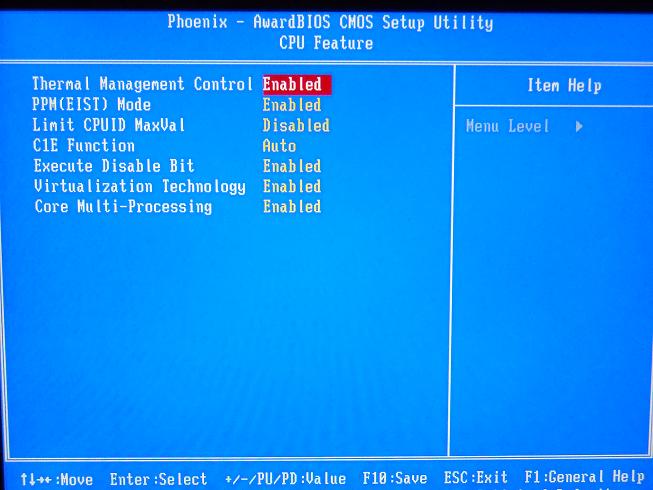
This is the CPU Feature menu. For maximum stability, it is best to have everything disabled except Core Multi-Processing. If you disable Multi-Processing, then if you have a Quad, only two cores will work, and if you have a Dual then only one core will work. This can be helpful if you’re going for the absolute max FSB with this board.
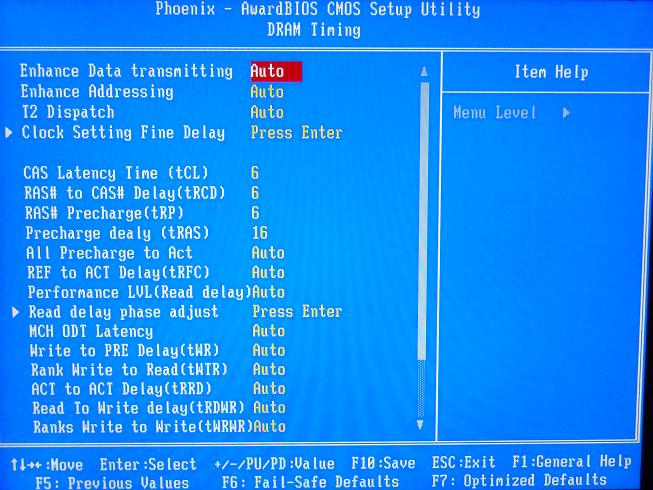
Here we have the DRAM timing menu. As with my NF4 SLI-DR Extreme, there are a ton of RAM options. Many of these I have never heard of, so I recommend you set them to Auto until you have more time to mess with them. You can potentially squeeze out a few more MHz from your RAM if you spend some quality time in this menu, but to me it’s really not worth it.
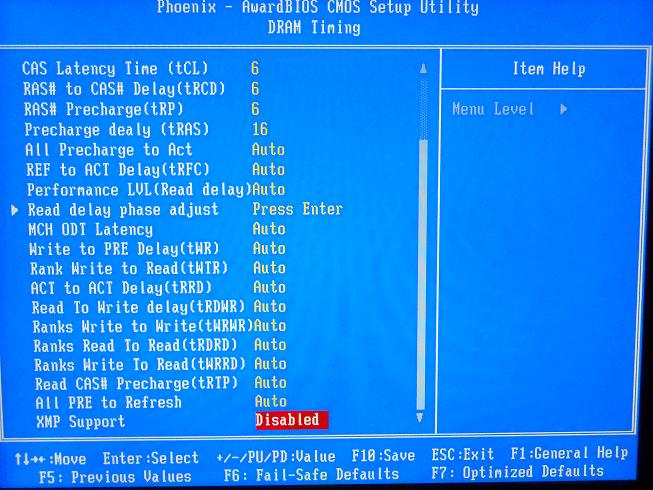
Here are the last few options on the bottom of this menu. Once again I find myself overwhelmed by all of these random options, but people with time to heavily research this board will learn how to tweak their settings to squeeze out every last MHz.
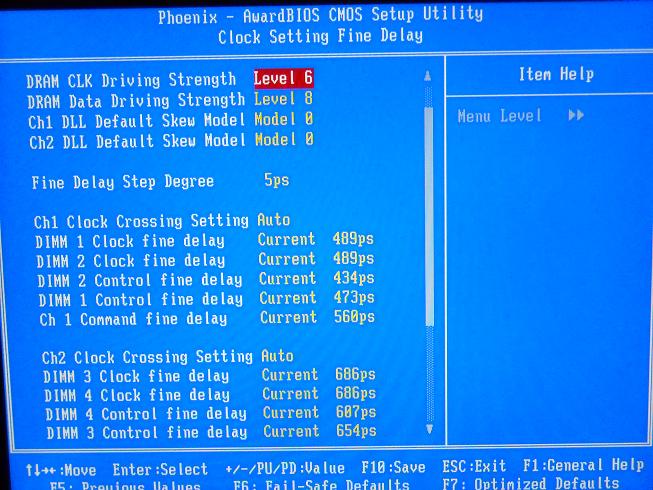
If we dig farther into the RAM sub menus we will find the Clock Setting Fine Delay. As if there already weren’t enough settings on the first screen, there are more here. This is to set the clock fine delay, hence the name.
There are even more options at the bottom of this menu. These options can lead to a higher overclock if time is spent tweaking them.
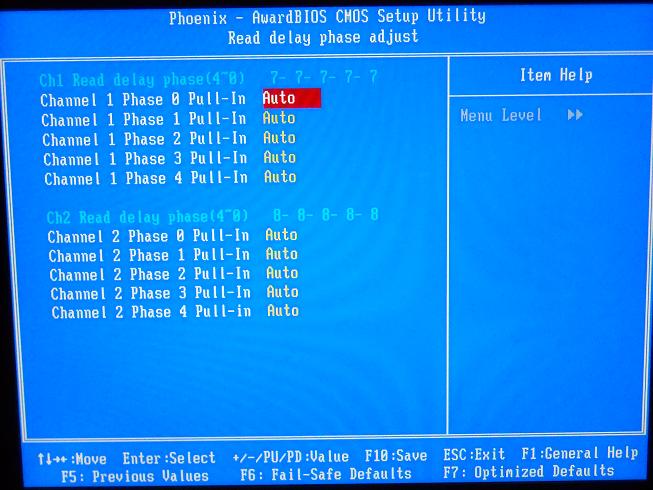
This is the Read delay phase adjust. This can be used to even further adjust your RAM. I personally haven’t even touched the sub menus on this board, because of the pure vastness of options to mess with. For every person like me, I am sure there is someone who will find great opportunities in adjusting settings in this menu.

Here is the Voltage control menu. From here you can adjust all of the voltages on everything from your CPU to your NB. There are quite a lot of options, and I am sure you will not find any shortage of pure voltage, as many of these voltages go far above what is safe on the CPU and other components.
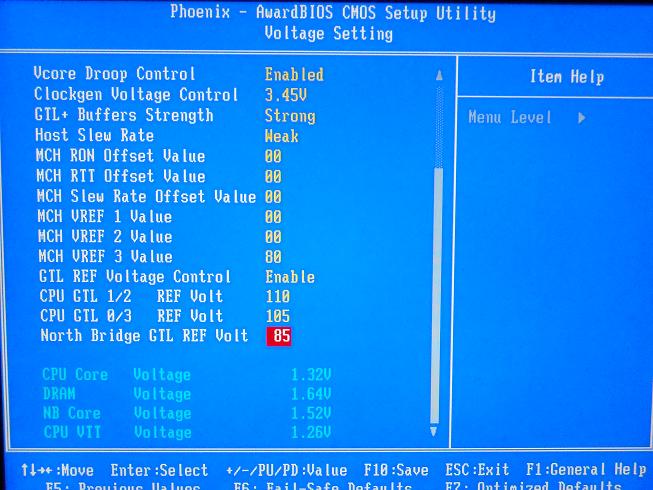
I found some success in overclocking when I adjusted a couple of these options. DFI has made a chart to give you a base in starting points for when you overclock.
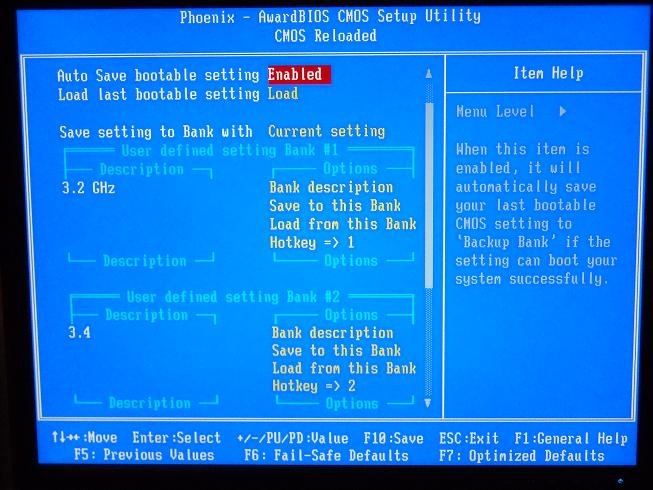
This is personally my favorite menu in the BIOS. This allows you to switch between different saved overclocking profiles. So you can save your record setting run, and easily revert back to your 24/7 speed. There are a total of four save slots the BIOS. I have heard bad things about this and certain auto settings. Supposedly, some of the auto settings will not adjust correctly, thus causing instability. Remember to clear CMOS if you encounter these issues before you deem the overclock or board as malfunctioning.
TESTING & METHODOLOGY
| Test Rig | |
| Case Type | Tagan El Diablo A+ |
| CPU | Intel Q9550 @ 3.6 (424 x 8.5) |
| Motherboard |
DFI LanParty X48 T3RS |
| Ram |
G.SKILL 4GB (2 x 2GB) 240-Pin DDR3 1333 @ 1411, 6-6-6-16 |
| CPU Cooler | Ultra Chilltec |
| Hard Drive | WD SE16 Caviar Blue 640 MB |
| Optical | Lite-On DVD R/W |
| GPU’s Tested |
Sapphire 4850 @ 700MHz core/1103MHz |
| Case Fans | Intake – One 240mm Front Extake – Two 180mm Top One 120mm Back |
| Testing PSU |
Corsair HX1000W |
All of the tests were done multiple times to ensure that the most accurate results were obtained. These results were then averaged to come up with the most accurate number. The Crysis test was done at the resolution of 1280×1024 to make sure that the CPU was being depended on more rather than the graphics card. An Intel Core i7 965 Extreme chip was used on an Asus P6T motherboard. The 965 was overclocked to 3.74 GHz. Also, a Q6600 clocked at 3.6 GHz was used on an EVGA 790i motherboard as a comparison. Windows Vista 64 bit edition was used as the operating system. This is to make sure that all of the RAM in the system is used. The RAM used on the 790i and X58 is DDR3 1600. This is not really that much of an advantage on the LGA775 socket motherboards, since the processors don’t have the built-in memory controller. Both the 790i and the X58 used an Nvidia GTX260 graphics card. This will make a difference in the test scores, but the HD 4850 was overclocked a bit to help make up for some of this difference.
|
Synthetic Benchmarks |
|
3DMark Vantage v. 1.01 |
|
3DMark06 v. 1.1.0 |
|
SiSoft SANDRA XII Professional SP2 |
|
Everst Ultimate Edition v. 4.50.1330 |
|
SuperPi Mod 1.5XS |
|
HD Tach RW 3.0.1.0 |
|
Cinebench R10 64 bit |
|
WinRar v. 3.71 |
|
Games |
|
Crysis |
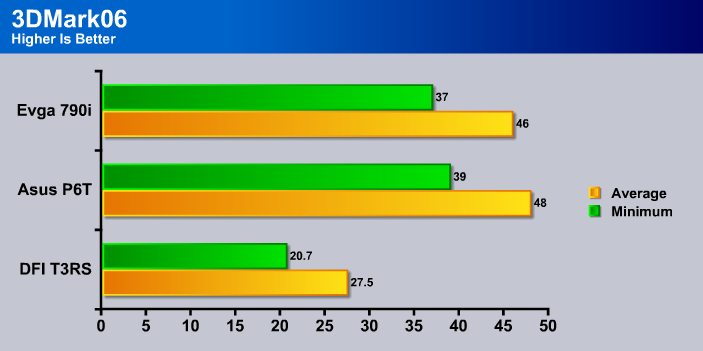
3DMark06

3DMark06 developed by Futuremark, is a synthetic benchmark used for universal testing of all graphics solutions. 3DMark06 features HDR rendering, complex HDR post processing, dynamic soft shadows for all objects, water shader with HDR refraction, HDR reflection, depth fog and Gerstner wave functions, realistic sky model with cloud blending, and approximately 5.4 million triangles and 8.8 million vertices; to name just a few. The measurement unit “3DMark” is intended to give a normalized mean for comparing different GPU/VPUs. It has been accepted as both a standard and a mandatory benchmark throughout the gaming world for measuring performance.
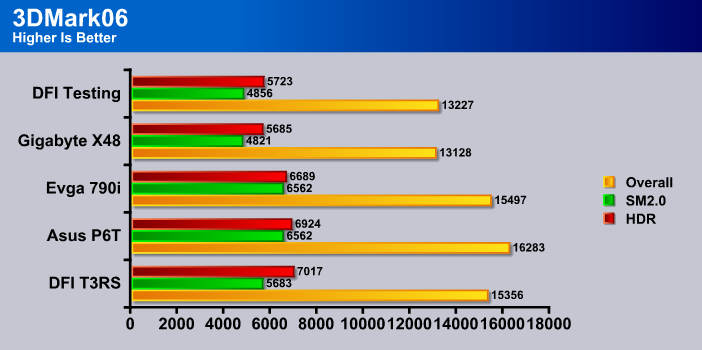
The scores were actualy quite a bit closer than I was expecting. The X58 and 790i were using a more powerful card, the GTX260 to be exact, so I expected them to beat out this rig, but it was fairly close. The Gigabyte lagged behind every other board on this test.
3DMark Vantage

For complete information on 3DMark Vantage Please follow this Link: www.futuremark.com/benchmarks/3dmarkvantage/features/
The newest video benchmark from the gang at Futuremark. This utility is still a synthetic benchmark, but one that more closely reflects real world gaming performance. While it is not a perfect replacement for actual game benchmarks, it has its uses. We tested our cards at the ‘Performance’ setting.
Currently, there is a lot of controversy surrounding NVIDIA’s use of a PhysX driver for its 9800 GTX and GTX 200 series cards, thereby putting the ATI 4850 Toxic and 4870 at a disadvantage. Whereby installing the PyhsX driver, 3DMark Vantage uses the GPU to perform PhysX calculations during a CPU test, and this is where things get a bit gray. If you look at the Driver Approval Policy for 3DMark Vantage it states; “Based on the specification and design of the CPU tests, GPU make, type or driver version may not have a significant effect on the results of either of the CPU tests as indicated in Section 7.3 of the 3DMark Vantage specification and white paper.” Did NVIDIA cheat by having the GPU handle the PhysX calculations or are they perfectly within their right since they own Ageia and all their IP? I think this point will quickly become moot once Futuremark releases an update to the test. For now we will show the GPU and CPU score and let you judge.
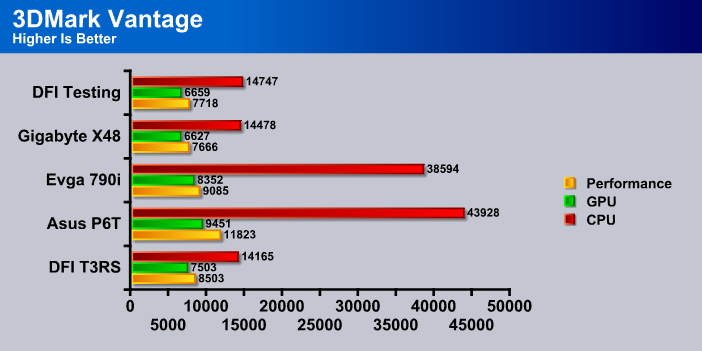
This bench can almost be thrown out, because I used an ATI video card on the DFI board, while the other two motherboards had an Nvidia video card which uses PhysX. That raises the CPU score up tremendously, which allows those other two boards to have a much higher score. The Gigabyte once again comes in last place.
EVEREST
“EVEREST Ultimate Edition is an industry leading system diagnostics and benchmarking solution for enthusiasts PC users, based on the award-winning EVEREST Technology. During system optimizations and tweaking it provides essential system and overclock information, advanced hardware monitoring and diagnostics capabilities to check the effects of the applied settings. CPU, FPU and memory benchmarks are available to measure the actual system performance and compare it to previous states or other systems. Furthermore, complete software, operating system and security information makes EVEREST Ultimate Edition a comprehensive system diagnostics tool that offers a total of 100 pages of information about your PC.”
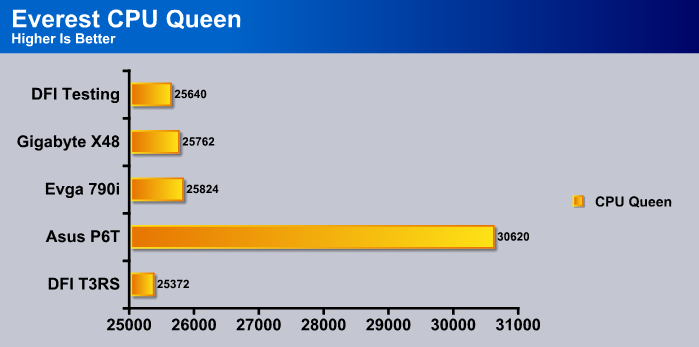
I was not really surprised with the X58 results here. The Nehalem does a lot more per clock cycle. I am a bit surprised at the 790i, slightly winning. It looks like the 790i board is a bit better at unleashing the CPU, though the X48 board was right behind it, only losing by a couple hundred points. The Nehalem took quite a large lead at about 5k more points. The Gigabyte board manages to pull ahead of both of the DFI results.
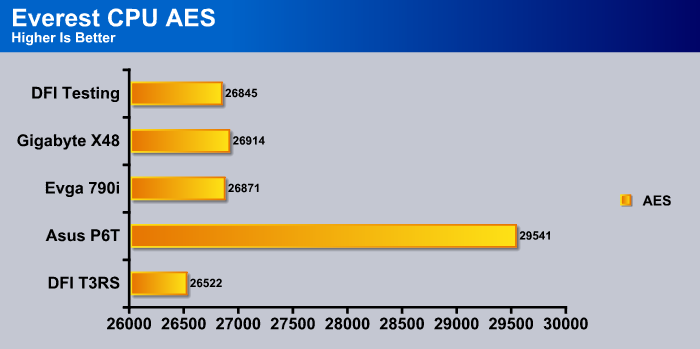
Once again the 790i beat out the X48 by a couple hundred points. The X58 completely blew out both the 790i and X48. This is more proof that Intel’s new Nehalem powerhouse packs quite a bit more performance compared to the older Core 2. So far it is looking like the 790i is a better platform, especially if you consider the slight handicap a Q6600 is to a Q9550. The Gigabyte has a slight advantage over the DFI X48.
SuperPi
SuperPi is the “Gold Standard” for many when it comes to judging system performance. We ran 1 and 2 Meg calculations, again running each test three times and reporting the average of the results.
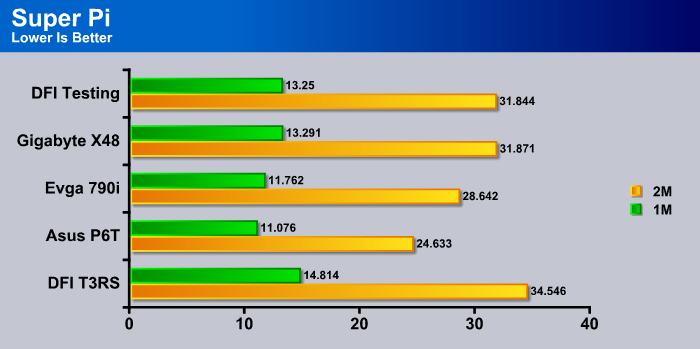
Super Pi can show what a CPU can do with a single core, but is quite lacking when it comes to multi core processors. As you can see, the DFI X48 once again comes up short. I am quite disappointed at this, as the Intel chipsets are very talked up to be the best for the Intel platform. The 790i was actually able to almost match the Nehalem, which is quite a feat for having a Q6600.
WinRar
This module in WinRar generates random data, which contains specially introduced redundancy, increasing the load to both the processor and memory. Data is then passed through RAR compression and decompression algorithms, and the output of the decompression algorithm is compared to the source data. If any differences are found, WinRAR then reports “Errors found – Yes” in the command window. WinRAR displays a size of processed data and compression speed, current and resulting, in kilobytes per second.
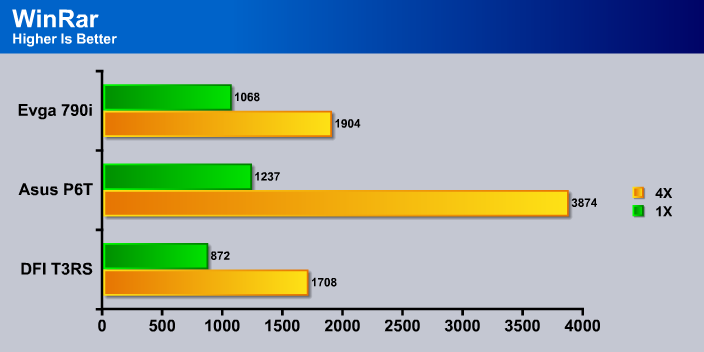
The X48 once again loses out. I think the worst part about this is that the 790i is using a worse processor at the same speed. No real surprise here that the Nehalem won out, but it is surprising how much more it did when multithreading.
CINEBENCH
“CINEBENCH is a real-world test suite that assesses your computer’s performace capabilities. MAXON CINEBENCH is based on MAXON’s award-winning animation software, CINEMA 4D, which is used extensively by studios and production houses worldwide for 3D content creation. MAXON software has been used in blockbuster movies such as Spider-Man, Star Wars, The Chronicles of Narnia and many more. MAXON CINEBENCH runs several tests on your computer to measure the performance of the main processor and the graphics card under real world circumstances. The benchmark application makes use of up to 16 CPUs or CPU cores and is available for Windows (32-bit and 64-Bit) and Macintosh (PPC and Intel-based). The resulting values among different operating systems are 100% comparable and therefore very useful with regard to purchasing decision-making. It can also be used as a marketing tool for hardware vendors or simply to compare hardware among colleagues or friends.”
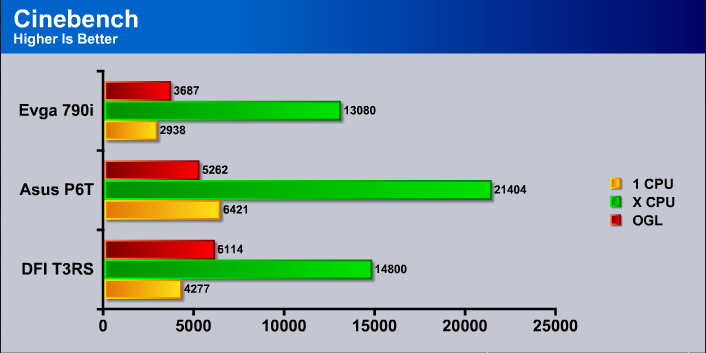
Here the X48 finally shows through. This is probably due in part to the extra cache of the CPU, but these margins are too big to just be cache. The X48 seems to be a better platform for performing in the kind of conditions Cinebench simulates.
Once again the X48 platform beats the 790i, though not by a large margin, but still a decent size chunk. The X58 once again wins all. This really is not a big surprise, as it is the next generation platform. But as you can see, the X48 can put up a decent fight, and happens to be a cheaper platform. This gives it a price per performance ratio that is better than the Nehalem.
Sisoft Sandra 2009 SP1
“SiSoftware Sandra (the System ANalyser, Diagnostic and Reporting Assistant) is an information & diagnostic utility. It should provide most of the information (including undocumented) you need to know about your hardware, software and other devices whether hardware or software. It works along the lines of other Windows utilities, however it tries to go beyond them and show you more of what’s really going on. Giving the user the ability to draw comparisons at both a high and low-level. You can get information about the CPU, chipset, video adapter, ports, printers, sound card, memory, network, Windows internals, AGP, PCI, PCI-X, PCIe (PCI Express), database, USB, USB2, 1394/Firewire, etc.”
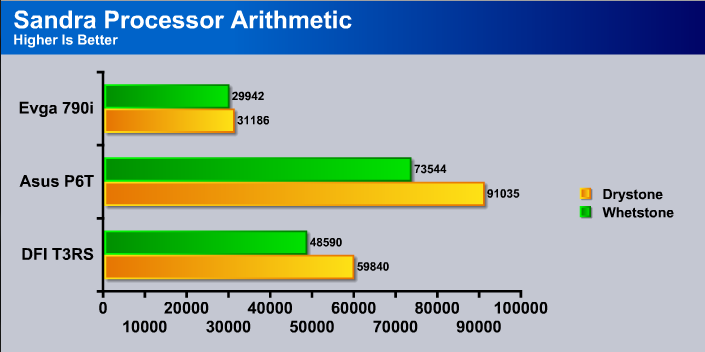
I was quite surprised at the outcome of this benchmark. The X48 totally beat up the 790i. You can’t even call this a close competition with over a 10k lead in both Drystone and Whetstone. The DFI really beat the 790i by more than a fair margin.

Once again the X48 beats out the 790i. It fell into the middle ground on this one, being about in the exact middle between the 790i and X58. It did put a little better fight with the X58 than I was expecting. Perhaps if I was able to get a little more of an overclock, the X48 would be competing more often with the X58.
CRYSIS

Crysis is the most highly anticipated game to hit the market in the last several years. Crysis is based on the CryENGINE™ 2 developed by Crytek. The CryENGINE™ 2 offers real time editing, bump mapping, dynamic lights, network system, integrated physics system, shaders, shadows, and a dynamic music system, just to name a few of the state-of-the-art features that are incorporated into Crysis. As one might expect with this number of features, the game is extremely demanding of system resources, especially the GPU. We expect Crysis to be a primary gaming benchmark for many years to come.
These results, like the 3DMark results, don’t mean a whole lot. The better graphics card in the other two systems easily beats my HD 4850. Had the same graphics card been used, the test would have come out more closely, though in a game like Crysis, the CPU doesn’t mean a whole lot.
HDTach
HD TACH performs sequential read and write tests on removable media and fixed disks. HD Tach is also capable of performing the sequential read and write tests on the entire disk instead of the small number of zones in the quick and long test. We opted to use the Short 8 (MB) and Long 32(MB) tests in the sequential read mode only, as sequential writes are covered by other benchmarks.

In this test, the X48 beats out the 790i even though the 790i had a smaller hard drive. Smaller HDD’s have an advantage because there is less information to sort through. Despite this advantage, the X48 still beat the 790i. I had my doubts about the X48 at the beginning of this review, but it is slowing gaining ground on the 790i.
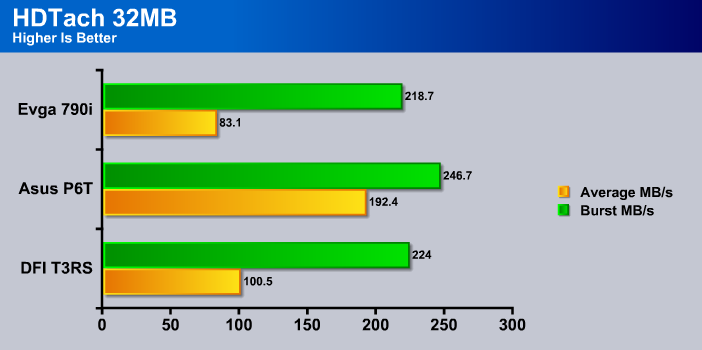
The X58 was using a SSD drive, so it’s no surprise that it won out overall. The X48 still manages to beat out the 790i, showing that there is something in the construction that beats the 790i chipset’s management of HDD’s.
OVERCLOCKING

I would first like to take the time to say that overclocking has its benefits and downfalls. Remember, do not push your hardware beyond its thermal specifications. Nothing can make your equipment go boom faster than a CPU that spikes up to 150°C. Only overclock in small increments at a time. If you go too high you may be unable to boot, and thus you might have to clear the CMOS. This is no fun, especially if you mess with all of the little settings. Overclocking is done at your own risk. It’s a free performance boost. You just have to be careful when you get it.
Buses
- FSB Frequency: 100 – 999Mhz in 1MHz Increments
- PCIE Frequency: 100 – 250Mhz in 1MHz Increments
Voltages
- CPU Voltage: 0.9v to 1.6v in 0.00625v increments
- CPU VID Special Add: 100.2% to 130% in ~0.24% increments
- Southbridge Core/CPU PLL Voltage: 1.51 to 2.38 in 0.13v increments
- NB Core Voltage: 1.265v to 2.04v in 0.013v increments
- CPU VTT Voltage: 1.1v to 1.61v in 0.005v increments
As with many other DFI boards, overclocking can be a long and tedious process. Overclocking was quite boring on this board, and not exhilarating like in most boards I overclock. This board just has too much stuff for me to dig through. Perhaps DFI should think about slimming up the BIOS, and throwing the excess options into another BIOS screen.
The max bus speed I was able to attain stable was 447NHz, but this took an extremely long time to get, and I could not get my CPU stable at this bus speed when the multiplier was set to 8.5. I managed to scrape out a max bus speed of 424MHz, but this showed up as 423.4MHz in Windows, thus giving me 3.599 GHz right on the button. This is an acceptable overclock, though I really feel that the board was holding this CPU back, as I have gotten up to 3.5 GHz stable on stock volts with another board. I have a little word of advice for achieving a higher overclock, GLT ratios and CPU VTT voltages. These helped me achieve a higher FSB stably. If you play around with them enough you may find a perfect spot to get even more FSB. DFI has been kind enough to make a chart for it, showing values to use as a base.
 |
|
A bus speed of 424MHz is quite low for any X48 board, but from what I have seen, this board does much better with dual cores, even being able to hit 500 FSB! While they are not the greatest FSB overclocker for quads, as with other DFI boards I have, they are excellent memory overclockers.
The RAM gained more MHz but I was able to tighten the timing to 6-6-6-16 from 7-7-7-18. The speed went from 1333MHz to 1411MHz. This is just shy of a 100 MHz increase, but I did have the RAM running at 1454MHz with the timings of 6-6-6-16 on this board totally stable. I was quite impressed with this! This board is simply amazing at overclocking RAM. It’s too bad I can’t say that much about the FSB.
CONCLUSION
The DFI LanParty LT X48 T3RS is a board that gives me mixed feelings. On one hand, it is quite the stable board, yet on the other hand, this board can prove to be a real pain to overclock. I was a little disappointed at quite a few different aspects of this board, but impressed by others.
The overclocking is really a mixed bag. There are a ton of options, so it could be possible to achieve a higher FSB than I did. Many boards are easier to overclock, so you can spend more time playing games instead of messing with the almost endless BIOS options. If you are using a Dual Core you will be able to get more FSB, thus making this board more worthwhile, but with a Quad it’s kind of hard to justify buying this board when many others at the same price will overclock higher, with much less effort. One thing that really annoyed me with this board was the fact that if you tightened your RAM timings too much, not even a clear CMOS would clear it. You have to take out the battery. This is very annoying when you are trying to tighten your RAM timings.
The layout of the board is quite good, but not the greatest. The RAM is a little too close to the CPU for extremely large heat sinks. The onboard power and reset buttons are perfect for anyone who wants to run a bench system. I personally prefer to have my whole system in a case so I can easily transport it to LAN parties. This motherboard uses a floppy connector to give more power to graphics cards. Most boards use a Molex to supply this extra power. This is not really a bad thing, but it’s certainly is odd.
The included chipset cooler is very good, and will easily keep the chipset cool when pumping in volts to achieve a higher FSB speed. I am quite disappointed in the Southbridge cooler though. It is not very efficient. DFI should have spent a little more on better materials such as copper. I am puzzled as to why DFI has mounting holes for some kind of a heat sink on the black heat sink that is right behind the back I/O shield.
The DFI is really a mixed bag. I feel that DFI could have done a much better job with this board. While the construction was good, the overclocking was extremely disappointing. Looking at the layout I can say that they did a good job with placing components, but the color scheme definitely feels more Nvidia than ATI, even though this is a Crossfire board. DFI motherboards have always been more for a niche market, and that’s where this board will stay. This board just happens to be too complex for the everyday user, but could be very appealing to the tuner who can spend hours in front of a BIOS screen. If you are a fan of DFI boards you’ll love it, but if you’re not, then I suggest you pass on this one. There are many more X48 boards out there that offer more for the same price.
Pros:
+ DDR3 RAM
+ Quality build
+ Many BIOS options
+ Chipset cooler
Cons:
– Low overclock on Quads
– Clear CMOS doesn’t clear RAM timings
With a final score of 7.5 out of 10 the DFI LanParty LT X48 T3RS receives the Bjorn3D Seal of Approval.


