GIGABYTE has come up with a motherboard that has good overclocking capabilities while at the same time making this motherboard affordable.
INTRODUCTION
By adding 2oz of copper to thier motherboards, using all Japanese solid state capacitors, too utilizing Ferrite core chokes (Ultra Durable 3). Make’s GIGABYTE a force to be reconed with when it comes to their motherboards.
When I was offered a chance to review one of GIGABYTES AMD motherboards, I jumped at the chance to review one of them. The last AMD CPU I played with these last few years was my two daughters computer. Like any typical teenagers they use the computer for looking at myspace, yik yaking with their buddies online (when the phone is off limits or being used), occasional light gaming, too movie watching when the big screen television is being used.
And god help us if one of the girls infringes on the other girl time on the computer. You do not want be near them. All we hear is mew, hiss, hiss, mew. Then a loud voice calls out, “Kitten Fight”, from that point on its claws, teeth and eyeballs.
Being it has been a few years since I even remotely tried overclocking an AMD CPU I was unsure what the AMD 4000+ 2.1 GHz Brisbane dual core could do. Since the original motherboard I used in the girls computer would only allow a mere 2.5Ghz overclock. I am pretty sure this GIGABYTE motherboard could take this little dual core CPU to new levels. Question remains, how far will this CPU go?
Lets step down into the Dragons Dungeon and warm things up a bit, and lets find out what the GA-MA785G-UD3H can do.
SPECIFICATIONS
|
|||||||||||||||||||||||||||||||||||||||||||||
|
PACKAGING

GIGABYTE does do one thing for sure when it comes to the packaging of their packaging. They are colorful, and also provide all of the important information the purchaser will need to know about their products.

The packaging of the motherboard is pretty simple. Here is what we get once we open the box up.
- The GA-MA785G-UD3H motherboard
- User manual
- Driver disk
- Installtion manual
- Two SATA cables with one IDE ribbon
- Finally the rear IO plate
There is no floppy ribbon included. Even though there is a floppy connector on the motherboard. So if you need the use of a floppy drive you may need to go dig a floppy ribbon up.

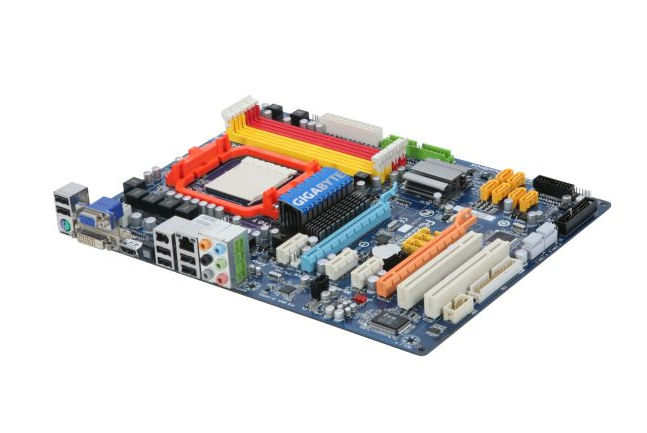
A quick glance of the top of the GA-MA785G-UD3H motherboard. So far the layout of the motherboard does not look too bad. The one area I am concerned with is top PCI-E 1x port.

Looking at the backside of the GA-MA785G-UD3H (Sometimes I wonder whats with the naming scheme of GIGABYTES motherboards). Like all AMD motherboards there is a retetnion plate allready in place.
OVERVIEW

Starting off on the rear IO ports of the GA-MA785G-UD3H. GIGABYTE is starting to fallow the trend of only including one PS2 for those people who still use the older style keyboards/mice. On top of the single PS2 port is two USB ports. Since this motherboard uses a 785G chipset, GIGABYTE included onboard DVI/D-SUB & an HDMI port. This motherboard also supports a hybrid crossfire, this will only work with the lower line video cards. So if you have a mid-high end video card you can not use a hybrid crossfire capabilities. Moving to right we have an audio opticle port, two more USB ports topped by a Firewire port. This Firewiire port does not support the newer Firewire 800 port. Moving along, we another set of USB ports being topped by a 1 Gigabit port. Finally we have an eight channel analog audio port.

Turning the motherboard over to the opposite end to the SATA ports. We see that GIGABYTE used a 90° SATA port and not the 180° SATA ports. Now this is really strange, why would GIGABYTE use this? The top four SATA ports are placed right behind the 2nd PCI-E 16x port. Getting access to these should be easy. The last two ports if you using a dual slot large GPU in this spot gaining access to these will be next to impossible. Right below the SATA ports is the front IO connectors. Time to move our attention towards the south bridge chip. Right below the SB heatsink is GIGABYTES Dual BIOS chips, I rather like this idea that GIGABYTE uses because incase we brick a motherboard from a bad flash the back up BIOS kicks in and recovers the motherboard.

Looking over the memory ports. This motherboard supports four DDR2 memory, for Dual Channel memory mode we need to put our two sticks of memory in either the yellow ports (DIMM 1/2) or the orange ports (DIMM 3/4) or fill all four ports up. Right below the DIMM ports is the main 24 power connector, then an IDE port. Oh looky its another fan header, fan header #2.

Time to look at the CPU socket. Glancing over this area we can see their might be enough room for us to use large CPU coolers, only time can tell if this holds true. Oops, forgot fan header #3 right next to the CPU cooler mount.

Looking at the power modules that will give our CPU’s the power it needs, their are no heatsinks on these power modules. Counting up the chokes, we can see that GIGABYTE uses a five phase power distribution for the CPU. That EPS CPU power plug is still in an awkward spot.

Time for us to move over the PCI expansion ports. The GA-MA785G-UD3H motherboard places a PCI-E 1x upper port, a full PCI-E 16x port, fallowed by two PCI-E 1x ports. Now the next PCI-E full port is not a full 16x port, this port is only capable of a 4x but can accomidate a full 16x PCI-E component. The last two ports are PCI, fallowed by the ancient port for the floppy drive users. Now right above the floppy connector is a com port. Does any one even have serial device in use today? inbetween the first PCI-E 1x port and the full PCI-E port is our last fan header, fan header #4.

A better look at the floppy and com ports.

Now if you notice a couple of images ago there were 3 yellow connectors that were inbetween the 2nd PCI-E 16x (below the 2 PCI-E 1x ports). Upon a closer inspection these were indeed the extra USB headers, odd placement. The CMOS battery is also located in this area. Getting to these should be pretty easy being they are right behind (above) the 2nd PCI-E 16x connector. Unless you used a long PCI-E 1x expasion card in the third PCI-E 1x port.

Time to investigate the upper PCI-E 1x port and its coorilation the north bridge heatsink.


From the looks of things it does not look like you could use this top PCI-E port at all. Well unless some modifications are done to the expansion card (like that will happen) or modify the north bridge heatsink.
Extra
It would not be right if I did not include some extra pictures for you to look at the quality of GIGABYTE GA-MA785G-UD3H motherboard.
|
|
|
|
|
|
|
|
|
|
|
|


Installation

Installation was pretty straight forward. The only thing worth mentioning was because of AMD’s inability of turning the CPU cooler a 90°. The CPU cooler I used here (an Zalman 9700) covered the first two memory ports so I had to install my taller G-Skill 800 MHz PI Blacks in the last two memory ports (orange or DIMM ports 3/4).
BIOS PART 1
I am going to give you an idea on what the BIOS of the GA-MA785G-UD3H motherboard. Not going to get into great detail.
|
|
|
|
|
|
|
|
|
|
|
|


Skipping the M.I.T. portion of the BIOS for now and going over the main portion where we can tell the BIOS what we want what feature turned on/off how to set up the SATA ports. We can also monitor our motherboard components temperatures or set up how we want our fans to run. As you can tell I turn off a lot of stuff that I don’t intend to use.
BIOS PART 2
This is all about the M.I.T. (Motherboard Intelligent Tweaker), this is where we overclock our motherboard, memory and fine tune our motherboard to our liking.
|
|
|
|
|
|
|
|
|
|
|
|
|
|
|
|
|
|


Upon entering this portion of the BIOS I was amazed that thier was not a boat load of settings, I gotten used to with the X58 motherboards. I also was a tad confused on a few settings, but what the heck lets start cranking things till the CPU either explodes, or the motherboard screams in agony. GIGABYTE does a good job on giving the current voltage the main components are using, and after adding a bit of voltage informs you the new voltage setting. The CPU tops at around 1.6 volts so this should be enough to allow some pretty decent overclocks.
TESTING METHODOLOGY
| Test Setup &Testing Methodology | |
| CPU | AMD 4000+ 65nm 2.1GHz |
| Motherboard | GIGABYTE 690V, MA785G-UD3H |
| Case | Cooler Master Elite 310 |
| Memory | GSkill PI Black 800MHz |
| Video Card’s | Sapphire 3870 |
| Hard Drives | 1 Western Digital 80 GIG |
| CDRom Drive | LG IDE DVD Burner |
| Power Supply | Rosewill 600 Watt PSU |
| CPU Speeds Used | 200 x 10.5= 2100MHz, & 300×10.5=3.15GHz |
| Operating System Used | Microsoft Windows Vista 32 |
| Type of Software Used During Testing | PCMark Vantage, SiSoft, Everest, 3DMark06, 3DMark Vantage, wPrime, CineBench, ATTO, World In Conflict, Company Of Heroes |
| Video Card Cooler |
Thermal Right HR03 |
| CPU Cooler |
Zalman 9700 |
|
Any attempt to copy these system specifications will result in lot of time sleeping during benchmarking LMAO. |
|
To test the GA-MA785G-UD3H motherboard I ran the above listed programs 3 times making sure stability was present, and that my scores were consistant with each other. I decided to add PC Mark Vantage to the line up, and drop Super PI completly. Good trade off, instead of a program taking 30 or so seconds I traded it for one that takes an hour and a half to complete. For the video card benchmarking Since I was limited to a resolution of 1280 x 1024 (I could not drag thier 19″ LCD monitor with me) so I used what I had available to me. The gaming sequencies were set at 1280 x 1024 max visual quality and no AA. Your results will vary greatly from my own.
OVERCLOCKING
To overclock the GA-MA785G-UD3H motherboard and the AMD 4000+ dual core CPU. I decidied to take my time at first to try and get a feel on how to overclock the AMD CPU. After a few minutes of upping the FSB by 3 rebooting checking stability by running a few quick benchmarks in Windows, got boring really fast. So I ended up jumping the FSB from 218 to 250 and see how things went from there. Everything seemed ok and was stable, so I decided to go to 275 FSB. Windows refused to load at this FSB speed. I had hit the reset button, reenter BIOS and back FSB to 250 where I had stability last at.
Rebooted reentered Windows started up CPU-Z to see how fast the memory was going. I found out that the memory was at a 1000MHz this led me to believe that my instability was caused by the memory getting ramped up to high.
Restarted computer re-entered BIOS then adjusted the memory divider from 800 (4:1 DRAM:FSB) to 667 (3.335:1) + I upped the voltage to 1.4 on the CPU, adjusted the FSB to 275 and exited the BIOS saving the new settings. Once Windows loaded I ran a few long benchmarks to make sure stability was present while I was at this new FSB speed.
Was I happy with 275 FSB? Naaa, never settle for a mere overclock. So I rebooted, re- entered the BIOS set FSB to 300.I then saved and exit the BIOS. Allowed Windows load ran a series of long tests to ensure stability was present.
Now I decided to call it good right here. Mainly because this is not my CPU to be cooking (it belongs to both of my daughters). Plus a 3.15GHz overall overclock I considered to be pretty good. Total time it took me to achieve this CPU speed was roughly an hour and a half. The GA-MA785G-UD3H motherboard did make overclocking this CPU pretty easy.

Here is my screen shot of my overclock on the AMD 4000+ 2.1GHz Brisbane CPU.
SISOFT
“SiSoftware Sandra (the System ANalyser, Diagnostic and Reporting Assistant) is an information & diagnostic utility. It should provide most of the information (including undocumented) you need to know about your hardware, software and other devices whether hardware or software. It works along the lines of other Windows utilities, however it tries to go beyond them and show you more of what’s really going on. Giving the user the ability to draw comparisons at both a high and low-level. You can get information about the CPU, chipset, video adapter, ports, printers, sound card, memory, network, Windows internals, AGP, PCI, PCI-X, PCIe (PCI Express), database, USB, USB2, 1394/Firewire, etc.”
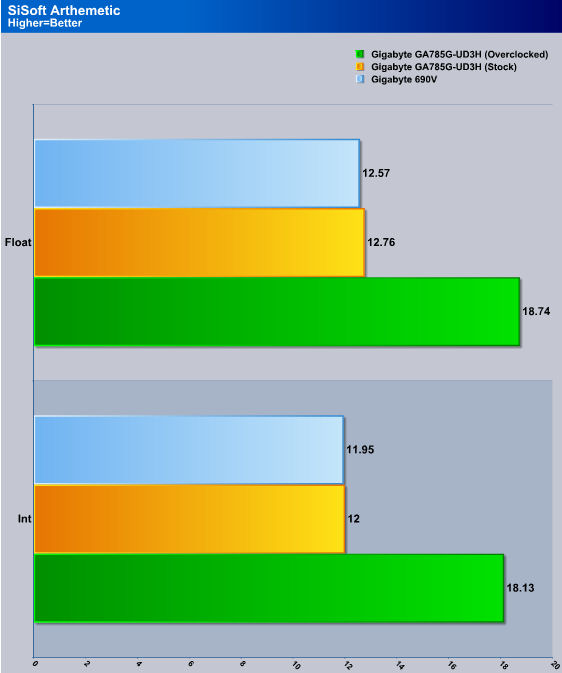
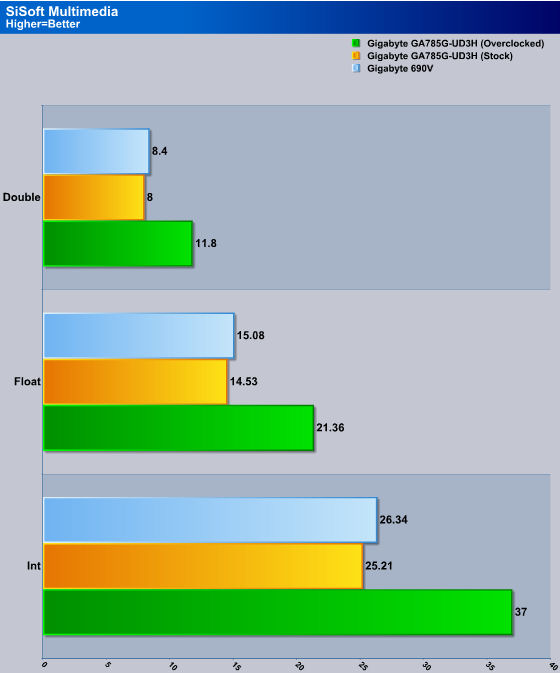
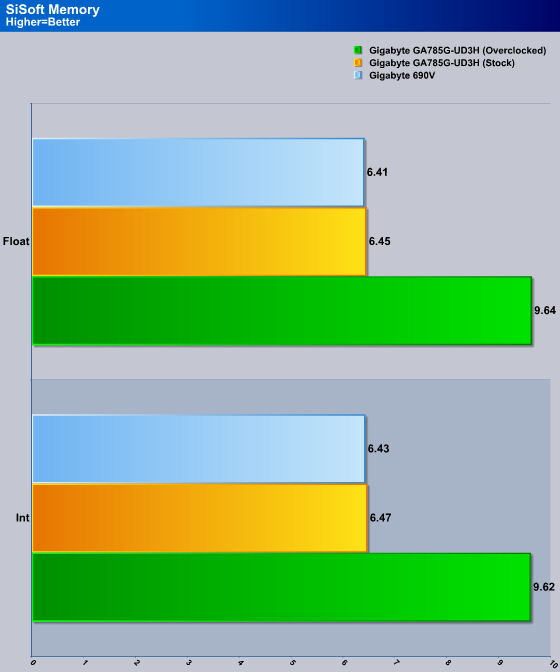
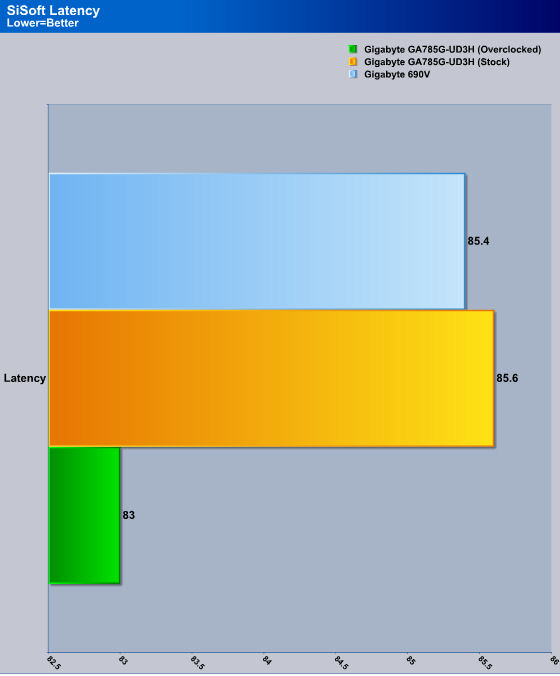
Starting off on SiSoft we see the differences from stock clock speeds and overclocked speeds. Really no need to get in great detail between these two motherboards as they were seriously handicapped by the CPU. It is a good sign though that the GA-MA785G-UD3H motherboard was able to bring up some much needed performance out of the AMD dual core CPU.
EVEREST
“EVEREST Ultimate Edition is an industry leading system diagnostics and benchmarking solution for enthusiasts PC users, based on the award-winning EVEREST Technology. During system optimizations and tweaking it provides essential system and overclock information, advanced hardware monitoring and diagnostics capabilities to check the effects of the applied settings. CPU, FPU and memory benchmarks are available to measure the actual system performance and compare it to previous states or other systems. Furthermore, complete software, operating system and security information makes EVEREST Ultimate Edition a comprehensive system diagnostics tool that offers a total of 100 pages of information about your PC.”
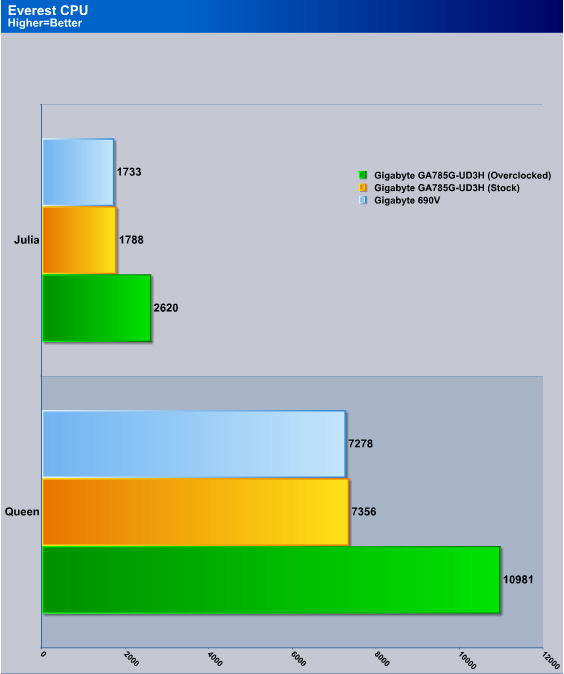
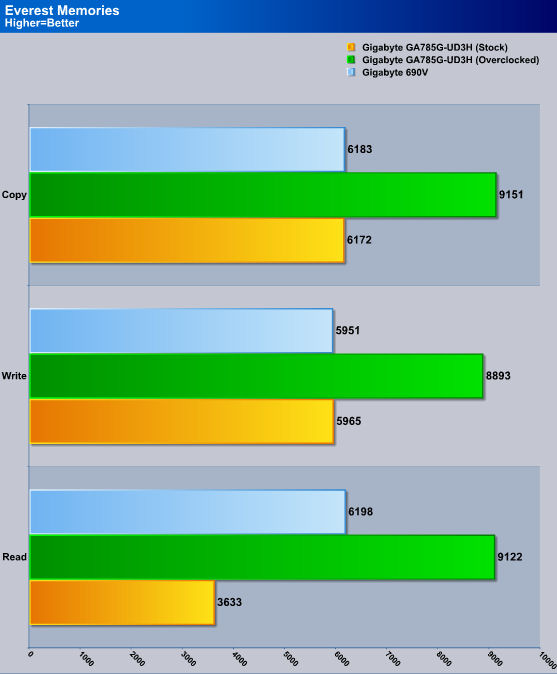
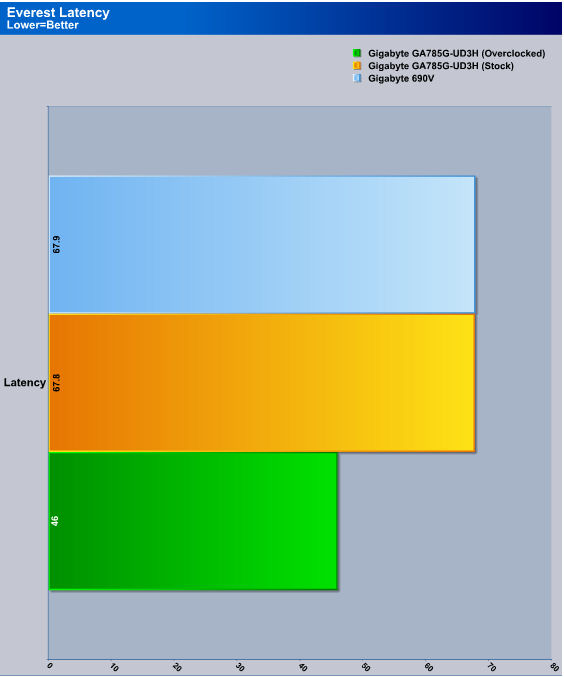
Everest pretty much sums up what we seen with SiSoft. Once we started overclocking the CPU our performance drastically improved.
PCMARK VANTAGE
PCMark Vantage is a PC benchmark suite designed for Windows Vista offering one-click simplicity for casual users and detailed, professional grade testing for industry, press and enthusiasts.
A PCMark score is a measure of your computer’s performance across a variety of common tasks such as viewing and editing photos, video, music and other media, gaming, communications, productivity and security.
From desktops and laptops to workstations and gaming rigs, by comparing your PCMark Vantage score with other similar systems you can find the hardware and software bottlenecks that stop you getting more from your PC.

With PCMARK Vantage, and a hour and half later, we see some small minor differences between the 690V and the GA-MA785G-UD3H motherboards. During the HDD testing we can clearly see the much newer AMD SB710 does out perform the older AMD SB600
CINEBENCH
CINEBENCH runs several tests on your computer to measure the performance of the main processor and the graphics card under real world circumstances. The benchmark application makes use of up to 16 CPUs

or CPU core.
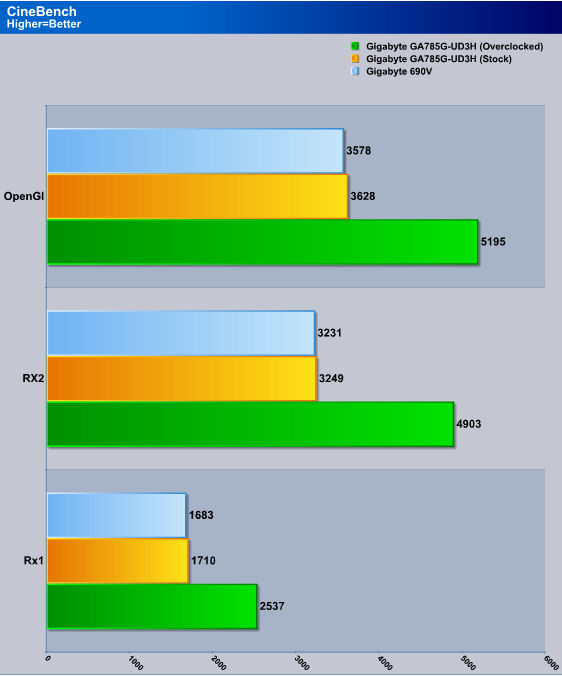
Back to reality, we see that the porr little ole AMD 4000+ gets a good work out. Overclocking once again drastically improves our ability to render in CineBench.
WPRIME
wPrime is a benchmarking application designed to use a highly multithreaded approach to calculating the square-roots of large amounts of numbers (up to 32 billion)
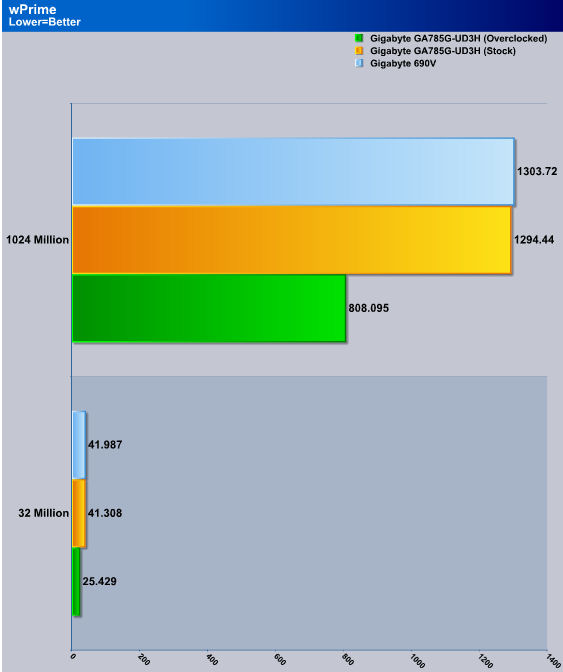
I don’t even know where to begin on this test. As this is is strickly CPU related. The only thing I can add is what I stated many times already. I think my daughters are tring to tell me something, when they offered thier computer up for a review.
ATTO
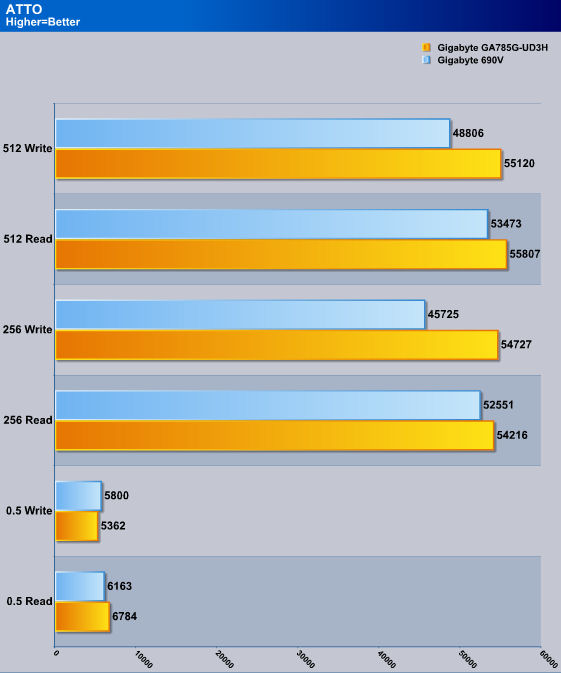
Not only we get 2 extra SATA ports with the SB710, we also get a nice performance boost with our HDD’s.
3DMARK06

3DMark06 developed by Futuremark, is a synthetic benchmark used for universal testing of all graphics solutions. 3DMark06 features HDR rendering, complex HDR post processing, dynamic soft shadows for all objects, water shader with HDR refraction, HDR reflection, depth fog and Gerstner wave functions, realistic sky model with cloud blending, and approximately 5.4 million triangles and 8.8 million vertices; to name just a few. The measurement unit “3DMark” is intended to give a normalized mean for comparing different GPU/VPUs. It has been accepted as both a standard and a mandatory benchmark throughout the gaming world for measuring performance.
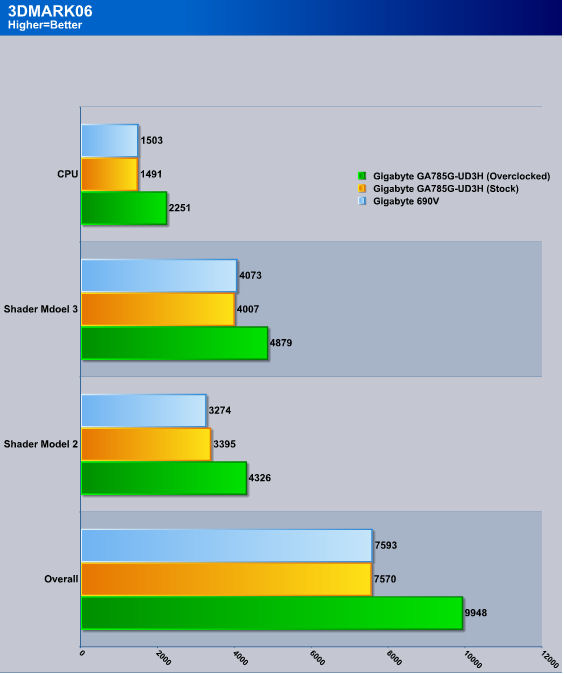
Hmmmm. where have we seen this before? The GIGABYTE GA-MA785G-UD3H motherboard really shines in its ability to overclock the AMD CPU therefore helping us relieve bottlenecks the CPU gives our 3870 video card.
Company Of Hereos

Company of Heroes(COH) is a Real Time Strategy(RTS) game for the PC, announced on April, 2005. It is developed by the Canadian based company Relic Entertainment and published by THQ. COH is an excellent game that is incredibly demanding on system resources thus making it an excellent benchmark. Like F.E.A.R., the game contains an integrated performance test that can be run to determine your system’s performance based on the graphical options you have chosen. Letting the games benchmark handle the chore takes the human factor out of the equation and ensures that each run of the test is exactly the same producing more reliable results.
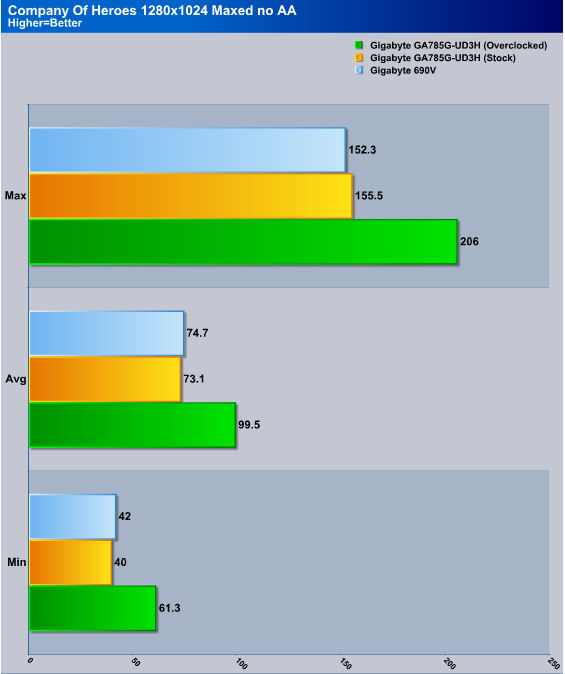
Even though at default CPU speeds of 2.1GHz on the AMD dual core CPU COH was playable. As we seen with 3DMark06 by upping the core speed of the CPU increases the frame rates of the game.
3DMARK VANTAGE

For complete information on 3DMark Vantage Please follow this Link:
www.futuremark.com/benchmarks/3dmarkvantage/features/
The newest video benchmark from the gang at Futuremark. This utility is still a synthetic benchmark, but one that more closely reflects real world gaming performance. While it is not a perfect replacement for actual game benchmarks, it has its uses. We tested our cards at the ‘Performance’ setting.
Currently, there is a lot of controversy surrounding NVIDIA’s use of a PhysX driver for its 9800 GTX and GTX 200 series cards, thereby putting the ATI brand at a disadvantage. Whereby installing the PyhsX driver, 3DMark Vantage uses the GPU to perform PhysX calculations during a CPU test, and this is where things get a bit gray. If you look at the Driver Approval Policy for 3DMark Vantage it states; “Based on the specification and design of the CPU tests, GPU make, type or driver version may not have a significant effect on the results of either of the CPU tests as indicated in Section 7.3 of the 3DMark Vantage specification and white paper.” Did NVIDIA cheat by having the GPU handle the PhysX calculations or are they perfectly within their right since they own Ageia and all their IP? I think this point will quickly become moot once Futuremark releases an update to the test.
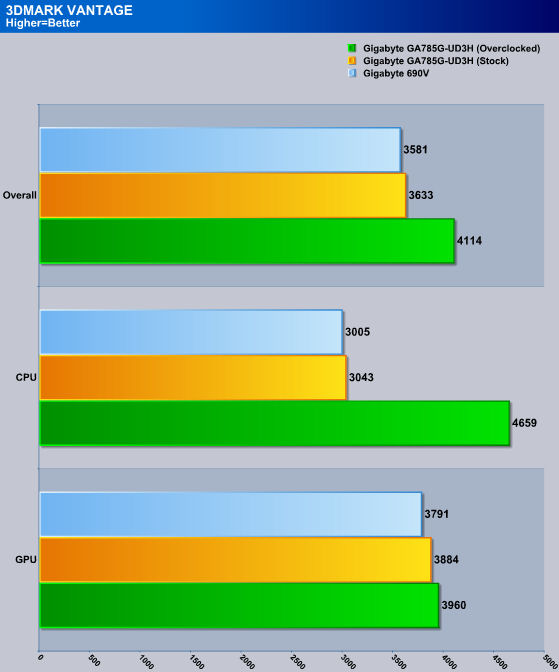
3DMark Vantage is just brutal to the HD3870 video card.
World in conflict

World in Conflict is a real-time tactical video game developed by the Swedish video game company Massive Entertainment, and published by Sierra Entertainment for Windows PC. The game was released in September of 2007. The game is set in 1989 during the social, political, and economic collapse of the Soviet Union. However, the title postulates an alternate history scenario where the Soviet Union pursued a course of war to remain in power. World in Conflict has superb graphics, is extremely GPU intensive, and has built-in benchmarks. Sounds like benchmark material to us!
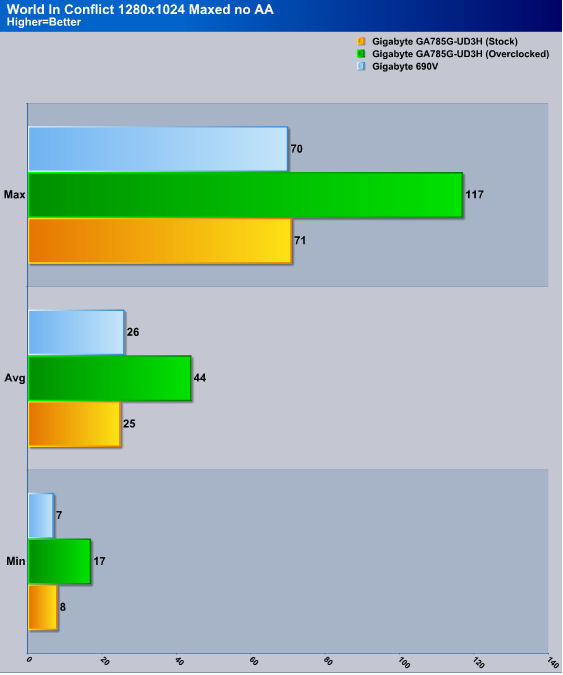
For our last test. Once again the superiority of the overclocking capabilities GA-MA785G-UD3H showed a staggering performance gain in WIC.
CONCLUSIONS
Being a high end computer user, sometimes the all out shear raw power of my computer puts myself in a different realm. Plain and simple that realm I am normally in is kicking butt and taking names. Doing a review like this brings me back into the reality that not every one has top of the line computer components. These people just want a computer that works, and give them what they need or want. This type of review to me really shows a motherboards true capability, using an old out moded CPU on a more updated motherboard and see how they dance with each other.
The GA-MA785G-UD3H motherboard did exactly what I had set in mind to do with this motherboard. Even if i had no idea how to do that task. I set my self a goal to push that little AMD dual core too new levels. This motherboard did exactly that, it was not as complicated as I thought it was going to be. Since I am not an avid AMD user I really dont know if 3.15GHZ on a AMD 4000+ 2.1 Brisbane CPU is good or average. I like to think it is a fairly decent little overclock, that the GA-MA785G-UD3H (sometimes gotta love copy and pasting motherboard names) gave me with very little trouble.
The areas I feel that GIGABYTE needs to work on with their motherboards. Is the placement of thr EPS CPU power plug, this has allways been in a hard to reach place. If we forget to hook this plug to our PSU’s before installing the motherboard into our chassis gaining access to this power plug will be rather difficult. Another area that I feel GIGABYTE needs to improve on is the upper PCI-E port (PCI-E 1) GIGABYTE seems to be continuously blocking the use of this port with the IOH/North Bridge heatsink rendering the use of this port useless.
Having only a price point point of 90 USD puts this great little overclocking motherboard in a range where most people can afford who needs or wants a good performing motherboard.
- Performance: 9
- Value: 9
- Quality: 9
- Warranty: 8
- Features: 7
- Innovation: 7.5
Pros:
+Overclocks very well
+Easy to understand BIOS
+Can support a wide range of AMD CPU
Cons:
–EPS CPU power plug still in a difficult spot
–Top PCI-E port (PCI-E 1) is still blocked by the IOH/North Bridge heatsink
The GA-MA785G-UD3H did exactly what I wanted to do or did exactly what I had in mind for it to do, the goal was simple achieve a new level of performance on an older AMD dual core. I give the GA-MA785G-UD3H from GIGABYTE a 8 out of 10 and the:

Also I give this motherboard a:


I use the top PCIe x1 slot without any issues ^^ The expansion card is a hauppauge colossus