Sporting an onslaught of fans, interior painting, and acoustic sound dampening, we review In Win’s Maelstrom full tower enthusiast case to see how it matches up.
Introduction
In-Win is back with their latest computer case designed for gamers, overclockers, and of course high-end workstation PCs. While we know that In-Win makes some of the craziest looking chassis’ on the market, it seems that the latest Maelstrom chassis is somewhat more unique in a sense that it’s not too wild looking, and instead of putting too much time into the whole outside look, there are some very interesting and useful features that make this case stand out from the crowd.
This chassis was designed precisely for gamers. With a total of 10 possible 120mm fans that can be used with this chassis, it is no doubt a performance case that can have plenty of air flow. Instead of having just a maximum of 10x 120mm fans, In-Win decided to take this case to the next level and also include acoustic dampening, anti-vibration standoffs for the power supply, and rubberized drive bay installation brackets to really knock down the overall noise being generated by the fans, the vibration, and the noise made by the installed hardware.
One thing that cannot be truly shown through pictures on the Maelstrom chassis is it’s luxurious interior and exterior painting, and the build quality. Overall, it’s very sturdy and very high quality built, and the interior black painting makes it very interesting and more attractive to the eyes when the hardware is installed. And finally before we continue to the details and tests, it is important to know that even though the case has excellent air circulation prepared already, the case also comes with pre-drilled water cooling setup holes that will meet the expectations of any user using outside water cooling for their system.
Features and Specifications
Great expandability
Maelstrom supports 5* 5.25” & 6*3.5″ drive bays and is compatible with 4 CPU M/B ranging from Micro-ATX to Extended-ATX.
User friendly ergonomic and mechanical design
The patented shock-free railing system protects the drive bays and is designed for quick maintenance and upgrading 5.25” devices. The Retaining holes on the M/B tray offer easy CPU cooler replacement.
Superior acoustic and vibration solution
The Maelstrom offers a quiet environment and silent operation by using the installed acoustic absorbers laid inside the chassis. The tough casing structure efficiently reduces the acoustic noise levels and vibrations.
Revolutionary high efficiency thermal solution
Ten front, side, and top 12cm fans enhance airflow while a meshed front and top panel provide superior ventilation. The Maelstrom offers an unparalleled thermal solution for any gaming system.
Luxurious exterior and interior painting
The Maelstrom is fully draped in a dark metallic black, offering much more luxury and refinement apart from other normal chassis. With black coating inside and outside of the chassis, the Maelstrom can prevent damage from humidity, oxidation, and extended the product life span.
SPECIFICATIONS
Specification
In-Win Maelstrom
Case Size
Full Tower Chassis
Material
SECC(0.8~1.0mm)
Dimension(HxWxD)
550 × 225 × 601mm
Power Supply
1. ATX 12V
2. PS 2 or EPS Power
I/O Expansion Slots
1. Front:12cm Fan x 1
2. Rear:12cm Fan x 1
3. Top:12cm Fan x 1 (Maximum Supports 12cm Fan x 2)
4. Side:22cm LED Fan with switch x 1 (Maximum Supports 12cm Fan x 6)
5. Water-Cooling Hole Ready
Thermal Solution
ATX Logic on-off additional power rocker switch
Front I/O
1. USB2.0*4
2. e-SATA*2
3. IEEE 1394A*1(FireWire)
4. HD/AC’ 97 Audio
External Drive Bay
1. 5.25” × 5
2. Includes FDD Cage x 1 (5.25″ Convert into 3.5″)
Internal Drive Bay
3.5” x 6
M/B
1. ATX
2. Micro ATX
3. E-ATX (12″ x 13″)
Transfer Rate
1. 3.0Gbps w/ SATA II
2. 1.5Gbps w/ SATA I
In-Win decided to build their computer case from steel, which not only makes the case very sturdy but also really heavy. In this case, they did build some parts from plastic, but from what I can tell, it’s only the bottom feet, the front panel of the chassis, and the top where power button and other connectors are. This is a very good configuration for a very sturdy case, however as I said before it can get a bit on the heavy side. This chassis weights 35lbs when it was shipped, so you can imagine how heavy it can get once all the hardware is installed in the chassis.
If you are considering to buy EVGA’s latest motherboard, the X58 4-way SLI motherboard, then this chassis is not for you. Since this chassis does not support 9 expansion slots as well as no XL-ATX boards, the X58 4-way SLI motherboard would not fit. Let’s take a look at some Exterior pictures of the In-Win Maelstrom chassis.
Closer look: External
Click Image For a Larger One
The In-Win Maelstrom Full Tower Chassis came double packaged, meaning, that the box you see above was packaged one more time. The double packaging helped protecting the case during shipment. The main packaging is not really that interesting, however it does include plenty of information about the case that a buyer will need to know when shopping around in their local computer store. Opening the box was very simple. Inside the box we are greeted with some more packaging of the case. Foam padding to keep the case from getting damaged. We can also see the user’s manual and some extra parts included.
Click Image For a Larger One
Once the case was taken out of it’s packaging, most of it was covered with transparent protection strips. This was used to protect the chassis from any scratches that could occur during shipping. In-Win is known for some of the most interesting looking cases on the market. This one happens to be one of them. In-Win decided to go with a complete black and green look this time. Plus, they decided to add two bars on the front of the chassis, that does not really serve anything rather than looks. The green bar has a warning on it that states that it cannot be used for lifting the chassis. In my opinion, that part of this chassis is completely useless and not needed to complete the look. However there is good news for those that don’t like the green bars. When taking off the front of the chassis, the green bars can be removed by unscrewing 4 screws. I personally didn’t like the green look of those bars, so I decided to remove them for my system setup, and spray paint them black. Now they go well with the chassis much better and overall look much nicer. This is my personal opinion only, since some might like the look of those bars on the front and might want to keep them green.
Click Image For a Larger One
These pictures show the left and right side of the chassis. You can see that the left side of the chassis has a massive 22cm fan on the side which can be removed if you like. Once the 22cm side panel fan is removed, you have the option to install 6 x 120mm fans instead. Unfortunately, In-Win didn’t include any dust filters on the left side of the chassis, which means that tons of dust will be blown into the case when the fans are blowing. The right side panel is just a plain side panel with nothing special about it. This is perfect since nobody is going to be looking at the left side of the panel anyway, since they would not see anything inside the case anyway. This also helps further lowering the overall noise that will be emitted from the case.
Click Image For a Larger One
These pictures show the back, the front and the top of the In-Win Maelstrom chassis. There are a few things to look at on these pictures. On the first picture, we can see that the Maelstrom chassis allows the power supply being installed on the bottom of the chassis. Further up we see 4x 1/2″ water cooling holes already pre-drilled and covered with rubberized covers. These holes will allow you to use the massive 1/2″ water cooling setups to pass through in the back of your chassis. Further up we see 7 slots for add-on cards that can be installed. Right next to that we can see lots of ventilation holes to further improve air circulation in the case. And finally on the top of the case, we can see a 120mm fan and the whole for the I/O shield plate and where all the connectors will go once the motherboard is installed. Next, let’s take a look at the middle picture. The front panel is nothing too interesting, except for those green bars on the front that cannot be used for anything. The front panel can hold up to 5x 5.25″ drives. In my opinion, this is a perfect amount of 5.25″ drive bays since I don’t think anybody is going to have too many Drives or other products put there. Anything below 5x 5.25″ drive bays would be too little and anything more than that, might be just a bit too much. And finally let’s take a look at the last image of the top of the chassis. We can see that 1x 120mm fan is already installed on the top of the chassis, however, there is no second 120mm fan included. One thing to notice about the positioning of these fans is that they are not right next to each other. I find this very annoying due to the fact that if you are thinking about installing a water cooling system on the top of the chassis with 2x 120mm fans, then it won’t work due to the positioning of the 120mm fan holes on the top. And finally, the Power Button, and the Reset button with additional plugs for different devices is included on the top of the chassis as well.
Click Image For a Larger One
Let’s take a look at some closer features of the Maelstrom’s outside. The first thing that will come to your eyes is the big Maelstrom logo that In-Win printed on the top of the chassis. Right above that is the power and reset button as well as the HDD activity LED. Further back we can see a microphone jack, a headphone jack, 4x USB 2.0 ports, 1x IEEE 1393 Firewire port and 2x external SATA I or SATA II ports. Continuing on to the second picture, we can see a switch on the left side panel right next to the 22cm fan and the large mesh. This switch allows the user to turn on and off the blue LED on the large 22cm fan.
Click Image For a Larger One
Next up we have two more pictures about the back of the chassis. On both of these pictures you can see that the side panels are held on to the whole chassis by thumb screws. There are a totally of 2 thumb screws on each side panel. Once the thumb screws are taken off, the side panel easily opens up from the back as a door and then it just pops out from it’s place. To put it back on, just slide it into place and close it like you would close a door. Put the thumb screws back on and there you have it. Very simple opening and closing of this case.
Click Image For a Larger One
A few more pictures of the back of the chassis. The first pictures shows how a 1/2″ water cooling PVC tubing can fit through the pre-drilled holes. This is great, because most of the chassis I have used in the past could only fit 3/8″ water cooling tubes through and they would only fit the 1/2″ tubing if the rubberized covers were taken off. The Maelstrom chassis can fit the 1/2″ tubing with the rubberized covers on as well. And finally this picture shows where all the add-on cards would get installed in your system. All of them come with a mesh cover which helps keep the chassis well ventilated in the inside. Let’s take a look out the final image of the outside of this chassis.
Click Image For a Larger One
Finally, here is the last image of the outside of the Maelstrom chassis. This is the bottom of the case that comes with 4 large rubberized feet to prevent any vibration caused by the case. These large feet will also keep the case very stable on your table or ground because they can be flipped out to further stabilize its standing. You can also see bunch of holes on the bottom of the case. This will allow the power supply installed on the bottom of the case to be well ventilated. Unfortunately In-Win did not include any dust filters and this is disappointing because the fan will suck in all the dust collected on the bottom of your floor or table. Let’s take a look at the inside of the Maelstrom chassis now.
Closer look: Internal
Click Image For a Larger One
OK, let’s take a look at the interior of the In-Win Maelstrom chassis. When the left side of the chassis’ panel is taken off, you are presented with the interior where you will be installing your hardware. The right side panel unravels the back side of the motherboard tray. While In-Win decided to cut a whole in the motherboard tray where you would put your cooler’s back plate for fast installation, In-Win did not include any cable management holes for hiding your cables. This is quite disappointing because you will need to keep your cables in the front of the hardware, or try to tuck them out in areas where you don’t have hardware. In-Win did include two cable clamps but that won’t help too much with hiding the cables out of the way when airflow is the main idea behind this case. Without good cable management, the whole airflow design is somewhat pointless in my opinion. Another problem I’ve seen is that when the left side panel is on, there is no space at all for cables to be hidden behind the motherboard tray. Plus the stand-offs that you will be mounting your motherboard on are so small that you can barely hide any cables under the motherboard. I believe the reason why this was done was to allow full-tower coolers to be installed on the CPU and still have enough space to have fans all over the side panel. Let’s continue on with the next pictures.
Click Image For a Larger One
The first picture shows the back bottom left side of the Maelstrom chassis. The second picture shows the front bottom right side of the case. If you look closely at the first picture, you will notice that where you will be installing you power supply, In-Win included 4 anti-vibration rubberized stand-offs to put the power supply on. this will prevent any vibration caused by the power supply’s fans and will keep the system quiet. Right above the PSU is where the water cooling tubes will pass through. You can also notice that In-Win also put acoustic foaming all over the bottom part of the right side panel. We are not sure why this was added since the whole left side panel has a mesh cover that will let the sound loose into the room anyway, but I think it might help a little with the noise generated by the hard drives since that part is not directly where the mesh is located. In the second picture we can see that you can install a total of 6 Hard drives. Five in the bottom compartment, and one in the top compartment right above the bottom compartment. One 120mm fan is included in the front to cool down the hard drives.
Click Image For a Larger One
One 120mm fans was included in the back and one 120mm fan was included on the top of the Mealstrom case. All of the fans except the 22cm fan uses 3-pin fan connectors. The other picture shows the 5x 5.25″ drive bays. One of the slots is take up already, but for a very interesting reason. If you want, you can remove this, however this holder comes very handy because it allows you to easily take of the clips that will allow you to install any drive into your case. No tools are needed, just your hands and the drive.
Click Image For a Larger One
Once the front panel is taken off of the Maelstrom chassis, you get access to the 5.25″ drives and the front 120mm fan. To take off the front panel, all you need to do is pull on it. It easily comes off. This is very handy because you don’t have to use pliers to take off the front. this is such a time saver. On the first picture you will notice where drives are installed there are two kind of lime colored bars sticking out. These are the bars that you use to install any drives. If you look closely, these bars stick out on their ends. by pushing them together, you can easily remove the drives, and by easily sliding it in, you install the drives. The bars click into little holes that will keep the drive in one position until you push the bars together again to detach them from the holes.
Click Image For a Larger One
Here are the connectors that come with the case. You will have 2x eSATA, 1x IEEE 1394, 1x HD Audio, or AC’97 Audio, and 2x USB 2.0 cables. On the second picture, you will have a Power Switch, Power LED, Resent Switch, HDD LED cables. Optional Speaker cable is included in the accessories bag.
Click Image For a Larger One
This is the left side panel of the Maelstrom chassis. it has a 22cm Blue LED fan already installed on the side, however this can be changed to 6 individual 120mm fans instead. Unfortunately, this case did not come with side dust filter for the fans. This is quite disappointing. But In-Win did include acoustic dampening foam to lower the noise being emitted from the case. We are not sure how well this will work since the whole side panel, the front and the top all has mesh covers, but hopefully it helps a little bit in lowering the overall noise of the whole system. We’ll see in our testing.
Click Image For a Larger One
This is the front panel of the In-Win Maelstrom case. It comes off by easily pulling on the front panel. One nice thing to note about this is that the front panel comes with dust filters. This is the only place where In-Win included dust filters. Another nice thing to notice is that if you are not a big fan of the front green bars, you can easily unscrew them on the front panel and take them off.
Click Image For a Larger One
And finally to top everything off, here are the accessories that come with the Maelstrom case. Two power plugs for switching the 3-pin fan connectors to the standard 4-pin molex connectors. Two cable clamps for organizing cables in the case. These clamps attach anywhere in the case since they come with high-quality sticky tape that can be attached to the case. Two more rubberized stand-offs are included for anything really, wherever you want to use them. Then they also included a speaker that will attach to the motherboard. Plenty of screws and necessary parts needed for installation of all the hardware, and finally a user’s manual.
INSTALLATION
According to our views on this case, we believe that the In-Win Maelstrom Chassis is very well designed for Gamers and users wanting a quiet airflow workstation that will allow them to overclock their PCs. In order to perform appropriate test for this case we stayed away from cheap components. We need to notice that not everybody is going to have an ultimate gaming systems, therefore we belive that the perfect way to test out this chassis is to use mid-to-high end hardware.
Test Platform
Processor
AMD Athlon II X2 240e 2.8Ghz
Motherboard
Gigabyte GA-MA790FXT-UD5P
Memory
4x 2GB DDR3-12800 @ 1600MHz
Hard Drive (internal)
640GB Western Digital Blue SATAII
Video Card
XFX GeForce 8800GTS G92 Alpha Dog Edition
Power Supply
Sapphire Pure 1250 Watt Modular
Case
In-Win Maelstrom
Operating System
Windows 7 Professional 64-bit
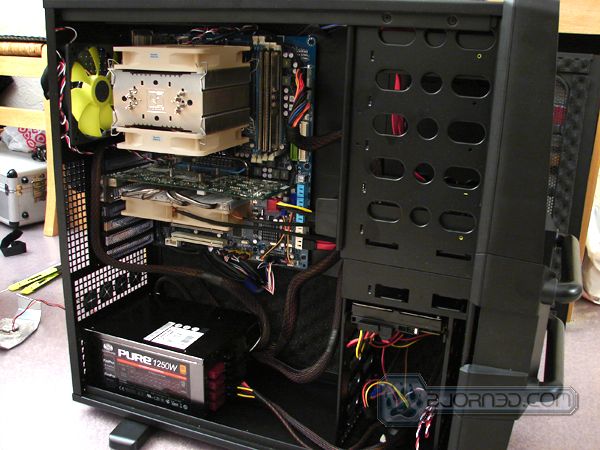
The installation of the hardware in the In-Win Maelstrom chassis was very simple. The hole in the back of the the motherboard tray made it very simple to install large heatsinks that require backplates. In our case, we used a Noctua NH-U12P Heatsink with two Noctua NF-P12 fans to maintain a low acoustic noise level, The motherboard stand-offs seem a little small, but I believe this was done for one reason, and that is to provide enough space for the side 250mm fan to fit with large CPU heatsinks. I found it a little bit annoying though, because this does not allow too much space for cables to be hidden under the motherboard, and there are no places to hide any of the power supply cables or other cables.
(Image of the hardware being installed in the System. Picture taken during installation, may not show all parts)
Other than that, everything was very simple, and we found the easy installation for the 3.5″ and 5.25″ drive bays very enjoyable, since you just take two clips that attach to the side of the drive you are installing, and you just slide the drive into the designated drive bay. The clips automaticaly snap in to place and make sure the drives stay sturdy in the chassis. Once you want to take out the drive, you just push on the two sides of the clips, and it will unclip from the drive bay. This tool less design was very effective and easy to use.
TESTING
Since the In-Win Maelstrom is an airflow case, we are very interested in seeing how it will perform not only under standard stock settings, but under overclocked settings as well. At the same time, we will also take into consideration the overall noise generated by the fans. Idle temperatures were taken after 30 minutes of leaving the system on after a 100% load, and Load temperatures were taken after 1 hour of 100% load with OCCT.
In-Win Maelstrom – Temperatures
Idle
Load
CPU
28C
33C
GPU
37C
52C
MB
32C
32C
Ambient
23C
23C
The temperatures look very promising, seeing that the GeForce 8800GTS G92 usually idles in the 40s, and hitting temperatures in the 60s under load when tested outside the case. This huge drop in the temperature must be because of the 250mm fan on the side panel and the overall great air circulation throughout the case.
CONCLUSION
Overall, I really enjoyed working with the In-Win Maelstrom chassis. There were some moments when it was pure joy putting together the system, however at times I felt like In-Win could have done a little better. The first thing I have noticed that I wasn’t really happy about was the cable management features. While they included some cable clamps, this in my opinion is not good enough to keep the case looking clean. Plus a case designed for ultimate air circulations should be prepared for good cable management since cables can get in the way of proper air circulation.
Missing Dust filters is another thing I wasn’t really happy about, and I think In-Win should have included them to cut down on the amount of dust particles entering the case. With a large 22cm fan on the side panel, there is no doubt that dust will slowly accommodate throughout the case.
Other than that, there were not really any other cons that would prevent a user from building a killer gaming system. The airflow, the silent fans, the 4 water cooling holes, the black painted interior, acoustic dampening, easy tool-less design and easy CPU cooler installation all add up to a great case with many good features. I also found this case to be in a very good price range, which is why I would like to approve this case as a “best bang for the buck” chassis. There is no doubt that I would recommend this case to all gamers, and people looking for low noise computer systems.
OUR VERDICT: IN-WIN MAELSTROM
Performance
9
Value
10
Quality
9
Features
7
Innovation
8
We are using a new addition to our scoring system to provide additional feedback beyond a flat score. Please note that the final score isn’t an aggregate average of the new rating system.
Total
7.5
Pro
Cons
Great airflow and features for the price.
Silent fans.
Water cooling holes fit large 1/2″ tubing.
Fully painted interior.
Massive 25cm fan or 6x 120mm fans on side panel.
Acoustic Dampening.
Easy Tool-Less design for drive bays.
Easy CPU cooler installation with back plates due to the cut out hole on the motherboard tray.
No Cable Management holes on motherboard tray, and literarily no space to hide cables behind drive bays. No access behind motherboard.
Top 2x 120mm fan design doesn’t allow 240 radiators to be installed due to the space between the fans.
Look might not suit everybody.
Dust Filter only on the front, and not on the sides or bottom.
Summary: While the In-Win Maelstrom Chassis might not impress everybody, it is definitely a case you should look at if you want to use high performance hardware in a low acoustic room. This case is also comes with excellent quality and overall features that make this case a great bang for the buck.