Today we look at Gigabyte’s top LGA2011 offering: the X79-UD7. It looks to be a strong performer boasting 4 way SLI support, and a full spate of features. Read on to see how it performs.
Introduction – Gigabyte X79-UD7
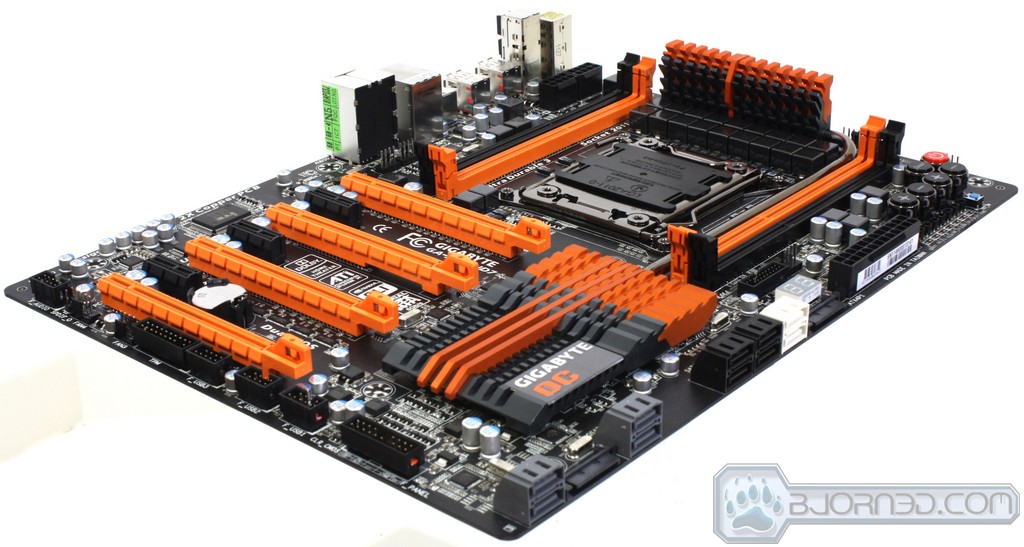
![]() The X79 Chipset has launched, and now comes the feverish pace of getting a look at each model out there and what makes them special. Today we have the X79-UD7 from Gigabyte. This board seems to be a mix of the previous enthusiast-grade X58A-UD7 and the X58A-OC board, as seen by the layout, naming, and feature set. The X58A-OC, while great for overclocking, did not offer as much connectivity as most other offerings, and we think that Gigabyte noticed this and decided it was time to make the ultimate all in one board that would fit for gamers, overclockers, and enthusiasts.
The X79 Chipset has launched, and now comes the feverish pace of getting a look at each model out there and what makes them special. Today we have the X79-UD7 from Gigabyte. This board seems to be a mix of the previous enthusiast-grade X58A-UD7 and the X58A-OC board, as seen by the layout, naming, and feature set. The X58A-OC, while great for overclocking, did not offer as much connectivity as most other offerings, and we think that Gigabyte noticed this and decided it was time to make the ultimate all in one board that would fit for gamers, overclockers, and enthusiasts.
Taking just a first look at the board shows us that the enthusiasts layout is present along with spacing for 4 way dual slot cards similar to the X58A-OC board, but since the X79 platform now supports native 4-way SLI, these 4 slots can be fully populated and linked. Since we already tested and reported our findings on the massively popular Asus Rampage IV Extreme, we’ll be comparing it to the X79-UD7 to see how the Gigabyte board performs. Presently priced at $369.99, the X79-UD7 is quite a bit below the $450-ish price of the Rampage IV Extreme and therefore could be a great performance value.
In this review we will look at the features and differences that separate the X79-UD7 from the competition and whether the features and performance merit the present $369.99 asking price.
Features
GIGABYTE 3D Power (patent pending)

GIGABYTE X79 series motherboards are the first to take advantage of the exclusive GIGABYTE 3D Power, an all new hardware and software-based Digital Power Engine for both the PWM and Memory that delivers unprecedented power delivery control.
 Utilizing a brand new Digital PWM controller, GIGABYTE’s 3D Power features precise Auto Voltage Compensation to deliver a steady flow of power to the CPU and memory no matter the loading. This all new, all digital power system provides enthusiast users with exceptional control over the overclocking potential of their GIGABYTE X79 motherboard.
GIGABYTE is the first in the industry to utilize digital memory controllers for not only the Memory, but VTT and VSA, for real-time monitoring and adjusting. Digital memory control allows users to monitor and record DDR power and current in real-time while gaming, overclocking or at idle. Users can also set OVP (Over Voltage Protection) to safeguard your memory, adjust memory Load-line Calibration to fix memory vdrooping for a quicker response time and adjust memory PWM frequency on-the-fly.
GIGABYTE 3D Power(patent pending) Utility
 |
Users can now enjoy a fully interactive 3D utility that facilitates adjustment of the 3 dimensions that control the power delivery to your CPU and Memory: Voltage, Phase and Frequency. These parameters are crucial to how the digital PWM supplies power to critical areas of the motherboard and can help users quickly obtain the highest, most stable overclock. |
 |
3D Power: Voltage Control Voltage parameters can be modified within 3D Power, including load line calibration the of CPU. By adjusting load line calibration, Vdrooping can be avoided, maintaining optimal voltages levels despite increasing current levels. OVP (over voltage protection) can also be adjusted to change default protection range of the CPU, memory controller, VTT and system memory. |
 |
3D Power: Phase Control Users can calibrate OCP (Over Current Protection) for the CPU, integrated memory controller and system memory power levels. This allows the Phase control to deliver even more power to the system when needed. |
 |
3D Power: Frequency Control GIGABYTE’s digital PWM allows for adjustable frequency control via the International Rectifier (IR3567) PWM controller. 3D Power frequency control allows users to change the PWM controller frequency so that the CPU VRM can adjust power delivery speeds more quickly. Users can also adjust the PWM spectrum or maximum and minimum overall frequencies. |
GIGABYTE 3D BIOS(patent pending)
 The revolutionary GIGABYTE 3D BIOS application is based on our new GIGABYTE UEFI DualBIOS™ technology and is available to consumers in two new exclusive modes of interaction never before seen in a BIOS environment. GIGABYTE has re-drawn the traditional BIOS experience providing mainstream and enthusiast users with a choice of unique and powerful graphical interfaces.
UEFI DualBIOS™ Technology
At the heart of this exciting 3D BIOS technology is a pair of 8MB physical BIOS ROMs containing GIGABYTE’s exclusive in-house designed UEFI BIOS technology. With a superior graphical interface capable of 32-bit color imaging and fluid user-friendly mouse navigation, UEFI DualBIOS™ makes BIOS configuration a new and exciting experience for novice and experienced users alike. UEFI BIOS also brings native support for large hard drives on 64-bit operating systems.
3D Mode Designed to provide an extremely streamlined and user-friendly BIOS environment, GIGABYTE’s exclusive 3D mode offers a fully interactive and illustrative GUI that allows users to easily and intuitively make key adjustments to the UEFI BIOS settings for optimum performance. 3D Mode allows novice or casual users to more clearly understand the areas of the motherboard that are being affected through the BIOS settings, gaining a clearer understanding of the BIOS functionality.
 Advanced mode provides a more comprehensive UEFI BIOS environment that is designed specifically for overclockers and power users who want maximum control over their PC’s hardware. GIGABTYE’s signature M.I.T. tuning technology can be found alongside fully configurable parameters for GIGABTE’s all new digital 3D Power engine. In short, advanced mode combines the signature GIGABYTE BIOS expertise you’ve come to expect, wrapped a slick, new and optimized graphical UEFI interface.
4 Channel Memory Architecture
 With a potential data bandwidth of up to 25GB/Sec and 256 Bits memory addressing, the Intel® X79 platform offers unrivalled memory performance. GIGABYTE X79 series motherboards give you the ultimate performance for today’s memory-intensive applications.
PCI Express Gen.3 Support

The GIGABYTE motherboard is fully configured to provide gamers with the latest Gen.3 PCI Express technology, delivering maximum data bandwidth for forthcoming discrete graphics cards.
* PCIe Gen. 3 is dependent on CPU and expansion card compatibility.
4 Way Graphics Support
 The GIGABYTE X79-UD7 delivers the industry’s most scalable graphics platform, with support for both 4-way ATI CrossfireX™ and Nvidia SLI™. Providing 4 PCI Express 3.0 x16 connectivity, X79-UD7 delivers ultra smooth 3D rendering, blazing-fast frame rates and enhanced graphics capabilities for users wanting to get the highest level of graphics performance from their system.
OC-VRM

OC-Touch

OC-DualBIOS™

OC-PEG

Most PCI Express Lanes Ever on the Desktop
GIGABYTE Bluetooth 4.0 and WiFi Card
 With 2 kinds data transfer mode, GIGABYTE Bluetooth 4.0 and WiFi Card providing spec 300 Mbps transfer rates, 802.11n supports the latest WiFi specifications for better signal coverage, and featuring the newest Bluetooth 4.0, you will not suffer from signal loss like before.
GIGABYTE 333 Onboard Acceleration

GIGABYTE X79 series motherboards feature GIGABYTE 333 Onboard Acceleration , a range of the latest technologies that are designed help speed up data transfer, including SuperSpeed USB 3.0 technology, SATA Revision 3.0 (6Gbps) technology and an unprecedented 3x USB power boost on all USB ports for more power hungry USB devices.
3x USB Power Boost
 GIGABYTE motherboards feature a 3x USB power boost, delivering greater compatibility and extra power for USB devices. GIGABYTE’s unique USB power design is also able to efficiently regulate output over the full voltage range, which greatly enhances USB device compatibility. In addition, dedicated lower resistance fuses ensure lower voltage drops, and provide more stable and plentiful power delivery.
SuperSpeed USB 3.0
 GIGABYTE motherboards boast SuperSpeed USB 3.0 technology made possible through an additional onboard host controller. With superfast transfer rates of up to 5 Gbps, users are able to experience a theoretical 10x improvement over USB 2.0. Additionally, backwards compatibility with USB 2.0 assures users of long term use of their legacy USB 2.0 devices.
SATA 6 Gbps
 GIGABYTE motherboards are High-Speed SATA Revision 3.0 compatible, delivering superfast 6Gbps link speeds for twice the data transfer rates of SATA Revision 2.0 (3 Gbps). When used in RAID 0 (Stripe) mode, they offer even faster data transfer rates of up to a theoretical 4x the speed of current SATA interfaces.
GIGABYTE On/Off Charge

* Due to certain mobile phone limitations, users may need to connect the mobile phone to their PC before the PC enters S4/S5 mode to enable a quick charge from non ON/OFF Charge USB ports.
Charging results may vary by model.
GIGABYTE Ultra Durable™ 3

 Dolby Home Theater® – Enjoy a Rich Home Theater Surround Sound Experience
 Dolby Home Theater® – Enjoy a Rich Home Theater Surround Sound Experience
Dolby Home Theater® places listeners in the middle of the action, giving their PCs a powerful set of tools to deliver a cinema-style experience in vivid surround sound.
- Delivers vivid surround sound for music, movies, and games, using two to eight speakers or any set of headphones
- Designed to automatically deliver the best possible listening experience
Specifications
| CPU |
(Please refer “CPU Support List” for more information.) |
| Chipset |
|
| Memory |
(Please refer “Memory Support List” for more information.) |
| Audio |
|
| LAN |
|
| Expansion Slots |
|
| Multi-Graphics Technology |
|
| Storage Interface | Chipset:
2 x Marvell 88SE9172 chips:
|
| USB | Chipset:
2 x Fresco FL1009 chips:
|
| Internal I/O Connectors |
|
| Back Panel Connectors |
|
| I/O Controller |
|
| H/W Monitoring |
|
| BIOS |
|
| Unique Features |
|
| Bundle Software |
|
| Operating System |
|
| Form Factor |
|
| Remark |
|
OC Peg
Gigabyte forgoes the standard Molex connector that other manufacturers use to add supplemental power the PCI-E slots. Instead they use what is coined as the OC Peg system which is usage of dual SATA power connections, which tend to be easier to place and have lower profiles. This avoids problems of hardware clutter.
As seen above the connectors are placed at the board’s edge and are quite easy to connect. This could cause hardware fit issues in some scenarios. If using an SATA power connector with wires coming from both sides, it can contact the motherboard tray, forcing users to bend the connector slightly. In our experience though, this has not caused any major damage. All in all, this is a nice unique implementation of extra power for the PCI-E slots when pushing multi card setups to the extreme.
OC Touch
OC Touch gives users full control over their systems. It also allows users to conduct real-time hardare monitoring with a DVOM via the included wire leads.
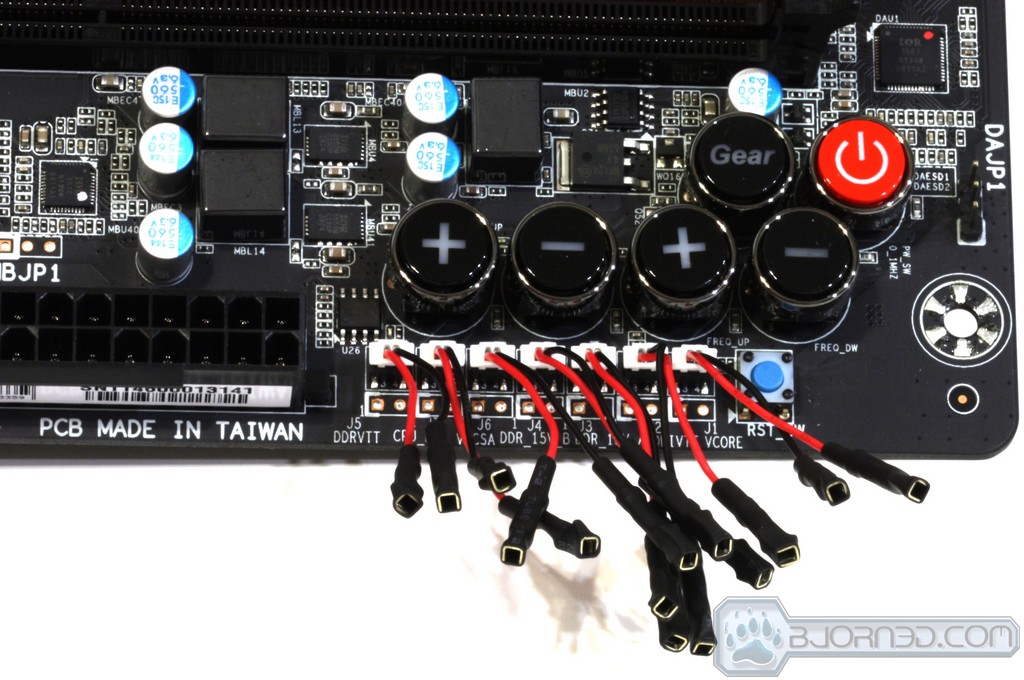
As seen above there are multiple press buttons cleanly laid out along with voltage monitoring points as well, all to make overclocking and pushing the limits that much easier. There are buttons for Power, Reset, Ratio (up/down) and Frequency (up/down).There are also monitoring points which not only allows monitoring during overclocking but also diagnosis if issues are experienced. These read points allow safe voltage checking without the possibility of shorting components by trying to read individual components manually. The Ratio and Frequency control buttons are very useful for on-the-fly overclocking, as very heavy CPU bound tests can be run by a quick drop in speed if the CPU cannot bear that frequency. Also the included “Gear” button allows for even more precise frequency scaling to eek out every possible MHz on the BCLK end.
OC VRM
Gigabyte has mounted a very powerful VRM on the X79-UD7 with Dual 8 Pin CPU power connectors allowing more power than could really be used by the LGA2011 processor.
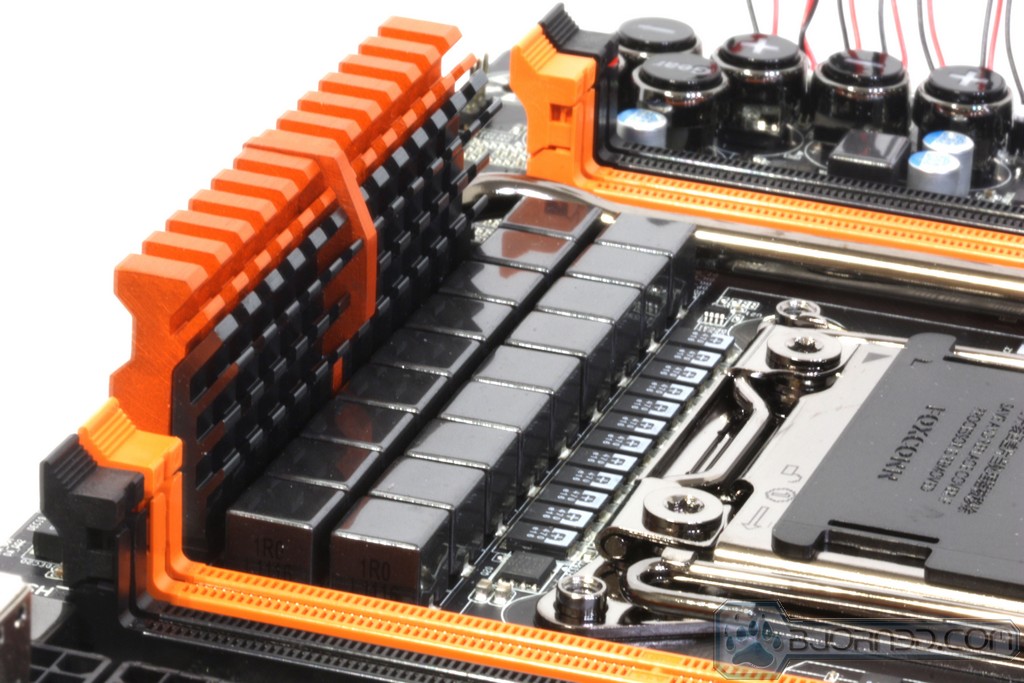
Utilizing POSCAPS all around the socket makes the voltage regulation very easy to insulate for extreme cold, as barrel style caps can be a real pain to properly insulate around. What does this mean for the regular gamer? If the VRM can handle that kind of punishment, this board won’t even blink an eye during heavy-duty gaming.
OC Dual BIOS
OC Dual BIOS is exactly what it sounds like: the board is equipped with dual independent BIOS chips, each with their own BIOS on them. One advantage is that if the BIOS ever becomes corrupt or unbootable, users can simply switch to the other BIOS chip and boot it up, and then reflash the corrupted one. Another cool usage could be to test different BIOS versions on the second chip while retaining the original settings or profiles from the main BIOS chip.
As seen above the BIOS can be switched from chip to chip very easily via a press of the rear panel switch.
WiFi/Bluetooth add-in card
A unique addition to the X79-UD7 is the inclusion of the PCI-E x1 card which enables both WiFi and Bluetooth 4.0 compatibility. This allows an obvious advantage as the system could now be installed anywhere within range of a wireless access point and have full internet usage without a Cat 5 cable.
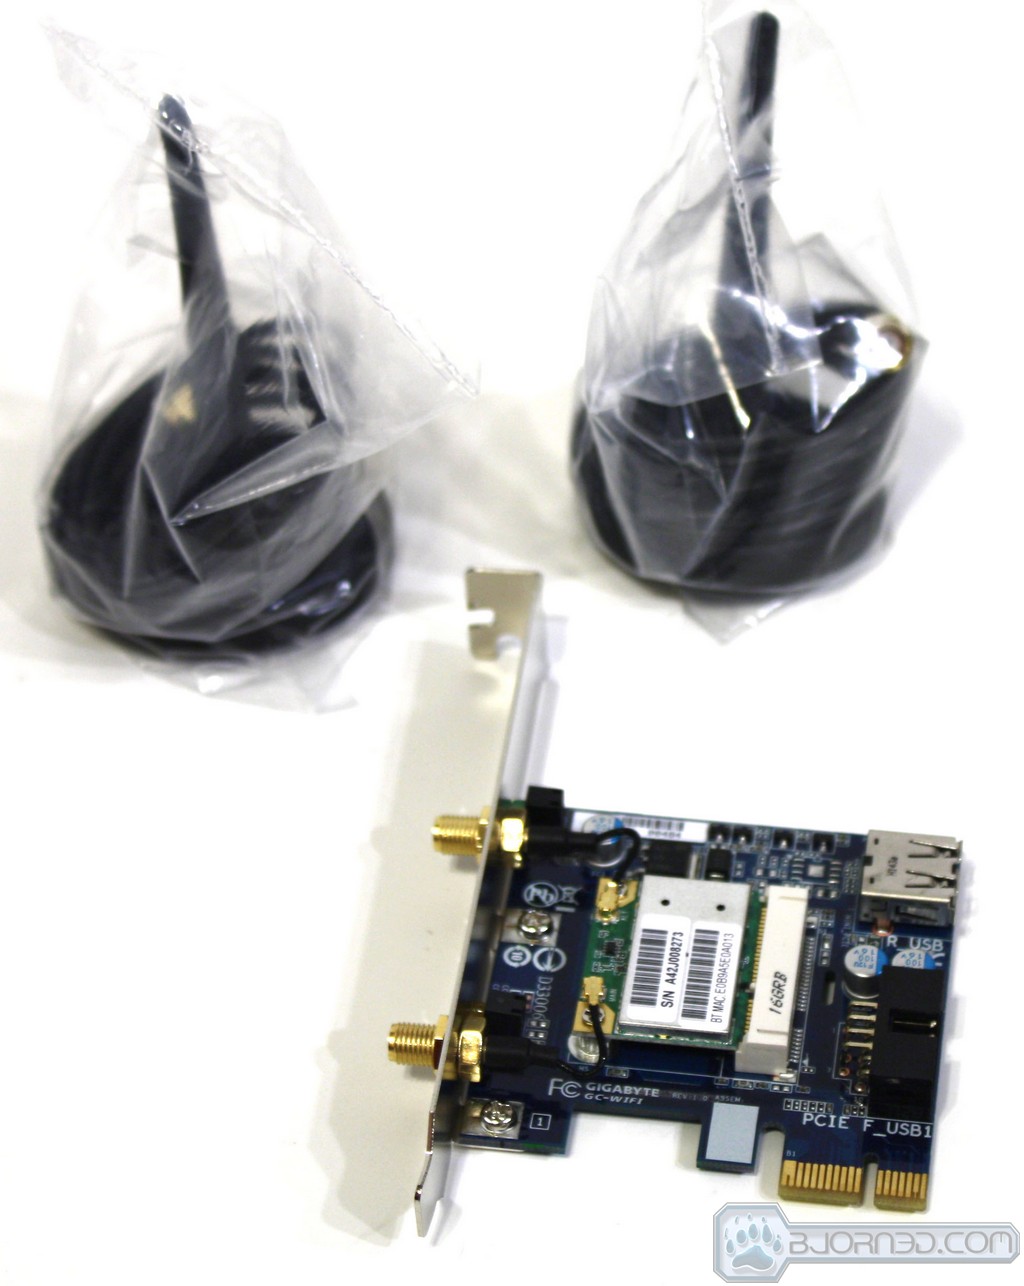
Above we see the card with the dual antennae, which are the key to unlocking the magic. There is not a lot more that needs to be said on account of this feature, as it works very well from our testing. One thing to note is that so far, of all the motherboards we have tested, this is the only motherboard offering WiFi connectivity included.
Overview of the X79-UD7


Gigabyte has finally introduced clear and simple packaging. The box design is a departure from Gigabyte’s normal design. The box has all of the key and noteworthy specs on both the front and rear without being too flashy. The rear shows a full rundown of what we are getting from the board and why we should buy it.


- IO Shield
- USB 3.0 Front
- panel 3.5″ bay
- USB interface
- cable for the WiFi/BT4.0 card
- WiFi/BT4.0 Card
- WiFi/BT4.0 Antennae
- Voltage Readpoint leads
- 2-Way SLI Cable
- 3-Way SLI Bridge
- 4-Way SLI Bridge
- Crossfire Bridge
- eSATA power/data rear panel
- SATA data cables
- Installation and user manuals
- Driver/installation disc
This is a very rich accessory bundle and more than enough has been included to get the board installed and running.


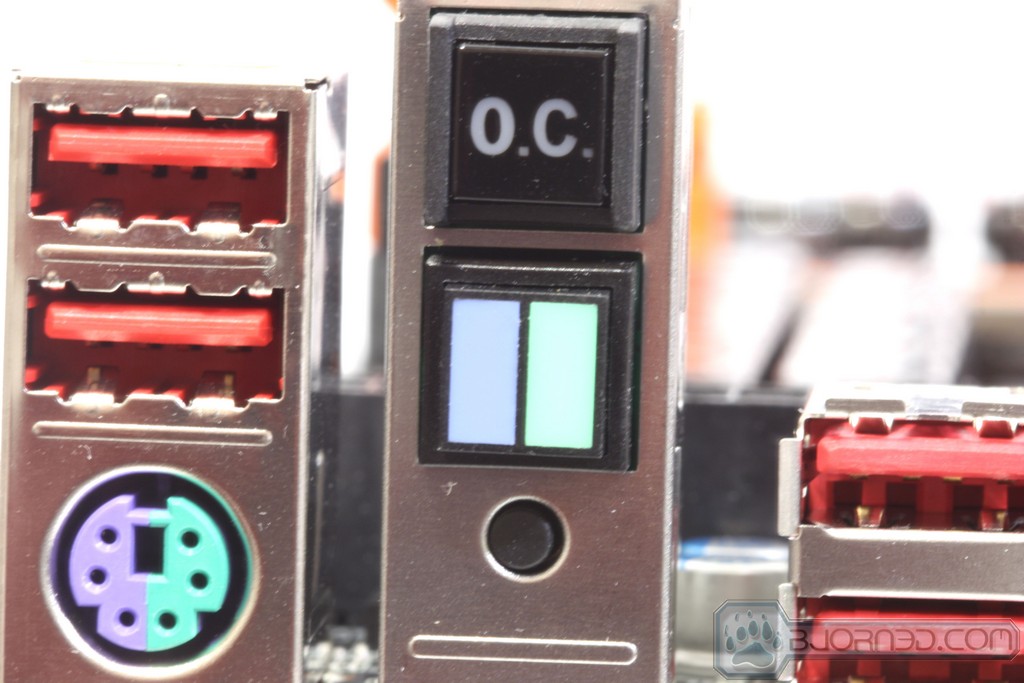
- Keyboard/Mouse PS2 combo port
- 8x USB 2.0 ports
- OC Switch
- BIOS Chip selector switch
- CMOS reset switch
- 2x USB 3.0
- 1x Intel Gigabit LAN (10/100/1000)
- Realtek 7.1 high definition audio
This connectivity is awesome for a high end overclocking and enthusiasts board allowing it to transition from the bench table to the gaming rig with ease.
a closer look at the X79-UD7


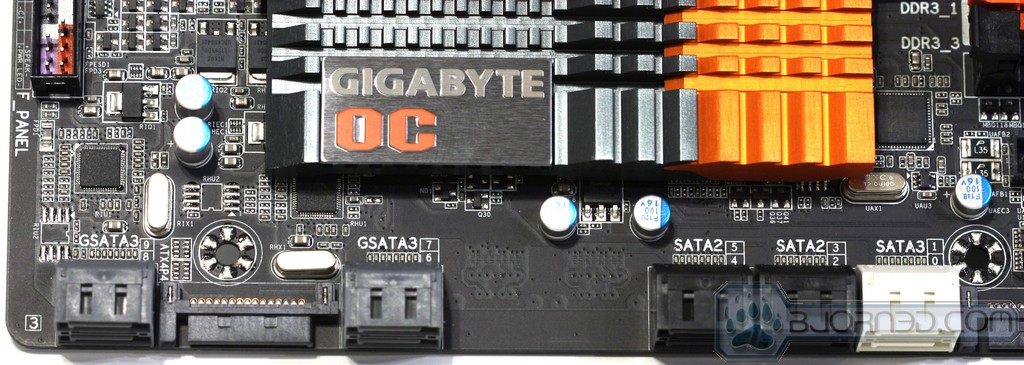
Now we take a closer look at the individual part of the board and try to highlight some key points or components on the UD7. First up we have the obligatory badge pic showing the OC moniker which tells us the origin of the design. Next we see what seems like the never ending stream of SATA ports: Gigabyte installed dual Marvell 9172 IC’s which allow for 2 SATA 6G capable ports each, which means excellent expandability. Note that each 9172 chip is independent, so 2 drives each can be set for RAID 1/0 but all 4 drives cannot work together in RAID, which is unfortunate because that would make for an awesome high speed array if paired with some top end SSD’s.
Toward the right upper side of the board we see even more of the performance based features. Near the 24 pin ATX connector we see an onboard USB 3.0 connector which allows for pretty easy connection for a case equipped with front panel USB 3.0, or even the included front panel USB 3.0 bay that comes with the UD7. Next we see the 2 digit LCD display which assists with diagnostics issues if the board fails to POST. Moving further up we see the main Touch OC area where overclocks can be monitored and adjusted, which allows for excellent on the fly performance and compatibility with any bench as clocks can be easily dropped at the press of a button.


Moving on to the more specifics we get a good look at the leads used for monitoring key voltages on the board. Gigabyte includes enough to monitor every voltage, though it’s not really necessary to monitor all of them at once and it is likely that the cables would be left installed and just connected to a volt meter when required. Here we get a clear look at the socket and VRM, which is ridiculously over-built with more than enough power available for everything the CPU should ever need. Moving down next to the slots we see a very neat and organized component placement. Moving up to the CPU socket location we see a very clean and well laid out VRM section.

We wanted to recap the rear panel function for the BIOS select switching along with the OC Switch and even the CMOS reset switch all on one section. The OC Switch is an instant overclock switch where on the fly instant overclocking can be enabled. The BIOS select switch dynamically allows switching BIOS chips being used during POST.
3Dpower Overview
Gigabyte offers a tuning utility within the OS separate from the Easytune software. This is called 3DPower, and as the name implies it is strictly designed for fine tuning the power components and delivery for the Gigabyte X79 motherboards.
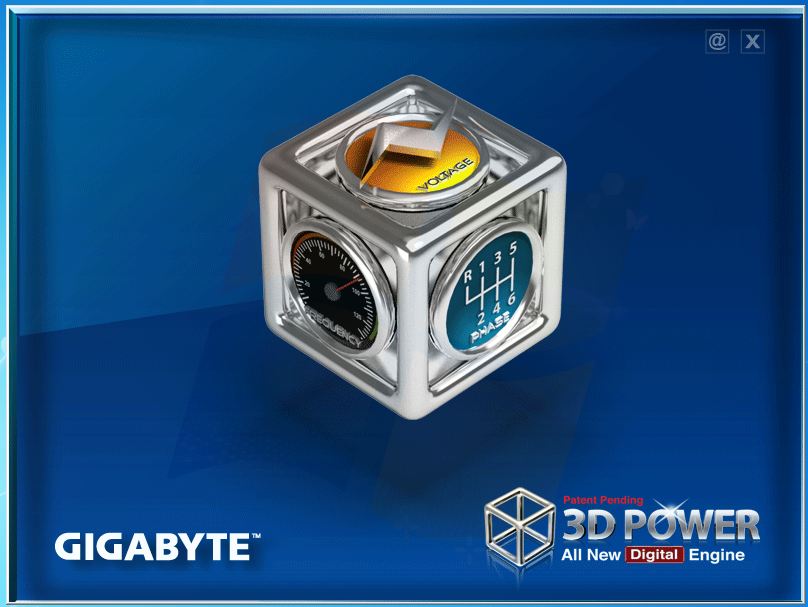
This is what we see when first opening the program. The 3D cube is the way we navigate the utility. Each of the 3 sides shown correspond to a specific function of the utility.
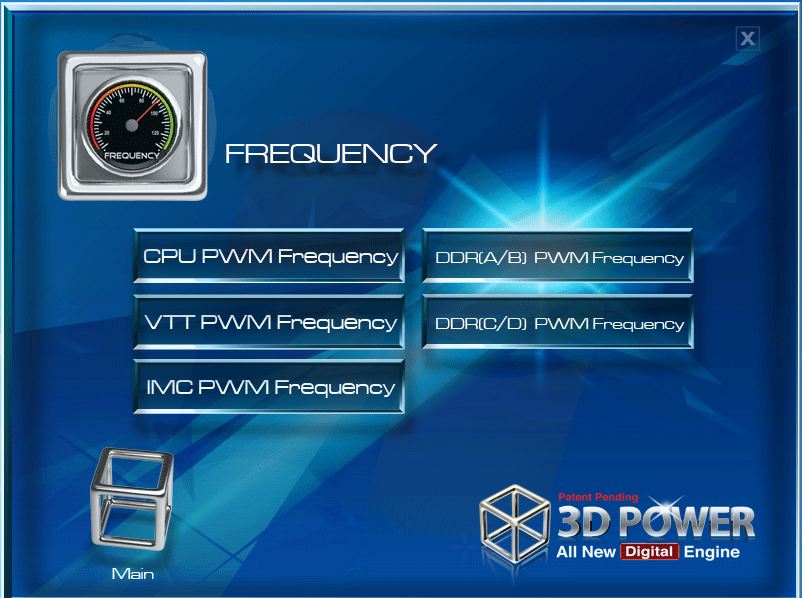
Clicking on the gauge side of the cube gets us to the Frequency section which has to do with all of the different PWM frequencies for the board. This allows for the ultimate in adjustability and below we can see one of the settings in use.
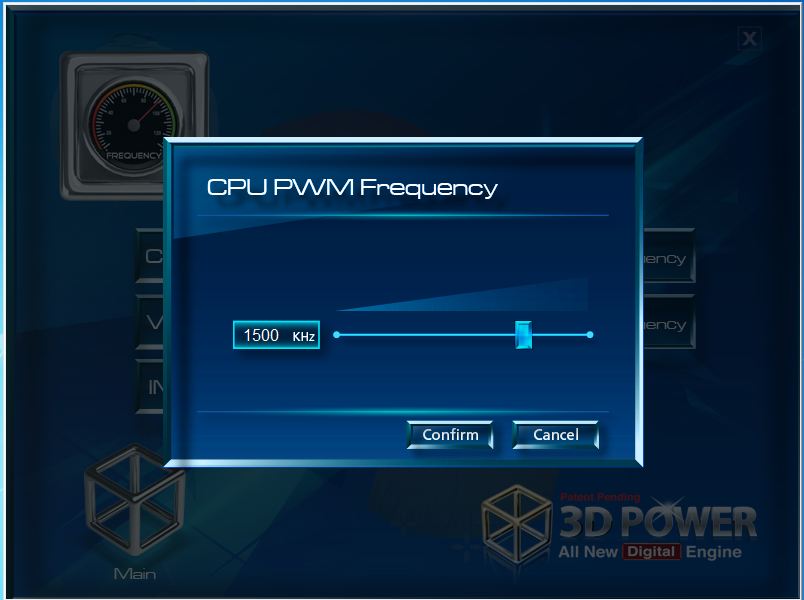
Here we see the adjustment method for the frequency used is the standard slider type and as default is 1000KHz. It can be adjusted upwards or downwards up to a maximum of 2500KHz. This makes adjustments as needed a snap and there were no issues observed with the utility.
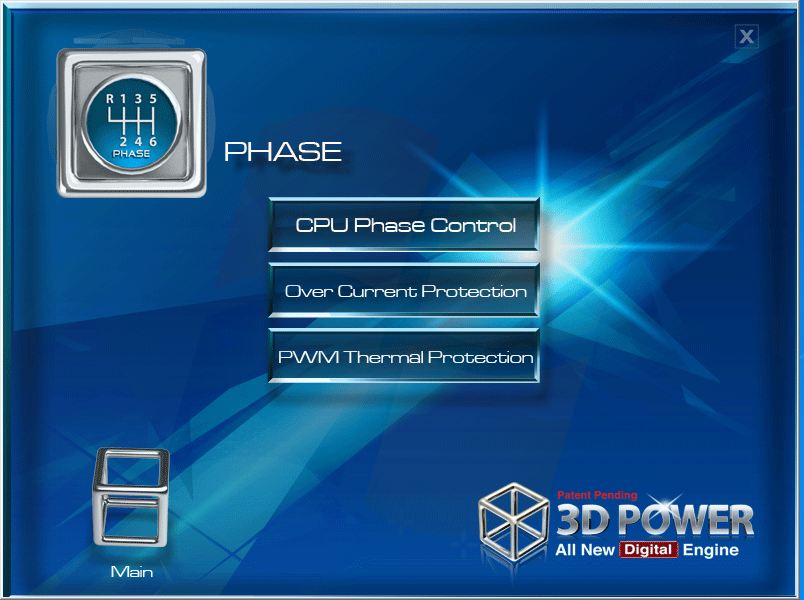
Next up is the phase control section which has to do with the settings for the power phases and also the current and thermal protections. This is applied for both the CPU power/PWM settings.
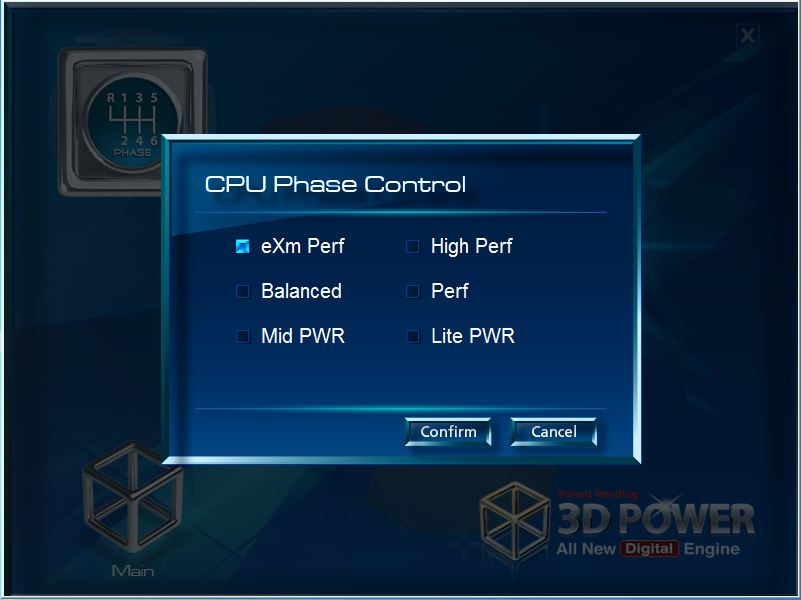
Here we see the CPU phase control setting which allows the different modes for the CPU power phase, from the mild “Lite PWR” to the extremely responsive “eXm Perf” modes. These will help when pushing overclocks for maximum performance.

Here we have the next setting which is the Over Current Protection or OCP. This helps raise the limit at which protection kicks in for the power circuit which will help us push more power as needed without the built in protections getting in the way.
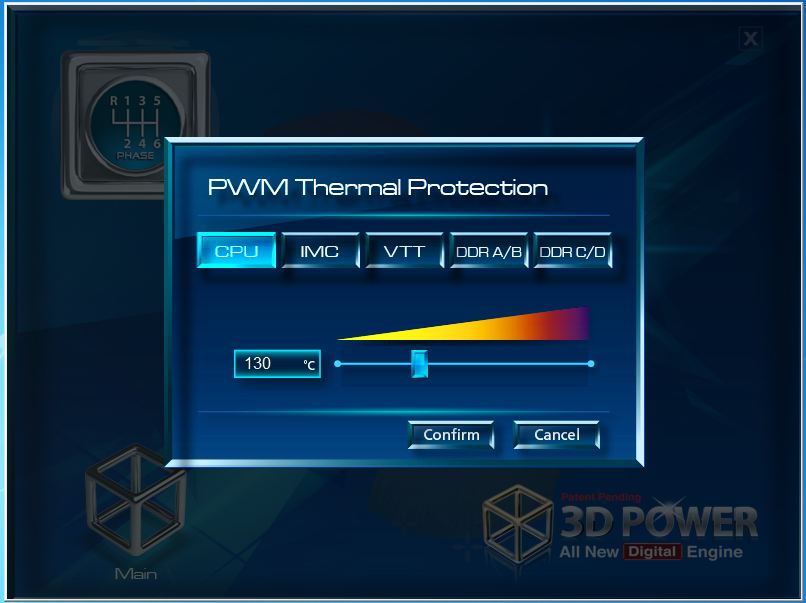
The PWM thermal protection is the next setting and allows adjustment for the protection threshold of the PWM in relation to temperature. Adjusting the threshold is necessary but with the Gigabyte installed cooling solution we never saw temps anywhere near this, no matter how hard we pushed.
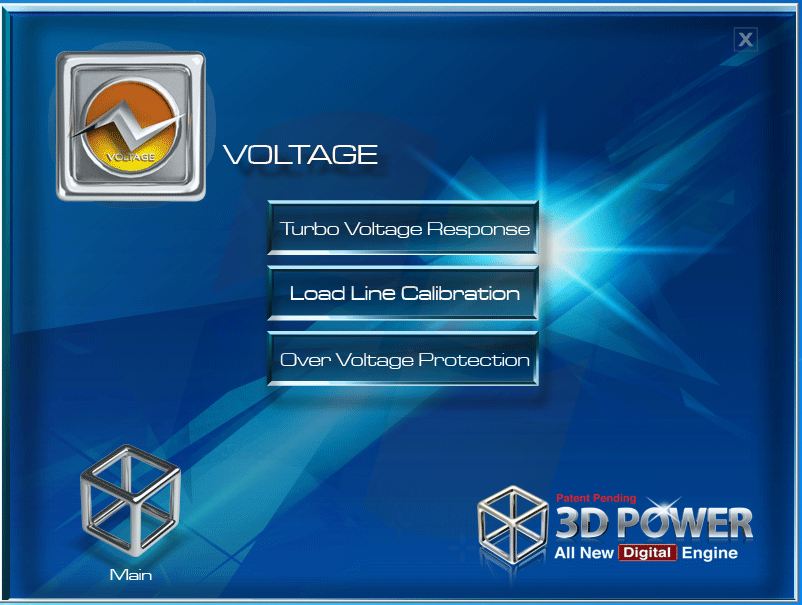
The last and final side of the cube would be the voltage settings. These have to do with adjusting the voltage response, LLC and OVP.
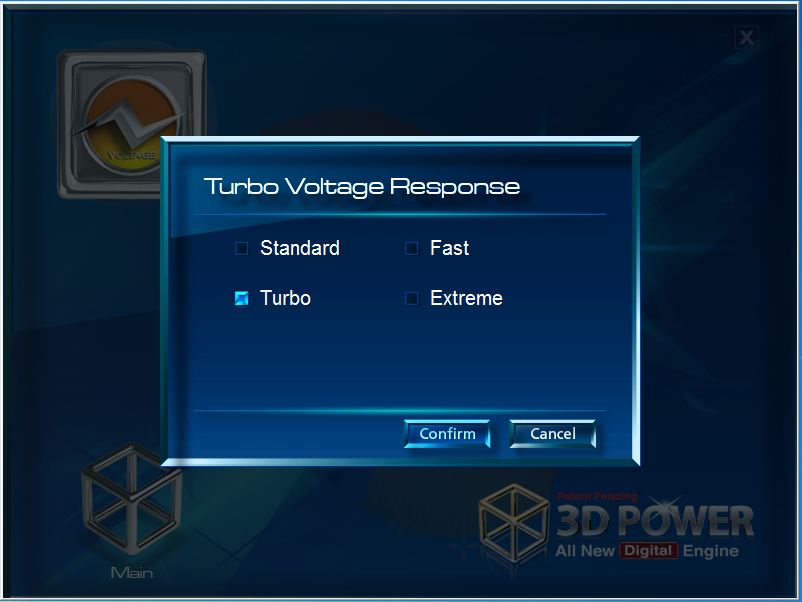
First up in the voltage section would be the Turbo Voltage Response. This adjusts how quickly the VRM will respond to loading changes and turbo ramping to allow for the quicker transition time needed when overclocking and pushing higher speeds and voltages.

The LLC or Load Line Calibration allows for fine tuning the droop in the power signal under loaded conditions. This section of the utility allows for fine tuning the power circuit reaction to load and not just for the CPU but the VTT power, IMC and all 4 memory channels.

The Over Voltage Protection adjustment gives similar fine tuning ability to the voltage protection for the CPU, IMC, VTT and all 4 channels of memory. This allows for exceeding the standard power delivery protections that are at default which will theoretically allow for higher overclocks and better stability when pushing the limits.
uefi BIOS Overview


Click Image To Enlarge
The BIOS has a whole gamut of clickable options here which will jump quickly to some of the basic controls for that section of the boards controls. However as any overclocker knows we want to dig deep into the options so let’s see what the BIOS offers as we click through the MIT section and see what kind of tricks are up the UD7’s sleeves.


Click Image To Enlarge
Gigabyte has left this area pretty much alone as it was a winning combo to begin with, and it offers a great amount of information. It has all of the overclocking areas well laid out and labeled to ensure it should be easy to find any setting users are looking for. Moving into MIT status we see the present state of things which is a pretty hefty overclock of 4.6GHz over the standard 3.3GHz that the chip comes with. Moving to the Advanced frequency settings we see the very heart of our setup and where we will spend some time in the tuning stages.


Click Image To Enlarge
Here we see the CPU-centric settings found under the Advanced CPU Core Features menu. These pretty much allow setting of the individual turbo ratios along with the active cores and even the power and thermal management features within the processor. Next up we have the memory settings which allow for full adjustability of the memory going from simple to downright confusing if not used to the subtimings that are available. This is not necessarily a bad thing, just make sure to do research before playing around too much in there.


Click Image To Enlarge
Ah the voltage settings, which of course is the cause and solution of all overclocking problems. The voltages available on the X79 based boards are a bit different than previous generation boards as it seems to go with every platform change many voltages do similar things but could be renamed or just totally new voltages completely. Going into the 3D power control allows for a huge amount of voltage fine tuning whether it is the protection points, LLC calibration, or more.


Click Image To Enlarge
Now we jump into the CPU voltage controls which are rather simple and to the point. The voltage control does allow for 2 options for VCORE which is manual voltage settings which is most common for most overclockers, and Dynamic VCORE which is another way of saying offset voltage as it takes the Normal voltage for the VCORE and adjusts it up with the offset placed in the BIOS. Then we move to the memory voltages which are broken up to 2 different sets to control 2 channels each. Lastly we have the lonely PCH voltage all in its own menu.


Click Image To Enlarge
Moving away from the voltages we get to the PC Health status section which allows full monitoring and reporting of voltages, fan speeds and temperatures. This screen could be pretty helpful for a quick check and confirmation of voltages but for true voltage readings always consult the onboard read points with a digital voltage reader to ensure accuracy. The system Tab is pretty standard as it allows setting of time/date and also displays system information as well.


Click Image To Enlarge
The rest of the settings are pretty standard fare for any BIOS and are primarily power features, boot configuration and other integrated peripheral controls. All in all Gigabyte’s first implementation of the UEFI BIOS is excellent and even superior to many out there which have been doing it for at least one generation of boards already.
Testing & Methodology

We’ve expanded our testing suite considerably since the X79 chipset release, and will continue to use the same methods for most of the motherboards and CPU’s we test. In the interests of thoroughness and accurate results, we run each test at least three times, and some tests more than that. We average the total of all the tests from each benchmark then report the average here.
The OS we use is Windows 7 Pro 64bit with all patches and updates applied. We also use the latest drivers available for the motherboard and any devices attached to the computer. We do not disable background tasks or tweak the OS or system in any way. We turn off drive indexing and daily defragging. We also turn off Prefetch and Superfetch. This is not an attempt to produce bigger benchmark numbers. Drive indexing and defragging can interfere with testing and produce confusing numbers. If a test were to be run while a drive was being indexed or defragged, and then the same test was later run when these processes were off, the two results would be contradictory and erroneous. As we cannot control when defragging and indexing occur precisely enough to guarantee that they won’t interfere with testing, we opt to disable the features entirely.
Prefetch tries to predict what users will load the next time they boot the machine by caching the relevant files and storing them for later use. We want to learn how the program runs without any of the files being cached, and we disable it so that each test run we do not have to clear pre-fetch to get accurate numbers. Lastly we disable Superfetch. Superfetch loads often-used programs into the memory. It is one of the reasons that Windows occupies so much memory. Vista fills the memory in an attempt to predict what users will load. Having one test run with files cached, and another test run with the files un-cached would result in inaccurate numbers. Again, since we can’t control its timings so precisely, it we turn it off. Because these four features can potentially interfere with benchmarking, and and are out of our control, we disable them. We do not disable anything else.
Test Rig
| Test Rig | |
| Case | Thermaltake Level 10 GT |
| CPU |
Intel Core i7-3960X |
| Motherboard | Gigabyte X79-UD7 |
| Ram | 16GB Gskill RipJaws Z 4x4GB (9-11-10-27) |
| CPU Cooler |
Swiftech H20-220 Edge |
| Hard Drive | Western Digital Velociraptor 300GB |
| SSD |
Intel 510 series SATA III 120GB |
| Optical | ASUS BD-ROM |
| GPU |
SLI 2x GTX 580 |
| Case Fans |
Front (intake): 200 x 200 x 20 mm ColorShift Fan x 1 (600~800RPM, 13~15dBA) Rear (exhaust): 140 x 140 x 25 mm Turbo Fan (1000PRM, 16 dBA) Top (exhaust): 200 x 200 x 30 mm ColorShift Fan (600~800RPM, 13~15dBA) Side (intake): 200 x 200 x 30 ColorShift Fan (600~800RPM), 13~15dBA) |
| Additional Cards |
N/A |
| PSU |
Thermaltake Toughpower Grand 1200W |
| Mouse | Thermaltake esports Black gaming mouse |
| Keyboard | Thermaltake Meka G1 mechanical gaming keyboard |
Test Suite
We will use the following applications to test the performance of the Motherboard. Benchmarks
| Benchmarks |
|---|
| PCMark 7 |
| Heaven benchmark 2.5 |
| Cinebench R10 |
| Cinebench R11.5 |
| 3DMark 11 |
| 3DMark Vantage |
| Wprime |
| SuperPi |
| Metro 2033 |
| Lost Planet 2 |
| SiSoft Sandra 2011b |
| HDTune Pro |
| X264HD |
| TrueCrypt 7.1 |
Overclocking

The X79 platform has been quite impressive to date. with overclocking ability similar to the 1155 variant with the exception that with more cores there is definitely more heat to deal with. Now of course the overclocking seems to depend upon chip once again but upon our testing pretty much all samples we have tested seem capable of 4.6GHz with adequate cooling.
The boards will likely pull much higher speeds with sub ambient cooling and more tuning time but we wanted to stick with something that regular users could reproduce and expect similar results.
NOTE: Memory is run at 1600 (9-9-9) for comparison as well to ensure continuity amongst all X79 boards tested.
Overclocking the X79-UD7 went rather easy, it does offer a 4.0GHz auto overclock setting but we know that it could do much better which is why we cranked it up to the 4.6 GHz comparison speed with relative ease. We were a bit surprised to find that the board’s maximum overclock profile was 4.0GHz considering how well it clocks but this was done to obviously err on the side of caution. Admittedly compared to the Rampage IV Extreme tested previously, the UD7 does require a bit more tweaking when pushing the board to achieve stability, and getting 5.1GHz on the UD7 could not be accomplished as easily and required much more tuning time to get it stable.
Important note: Overclocking can cause component failure. Please exercise caution when attempting any level of overclock on system components.
Temperatures

The temperatures were recorded with Realtemp while running Wprime 1024 right before the end of the 5th run. The results were recorded carefully. After the results were recorded, we waited for 30 minutes before taking Idle temperature measurements. The results were as follows:
| CPU Temperatures | Temperature (Idle/Load) |
| X79-UD7 OC (4.6GHz) | 33C/67C |
| X79-UD7 | 31C/57C |
| Chipset Temperatures | Temperature (Idle/Load) |
| X79-UD7 OC (4.6GHz) | 40C/51C |
| X79-UD7 | 35C/44C |
Testing was completed with the Swiftech H20-220 Edge kit to ensure CPU temps were kept in check and much more overclocking headroom is given compared to a standard air cooler.
Power Consumption

The power consumption was tested while running Wprime 1024 for a few minutes at stock settings. The results were recorded carefully with a Kill-A-Watt power consumption measuring tool at the wall. After the results were recorded, we waited for yet another few minutes minutes before taking Idle power consumption measurements.
| Configuration | Power Consumption (Idle/Load) |
| X79-UD7 (4.6GHz) | 219W/453W |
| X79-UD7 | 163W/344W |
The power consumption is not with GPU usage. This is with CPU/system loading but nothing graphically intensive in order to provide the most accurate results by not ramping up the GPU, which will pull significantly more power.
Wprime
Wprime is a processor heavy multithreaded benchmark at which it crunches numbers of a specific data set and gives the end user an output time which can then be used as a gauge to compare system performance.

Wprime Shows the LGA2011’s ability in multithreaded apps and also the efficiency of the new architecture. It rips through this bench with relative ease and is only a very small amount behind the Rampage IV Extreme which is no small accomplishment.
Superpi
SuperPi is a single threaded benchmark which measures efficiency and is heavily influenced by architectural changes as much as it is by clockspeeds.
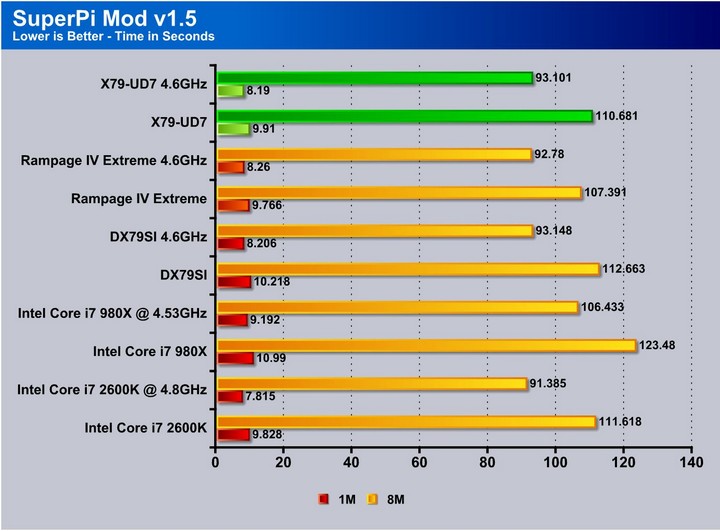
SuperPi is a much older benchmark, and some may argue its obsolescence, but with some newer processors scoring poorly in this test, it is always good to include it. The efficiency is awesome once again and at the overclocked setting the UD7 even edges out the Rampage ever so slightly at 1M, which is excellent and means with more tuning this board could be a contender for the top spot at a value.
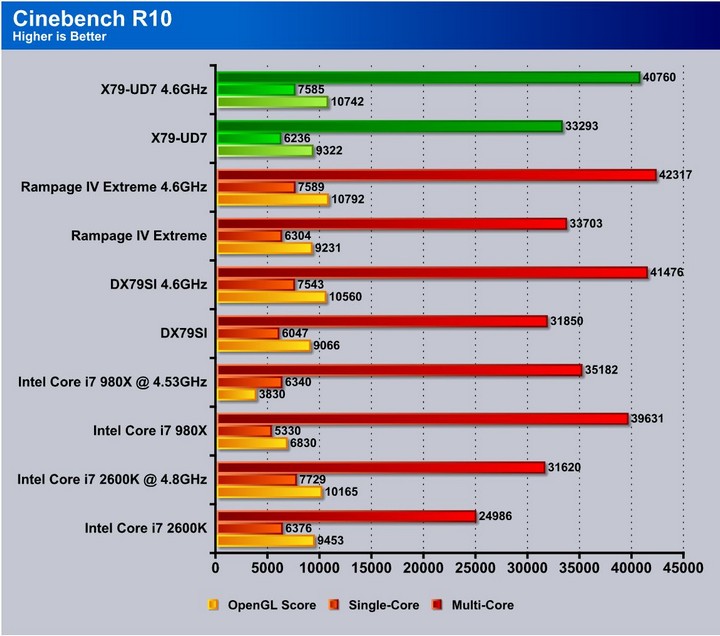
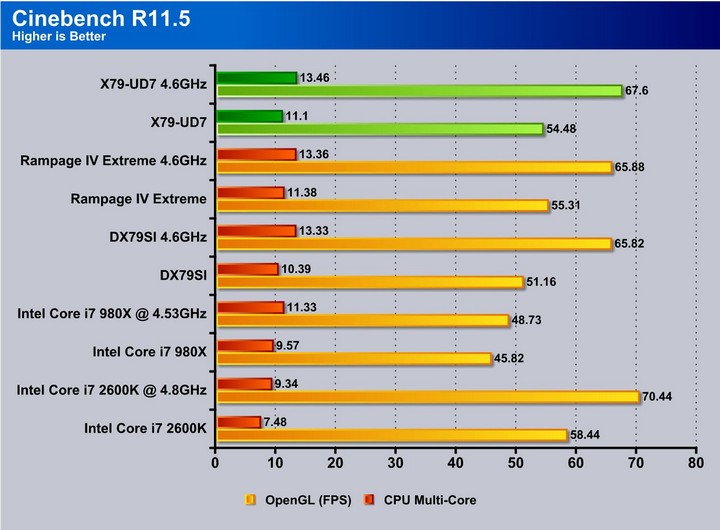
Cinebench R10 and R11.5

“CINEBENCH is a real-world test suite that assesses your computer’s performance capabilities. MAXON CINEBENCH is based on MAXON’s award-winning animation software, CINEMA 4D, which is used extensively by studios and production houses worldwide for 3D content creation. MAXON software has been used in blockbuster movies such as Spider-Man, Star Wars, The Chronicles of Narnia and many more. MAXON CINEBENCH runs several tests on your computer to measure the performance of the main processor and the graphics card under real world circumstances. The benchmark application makes use of up to 16 CPUs or CPU cores and is available for Windows (32-bit and 64-Bit) and Macintosh (PPC and Intel-based). The resulting values among different operating systems are 100% comparable and therefore very useful with regard to purchasing decision-making. It can also be used as a marketing tool for hardware vendors or simply to compare hardware among colleagues or friends.”
SiSoft sandra 2011

“SiSoftware Sandra (the System Analyzer, Diagnostic and Reporting Assistant) is an information & diagnostic utility. It should provide most of the information (including undocumented) you need to know about your hardware, software and other devices whether hardware or software. It works along the lines of other Windows utilities, however it tries to go beyond them and show you more of what’s really going on. Giving the user the ability to draw comparisons at both a high and low-level. You can get information about the CPU, chipset, video adapter, ports, printers, sound card, memory, network, Windows internals, AGP, PCI, PCI-X, PCIe (PCI Express), database, USB, USB2, 1394/Firewire, etc.”
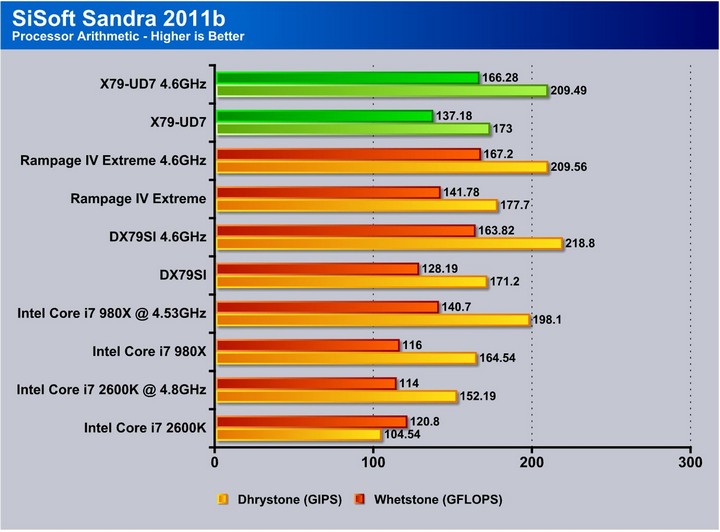
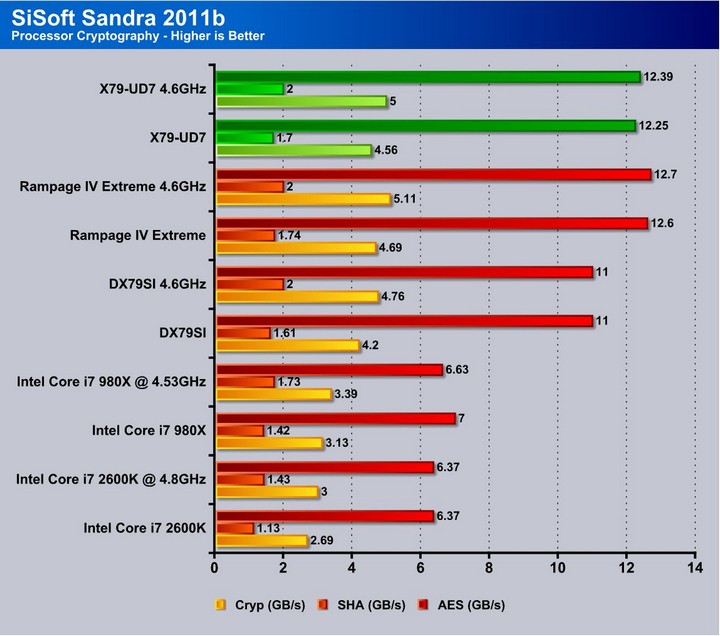
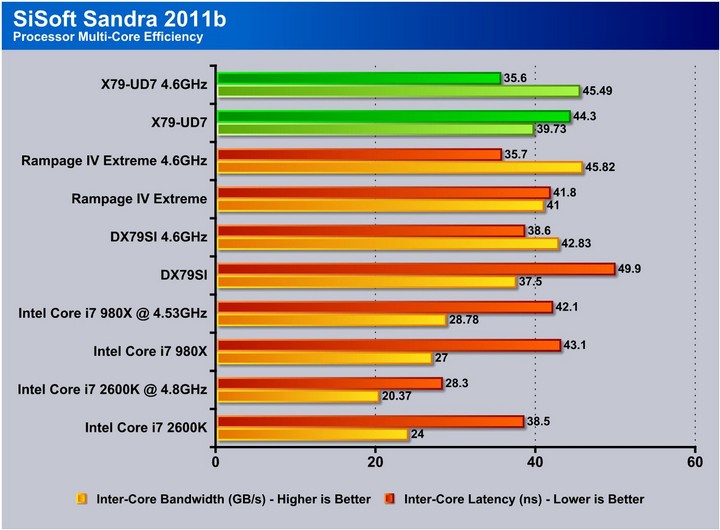
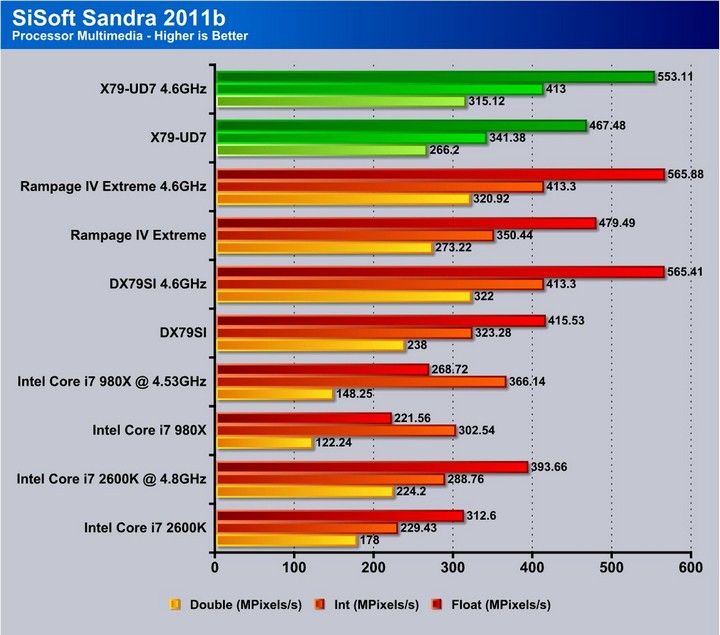

It seems the tests are just mirroring themselves over and over again as the UD7 and Rampage keep trading for the top spot. These processor bound tests definitely seem to lend themselves a bit more in the Rampage’s favor which goes to say that board optimization is likely quite a bit better. It will be interesting to see as the platform matures how it affects these results.
PCmark 7


PCMark 7 is a complete system benchmark testing multiple facets of what a computer does every day. This is interesting as there are areas now we are seeing where the ROG board definitely shines as the UD7 struggles to keep up but its not that bad for a single benchmark program to see such results.
X264HD
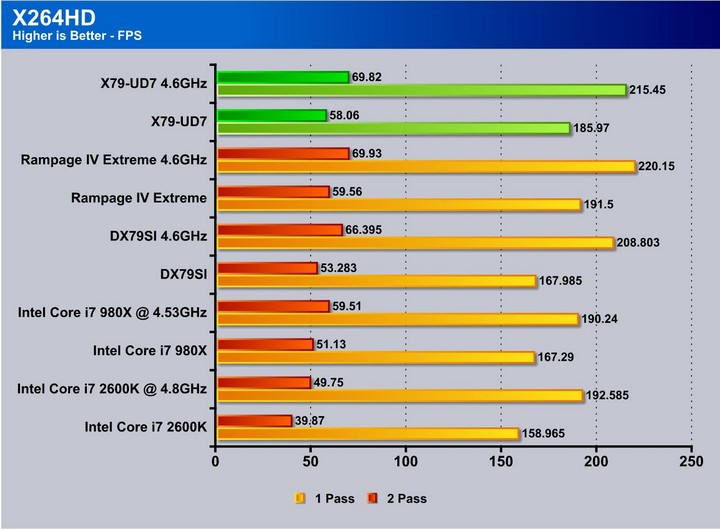
The X264HD benchmark tests the encoding capabilities of the CPU to encode a short HD video clip. Here we see the UD7 is very close to the Rampage again but just couldn’t surpass it.
Truecrypt 7.1
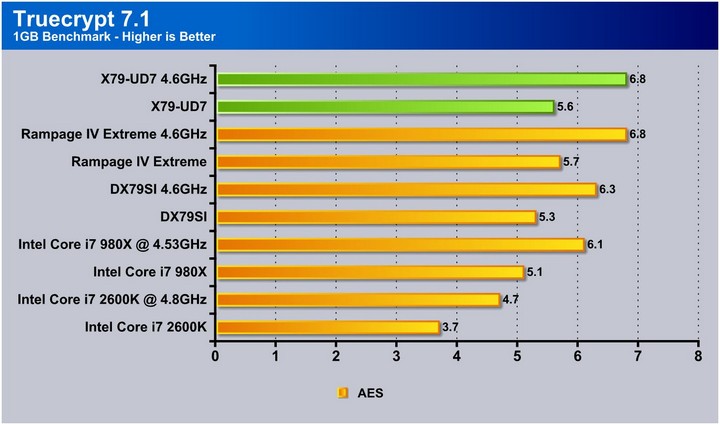
The Truecrypt benchmark shows similar to the Sandra 2011 encryption tests that the Rampage is slightly ahead of the UD7 again but only a very small margin and when overclocked its a dead heat.
HDTune pro
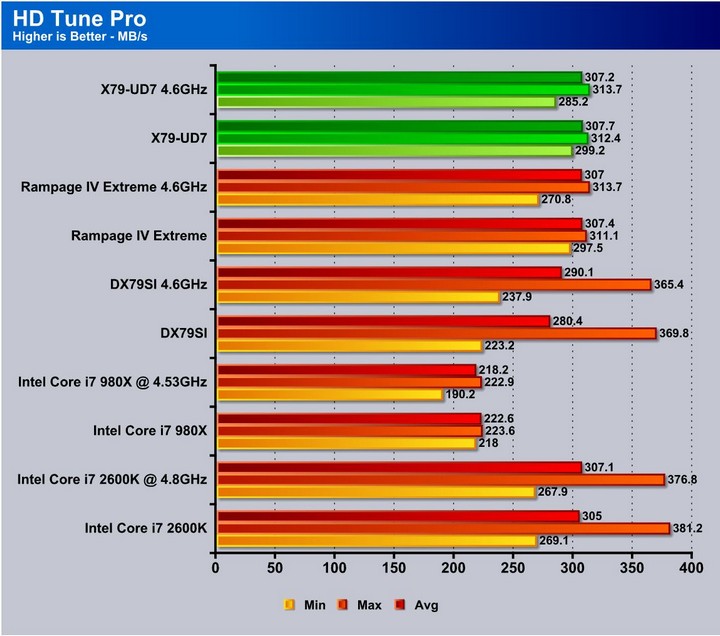
The HDTune tests shows similar results between the 2 boards as the same SSD was used and it shows as the results are almost dead on to within less than a MB in most cases.
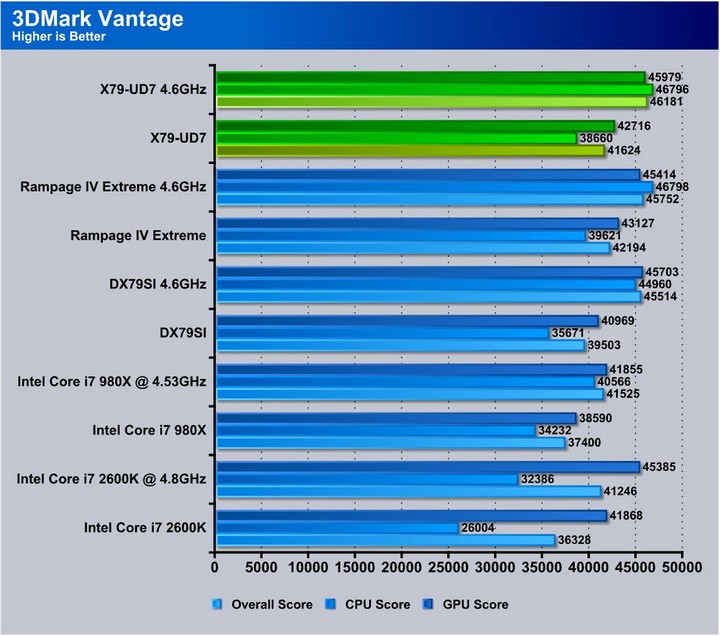
3DMARK VANTAGE

For complete information on 3DMark Vantage Please follow this Link:
www.futuremark.com/benchmarks/3dmarkvantage/features/
The newest video benchmark from the gang at Futuremark. This utility is still a synthetic benchmark, but one that more closely reflects real world gaming performance. While it is not a perfect replacement for actual game benchmarks, it has its uses. We tested our cards at the ‘Performance’ setting.
3DMARK 11
![]()
3DMark 11 is the newest in futuremark’s suite of benchmarking utilities. Its a fully capable DirectX11 benchmark which also stresses and analyzes the system performance as a whole to simulate a heavy rendering environment such as a high end game or other app the end user may run. This benchmark was run with Performance settings 5 times and all runs were averaged for the result below.
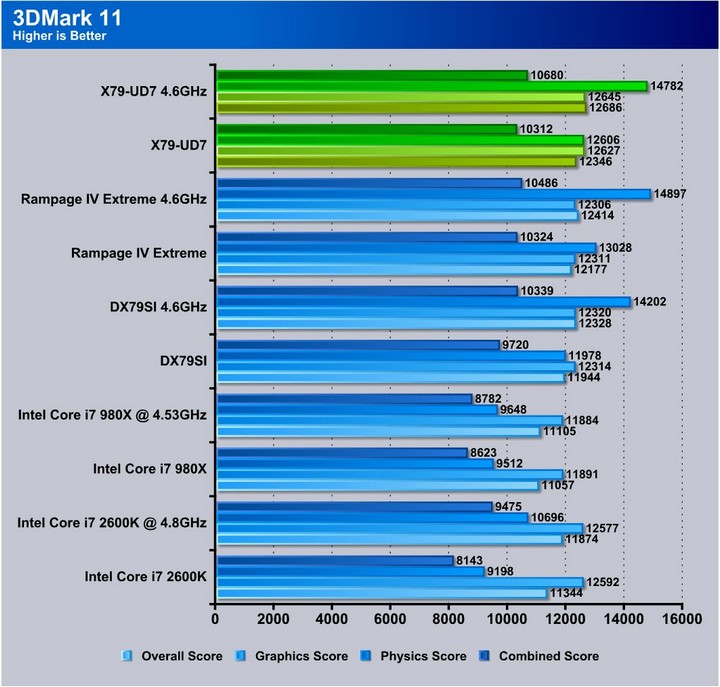
3DMark Vantage and 3DMark 11 both show similar back and forth as the boards once again relegate to trading blows as the UD7 takes a small lead on Vantage, yet it gives up the win on 3D11 to the Rampage.
Unigine Heaven 2.5

Unigine Heaven is a benchmark program based on Unigine Corp’s latest engine, Unigine. The engine features DirectX 11, Hardware tessellation, DirectCompute, and Shader Model 5.0. All of these new technologies combined with the ability to run each card through the same exact test means this benchmark should be in our arsenal for a long time.
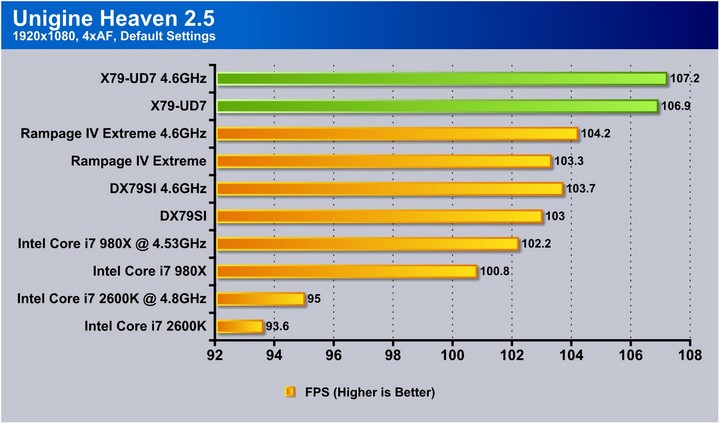
Unigine Heaven 2.5 shows the strong point in the UD7 as it easily pulls ahead by a couple FPS which tells us that this board is obviously tuned for 3D, whereas the Rampage tends to knock it back when heading to 2D benchmarks.
Metro 2033
![]()
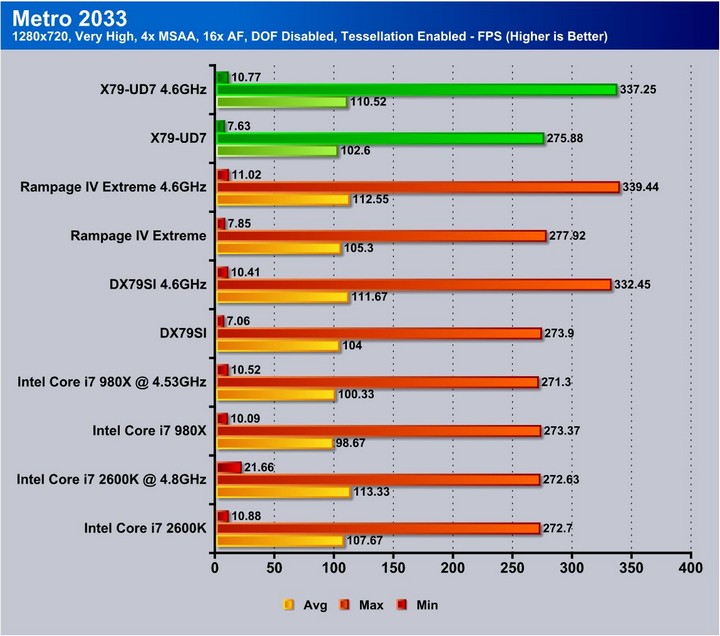

Metro 2033 is a very demanding game for graphics. The UD7 does give up the win a little to the Rampage which leads us to believe our earlier assumption that the UD7 is tuned for 3D may be incorrect, or Metro with SLI 580’s may use more of the CPU efficiency than we think.
Lost Planet 2

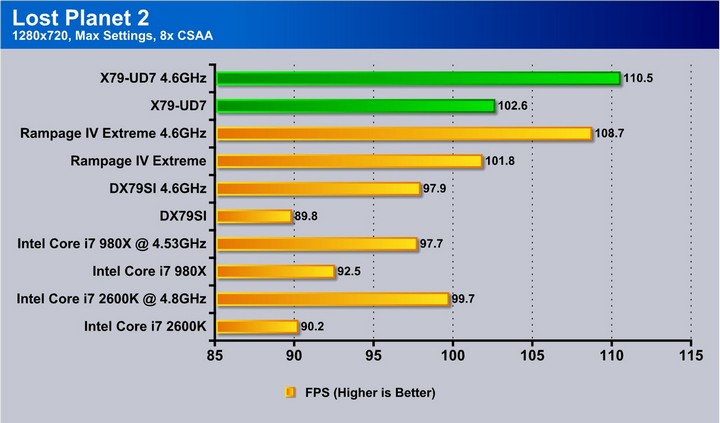
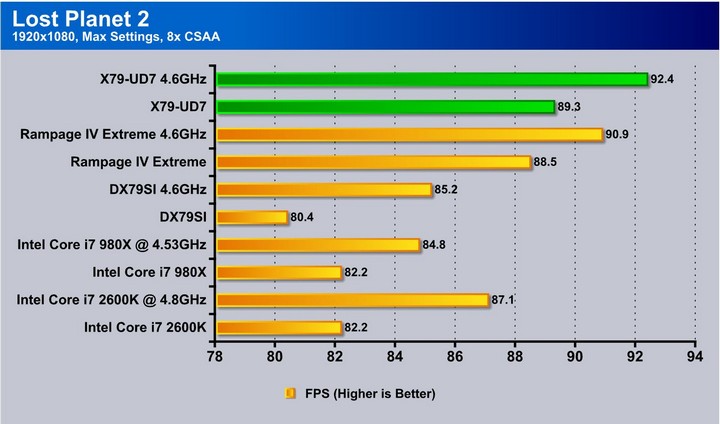
Lost Planet 2 shows yet again the UD7 comes out swinging with a clear lead by a couple FPS, and this shows that the UD7 is a more than capable board for heavy gaming and benching alike.
CONCLUSION
After looking at the Rampage we knew that any board that followed had a very daunting task ahead of it. The UD7 has many great features including a intuitive and easy to use UEFI BIOS that is not too far from the original so that anyone used to the old blue Award BIOS will feel very comfortable in the UD7’s interface as well. All sections are laid out similarly and there is a plethora of options to tweak and tune the thing to the very limits. The overclocking does require a bit more tuning, but then again for Gigabyte boards we are used to tweaking our way to what we want.
The included WiFi/Bluetooth 4.0 card is a great plus and frees the user from having to either run a very log network cable or limit system placement near a wall jack. This is a great added value option and something that is very useful unless there is a 4-Way graphics setup installed at which point the card would not have a place to fit. The overclocking section at the top of the board offers excellent on the fly adjustability and also the read point leads are great for a bench top setup or when running subzero.
The performance as observed is just shy of the Rampage IV Extreme and could possibly do better with a BIOS update or even under extreme cold it could wake up and just walk away but for the regular user the CPU performance will be a little behind the Rampage clock for clock. However 3D performance seemed to be quite good on this board easily eclipsing the Rampage in some cases which is great and speaks well to the boards capability.
At almost 100 dollars less than the Rampage it is hard to deny the boards value and should be considered for anyone looking to go LGA2011 and not planning on using some of the extra bencher friendly features that the Rampage offers.
| OUR VERDICT: Gigabyte X79-UD7 | ||||||||||||||||||
|
||||||||||||||||||
| Summary: The Gigabyte X79-UD7 does not fail to impress and comes out of the gate swinging. For its excellent performance and features, it earns the Bjorn3D Golden Bear Award. |