The GIGABYTE X79-UD5 support up to 8 DIMMs, the latest X79 Extreme Processors, 3-way SLI/CrossfireX configurations and also comes with WiFi/Bluetooth add-on card.
Introduction

If you’re an avid reader of Bjorn3D, you may have realized that we have reviewed a lot of motherboards in the past years. I have personally been on the band wagon, testing and playing around with motherboards starting with the P35 and X38 chipsets and seen the change in the technology and components used on these motherboards. The release of a new chipset usually means that there’s something new about the motherboard and that it is capable of running the latest and best hardware available on the market, or it could also be just a different chipset for a different market segment. These are the times when manufacturers like GIGABYTE like to show off their latest features and advancements that they have been developing for several months or years. This time around, we have GIGABYTE’s X79-UD5 high-end motherboard, the top performance X79 chipset platform combined with Intel’s flagship Core i7-3960X Extreme 6-Core processor.
With the release of the X79-UD5, GIGABYTE also introduced their latest features, a new Dual UEFI BIOS, and a new digital power design for the CPU and Memory, called 3D Power. While we’ve been waiting for these upgrades for a while now, it is also questionable whether we can call these new features ‘upgrades’. Its not that we do not welcome new motherboard designs from GIGABYTE, but it’s more about reliability/stability, and user friendliness we’re looking for. There are a few down sides we’ve noticed with the current implementation of the digital power design and the new UEFI BIOS that comes on the X79-UD5, but we’ll go into more details about that on the following pages.
On the bright side, the X79-UD5 does come with some welcomed additions. For the first time, GIGABYTE provides their buyers with a Bluetooth 4.0 and Wi-Fi add-on card. The UD5 is also one of the high-end motherboards in GIGABYTE’s X79 chipset lineup that comes with 8 DIMM memory slots for up to 64GB of DDR3 2400MHz memory goodness. So it is hard to say that this motherboard couldn’t become a film maker’s dream due to the possibilities that it provides. On the other hand, the UD5 also comes with PCIe Gen 3 switches, making it possible to use the latest PCI-Express Gen 3 video cards for the best possible gaming experience. However, it is still questionable how useful this feature will be if the current Intel LGA2011 CPU’s do not necessarily support PCIe Gen 3. It is a great possibility that the future rumored Ivy Bridge-E CPUs will have this support and the BIOS will be updateable to support those future CPUs on the X79 chipset.
The X79-UD5 is not an inexpensive motherboard, as it will put you back about $300 without any promotions, but lets take a look at how this motherboard actually performs and its pros and cons before drawing conclusions about its price and what it comes with.
Features
 GIGABYTE X79 series motherboards are the first to take advantage of the exclusive GIGABYTE 3D Power, an all new hardware and software-based Digital Power Engine for both the PWM and Memory that delivers unprecedented power delivery control.
All New Digital Power Control for the CPU and Memory
 Utilizing a brand new Digital PWM controller, GIGABYTE’s 3D Power features precise Auto Voltage Compensation to deliver a steady flow of power to the CPU and memory no matter the loading. This all new, all digital power system provides enthusiast users with exceptional control over the overclocking potential of their GIGABYTE X79 motherboard.
GIGABYTE is the first in the industry to utilize digital memory controllers for not only the Memory, but VTT and VSA, for real-time monitoring and adjusting. Digital memory control allows users to monitor and record DDR power and current in real-time while gaming, overclocking or at idle. Users can also set OVP (Over Voltage Protection) to safeguard your memory, adjust memory Load-line Calibration to fix memory vdrooping for a quicker response time and adjust memory PWM frequency on-the-fly.
 The revolutionary GIGABYTE 3D BIOS application is based on our new GIGABYTE UEFI DualBIOS™ technology and is available to consumers in two new exclusive modes of interaction never before seen in a BIOS environment. GIGABYTE has re-drawn the traditional BIOS experience providing mainstream and enthusiast users with a choice of unique and powerful graphical interfaces.
UEFI DualBIOS™ Technology
At the heart of this exciting 3D BIOS technology is a pair of 8MB physical BIOS ROMs containing GIGABYTE’s exclusive in-house designed UEFI BIOS technology. With a superior graphical interface capable of 32-bit color imaging and fluid user-friendly mouse navigation, UEFI DualBIOS™ makes BIOS configuration a new and exciting experience for novice and experienced users alike. UEFI BIOS also brings native support for large hard drives on 64-bit operating systems.
3D Mode
 Designed to provide an extremely streamlined and user-friendly BIOS environment, GIGABYTE’s exclusive 3D mode offers a fully interactive and illustrative GUI that allows users to easily and intuitively make key adjustments to the UEFI BIOS settings for optimum performance. 3D Mode allows novice or casual users to more clearly understand the areas of the motherboard that are being affected through the BIOS settings, gaining a clearer understanding of the BIOS functionality.
Advanced Mode
 Advanced mode provides a more comprehensive UEFI BIOS environment that is designed specifically for overclockers and power users who want maximum control over their PC’s hardware. GIGABTYE’s signature M.I.T. tuning technology can be found alongside fully configurable parameters for GIGABTE’s all new digital 3D Power engine. In short, advanced mode combines the signature GIGABYTE BIOS expertise you’ve come to expect, wrapped a slick, new and optimized graphical UEFI interface.
 With a potential data bandwidth of up to 25GB/Sec and 256 Bits memory addressing, the Intel® X79 platform offers unrivalled memory performance. Supporting up to 64GB of DDR3 1600 memory (X79-UD5 only), GIGABYTE X79 series motherboards give you the ultimate performance for today’s memory-intensive applications.
 The GIGABYTE motherboard is fully configured to provide gamers with the latest Gen.3 PCI Express technology, delivering maximum data bandwidth for forthcoming discrete graphics cards.* PCIe Gen. 3 is dependent on CPU and expansion card compatibility.
 The GIGABYTE X79-UD5 is equipped to help extreme gamers see the enemy from distance, regardless of how bloody the battlefield, offering the utmost graphics flexibility and upgradeability with multiple GPU support, that includes three PCI Express slots for both AMD CrossFire™ X and Nvidia SLI™ technologies in 3-way discrete card configurations. The GIGABYTE X79-UD5 motherboard delivers maximum FPS, allowing gamers to see more clearly, aim faster, and move more quickly.
 With 2 kinds data transfer mode, GIGABYTE Bluetooth 4.0 and WiFi Card providing spec 150 Mbps transfer rates, 802.11n supports the latest WiFi specifications for better signal coverage, and featuring the newest Bluetooth 4.0, you will not suffer from signal loss like before.
 GIGABYTE X79 series motherboards feature GIGABYTE 333 Onboard Acceleration , a range of the latest technologies that are designed help speed up data transfer, including SuperSpeed USB 3.0 technology, SATA Revision 3.0 (6Gbps) technology and an unprecedented 3x USB power boost on all USB ports for more power hungry USB devices.


 * Due to certain mobile phone limitations, users may need to connect the mobile phone to their PC before the PC enters S4/S5 mode to enable a quick charge from non ON/OFF Charge USB ports.Charging results may vary by model.


Dolby Home Theater® places listeners in the middle of the action, giving their PCs a powerful set of tools to deliver a cinema-style experience in vivid surround sound.
- Delivers vivid surround sound for music, movies, and games, using two to eight speakers or any set of headphones
- Designed to automatically deliver the best possible listening experience
- The entire materials provided herein are for reference only. GIGABYTE reserves the right to modify or revise the content at anytime without prior notice.
- Advertised performance is based on maximum theoretical interface values from respective Chipset vendors or organization who defined the interface specification. Actual performance may vary by system configuration.
- All trademarks and logos are the properties of their respective holders.
- Due to standard PC architecture, a certain amount of memory is reserved for system usage and therefore the actual memory size is less than the stated amount.
Specifications
| CPU |
(Please refer “CPU Support List” for more information.) |
| Chipset |
|
| Memory |
(Please refer “Memory Support List” for more information.) |
| Audio |
|
| LAN |
|
| Expansion Slots |
|
| Multi-Graphics Technology |
|
| Storage Interface | Chipset:
3 x Marvell 88SE9172 chips:
|
| USB | Chipset:
2 x Fresco FL1009 chips:
|
| IEEE 1394 | VIA VT6308 chip:
|
| Internal I/O Connectors |
|
| Back Panel Connectors |
|
| I/O Controller |
|
| H/W Monitoring |
|
| BIOS |
|
| Unique Features |
|
| Bundle Software |
|
| Operating System |
|
| Form Factor |
|
| Remark |
|
Key Features
GIGABYTE Bluetooth 4.0 and Wi-Fi Adapter
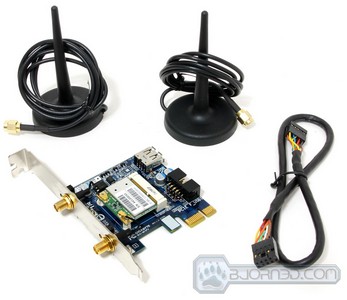
GIGABYTE’s new Bluetooth 4.0 and Wi-Fi Adapter makes it really easy for any user to get connected to a wireless network or to connect your personal cell/smart phone with your desktop PC. Finally for the first time, GIGABYTE provides the adapter with their motherboard, which makes it a perfect choice for people that do not want to have other Wireless or Bluetooth adapters in their PC. While sometimes having external USB Adapters is a good choice for any wireless adapter due to better reception, GIGABYTE’s wireless card comes with two antennas that can be positioned anywhere around your PC to get the best possible reception. On the down side however, by using this adapter, you will have to occupy one of the PCI-E x1 slots on your motherboard, which could be used by another card, or could prevent you from installing a 2nd or 3rd video card in the future. The wireless adapter is supports 802.11n with up to 150Mbps transfer speeds.
Software Overview
GIGABYTE 3D Power(patent pending) Utility
 |
Users can now enjoy a fully interactive 3D utility that facilitates adjustment of the 3 dimensions that control the power delivery to your CPU and Memory: Voltage, Phase and Frequency. These parameters are crucial to how the digital PWM supplies power to critical areas of the motherboard and can help users quickly obtain the highest, most stable overclock. |
 |
3D Power: Voltage ControlVoltage parameters can be modified within 3D Power, including load line calibration the of CPU. By adjusting load line calibration, Vdrooping can be avoided, maintaining optimal voltages levels despite increasing current levels. OVP (over voltage protection) can also be adjusted to change default protection range of the CPU, memory controller, VTT and system memory. |
 |
3D Power: Phase ControlUsers can calibrate OCP (Over Current Protection) for the CPU, integrated memory controller and system memory power levels. This allows the Phase control to deliver even more power to the system when needed. |
 |
3D Power: Frequency ControlGIGABYTE’s digital PWM allows for adjustable frequency control via the International Rectifier (IR3567) PWM controller. 3D Power frequency control allows users to change the PWM controller frequency so that the CPU VRM can adjust power delivery speeds more quickly. Users can also adjust the PWM spectrum or maximum and minimum overall frequencies. |
 Dynamic Energy Saver™ 2
GIGABYTE Dynamic Energy Saver™ 2 incorporates a host of intelligent features that use a proprietary hardware and software design to considerably enhance PC system energy efficiency, Reduce power consumption and deliver optimized auto-phase-switching for the CPU, Memory, Chipset, VGA, HDD, and fans with a simple click of button.
|
||||||||||||
 Cloud OC
GIGABYTE Cloud OC is a free overclocking application that facilitates PC overclocking through any web browsing capable device such as a smart phone, iPad, iPhone, Netbooks or notebook PC. Being browser based it connects via wireless Internet, Bluetooth or through an Ethernet cable and its many functions are categorized into three tabs: Tuner, System Info and Control…more
|
||||||||||||
 Hotkey OC
GIGABYTE Hotkey OC allows users to create and save various profiles that can be adopted for different benchmarks. Hotkey OC then allows users to jump between these profiles on the fly so that the best profile for each segment within the benchmark can be used to optimize scores and boost overall performance. So, for example, when running 3DMark 06 the 1st profile might be optimized for graphics and can be used for the first two graphics tests, then the next two tests can utilize the 2nd profile which might be optimized for CPU tests, and one could jump back to the 1st profile again for the final two graphics (shader) tests…more
|
||||||||||||
|
Smart 6- A Smarter way for PC system
Management
GIGABYTE Smart 6™ is designed with user-friendliness in mind, and offers a combination of 6 innovative software utilities that provide easier and smarter PC system management. Smart 6™ allows you to speed up system performance, reduce boot-up time, manage a secure platform and recover previous system settings easily with a click of the mouse button.
|
||||||||||||
 AutoGreen- Greening your PC via Bluetooth cellphone
AutoGreen technology can automatically save power for you simply by your bluetooth cell phone when you are away from your computer.Note: GIGABYTE motherboards do not include a Bluetooth® receiver; the addition of a 3rd party Bluetooth receiver is required.
|
||||||||||||
 TouchBIOSTouchBIOS is a Windows based application that gives full control over the BIOS in real-time for the users that might not be used to the Traditional text based BIOS. This utility will allow users that just want to make quick changes to the BIOS with a graphical user interface right through Windows. TouchBIOS provides users with overclocking and boot options, while also having some nice tools like the Smart QuickBoost Utility, @BIOS Utility for updating the BIOS to the latest version, Integrated Hardware Menu, Power Management, Load BIOS Defaults, PC Status, and BIOS Password Locking.GIGABYTE Touch BIOS™fully supports any ‘Touch Screen’ monitor, which allows users to tweak their PC BIOS with the touch of a finger TouchBIOSTouchBIOS is a Windows based application that gives full control over the BIOS in real-time for the users that might not be used to the Traditional text based BIOS. This utility will allow users that just want to make quick changes to the BIOS with a graphical user interface right through Windows. TouchBIOS provides users with overclocking and boot options, while also having some nice tools like the Smart QuickBoost Utility, @BIOS Utility for updating the BIOS to the latest version, Integrated Hardware Menu, Power Management, Load BIOS Defaults, PC Status, and BIOS Password Locking.GIGABYTE Touch BIOS™fully supports any ‘Touch Screen’ monitor, which allows users to tweak their PC BIOS with the touch of a finger |
||||||||||||
 EasyTune6
GIGABYTE has completely redesigned EasyTune6 from the ground up to make it easier than ever to manage and monitor your hardware resources as well as tweak your system settings in order to achieve maximum system performance. Whether you are an overclocking enthusiast, or a computer novice, EasyTune6 provides the tools you need to quickly and effortlessly fine tune your system.
|


Overview of the X79-UD5


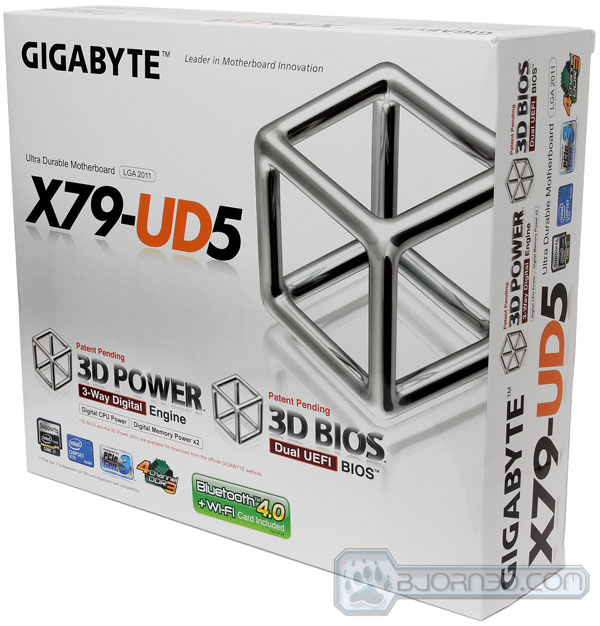
Right off the bat, we can see that GIGABYTE is using a completely different box design on their X79 chipset motherboards. The black and white color scheme works quite nicely and makes the product look quite elegant already. The box cover on the other hand is quite busy about the motherboard’s new features. The front shows off the 3D Power (3-way Digital Engine) motherboard design, the 3D BIOS Dual UEFI BIOS and of course the Bluetooth 4.0 + Wi-Fi Adapter card. The back of the box shows off the motherboard, and it’s key design aspects.


Taking the main box out of the cover reveals another white box, which of course holds the motherboard in an anti-static bag and all the other accessories right under the motherboard. For the X79 motherboards, GIGABYTE is going with a much sturdier box compared to some of the other boxes we’ve seen from other vendors. The sturdier design of the box helps keep the motherboard safe during shipment.


GIGABYTE in the last year dramatically dropped the amount of accessories they include with their motherboards. However, with the X79-UD5, the user will get a nice Bluetooth 4.0 + Wi-Fi Adapter, as well as an additional USB 3.0 front panel 3.5 adapter which can allow the user to use up to two more USB 3.0 devices besides the 2 other USB 3.0 external ports on the back of the motherboard. The fact that a few additional goodies are included in the box kind of makes up for the fact that other accessories were taken away. But back to the Wireless Adapter, it comes with two Antennas and a cable which needs to be connected with the Adapter and the motherboard. There are three Multi-GPU bridges: one 2-way SLI bridge, one 3-way SLI bridge, and one 2-way CrossFireX bridge. Finally, 4 SATA connectors are included, however if more than 4 storage devices are used, the user will have to buy additional SATA connectors.


Finally, there are a few additional parts included along with the X79-UD5. The most important from them is the I/O shield plate which gets installed at the rear end of the chassis. This is also a Users Manual, a Quick Installation guide and a Bluetooth + Wi-Fi installation guide provided with the driver CDs and some stickers for your system.


And here is our first look at the GIGABYTE X79-UD5. it’s full black color scheme with a few splashes of blue and white looks excellent. I’m a fan of black and blue, but besides that a black PCB can easily make any hardware look fantastic. It might be hard to see but due to the amount of surface-mounted parts on the UD5, GIGABYTE had to extend the board width wise. Usually on a Standard ATX motherboard, the far right mounting holes are exactly at the edges of the motherboard. This time we can see that there is an additional 0.5-1 inch of the board added. This is good to know for those using smaller chassis, that might not fit slightly larger than standard ATX motherboards. If size is not an issue, the advantages of the slightly bigger motherboard can go long ways. Additional memory slots allow this motherboard to utilize up to 64GB of DDR3 2400MHz memory. That’s 8 DIMMs on a single Standard ATX motherboard which also has a much larger LGA 2011 CPU socket.
A Closer Look at the X79-UD5

Click Image For a Larger One
The X79-UD5 comes with two interesting buttons on the rear of the motherboard. These buttons can be quite useful for not just overclockers but also for the average Joe. The top button is an overclocking button mainly there for the average user, who does not necessarily want to mess around with the BIOS and changing numbers that he might not be sure about. This button will overclock the system to reasonable clock speeds with just a click of a button. The button right under the O.C. button is a Switch BIOS button. This allows the user to switch between the original and the backup BIOS in case the system fails to boot, or in case the user wants to switch between different BIOS settings without having to reload new settings or going into the BIOS to set the settings.
Due to the coloring scheme on the I/O connectors, it can be confusing to understand what the UD5 actually offers as far as I/O connectors go. There are only two USB 3.0 connectors available at the back, but up to 7 additional USB 2.0 ports for other non-USB 3.0 devices are also available.
A PS/2 Keyboard and Mouse connector is also available for those that still use PS/2 ports. A single Firewire IEEE1394a port is a nice addition to the UD5, since most of the current motherboards don’t have Firewire ports anymore. Finally there is one optical output, 5 mini-stereo jacks, and 2 eSATA ports.

When we check the other side of the motherboard, we see 10 SATA connectors. The Black and White SATA connectors are controlled by the X79 chipset, where the white connectors denote SATA III / 6Gbps capability. The other four black SATA connectors are standard SATA II / 3Gbps connectors. Further to the left, the four Gray SATA connectors are controlled by the Marvell 9172 controller. These Gray SATA III connectors are also capable of 6Gbps throughput, however these will not support any other RAID configuration besides RAID 0 and RAID 1. The X79 chipset supports other RAID configuration: RAID 0/1/5/10.
The USB 3.0 front panel 3.5″ adapter we looked at on the previous page also has its main connector right in between the White SATA III ports and the 24-pin motherboard power connector.


A closer look at the LGA 2011 socket lets us see how close all the surface-mounted components had to be mounted on the X79-UD5. We’ll have a closer look at the digital VRM further down this page, but first lets address the disadvantages of a board such as the X79-UD5. Having a CPU socket really close to the memory modules and other slots like the top PCI-Express x16 slot can be dangerous. In most cases a user will not run into any problems as long as they do their research before buying their next aftermarket air cooler. One thing to worry about is the memory slots. If the cooler is too wide and too low, it could be obstructing the memory slots. The Noctua NH-D14 CPU cooler that we used is one of the largest CPU coolers available on the market, and we did not have any major problems during installation. If the NH-D14 is mounted horizontally, that will prevent the user from accessing the memory modules in the future, however if the cooler is mounted vertically, the user will most likely have to remove the bottom fan and mount that fan on the other side of the cooler instead. Either way, the best option on a X79 board would be to use a all-in-one water cooling solution like the Corsair H100 to cool the CPU.


Lets take a look at the main areas of the motherboard. There are six expansion slots available on the X79-UD5. Starting from the top, we can see three long expansion slots. These are the three PCIe 2.0 x16 slots. Lets not confuse this by having three actual x16 PCIe slots. The top and the middle PCIe 2.0 slots are x16 while the bottom slot is only PCie 2.0 x8 slot. All PCIe x16 slots on the other hand conform to PCI Express 3.0 standards. The motherboard comes equipped with PCIe 3.0 switches, which means that if current Socket LGA 2011 CPUs would support PCIe 3.0 standards, then the latest video cards could take advantage of the extra throughput available on the new PCIe 3.0 standard. It is still questionable though whether PCIe 3.0 standards are really necessary even though the latest video cards coming with the PCIe 3.0 standard still do not utilize the full potential of PCIe 2.0. On the bright side, having PCIe 3.0 support on a motherboard only means that when future CPUs are launched with PCIe 3.0 support, a potential BIOS update would be the only thing keeping the motherboard from using the new interface. Between the three PCI-Express x16 slots, we can see two PCIe x1 slots, and finally a standard old school PCI slot at the end.
On the bottom of the motherboard, there are several connectors for additional external connectors. Starting from the left, we can see a front panel audio connector, a Firewire IEEE1394 connector, a TPM connector, three USB 2.0 connectors, and the standard front panel Power/Reset button connectors which also include the LED connectors for the hard drive and power LED. On the right bottom side of the motherboard, there is a small blue reset button, which is mainly used by overclockers that have their system set up on a testbench. It’s interesting to see that the power button for the motherboard is actually located on the other side of the motherboard at the top right corner. Besides that though, there are two 3-pin fan headers at the bottom: one right next to the IEEE1394 connector and the other right next to the Reset switch.


Since we are already talking about fan headers, there are two additional fan headers along the right side of the motherboard: one located right next to the 24-pin power connector, and one 4-pin PWM fan header right above and between the CPU socket and the right side memory slots.
Getting back to the CPU VRM design that GIGABYTE implemented on the X79-UD5 is somewhat questionable. It is definitely a reliable solution, however it has its limitations if the chassis the UD5 is in is not well ventilated. A poor airflow in the case could lead the VRM overheating, making the system down throttle itself in performance just to prevent any damage to the VRM. While software like LinX are known to push hardware past their designed levels, we saw the board down throttling from our overclocked settings to stock settings in order to prevent overheating even in a well ventilated system. There is not much that GIGABYTE could be blamed for in this instance, as this is their first Digital VRM design they have done, while other companies like ASUS are already on their 7th generation Digital VRM design. While we are not the engineers of the motherboards, a possible solution could be to have two separate VRMs appart from each other. Each set would be used separately, and when one gets too hot it switches over to the other set. This way it could switch between two sets instead of just one VRM taking all the load all the time.
But getting right down to the details, the X79-UD5 features the standard hi/low VRM design with a total of 14 phases for the CPU itself. 10 phases are dedicated to the CPU cores, supported by five dual-channel input drivers on the back of the motherboard. The other 4 phases are used for the System Agent and VTT domains, each supported by two dual-channel input drivers that are hidden right under the VRM heatsink behind the 8-pin CPU connector. Right above and bellow the VRM heatsink on the front side of the UD5, the input drivers are balanced with several capacitors. The memory slots also have a very similar VRM design.


Moving on to the side of the UD5, there are lots of other chips and components squished together to provide all the features that the UD5 is capable of. One thing to notice here though is the 4-Pin PWM fan header which is located right at the top far left corner of the motherboard.


Lets take a closer look at the expansion slot design of the X79-UD5, and how it might be somewhat of a poor design in certain instances. In our instance we have a dedicated Audio card, the ASUS Xonar Xense, which uses a PCIe x1 expansion slot. This card can be installed in a standard PCIe x16 slot too. The GIGABYTE Bluetooth 4.0 + Wi-Fi adapter also uses the PCIe x1 expansion slot connector, which means that if you install the Wireless card, you will loose at least one valuable PCIe x16 slot which could be used for a 3-way SLI setup. By having bot the audio card and the Wireless adapter installed, it becomes clear that you can only use a single video card in the system unless the cards are repositioned to the other PCIe x16 slots. In that case, it would be possible to run a 2-way SLI system, but still not 3-Way SLI. The best possible fix would be to have the PCIe x1 slot above the first PCIe x16 slot, and that way you if the user only uses either a Dedicated Audio card or the Wireless adapter, they can still run a 3-way SLI system.
BIOS Overview


Click Image To Enlarge
One thing that just had to be mentioned here is that the BIOS feel sluggish in this GUI. The mouse feels jumpy in a sense or like it has a lag or delay like a newer game playing on an older underpowered computer. Also another bone we have to pick with the Gigabyte Firmware would be the complete lack of descriptions on specific settings as this will make overclocking very difficult since anyone not deeply familiar with what a setting does can find themselves stuck well short of the boards or chips potential as the user just may not understand what to set or how to get their system to the next level.


Click Image To Enlarge
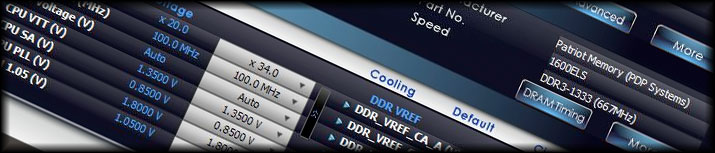
Here we see some of the menus mentioned previously and while there are many useful features with a wide range of adjustability there is no explanation of what the setting does or what it may help with by increasing the setting. Most people will not have an issue but anyone who just wants to have some fun and wants to try a little tuning could easily find themselves lost or drowning in the amount of settings and what adjusting them will do or if it will help with what they are trying to do. There is a “Auto” setting which works surprisingly well for being just a set it and forget it tuning option however as we increase our overclock level it quickly becomes necessary to venture into the settings on our own. Here we see the Voltage settings which as we mentioned before are quite capable still could use some hints or pointers on how they work or what they help with, to help new users be able to do tweaking of their own on their own.


Click Image To Enlarge
Next up we have the current settings and this helps us set the limits of the currents for the power circuits and this could help quite a lot as when overclocking in some situations the current being fed to the important bits can easily exceed theoretical maximums that were setup at stock. Next up is the thermal protection settings which allows for adjustment of the preset thermal protections which can be used to adjust the thermal protections to allow for more headroom when pushing the limits. Next we see the First part of the frequency configurations which can be used to adjust Multiplier, BCLK frequency, BCLK ratio and memory Profile or frequency as well.


Click Image To Enlarge
The next option we have is the memory timing options which also use slider bars and this seems odd to us as it could be much easier by just having a text entry box so that we could adjust the settings much easier. This method works but could be more efficient. The voltage settings for this section is simple but once again there is not description as to what the specific setting does or how it will help or hinder an overclocking situation. Now we see the BIOS setting menu which allows general BIOS configuration such as Virtualization tech controls and boot logo configuration as well.


Click Image To Enlarge
Here we see the fan speed options and controls allowing fine tuning and adjustment of the cooling and acoustic properties of the platform once setup and running. Next up is the IO settings which consists of rear panel IO settings which allows configuration of the IO connector functionality on the Rear IO panel. This includes everything from USB ports to eSATA, LAN, Audio and Firewire ports.

Click Image To Enlarge
First up in this set we see the PCIe slot configuration which is very basic allowing configuration of Rom Priority and Primary display slot initialization.


Click Image To Enlarge
Here we get to the real BIOS were used to in its list mode which gives us a little clearer picture of what we are dealing with on this board. While the GUI interface with the board image was nice this layout is definitely more user friendly and easy to work with via keyboard input since the mouse input is laggy and makes for a somewhat frustrating and disconnected feel. Similar to Gigabyte BIOS we have seen before the overclock settings are found in the MIT pages and are quite well laid out with a MIT current status screen which shows a breakdown of components installed and their settings. Anyone Familiar with the MIT pages of days past will find the MIT in the UEFI the same just not Blue and white like previous gen boards. this list mode does also include small descriptions of settings while they are not great they are better than no information at all. Memory settings are much easier to configure via this mode as well


Click Image To Enlarge
Here we have the Voltage settings/configurations. these settings are extensive but once again we are bitten by the lack of descriptors to help new users with settings and how they should be used or at least a general direction on what the setting affects and how to control them. There are 4 power control sections within the MIT page, and each is pointed at specific areas.
First up is the 3D power control settings which is the main area for many of the key settings for Vcore and all vital voltages that will be used in the overclocking and tuning of the board. The CPU core Voltage Control settings are exactly that which allows CPU centric voltages to be fine tuned within the menu, while this menu may seem barren it needs to be kept in mind that many settings are already in the 3D power settings menu. The Dram settings menu is actually surprisingly in depth with a decent amount of voltage settings but some settings without prior knowledge of the terminology or lingo could once again be problematic to newcomers.


Click Image To Enlarge
The PC Health status screen is the last screen in our MIT settings menu and it allows monitoring of pretty much every key temperature and voltage to ensure the board vitals are well within spec and always in check to help with diagnosis if issues were to ever show their head.


Click Image To Enlarge
Lastly we have the other settings which are just the standard board options used for configuring board options and component settings to ensure the board acts how we want when we want. This is all very standard so we have imaged them but going into detail on them wouldn’t really be necessary.
OVERCLOCKING
With X58, (socket LGA1366) overclocking a Core i7 9xx Nehalem/Gulftown processor was an art in itself. Enthusiasts had lots of options to play around with making the system extremely tweakable when it came to overclocking. This included messing with BCLK, Multipliers, Memory Bandwidth, Timings, Main voltages and other system related voltages, and much more. The release of P67 (socket LGA1155) revolutionized overclocking. Instead of mainly relying on BCLK tweaking, which allowed for memory performance changes, the users were now mostly limited to just manipulating with the CPU Multiplier. This is nice for those that want to easily overclock their system with minimal tweaks, but it left the hardcore overclockers asking for more.
The X79 chipset seems to be somewhat a combination of the two platforms when it comes to overclocking. Since the new Sandy Bridge-E chips have the same architecture as previous Sandy Bridge CPU’s, overclockers still need to rely on multiplier-based overclocking. However, Intel has introduced a 2nd intermediate reference clock ratio multiplier, called the coarse ratio multiplier, that can play a big role during overclocking on the LGA2011 socket systems. The multiplier allows the user to raise the base clock frequency of the processor and its memory controller frequency, while leaving the I/O part of the architecture untouched.
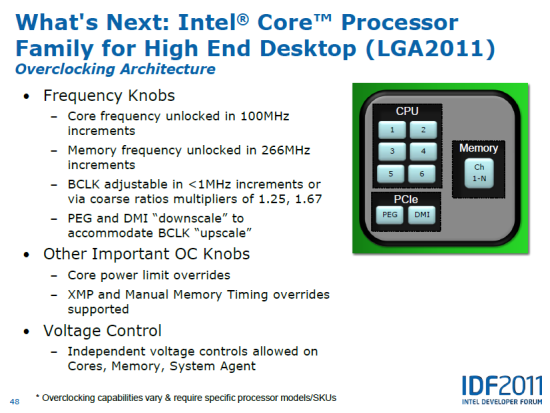
Overclockers are still stuck to the roughly 5% BCLK difference as on previous LGA1155 Sandy Bridge platforms, due to the PEG and DMI frequencies still being tied to the base clock frequency, however with the new coarse ratio multiplier, overclockers can apply 1.00x, 1.25x, or 1.67x multipliers to the other CPU Frequency determining settings for additional tweaking. This new multiplier is actually not located on the CPU at all. It is located right on the chipset, as the chipset is responsible for its operation.
So how does this all work? Here is a quick calculation:
Traditional Clockspeed Equivalency
[CPU Multiplier] x [Reference Clock] = [CPU Frequency]
ex1: [34x] x [100MHz] = [3400MHz]
ex2: [48x] x [100MHz] = [4800MHz]
Sandy Bridge-E Clockspeed Equivalency
[CPU Multiplier] x [Reference Clock Ratio] x [Reference Clock] = [CPU Frequency]
ex1: [33x] x [1.00x] x [100MHz] = [3300MHz]
ex2: [32x] x [1.25x] x [100MHz] = [4000MHz]
ex3: [24x] x [1.67x] x [100MHz] = [4008MHz]
Therefore, there is a lot of tweaking that can be done. Overclockers can manipulate with all three parts which will determine the overall CPU Frequency. The overclocking for memory modules will stay the same as on LGA1155. With a 266MHz increment the user will be able to set the speed on memory from DDR3-1067 all the way up to DDR3-2400. Do remember that the 3960X uses a memory controller which supports DDR3 1666MHz. Previous processors only supported up to DDR3 1067/1333MHz.

(Power Saving with Overclock)
The above picture shows how nicely the 3960X can downthrottle to 1200MHz when it is idle, even when the system is overclocked. Our power consumption graph will show the overall power consumption of the processor when the processor is idle and at 100% load.

(24/7 Safe 4.6GHz Overclock with Noctua NH-D14 CPU Air Cooler)
To put the motherboard to test, we have loaded up all DIMM slots with 4GB memory modules in each slot running at 1600MHz. This is a very unlikely scenario as most users will only use 4 memory modules which is not as stressful on the CPU’s IMC as 8 memory modules. Even at these settings we reached 5GHz, but with air cooling, we were not able to achieve a stable overclock. It is not recommended running the CPU at these voltages and especially not on Air, which is why our 24/7 overclocked system is running at 4.6GHz.
Do note that for some reason, the GIGABYTE X79-UD5 needed about slightly higher voltages then what we were used to on previous boards like that ASUS P9X79 Pro motherboard.
TEMPERATURE

The temperatures were recorded with Realtemp while running Wprime 1024 right before the end of the 5th run. The results were recorded carefully. After the results were recorded, we waited for 30 minutes before taking Idle temperature measurements. The results were as follows:
| CPU Temperatures | Temperature (Idle/Load) |
| GIGABYTE X79-UD5 OC (4.6GHz) | 33C/73C |
| GIGABYTE X79-UD5 | 30C/58C |
| Chipset Temperatures | Temperature (Idle/Load) |
| GIGABYTE X79-UD5 (4.6GHz) | 35C/53C |
| GIGABYTE X79-UD5 | 33C/45C |
The temperatures achived with the overclocking are not too bad, however they could be better. We’ve seen slightly lower numbers on competition boards like the ASUS P9X79 Pro motherboard. Other applications might produce higher temperatures, which is important to keep in mind when looking at these numbers. Though if the system is not at full load for long periods of time, higher overclocks should not be a problem even with air coolers, like our Noctua NH-D14 CPU cooler.
POWER CONSUMPTION

The power consumption was tested while running Wprime 1024 for a few minutes at stock settings. The results were recorded carefully with a Kill-A-Watt power consumption measuring tool at the wall. After the results were recorded, we waited for yet another few minutes minutes before taking Idle power consumption measurements.
| Configuration | Power Consumption (Idle/Load) |
| GIGABYTE X79-UD5 OC (4.6GHz) | 146W/423W |
| GIGABYTE X79-UD5 | 142W/293W |
The following tests were not done with GPU load. The GPUs were idle throughout our testing. The power consumption of the complete system is mainly dependent on the CPU, and we can see a big increase in power requirement at overclocked settings.
Testing & Methodology
We’ve expanded our testing suite considerably for the X79 chipset, and will continue to use the same methods for most of the motherboards and CPU’s we test. In the interests of thoroughness and accurate results, we run each test at least three times, and some tests more than that. We average the total of all the tests from each benchmark then report the average here. If we had any ambiguous results we left those out and ran the benchmark once again.
The OS we use is Windows 7 Pro 64bit with all patches and updates applied. We also use the latest drivers available for the motherboard and any devices attached to the computer. We do not disable background tasks or tweak the OS or system in any way. We turn off drive indexing and daily defragging. We also turn off Prefetch and Superfetch. This is not an attempt to produce bigger benchmark numbers. Drive indexing and defragging can interfere with testing and produce confusing numbers. If a test were to be run while a drive was being indexed or defragged, and then the same test was later run when these processes were off, the two results would be contradictory and erroneous. As we cannot control when defragging and indexing occur precisely enough to guarantee that they won’t interfere with testing, we opt to disable the features entirely.
Prefetch tries to predict what users will load the next time they boot the machine by caching the relevant files and storing them for later use. We want to learn how the program runs without any of the files being cached, and we disable it so that each test run we do not have to clear pre-fetch to get accurate numbers. Lastly we disable Superfetch. Superfetch loads often-used programs into the memory. It is one of the reasons that Windows occupies so much memory. Vista fills the memory in an attempt to predict what users will load. Having one test run with files cached, and another test run with the files un-cached would result in inaccurate numbers. Again, since we can’t control its timings so precisely, it we turn it off. Because these four features can potentially interfere with benchmarking, and and are out of our control, we disable them. We do not disable anything else.
Test Rig
| Test Rig | |
| Case | Cooler Master Storm Trooper |
| CPUs | Intel Core i7 3960X (Sandy Bridge-E) |
| Motherboards | Intel DX79SI (Siler) X79 Chipset Motherboard |
ASUS P9X79 Pro X79 Chipset Motherboard
ASUS Rampage IV Extreme X79 Chipset Motherboard
GIGABYTE X79-UD5 X79 Chipset Motherboard
MSI X79A-GD65 (8D) X79 Chipset MotherboardRamKingston HyperX Genesis 16GB (4x4GB) 1600Mhz 9-9-9-24 Quad-Channel KitCPU CoolerNoctua NH-D14 Air CoolerHard Drives2x Western Digital RE3 1TB 7200RPM 3Gb/s Hard DrivesSSD1x Kingston HyperX 240GB SATA III 6Gb/s SSDOpticalASUS DVD-BurnerGPU2x Nvidia GeForce GTX580 Video Cards in 2-way SLIPSUCooler Master Silent Pro Gold 1200W PSUMouseRazer Imperator Battlefield 3 EditionKeyboardRazer Blackwidow Ultimate Battlefield 3 Edition
Test Suite
| Benchmarks |
|---|
| SuperPi Mod 1.5 |
| Wprime 1.55 |
| PCMark 7 |
| 3DMark 11 |
| 3DMark Vantage |
| Cinebench R10 |
| Cinebench R11.5 |
| SiSoft Sandra 2011b |
| HD Tune Pro |
| X264HD |
| Truecrypt 7.1 |
| Unigine Heaven 2.5 |
| Metro 2033 |
| Lost Planet 2 |
PCmark 7

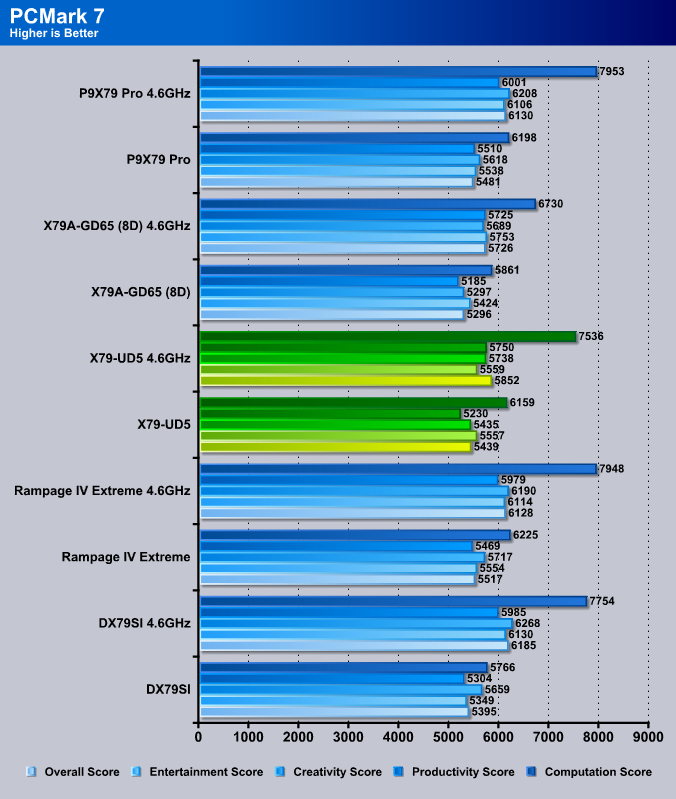
We are not quite sure why the P9X79 Pro and the X79A-GD65 (8D) performed poorly on the Computation benchmark, but at least the GIGABYTE X79-UD5 did not fall into the same category. It still is slightly slower than the other motherboards, but not as bad as the P9X79 Pro and the X79A-GD65 (8D).
3DMark 11
![]()
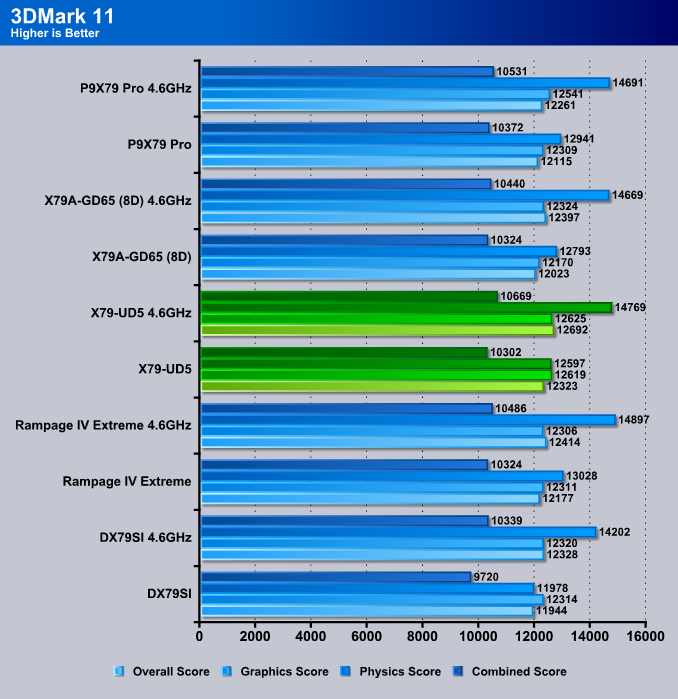
3DMark 11 is Futuremark’s latest Gaming benchmarks. 3DMark 11 helps us compare overall system performance mainly when it comes to gaming performance. The higher scores, the better, and in this situation the X79-UD5 did quite well in certain tests, but on average it did just about as good as the other motherboards that were also put against the UD5.
3DMark Vantage
![]()
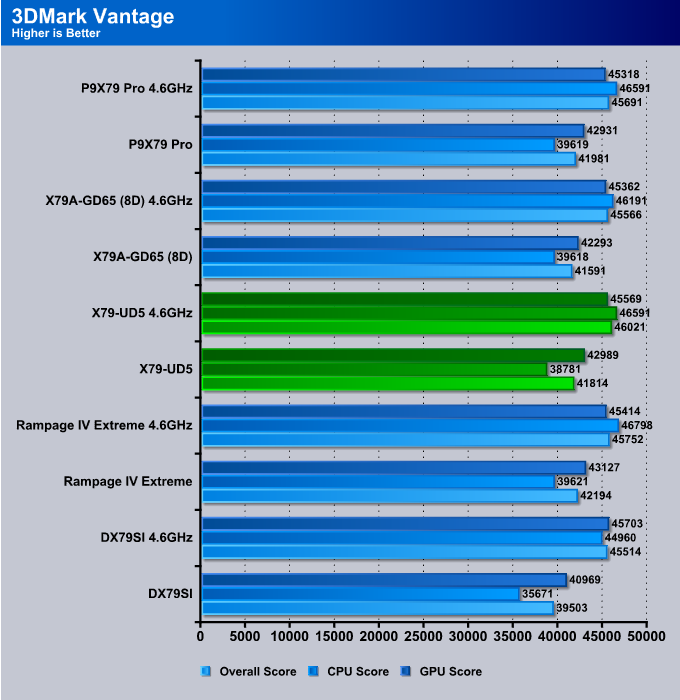
3DMark Vantage is the older version of Futuremarks gaming benchmark. According to the results, the UD5 performed the best in DX10 games compared to the other motherboards, scoring P46021.
SuperPi

SuperPi is a single-threaded benchmark, measuring the performance of the CPU and memory. Here the GIGABYTE X79-UD5 performed quite poorly compared to the other motherboards, but lets check out the next benchmark to see how the UD5 did in a multi-threaded environment.
Wprime
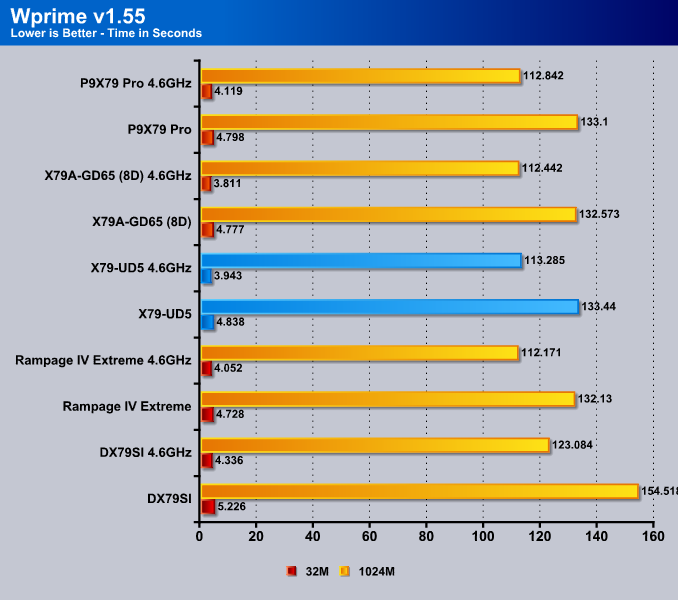
Once again, the GIGABYTE X79-UD5 fell slightly behind the other motherboards, except for the Intel DX79SI, which finished about 21 seconds later than the GIGABYTE X79-UD5 in the same test.
Cinebench R10 and R11.5

“CINEBENCH is a real-world test suite that assesses your computer’s performance capabilities. MAXON CINEBENCH is based on MAXON’s award-winning animation software, CINEMA 4D, which is used extensively by studios and production houses worldwide for 3D content creation. MAXON software has been used in blockbuster movies such as Spider-Man, Star Wars, The Chronicles of Narnia and many more. MAXON CINEBENCH runs several tests on your computer to measure the performance of the main processor and the graphics card under real world circumstances. The benchmark application makes use of up to 16 CPUs or CPU cores and is available for Windows (32-bit and 64-Bit) and Macintosh (PPC and Intel-based). The resulting values among different operating systems are 100% comparable and therefore very useful with regard to purchasing decision-making. It can also be used as a marketing tool for hardware vendors or simply to compare hardware among colleagues or friends.”
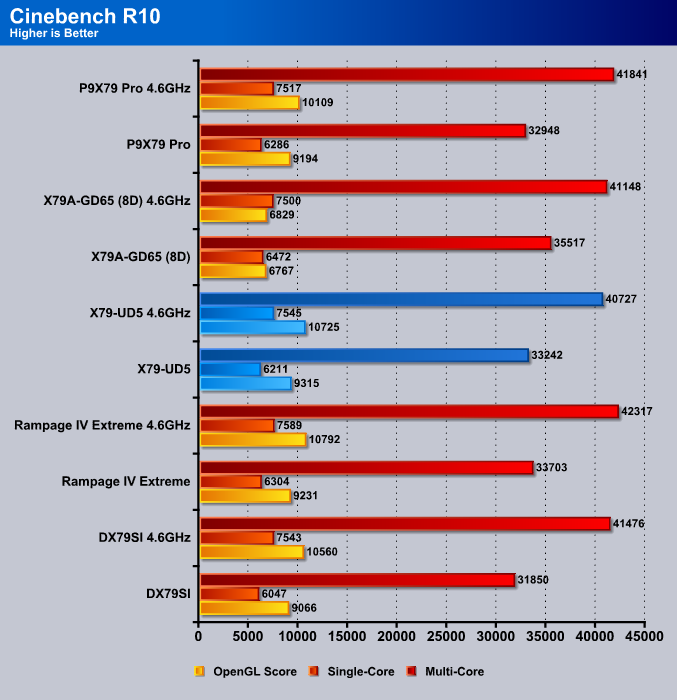
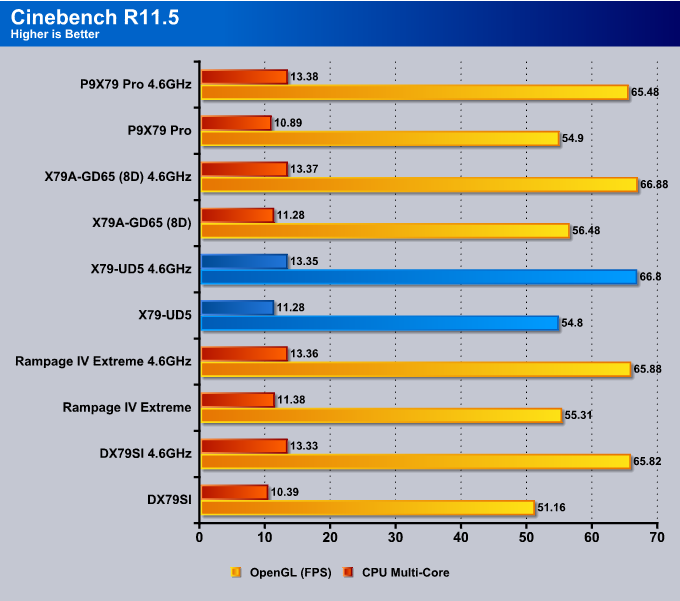
Cinebench R10 seems to follow the same results that we’ve gotten in SuperPi and WPrime, however in Cinebench R11.5, the X79-UD5 takes the lead in the overclocked results, with the exception of the X79A-GD65 (8D) motherboard from MSI.
SiSoft Sandra 2011b

“SiSoftware Sandra (the System Analyzer, Diagnostic and Reporting Assistant) is an information & diagnostic utility. It should provide most of the information (including undocumented) you need to know about your hardware, software and other devices whether hardware or software. It works along the lines of other Windows utilities, however it tries to go beyond them and show you more of what’s really going on. Giving the user the ability to draw comparisons at both a high and low-level. You can get information about the CPU, chipset, video adapter, ports, printers, sound card, memory, network, Windows internals, AGP, PCI, PCI-X, PCIe (PCI Express), database, USB, USB2, 1394/Firewire, etc.”
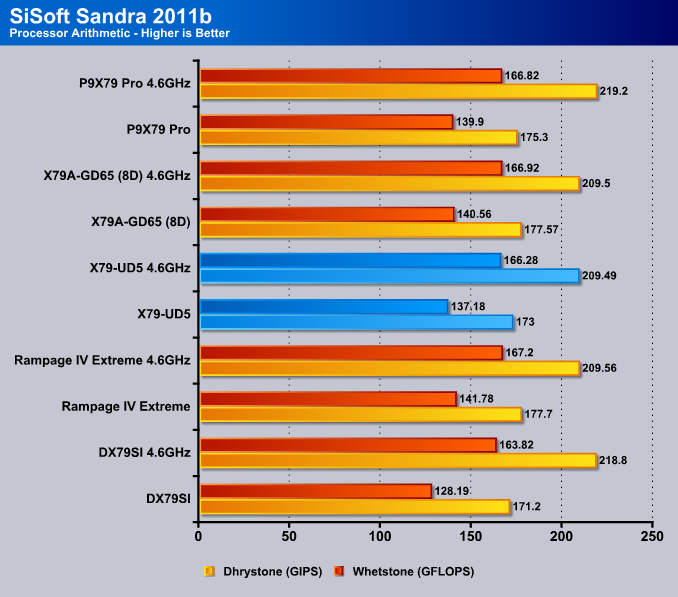
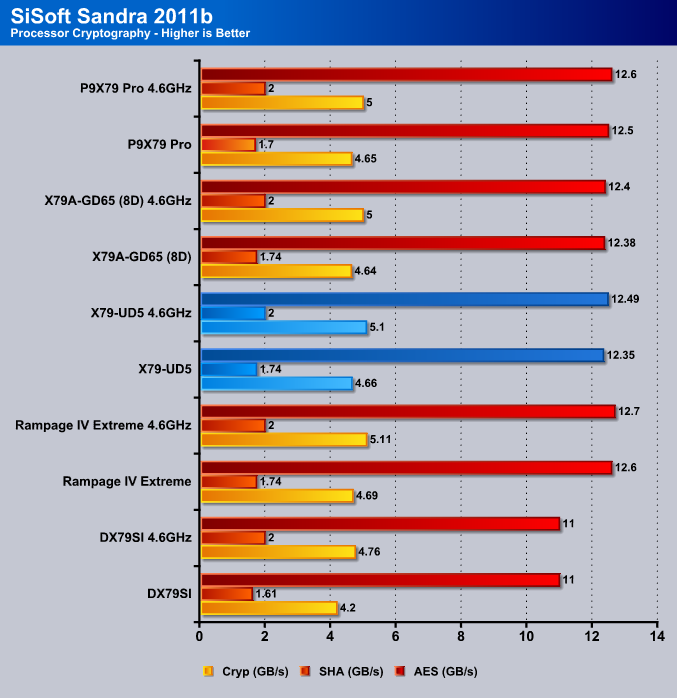
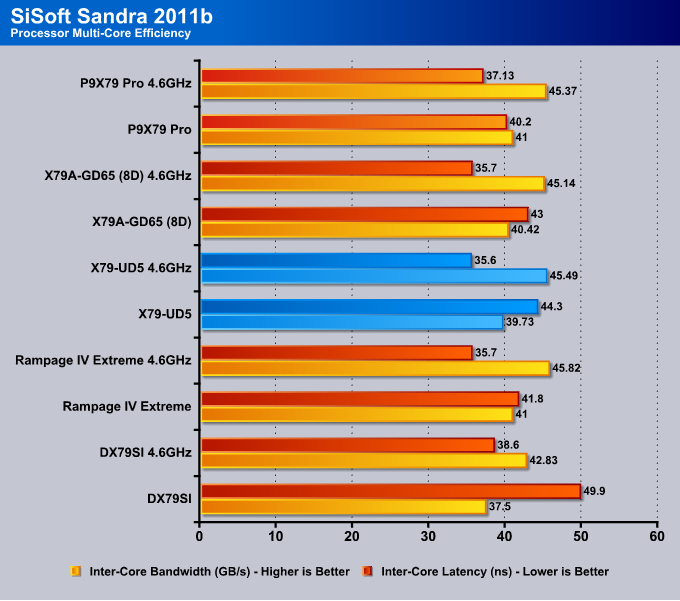
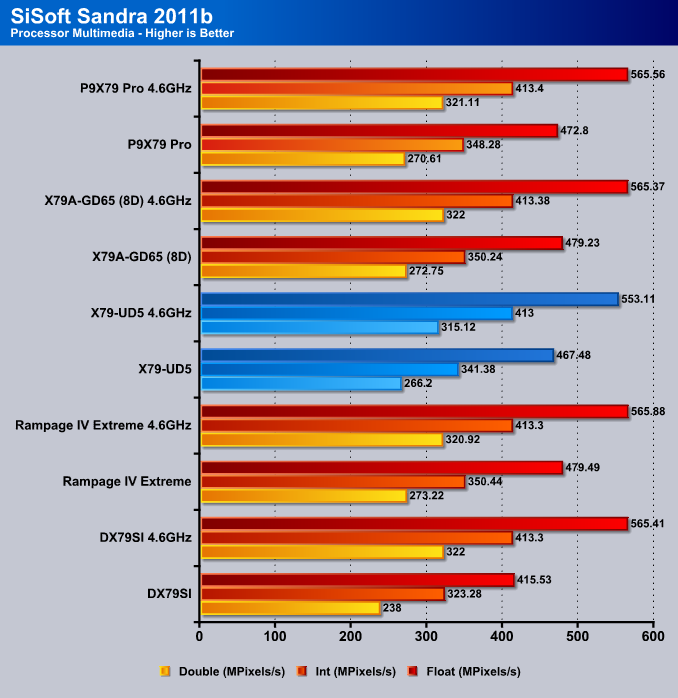

Not much to say about the performance of each board on the following benchmarks. Each motherboard is so close to each other in relative performance, the user will most likely not see a difference between the motherboards in an average everyday use.
HD Tune Pro

We always get questions about storage performance and which storage drives to get when upgrading a system. Some people don’t realize that having an older system can drastically lower the performance of recent SATA III SSDs and other storage devices. With the X79 chipset, this should not be the case, and we can also see that the GIGABYTE X79-UD5 perform just as well as the ASUS P9X79 Pro and the Intel DX79SI motherboard.
X264HD


We see a slight dip in video conversion compared to the other motherboards, though in situations where complete video projects are being rendered from a video editing software, it is likely that motherboards like the X79-UD5 will perform better over other motherboards that only use 4 DIMMs, because of the memory capacity available for the software to use.
Truecrypt 7.1

TrueCrypt is our Encryption benchmark tool, however it’s also a encryption software for your files. The GIGABYTe X79-UD7 fell just right below the ASUS Rampage IV Extreme motherboard, but comparing prices between the two motherboards shows brings us to a clear conclusion. It’s most likely not worth spending the extra money on a board like the Rampage IV Extreme if the main purpose of the system will not be Gaming. While this is an encryption benchmark, since it fell slightly below the Rampage, it is still only a marginal difference, and performance difference should barely be noticeable even in long encryption processes.
Unigine Heaven 2.5

Unigine Heaven is a benchmark program based on Unigine Corp’s latest engine, Unigine. The engine features DirectX 11, Hardware tessellation, DirectCompute, and Shader Model 5.0. All of these new technologies combined with the ability to run each card through the same exact test means this benchmark should be in our arsenal for a long time.
Unigine Heaven is one of our favorite benchmark tools when it comes to graphics performance. We can see that the GIGAYTE X79-UD5 takes 1st place in this benchmark. This could be because of the optimal PCI-Express configuration on the board which is a direct-to-CPU slot connectivity design.
Metro 2033
![]()
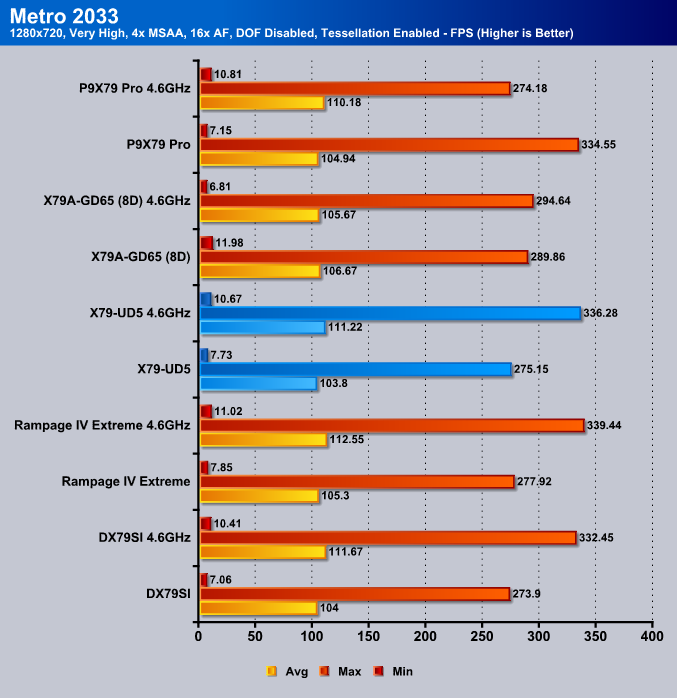
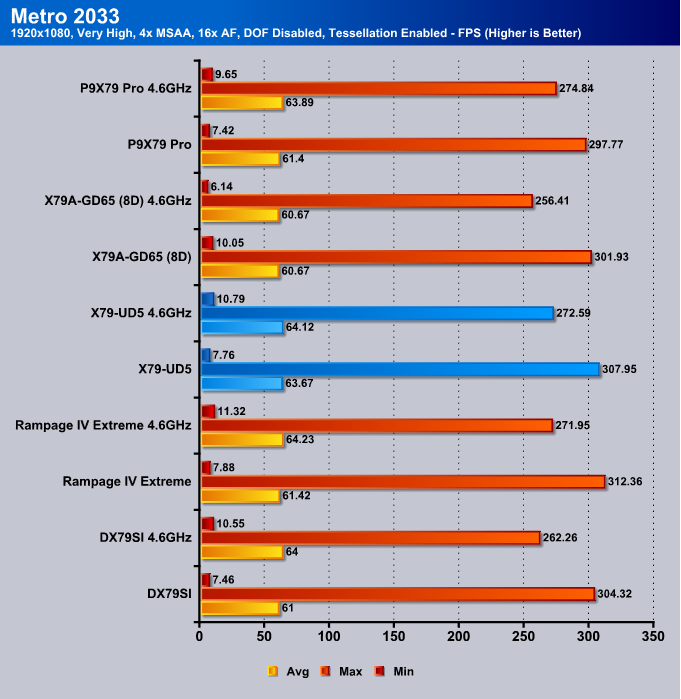
In Metro 2033, the Rampage IV Extreme takes the lead, but the GIGABYTE X79-UD5 comes in second in the average FPS performance.
Lost Planet 2

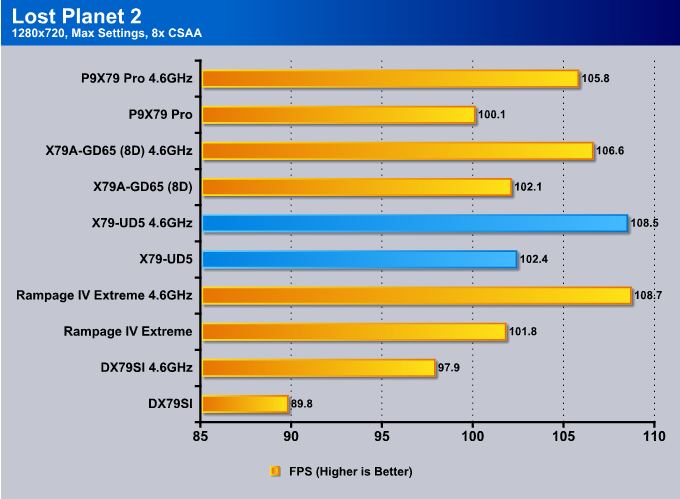
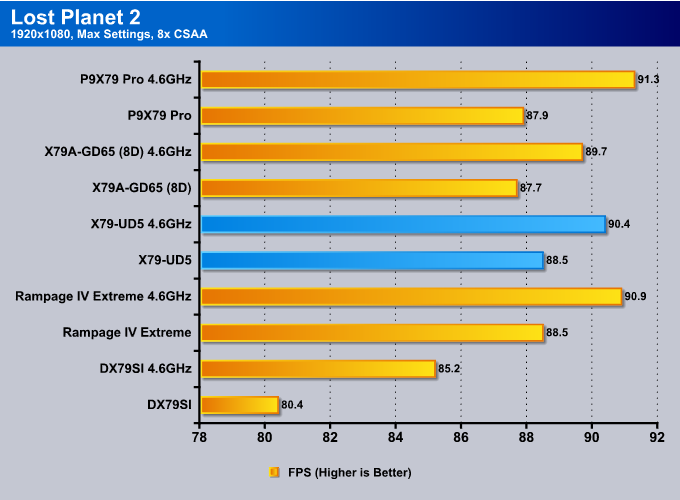
Lost Planet 2 shows similar results as Metro 2033, however, this time the P9X79 Pro takes first place, then the Rampage IV Extreme, and finally the GIGABYTE X79-UD5 takes 3rd place. Still not too shabby.
Conclusion
The GIGABYTE X79-UD5 motherboard is a very reasonable priced motherboard, especially compared to its competition. At a price of $279.99 after mail-in-rebate, it really makes it difficult for others to compete with GIGABYTE’s offering. The X79-UD5 comes with excellent features, great hardware accessories, as well as an overall great motherboard layout, making it a fantastic board for not just any gamer, but also for an overclocker, a PC enthusiast, and creative users working with film and photography.
The GIGABYTE X79-UD5 did have a rough first few weeks when it hit the store shelves, and we had a few issues that needed addressing especially around the BIOS, however, with the help of some great people at GIGABYTE, these issues got resolved in no time, and we had no major issues since. While the cooling solution on the X79-UD5 is not too complicated and is also passive, it is a possibility that a non-well ventilated system will cause some bottlenecks and down throttling on your CPU clock speeds. However, adding a fan that blows over the VRM can go long ways and also improve overall performance and stability of the system.
The part that we enjoyed the most about the UD5 was probably the 8 DIMM slots, which make it possible to install up to 64GB of memory, and of course the possibility to install up to 3 high-end video cards in a 3-way SLI or CrossFireX configuration. This is what makes the GIGABYTE X79-UD5 such an amazing board for its price. If you are a gamer, you can fill up all the PCIe slots with your video cards and have a great gaming experience, while if you are a film maker, the addition of 4 extra DIMM slots can make a massive difference in editing and rendering performance.
| OUR VERDICT: GIGABYTE X79-UD5 MOTHERBOARD | ||||||||||||||||||
|
||||||||||||||||||
| Summary: First, we were skeptical about the quality and stability of the GIGABYTE X79-UD5, however, after a major overhaul on the BIOS from GIGABYTE, we have no problem recommending the X79-UD5 to any gamer, overclocker, or even PC enthusiasts that need the best of the best for their system. The GIGABYTE X79-UD5 deserves Bjorn3D’s Golden Bear Award and a final score of 9 out of 10. |