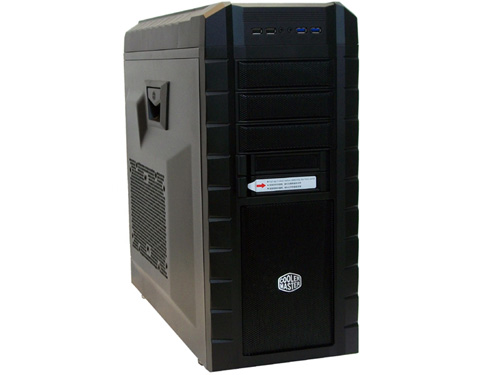
CoolerMaster has released a new chassis in the HAF line: the XM. Not quite a smaller version of the HAF X, this new case incorporates some of features from the X, along with some truly out-of-the-box thinking.
Introduction
As computer enthusiasts, one of our goals is to keep our system’s internal heat levels to a minimum. Cooler Master has made this their mission, and over the years has built a reputation for doing it well. With the advent of their HAF (High Air Flow) series of cases they took it to a whole new level. We have had the opportunity to review several of the HAF series here at Bjorn3D, so when they offered us the chance to get our hands on the HAF XM, before it was on the market, we jumped at it.
One of the things we liked about the HAF series was the futuristic/sci-fi feel of the design. The HAF XM has that same style of aesthetic without being a carbon copy of any previous HAF. But what we valued most was the performance. So now we are going to load this puppy up, and generate as much heat as we can to see if this latest offering can carry the torch forward for the HAF lineage. While we are at it, we will be looking at the numerous features offered in this chassis. This unit’s model number is: RC-922XM-KKN1.
The HAF XM has an MSRP of $129.99 USD and is available today. Detailed specifications may vary based on geographic locations.
Features and Specifications
The Cooler master HAF XM is a feature packed chassis. Some of the highlights are;
- Dust filters on all intakes
- Dual hot swap X-dock accessible from the front bezel
- Super Speed USB 3.0 ports
- Liquid cooling support
- Support for motherboards up to E-ATX
- Support for long graphics cards
- Multiple cable management features
- On off switch for the front fan’s LED
- Catch all/ cubby on the top of chassis
- And more, which will be covered as we examine this case.
Specifications
|
Model |
HAF XM |
HAF XM (side window panel version) |
|
|
Available Color |
Black |
||
|
Materials |
Outer body: coated steel mesh and Synthetic compounds; |
||
|
Inner body: coated enforced steel alloy |
|||
|
Dimensions |
252.0(W) x 530.5(H) x 579.0(D)mm / 9.9 x 20.9 x 22.8 inch |
||
|
Weight |
10.5 kg / 23.1 lb |
||
|
M/B Type |
Micro-ATX, ATX, E-ATX |
||
|
5.25″ Drive Bays |
3 |
||
|
3.5″ Drive Bays |
8 (hidden x 6, X-Dock x 2) |
||
|
2.5″ Drive Bays |
9 (6 are converted from 3.5“ bays, X-Dock x 2, 1 is behind M/B tray) |
||
|
I/O Panel |
USB 3.0 x 2 (int.), USB 2.0 x 2, Audio In & Out x 1 (supports HD Audio), LED switch for the front fan |
||
|
Expansion Slots |
8+1 |
||
|
Cooling System |
Front: 200mm Red LED fan x 1 (converted to 120mm fan x 2 / 140mm fan x 1) |
Front: 200mm Red LED fan x 1 (converted to 120mm fan x 2 / 140mm fan x 1) |
|
|
Top: 200mm fan x 2 (one is optional; converted to 120/140mm fan x 2) |
Top: 200mm fan x 2 (one is optional; converted to 120/140mm fan x 2) |
||
|
Rear: 140mm fan x 1 (converted to 120mm fan x 1) |
Rear: 140mm fan x 1 (converted to 120mm fan x 1) |
||
|
Side: 200mm fan x 1 (optional; converted to 140mm fan x 2) |
|
||
|
HDD: 120 x 25mm fan x 2 (optional) |
HDD: 120 x 25mm fan x 2 (optional) |
||
|
Power Supply Type |
Standard ATX PS2 / EPS |
||
|
Maximum Compatibility |
VGA card length: 354.0mm / 13.9 inch (with HDD cage) |
||
|
463.0mm / 18.2 inch (without HDD cage) |
|||
|
(*AMD Radeon HD 6990: 304.8mm / 11.9”; NVIDIA GTX 590: 279.4mm / 10.9”) |
|||
|
CPU cooler height: 196.0mm / 7.7 inch |
|||
|
(*Can accommodate Cooler Master CPU cooler |
|||
Packaging & Exterior
In this section we are going to look at the box and the outer shell of the HAF XM chassis.


CLICK IMAGES FOR LARGER VIEW
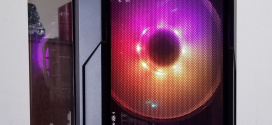
The box is an industry standard container made to protect the unit during shipping. The front has the obligatory product shot, logo and name along with a quick rundown of the main selling points. Turning to the right side we see an angled shot of the front and access sides with a listing of the possible models inside. On the back we find a 3-picture layout showing off the many features of this case as well as a list of features in 8 different languages. Moving to the left side we find the complete specifications list along with the addresses, phone numbers and E-mail addresses of the 4 main service centers for Cooler Master. The top features the Cooler Master logo and chassis name. The bottom is just a blank purple panel so we used a shot of the open box instead, which shows the polystyrene packing frame.


CLICK IMAGES FOR LARGER VIEW
Getting to the good stuff, once out of the box we can see that the HAF XM is made of the same heavy gage steel used in the previous HAF series cases, and the matte black finish has carried over to this model as well. The face has a large mesh over honeycomb intake, which unlike some of the other HAF cases, cannot be removed without taking off the entire bezel. Behind this is a 200mm red LED fan. To the right is a solid panel which has been machine pressed with angular shapes allowing more room for wire management. To the left is the primary access panel with a dual fan mount intake allowing the use of one 200mm or two 140mm fans. At the back we find the top secured by a thumbscrew, 3 grommet protected ports for wire pass through or liquid cooling systems, an exhaust port for a 140mm (included) or 120mm fan /radiator, 8 PCI slots, and the opening for the bottom mounted PSU. many cases we look at make statements like 7+1, or 8+1 when talking about the PCI slots. This chassis claims 8+1 and is the first in which we have found there is actually a +1. Looking just to the right of the 8 slots we see what at first glance seems to be a vent. This is a removable PCI slot cover that gives us an extra port to mount a shield with wired ports or one of those fans that normally fits into a PCI slot blocking one of the m/b slots. On top we find a very large exhaust vent, a compartment with a rubber pad in it, and the LED on/off, Power and reset switches. The bottom of the case has one opening for air intake to the PSU which does contain a removable filter, though that filter is mounted from the inside and requires removal of the PSU for access. We would have preferred easier access to this filter.

 >
>


CLICK IMAGES FOR LARGER VIEW
Popping the top cover we can see the upper fan mounts and the included 200mm fan. This area can accommodate a second 200mm or a wide array of radiator/fan options in the 140-120mm range. Under the front cover we see the 200mm LED fan, as well as the optional mount points for using a single 140mm or two 120mm fans. Moving back to the access panel, here’s a shot of the fan mount/intake with support for one 200mm or two 140mm fans. Our next image shows the “Easy Access Latch”. We included two shots to demonstrate what might just be our favorite chassis feature ever: the “Easy Access Latch Design”. There is nothing holding the side panel except the chassis. This allows easy access to the system for quick adjustments and when full access is needed, one just lifts the panel off. The panel does have 2 thumbscrews and a built in lock loop to make it more secure, but while working on the system this panel design is nothing short of a blessing.


CLICK IMAGES FOR LARGER VIEW
On this chassis they warn us to remove the drive trays before taking the bezel off. The label was glued on a bit better than necessary, but the glue will come off easily with rubbing alcohol, or if in a hurry, we found that RadioShack Electronics Cleaner works quite well also. Pulling the trays we find a PCB at the back that is designed to line up with SATA drives once they are properly mounted in the trays. removal and installation of the trays is as close to effortless as imaginable. The only way to make it easier is to get some one else to do it.


CLICK IMAGES FOR LARGER VIEW
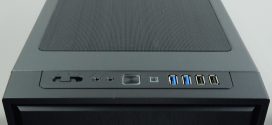
The front ports are right at the top of the face and include two USB 2.0, two 3.5 audio jacks for headsets, and two USB 3.0 ports with a 19pin internal connector. Our next image is of the switches which are (from left to right): the fan LED control, the main power, and the reset. We also get a good look at the built in tray. Finally we have the user Manual and accessories which include the necessary screws, bolts, and standoffs to complete the build, as well as a generous supply of wire-ties, a standoff installation tool, and a M/B speaker.
Interior & Installation


CLICK IMAGES FOR LARGER VIEW
Opening the case we find the accessory box secured inside (contents shown on previous page). We also see that this chassis shares some interior features with the HAF X, such as the sliding PSU cable cover. Also, the HDD cage is very much like many other CoolerMaster HAF chassis. While there are similarities, the rest of this interior is enough different to make this a whole new case. The tray opening allowing access to the CPU fan mount is huge, facilitating easy changes to cooling options. The optical drive locks are different, the placement of the wire management holes is different. Ok, let’s look at what it does have in here.


CLICK IMAGES FOR LARGER VIEW
First we have the ODD locks for the 5.25 inch bays. These are a simple to use: flip the switch forward to unlock, slide in a device, then flip it to the back of the case to lock it. Next we have the HDD trays, on the left is the tray from the front X-Dock, on the right is the interior HDD cage tray. The following shot shows a 2.5 inch drive mounted to the X-Dock tray. This required removing one of the anti-vibration mounts used if mounting a 3.5 inch HDD. Next we see both a 2.5 and a 3.5 inch drive mounted in the HDD cage. The last image in this group shows one of two possible interior fan mounts, the other is directly under the one used here. This fan was mounted for demonstration purposes only and is not included during testing.
The rest of the installation was fairly typical and we encountered no difficulties.

![]()

CLICK IMAGES FOR LARGER VIEW
When the motherboard was installed it was installed Transformer3 CPU cooler and all. Sitting on the bench, begging to be used was was a CoolerMaster TPC 812 (review coming soon) sealed in the box. So of course we had to use it, just to see how difficult it would be to change out in the case.


CLICK IMAGES FOR LARGER VIEW
First step was the removal of the stock AMD retention collar and back plate, 4 screws out and done. then of course we cleaned the old TIM off the CPU.


CLICK IMAGES FOR LARGER VIEW
Our cooler installation was extremely easy. The details will be included in the cooler review (coming soon).


CLICK IMAGES FOR LARGER VIEW
One thing that has been a problem in the last 4 or five cases we’ve used was interference by a set of wires used to add rear ports where they crossed the bottom GPU. This wasn’t a design flaw in the wires, GPU or chassis, it was just a problematic hardware configuration. The wire would rub on the fans no matter how we installed them when using PCI slots above or below the ones the motherboard uses. This chassis provides one extra that is outside of the normal layout and perfect for our needs. It can be used for this, one of the fans that mounts in a PCI slot, an antenna mount, or anything that doesn’t require mounting directly into the motherboard. The CoolerMaster HAF XM is very easy case to build in. The only thing we regret in fact is that we didn’t notice that the center 5.25 cover was pushed in while we took these shots. It mounts securely, but we forgot to make sure it was secure.
Now we move on to testing this chassis for temperature control.
Testing & Methodology
To load this system we ran Stanford’s Folding@Home distributed computing application* to load the GTX 560 at an average of 97-98%. This was the first thing we started.
Then we ran a torture test in Prime95 (In place large FFT’s, maximum heat, power consumption, some RAM tested) to load the CPU at 100% to heat up the CPU and get the MCP to warm up also.
After those got the system temps going, Furmark was used to overheat the GTX 480’s at an average load of 97-99%.Furmark settings (Post FX was disabled due to the exccesive heat generated when using it. GPU’s reached 107°C within minutes and were shutdown to avoid damage)
The CPU was overclocked to 2.51GHz, the two GTX 480’s at a core clock of 800, shaderclock of 1600, the GTX 560 at a core clock of 924, shaderclock of 1848. All GPUs overclocked using MSI afterburner, with fans on auto. CPU fan controlled by motherboard PWM circuit. GTX 560 VRM temps have no sensor to report the info, it is therefore unavailable.
*information on Stanford’s Folding @ Home app can be found HERE & HERE
| Test System | |
| Case | Cooler Master HAF XM |
|
Processor |
AMD Phenom II X4 9500 (Agena) @2.5GHz
|
|
Motherboard |
Asus M3N-HT Deluxe (bios 3401) |
|
Memory |
4 GB Patriot 8500EL series PC2-6400 |
|
Drive(s) |
WDC WD5000AAKX, HDD1 WDC WD 1600BEVT, HDD2 Maxtor 7H500F0, HDD3 |
|
Graphics |
Video Card 1: Nvidia GTX 480 (reference)
Video Card 2: Nvidia GTX 480 (reference)
Video Card3: Gigabyte GTX 560 OC
|
|
Power Supply |
Enermax Revolution87+ 1000w SLI |
| Operating System | Windows 7 |
| CPU cooler | Cooler Master TCP 812 |
| Fan controller | NZXT Sentry 2 |
RESULTS
The following custom fan profile was enabled in MSI Afterburner during one of these tests. We wanted to determine if its use keeps not only the GPU temps lower, but reduces the overall system temps as well.
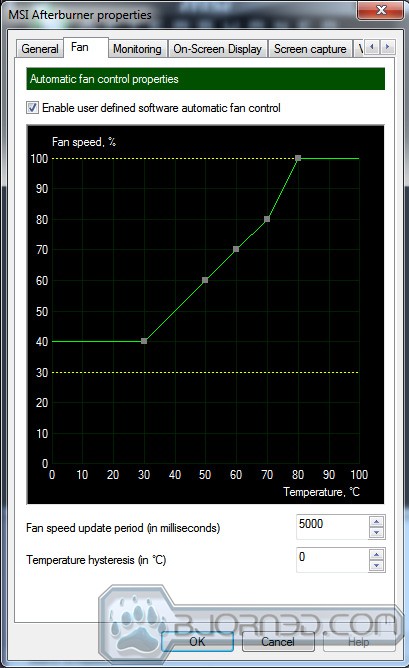
Temperatures obtained via HWiNFO64. All temperatures are in Celsius, ambient temperature during testing was 23°C (74°F)
As we had no 140mm or 200mm fans available to add to this case at the time of testing, it was tested with just the stock fans.
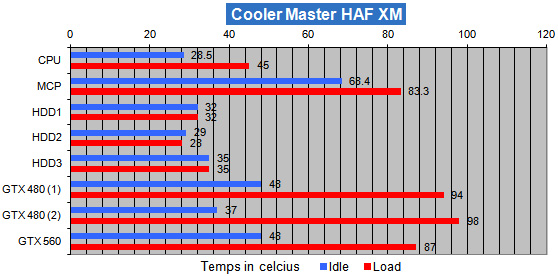
While we find the temperatures quite acceptable, we can not help but feel this chassis would benefit from at least one 140mm fan in the side panel. The HAF chassis we have dealt with in the past all had at least one in the side. Putting our wants aside for the moment, there is obviously enough airflow to keep the system under control with out that fan.
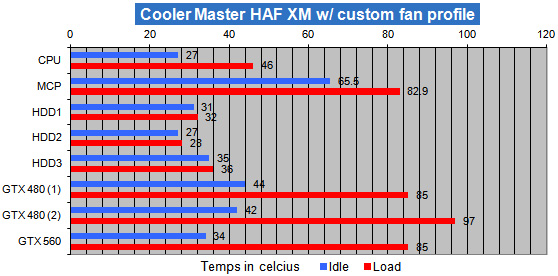
With the custom profile in play we find that the system temps are so similar that it doesn’t seem to make much difference. For those looking to squeak every last degree drop out of their hardware, this little bit might be worth the time to set up a profile.
The HAF XM keeps system temperatures well within reasonable ranges, not that we expected anything else from this chassis.
Conclusions
We have to admit that even before we removed the Cooler Master HAF XM from it’s box we were expecting a quality product with tons of features. We are pleased to report that we were not disappointed.
From the styling to the matte black finish on the heavy gage steel this product is crafted with quality. Each part fits in it’s place with precision. The seams are perfectly aligned and the panels and bezels are easy to remove and replace when users need to get under them. The cubby on top is a great place to drop cell phones, thumbscrews, or whatever.
The layout of the interior is well thought out, and gives ample room for any system components currently available. The placement of the extra 2.5 inch drive mount behind the M/B tray is a nice touch, though after looking at it we believe they could have put two in there with no problem. The 5.25 inch bay lock system is simple and easy to use. The sliding PSU wire cover keeps everything looking very clean. Wire management has been covered by the inclusion of more than enough access points and tie down spots, and Cooler Master supplies a generous amount of wire ties in the accessory box. The center fan mounts allow users to direct air from the front straight into the GPU’s, and the extra PCI slot beside the normal one’s is just a nice bonus feature.
There are enough places to mount fans or radiators to make most users happy, though some extreme cooling enthusiasts may not agree. The inclusion of dust filters on all intakes tells us that CoolerMaster pays attention and listens to its customer base. We are not to happy that removing the PSU filter requires removing the PSU first. We might have wanted a fan speed control, but the chassis fans are so quiet this case doesn’t need one.
There is placement for up to 9 disk drives, not counting optical, so storage options should never be a problem. With the inclusion of the X-Dock swap bays, the XM even provides easy disk management for those that need to swap out storage due to high file volume.
Finally our personal favorite feature, the Easy Access Latch Design, this makes getting the system open simple and quick while allowing the panel to be secure when closed. We found it to be a great feature while going in and out of the system to move wires and make adjustments. It will also make showing the system components off very easy. For those worried about security there is a lock loop built in.
CoolerMaster has been steadily building a reputation for excellence with the HAF series, We feel the HAF XM continues in this tradition.
| OUR VERDICT: CoolerMaster HAF XM Mid-Tower Chassis | ||||||||||||||||||
|
||||||||||||||||||
| Summary: The Cooler Master HAF XM is a quality, innovative product. It has numerous features that enhance the user experience. It’s performance is on par with anything out there, and it looks great. Add a reasonable price to that and we have a winner. We are pleased to give it the Bjorn3D Golden Bear Award. |