Building a System in the amazing 909
| Case | In Win 909 |
| Motherboard | ASUS Maximus VIII GENE |
| Memory | Patriot Viper Extreme DDR4 3000Mhz 16GB Kit |
| PSU | Thermaltake Toughpower DPS G RGB 1250W |
| CPU | Intel i7 6700K |
| Cooler | XSPC AX360 Liquid cooler |
| Hard Drive | Adata SP550 M.2 240GB |
Installing your components into the 909 is rather straightforward if you have ever built a computer. However, we would advise that you plan your build out since sometimes it is easier to install some components or wires first and while this is nothing new when you add liquid cooling components into the mix this becomes even more important. The 8-pin PSU cable is one we would advise pulling through before you install the board and because of the PSU being in its own chamber, we found it advantageous to connect the wires to your PSU and pull them through the cutout for the cables as you slide the PSU in place. Once you get it in, simply screw it down with the screws included. If you try installing the PSU without connecting the wires that you need, you might have an issue connecting them once the PSU is nestled into its chamber. I know with our big hands when we had to add an additional wire into the modular PSU, it turned into a very difficult task.

Thanks to the enormous size of the In Win 909 it makes installing your components a breeze. The separate compartments not only assisted with thermal management but also made the 909 look a lot cleaner since there were not as many components having to share the space within the motherboard compartment. The upper 3.5 inch hard drive compartment allows the users to mount four traditional hard drives. As mentioned before there are an additional six SSD mounts on the rear of the motherboard panel.
Liquid Cooling
One of the aspects that make the In Win 909 so special is its ability to fit custom liquid cooling loops that feature multiple radiators and water blocks. So we were privileged to be reviewing one of XSPC 360mm radiator systems at the same time as the 909 because it gave us the perfect opportunity to shop off the capacity of the 909. The kit that SXPC sent us is their new Pro Ion AX360 and includes all the required hardware except for the coolant additive.
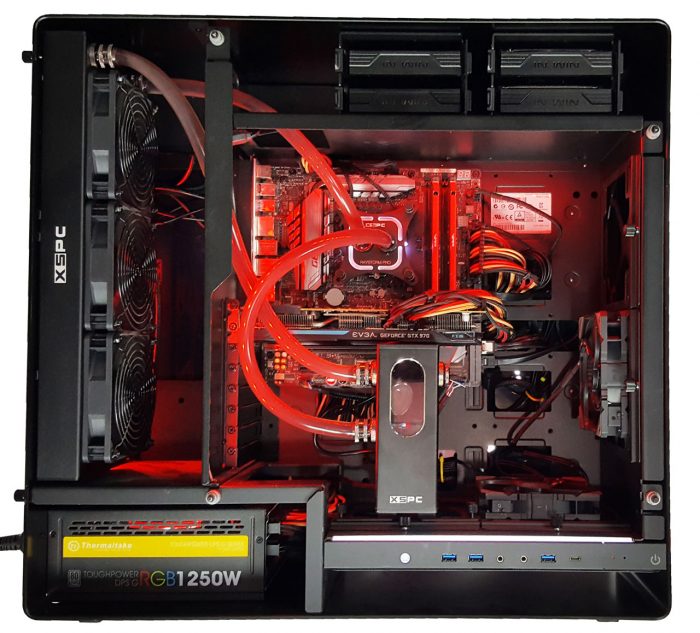
Mounting the radiator in the rear water cooling compartment, we first test fitted the system and cut the tubing to length. Then we took the radiator back out connecting the fittings to it and pushing the tubing over the fittings. Next, you will want to mount the fans and fan grills to the radiator and then you officially mount the large radiator into its new home and on the rear of the case you use the screws provided to mount it securely.

It is also important to note that there is additional room to fit a 280mm radiator up front and a 240mm radiator on the bottom and last but not least a 120mm radiator on the panel that divides the motherboard chamber and 260mm radiator chamber. With this array of liquid cooling configurability, it gives users the ability to not only cool their CPU, GPU or GPU’s, MOSFETs, and memory, but also anything else they want to mount a liquid cooling block onto.