Petite but packs a punch! That’s a great way to describe the Shuttle SB75G2 SFF computer. How can such a small package be such a big player in the PC market? Check out the review to find out.
Introduction
Smaller is better? You don’t hear that too often, but in the world of PCs, the smaller you can make it the better off you might be. In comes the rush of small form factor (SFF) systems that have made quite a mark in the home computing market. People looking for a smaller and quieter machine to serve their daily needs are becoming more and more common.
We are going to take a look at Shuttle’s awesome new SB75G2 XPC system with the Intel 875P chipset. Yes folks, one of the latest and greatest platforms for Intel desktops, the Canterwood, has made its way into a much more compact form. For those looking for a rival to your toaster or bread maker, the SB75G2 can probably give them a run for their money.
Specs and Features
Well, before we go any further with this review why don’t we take a look at the specifications and features of the SB75G2 from Shuttle.
 |
 |
 |
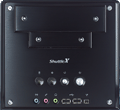
CHASSIS
- Dimension : (L)300*(W)200*(H)185, 2.85Kg(N.W.), 4.65Kg(G.W.)
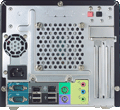
- Front Panel : USB * 2, MIC * 1, Line in * 1, 1394 * 1
- Back Panel : PS/2 Keyboard & Mouse * 1, Serial Port * 2, Giga LAN * 1, 1394 * 1, USB * 4,
- SPDIF In/Out
- Extension Bay : 5.25″ * 1, 3.5″ * 2
MAINBOARD FB75
- Form Factor : Shuttle Form Factor
- CPU Socket : Intel Socket 478, support 533/800MHz FSB HT CPU
- Chipsets : North bridge:Intel 875P, South bridge:ICH5-R
- Memory Socket : DDR 333/400 * 2 (Dual Channel)
- On Board VGA : None
- On Board Audio : Realtek ALC650 6 channel audio
- Expansion Slot : PCI * 1 8X AGP * 1
- IDE interface : ATA-100 / Serial ATA
POWER
- 220W (PFC)
FEATURES
- Built-in Fast Gigabit Ethernet
- Built-in Intel PAT mode (Intel Performance Acceleration Technology)
- Support Dual Channel ECC DDR400 Memory
- Shuttle I.C.E. heat-pipe technology
- Large Side Mesh Windows Case Cover
The addition of all the built-in peripherals is a huge selling point for the SB75G2. Built-in gigabit NIC, sound, 6 USB ports, Firewire, SPDIF, and SATA support to boot. This is loaded to the hilt. We aren’t talking barebones here, this thing comes with all the trimmings. What is noticeable though is the lack of a parallel port on the back. If you have relied on that old standard for your printer or other peripheral, time to move to USB because you have plenty of those connections to work with.
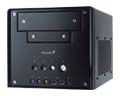
What a cool looking machine. Even the box it came in is cool looking. Immediately my thoughts move to “How the heck can you fit a whole PC in that little bitty box?” Well, I was soon going to find out first hand.
The case is a smooth jet black aluminum finish. Very sleek, very sexy for a PC. I can definitely see this kind of component in a home theater system or in the living room. It’s very refined with the black finish and silver buttons and accents. You have to be a little careful you don’t scratch up the surface as it seems like it could show knicks and scrapes pretty easily if you get rowdy with it. So we know it’s stylish, but what else can it do?
 Drive covers would come in handy here. Drive covers would come in handy here. |
 Attractive design makes for easy placement in the house. Attractive design makes for easy placement in the house. |
 Is that a 5200 Ultra in your case, or are you happy to see me? Is that a 5200 Ultra in your case, or are you happy to see me? |
 No parallel port standard, find that USB printer today! No parallel port standard, find that USB printer today! |
In the bundle comes a couple of manuals, cables galore to fit inside that little space, some thermal paste, and one of the coolest things inside was a full version of Mandrake Linux 9.0. For all the open-source gurus out there, these CDs can come in real handy. I myself have always thought about putting a new partition on my hard drive to take a deeper look into Linux. This just may be the push I needed to complete that task.
Install
I quickly went to work on the Shuttle system by pulling off the cover and taking a look at the innards of the little PC. Wow, not a whole lot of room in there! A simple drive cage for the HDD, floppy, and CD-ROM cover practically the whole main board. The memory is tucked underneath, with the processor and power supply taking pretty much all of the other real estate this PC has to offer. Tiny, but efficient in design.
What’s the point in stopping there, let’s go ahead and get this PC running. No use in letting a nice machine just sit there.
I want to take a closer look at the cooling system that Shuttle has developed for their XPC systems. The Shuttle I.C.E heat-pipe cooling system is a pretty dominating force inside the case of the PC. A large heatsink gives way to 4 heatpipes that run up the back of machine to a relatively large radiator. The radiator is then cooled by a large case fan attached to it. The design is great, putting a lot of cooling power into a very compact area. The heat-pipes keep the ambient heat from escaping into the case with the fan blowing the extra heat out the back. It looks like heat probably won’t be much of a factor in this little box. Very “cool” indeed 🙂
 4 heat pipes + radiator = cool 4 heat pipes + radiator = cool |
 Piping hot!. Piping hot!. |
 That’s gonna fit inside of that little case. That’s gonna fit inside of that little case. |
 Several pennies died to make that bottom. Several pennies died to make that bottom. |
After installing the 2.4Ghz P4 in the Shuttle with a quick couple of clips on the heatsink, I moved on to the memory and cables. The memory is tucked away in the front of the case along with the IDE connections. A pretty tight fit underneath that drive cage, but Shuttle does a great job in their instructions letting you know exactly how to route the cables to best fit inside the case. It’s a great setup that works really well.
 Anyone have bread for this toaster? Oh wait….. Anyone have bread for this toaster? Oh wait….. |
 Memory is tucked away up front. Memory is tucked away up front. |
 The North Bridge is cooled with a nice HSF setup. The North Bridge is cooled with a nice HSF setup. |
 The brains of the Shuttle, a 2.4C P4 w/ 800Mhz FSB The brains of the Shuttle, a 2.4C P4 w/ 800Mhz FSB |
 Overall board layout works well for a cramped space. Overall board layout works well for a cramped space. |
A couple of screws removed the front covers from the case and I quickly installed a CD-RW and floppy drive into the cage. The drive cage fits like a glove. Once again, seems like a tight fit, but everything is going more than according to plan.
No need to worry about anything else. Built in NIC, sound, USB, and firewire make this install a breeze. But wait, what about a video card? Well, I went ahead and decided to go conservative at first and installed the Palit FX 5200 Ultra card to start off with. I didn’t want to get too crazy right away with a small 220W power supply. We will definitely address this issue later on in the review.;)
Testing
Test System Specs:
- 2.4C P4 processor
- Palit Daytona FX5200 Ultra 128MB
- Western Digital 80GB HDD 8MB buffer
- 2 x 256MB Corsair XMS PC3200 RAM
- Sony CD-RW
Plug it all in, give the power button a press and the Shuttle comes to life with a loud ROAR?!?!! What’s going on here? Ahhhhh…just kidding, upon startup the fan spins up to a pretty loud pace but within seconds dies to a very low humming tone that is hardly a roar but more like a purr. It’s a very quiet system with an attractive set of LEDs on the front for power and HDD. I put a clean install of XP on the 80GB WD drive to start off my testing phase. Of course that went off without a single hitch and we were ready to see how this little box can run.
I wanted to basically get a good feel for what this system is like to use on an everyday basis, and in special occasions, namely a LAN party I attended. Let’s go ahead and take a look at some quick benchmark numbers and then we will move on to some of the real-world observations I have made.
SiSoft Sandra 2004 v. 2004.10.9.89
|
|||||||||||||||||||||||||||||||||
PCMark 04
|
||||||||||||||||||
LAN Party Test
So far I have had nothing but great thoughts about the Shuttle SB75G2 XPC system. In everyday use it is fast, quiet, and small enough to hide away or glamorous enough to show off to the masses. I love the size, weight, and portability of this system. That gets me to my next set of observations.
I immediately thought about the benefits of portability with such a small PC in my grasps. I have been to several LAN parties and always dread the lugging of my mid-tower case and monitor clear across town. This most recent LAN party was an exception to the norm. I threw the little Shuttle in my car, loaded up the monitor, and didn’t even have to use the back seat. It was all on the floor and seat of the passenger side of my car. I even had room to fit a bag next to the Shuttle. I’m driving a little sports car also, not some big SUV here. I was already thrilled and I hadn’t played a second.
Once I got to the party things only got better. I had everything out of the car and ready to roll in seconds. Here was my monitor, and what looked like a black shoebox next to me. Lots of questions and stares came from my gaming compatriates on what I had with me. Then the cool thing I said I would address later came into play. There was no longer an FX5200 Ultra in the Shuttle, I stuck the Visiontek 9800 Pro inside and took this system for the ultimate spin.
Well, I can’t say that I wasn’t worried a little about power and heat problems by putting the 9800 Pro inside the little Shuttle. I had to use an extension that I had to get a standard 4 post connector to reach the card. I powered it on and it ran like a jewel. No problems whatsoever. Hours into gaming the Shuttle was still running strong. I noticed a little bit of heat buildup coming out of the fans in the back, but nothing too horrible. If worst came to worst I could have easily pulled the cover off and let the system breathe a little bit. This was definitely the highlight of my experience with the Shuttle system so far.
Overclocking
Overclocking was not the most successful thing I encountered while using the Shuttle system. I was hoping to take the 2.4 P4 up to at least 2.7 or so, but unfortunately the Mars lander must have knocked Mars itself out of alignment with Jupiter and the North Star because the planets were not aligned in my favor.
I did have a small amount of success by reaching 2.56Ghz or so. I will be relatively cool about the lack of overclocking ability on the little Shuttle. This is not a system you go out and buy to crank it up beyond its limits. You buy the Shuttle for the size and convenience of it all. If you want to do some serious overclocking, go and buy a standard motherboard and have at it. I suggest you just leave the Shuttle SB75G2 to go about its quiet and cool business without adding any stress to it. It doesn’t need any extra Mhz to be a top performer.
Final Thoughts
Pros:
- Small, very very small
- Quiet
- Awesome looks
- Versatility to use as game machine, or multimedia if you like. You name it, it can do it.
- Onboard components are top notch with hardly any installation needed.
Cons:
- With small size comes cramped insides.
- Not much room for upgrades.
- No drive covers to keep attractive front.
Overall, this is one of the sweetest pieces of computer equipment I have ever had my hands on. I can recommend this machine to everyone from my Grandma to a die-hard gamer. This would be a sweet machine for anyone looking to save some space around the house or dorm room. You could throw in a nice LCD monitor and fit the entire system on top of a small desk with relative ease.
The SB75G2 isn’t the cheapest piece of hardware in the world. It can be found for right around $350 and above at most online retailers. This may strike hard at some people’s pocketbooks, but the convenience and features of the Shuttle SB75G2 are worth every penny.
I love the SB75G2 and give it high marks in just about every category I can think of. I give the Shuttle XPC SB75G2 a 9.5 out of 10 and the Bjorn3D Golden Bear Award of excellence.


