Antec enters the medic PC market with the Overture. Both the case and the included power supply feature the high level of quality that we expect from Antec. The Piano Black finish must be seen fully appreciate. While not the quietest media case around, it’s quiet enough for my taste.
Introduction
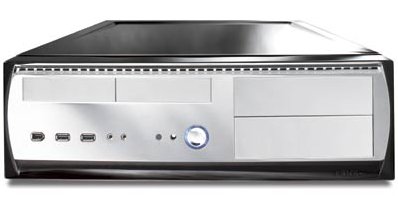
Antec jumped into the media case fray several months ago with the introduction of the Overture, a member of the LifeStyle Series and touted by Antec as a “Piano Black Quiet Media Case.” The “Piano Black” description might ring a bell for some of you as it is also used to describe the award-winning Sonata. Being a “media case” or home theater PC (HTPC) case, the Overture certainly needs to look good. The finish is truly nothing short of incredible, but I’ll get to that later.
An HTPC case needs to not only be attractive, but it also must be very quiet. No one wants to have to turn up the TV extra loud just to drown out his HTPC’s noise. That just kind of takes away from it all. Trust me; I’ve been looking forward to swapping out my noisy HTPC box with the Overture for a long time. It’s a much better solution than my previous case. Please keep reading to get a good look at the Overture inside and out… and with components installed in it of course.
Features, Specs and Packaging
Antec packs some nice features in the Overture, including front USB and FireWire ports, front audio ports, a special 380W power supply and seven total drive bays. The TruePower 380W PSU features only one fan to help keep noise down, and it is the same ‘True380S’ PSU that is used in the Sonata. Interestingly, Antec opted to include two external 3.5″ drive bays. I think it’s unlikely that most users would populate both of these bays, but the expansion potential is nice nonetheless. The inclusion of two external 5.25″ and three internal 3.5″ drive bays was a great decision. The Overture can hold more drives than some of the competition, and that will make the difference for some of you. Let’s take a quick look at the Overture’s features and specifications.
Features
- TruePower 380Watt ATX12V power supply features a single-fan design for ultra-quiet operation (special version PSU True380S for Sonata and Overture)
- Front mounted USB & IEEE1394 (FireWire) ports
- Front Audio ports
- 7 Drive Bays:
- 2 x 5.25″ external drive bays
- 2 x 3.5″ external drive bays
- 3 x 3.5″ internal drive bays with rubber grommets to absorb hard drive vibrations
- Motherboards: Standard ATX
Specifications
|
|
|
||||||||||||||||||||||||||||||||||||||||||||||||||||
The Overture packaging is typical of Antec’s style — a fully descriptive, custom cardboard box. That way if the courier wants to steal it, he knows exactly what he’s getting. 🙂 Seriously though, Antec’s packaging seems to consistently be well done. The case itself was protected by styrofoam on both sides and also wrapped in plastic and styrofoam wrapping. It should arrive safe and sound with its beautiful finish unscathed.
 Custom Overture Box |
 Padding for Protection |
 Wrapped for Protection |
When I opened up the box and unwrapped the Overture, I was met with a nice surprise — the awesome ‘Piano Black’ finish. Antec did an awesome job making it look superb! I could almost shave while looking into this black beauty. Worried about fingerprints?! Well, don’t fret too much…Antec has you covered with the included soft, lint-free cleaning cloth. The velvety black cloth is a good fingerprint and smudge remover. Kudos to Antec for its thoughtful inclusion.
 Check Out the Overture |
 Look at That Finish! |
 Small Bundle of Goodies |
These two pics show a closer view of those front external drive bays, which, as I mentioned above, include two of each size. I think that should be pleny (if not too many) for most users. You can also see the other front ports, including two USB, one FireWire, one mic-in and one headphone jack. Next to this multitude of ports are the HDD activity indicator, reset button and power button. Overall, the front of the Overture looks pretty slick. The silver and black colors should help it look good in your A/V rack or on your desk.
 Two 3.5″ External Bays |
 Two 5.25″ External Bays |
We can’t just look at the front though, so I turn the Overture around to get a good look at its backside stylings. Antec quality (that is, high quality and solid construction) is present here as well. A nice color-coded I/O back panel shield is installed, but as we all know, most of the more advanced motherboards available don’t use this simple, standard rear I/O port layout. Still, it’s nice to see that extra effort put in by Antec to provide a more complete positive experience (I hate the flimsy, thin rear I/O shields included with most motherboards). In the second pic, you can see one of the two thumbscrews that hold the top panel in place. Thumbscrews are always a welcome addition to any case! Maybe we should petition to make them part of the BTX form factor. 😉
 Back of the Overture |
 Two Thumbscrews Secure the Top Panel in Place |
The left side (when facing the front) of the Overture features a small square filter. Antec made it easy to remove, which in turn makes it easy to clean. As you will see on the next page, this ventilation area is located here because that is where the PSU happens to be. The bottom of the Overture features four rubber feet.
 Filter on the Left Side |
 It’s Easy to Remove and Clean |
 Overture’s Bottom |
 Close Up of the Rubber Feet |
Well, that’s about it for the external tour. Let’s open ‘er up and see what’s cooking on the inside. It’s as simple as unscrewing two thumbscrews and sliding the top panel back. Try not to get your grubby paws all over it though, or you’ll be cleaning of fingerprints later! You can see prints and smudging in the pic below.
 Open Says Me! |
Getting Inside – A Closer Look
Almost every case I’ve ever been inside fixing and installing stuff in has been a tower case. I was looking forward to seeing what type of experience I would have with the Overture since it is a desktop style case. I was also anxious to see exactly how the PSU is situated in this case, because I’ve read several times that it is situated towards the front of the case, totally opposite of what one would expect. Many reviews I saw didn’t really highlight this difference with pictures though, but don’t worry; I will.
 Overture’s Guts |
Since I already brought it up, I’ll move right into the interesting PSU situation in the Overture. In most cases, the PSU is of course located in the back, where you plug in the power cable directly to the PSU itself. Antec opted to take the road less traveled (or maybe they built a new road) though with the Overture. The 380W TruePower is located in the front of the case and a pass-through cable leads towards the back to a power connection. It’s interesting to say the least, but pictures can tell the story better, so here are some pics I took in hopes of making what I just described more clear.
 Pass-Through Power Cable Connected to the PSU… |
 …Leads to the Back of the Overture… |
 …And Ends at a Power Connection |
What you don’t see in those pics is the HDD cage that I removed before taking those pics. It’s an interesting design, but that’s about it if you ask me. I don’t think there are any negatives to Antec’s implementation. To really see the PSU, you have to remove the 3.5″ external drive bay ‘shelf’ that is on top of it.
 Removing the External 3.5″ Drive Bay Shelf |
 One End of the PSU Faces the Side Ventilation Area |
 TruePower 380W |
For HDD installation, there is a separate, removable cage that can house three 3.5″ drives. This HDD cage is securely held in place by two screws and features rubber grommets in the screw holes to reduce vibration and noise. Rubber grommets seem to be getting more popular in cases, and it’s nice to see Antec include them here.
 Removing the Internal 3.5″ Drive Cage |
The 5.25″ drive cage is secured a bit differently than the internal 3.5″ drive and external 3.5″ drive cages. Instead of screws, it is held in place by a lever mechanism, which is easy to use. Basically, you just push down and to the left to slide it over and then use a little force to pull the cage out. There was an loose piece of paper in the manual that was an addendum to the manual, and it describes the removal very clearly. I like the design; it allows for quick and easy removal.
 5.25″ Drive Cage |
 Move the Lever Over to the Left |
 Pull the Cage Out |
Exhausting hot air is mostly the responsibility of the 92mm SmartCool Plus fan that is installed in the rear of the Overture, right behind the HDD cage. The fan includes a male and female 4-pin connector for power and a 3-pin motherboard connector for RPM sensing. It also features a thermal sensor so that it can regulate its speed (and therefore noise) based on the detected temperature. Antec warns in the manual not to connect one of the TruePower 380S’s “Fan Only” connectors to this fan. It must be connected to a regular 4-pin connector. Since the fan can regulate its speed on its own, it doesn’t need the PSU to do it.
 92mm SmartCool Plus Fan |
 Available Connectors and Thermal Sensor |
Now that concludes the tour of the Overture. I believe I’ve highlighted most of the features that matter. So, now it’s time to put some stuff in it.
Installation and Use
Although marketed as a ‘media case’ or HTPC case, the Overture could also function as a desktop PC. While most people getting it are probably interested in the media PC application for the Overture, I just thought I’d point out that it would make a good looking business or home machine. You could sit it on your desk and put an LCD monitor on top of it, and you’d be good to go… computing with style.
I actually requested the Overture for review to replace the case I was using to house my media PC. Here is the list of components I installed in the Overture.
Components Installed in the Overture
- Processor: AMD Athlon XP 2100+
- CPU Cooler: Thermaltake K7 Silent Boost
- Motherboard: DFI LANParty NFII Ultra
- Memory: 512MB (2x256MB) HyperX KHX3500
- Video Card: BFG GeForce FX 5700 Ultra
- Optical Drive: Plextor PX-504A DVD+R/RW CD-R/RW
- HDD 1: 30GB IBM Deskstar
- HDD 2: 120GB Maxtor
The manual describes all the steps involved in installing components in the Overture, but there are not pictures to guide you during installation. Experienced PC installers will only need a couple bits of info from the manual, but newbies could probably use more info to make their experience easier. Compared to other case manuals, the Overture’s manual is average, but that’s not saying much considering how bad many of them are.
After reading reviews of the Overture, the main thing I was worried about before beginning installation was whether or not the main PSU power cable would reach the connector on my motherboard. It turns out that the cable was longer than I expected, and I had no problems at all. I installed the included brass motherboard standoffs, swapped out the I/O shield, and then secured the motherboard with screws. Antec was thoughtful enough to label each standoff hole with an “A” for ATX and/or “M” for micro-ATX.
 Brass Motherboard Standoffs |
 Reach of the Main Power Cable |
 Mobo Installed |
Since space is limited in Overture, careful planning is necessary before proceeding with the installation. After seeing how close my motherboard’s CPU socket was to the HDD cage, I decided to go ahead and see if my Thermaltake Silent Boost cooler would fit. I removed the HDD cage, installed the 2100+ and then put the Silent Boost on. Next, I installed two HDDs in the cage and carefully put it back in. It was a tight fit and probably isn’t ideal, but the Silent Boost does work. A smaller cooler would work best in the Overture regardless of where the socket is, but if you have a motherboard with a socket close the edge like the NFII Ultra, then it’s even more essential to carefully consider what cooler to use. I was determined to use the Silent Boost since I bought it especially for my media PC because of its quiet operation.
 CPU Socket and HDD Cage Almost Kissin’ |
 Now the Silent Boost and HDD Are Kissin’! |
Next, I moved all the power cables out of the way and installed the Plextor DVD writer without any problems. Memory also went in painlessly. I wish I could say the same for the first video card I tried, a Leadtek GeForce4 Ti4600. This card features a big heatsink that wraps around to the back of the card, which makes it taller than any card with a heatsink that only covers the GPU/VPU. This turned out to be too tall for the Overture, as you can see in the pic below.
 Leadtek Ti4600’s Heatsink Sticks Up Too Much |
 Can’t Close the Top Panel! |
I can’t really fault the Overture too much for this problem. It was just poor planning on my part. Luckily, I have some other cards laying around. So, I grabbed my BFG GFFX 5700 Ultra and put it in instead. As expected, it worked just fine. It’s worth mentioning that the PCI slot covers have to be popped out in a way I’ve never seen before. I used a screwdriver to get under the botton of the cover and then pop them up. They come out with very little effort, which is always good.
 Removing a PCI Slot Cover |
 Included Installation Hardware |
The last thing I had to do was plug in all the cables, which I really wasn’t looking forward to considering how cramped it was getting in there. This case isn’t designed to give you a bunch of extra room though, so I’m not complaining. I think the layout works fine. I was just dreading crossing all the IDE and power cables everywhere and making some cable spaghetti. Thanks to the round cables I used, it wasn’t all that bad. Since I put the optical drive in the bottom bay, I shoved all the extra cables and whatever else I could on top of it to get them out of the way. I closed up the Overture and added it to my A/V shelf. It looks pretty good there, and upon powering it up, I was greeted with a nice blue ring around the power button.
 Installation Complete |
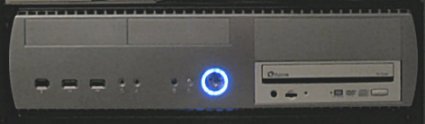 Nice Blue Ring Around the Power Button |
Overall, I would rate my experience inside and outside of the Overture as positive. The most important thing I learned about the Overture is that the user must choose his/her components wisely. A little thinking ahead and research should lead to a relatively painless installation process.
Conclusion
After carefully scrutinizing, working in and using the Overture several weeks now, I am very happy with it. It is pretty quiet, but it is not silent. My girlfriend and I are much happier with this case than our previous media case because of how much quieter it is and how much better it looks as part of the A/V setup.
I was worried about temperatures (CPU and case temps) after hooking it all up, but they have stayed within reasonable ranges. The CPU is typically at around 45C, and the case temp is usually under 40C. Those are better temps than I expected considering that there’s only one case fan and one PSU fan.
According to our PriceGrabber price search, the Overture can be found for around $90, which is a fair price for a high quality case with a high quality PSU. As a case and power supply leader, Antec is a name you can trust.
Pros:
- Piano black finish looks great
- Fairly quiet
- Front ports
- Plenty of drive room
- Good quality 380W PSU
- Girlfriend-approved! 🙂
Cons:
- Manual could be more thorough, especially for newbies
- It’s a fingerprint and smudge magnet
- Can only fit ‘shorter’ expansion cards
For its good looks, high quality and fairly quiet operation, I’m awarding the Antec Overture an 8.5 out of 10.


