NVIDIA Firewall is a packet-based hardware implementation of network firewall integrated into nForce2 Ultra 400GB and nForce3 250Gb MCPs. This is truly a revolutionary shift by NVIDIA in terms of motherboard features technology that was there, but was never actually implemented into motherboard chipset. NVFirewall is fully compatible with NVIDIAs Gigabit Ethernet as well as other 3rd party devices.
Introduction
The nForce platform has come a long way since Bjorn3D looked at the first nForce1 back in December of 2001. The original nForce was NVIDIA’s first move into the chipset market for AMD based computers. Since then NVIDIA has introduced nForce2 and now nForce3. NVIDIA has now expanded on its very popular nForce2 platform by upgrading the nForce2 Ultra 400 MCP — which brings all the integrated features of nForce3 250 MCP to the Athlon XP platform.
Here is what we will be looking at with our nForce2 Ultra 400Gb:
- Native hardware features through MCP
- NVIDIA RAID – this includes native SATA and PATA RAID native in the MCP
- NVIDIA Gigabit Ethernet – NVGigE
- NVIDIA Firewall – a firewall implementation inside the MCP
- New NVIDIA nForce drivers and Software
- NVIDIA Mixer – part of Forceware UDA (SoundStorm control panel)
- NVIDIA System Utility – NVIDIAs overclocking and information utility

As you can see this is a nice set of features to be included in the new nForce2 MCP. Also, every native technology outlined above is supported by the Forceware Unified Driver Architecture. There are five major topics (features) we would like to go over in this preview — some are more important than others, but we tried treating them equally giving the end user as much information as possible. So let’s start looking at the new nForce2 Ultra 400Gb.
NVRAID
RAID (Redundant Array of Independent Disks) has not been natively available via nForce2 MCP chipset until today. First native RAID solution was seen on nForce3 platforms — nevertheless not many could enjoy it because the chipset was specifically built for AMD64 CPUs in mind.
With the introduction of nForce2 Ultra 400GB chipset, NVIDIA brought nForce3 250Gb solutions to AMD Athlon XP Market, including native RAID technology called NVRAID. No longer it’s up to NVIDIA partners to carry RAID support for their motherboards this usually means motherboard makers teaming up with chipset manufacturers which results in higher costs. NVIDIA nForce Media and Communication Processors (MCPs) integrate this very useful RAID technology and let you apply high-end disk storage solutions within your own computing environment. Note that RAID arrays can be constructed with SATA as well as ATA drives.

NVIDIA RAID SPECIFICATIONS
- Support for RAID 0, 1, 0+1 and JBOD (just a bunch of disks)
- Single RAID across controllers (ATA and SATA) Spare disk allocation – Shared or dedicated
- Booting from a RAID drive
- On-the-fly rebuilds
- Advanced GUI
NVIDIA RAID BENEFITS
- Value
- Exceptional performance
- Fault Tolerance
- User Friendliness
RAID level 0: Disk Striping
If you seek huge performance increase, RAID 0 is the method you should be looking at. This particular method improves your hard drive’s read and write speeds by striping data across an array of disks (Figure 1). Although safe most of the time, it might be a problem when one of the disks stops working usually, data is lost. So if you are concerned with security we recommend RAID level 1.
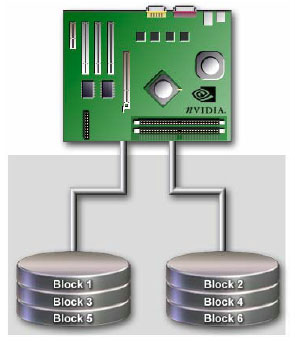
Figure 1: RAID 0: Disk Striping
RAID level 1: Disk Mirroring
With this level, data is mirrored onto the second drive or simply resides on the same disk; in other words, every write is transmitted in parallel creating redundancy within the formed array. RAID level 1 protects the data by mirroring it in case one of the disks fails. This is a more expensive solution because data is written twice, requiring multiple disks or simply more hard drive space. On the other hand this is a great way of creating automatic backups without user’s interference (Figure 2). In case of drive failure NVRAID solution will rebuild the mirrored copy while the operating system is up and running, eradicating the need for rebooting the machine and increasing the uptime respectively very important in today’s business environment. Also RAID level 1 technique will let the user create spare disks which will act as array protectors. This feature is not usually available with standard RAID controllers; however NVIDIA RAID solution does incorporate it inside the MCP chip. It’s a crucial element when it comes to managing and protecting disk arrays.
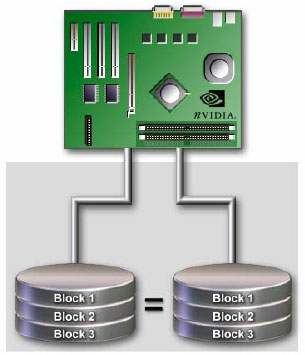
Figure 2: RAID 1: Disk Mirroring
RAID level 0+1: Disk Striping and Mirroring
RAID level 0+1 is a mixture of striping and mirroring (Figure 3). This particular technique grants optimal speed and reliability, but holds the same problem as RAID level 1. It is important to observe that once single drive fails it will cause the entire array to turn into RAID level 0 array.
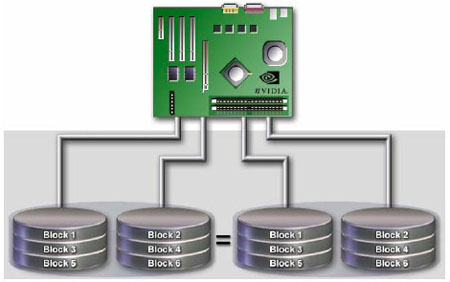
Figure 3: RAID 0+1: Disk Striping and Mirroring
NVRAID User Interface And Functionality
Setting up an array of disks is a really simple task. NVIDIA provides the user with a wizard (Figure 4), eliminating the need for prior RAID experience. Here you can configure each disk and specify RAID level to use.
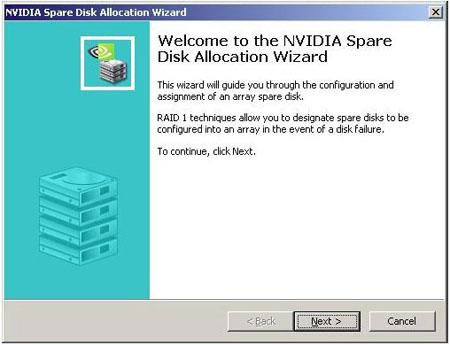
Figure 4: NVRAID Wizard
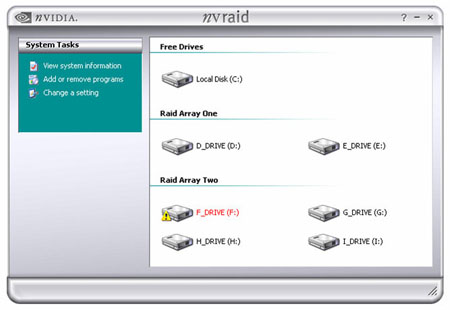
Figure 5: NVRAID utility
NVRAID utility (Figure 5) is a simple and friendly application — it looks and acts just like My Computer in Windows XP.
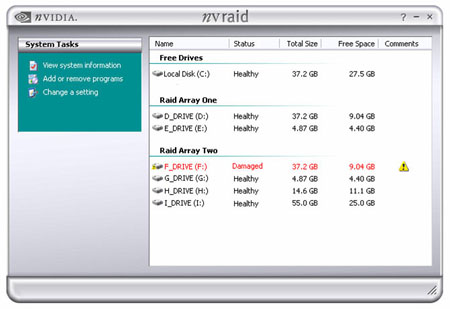
Figure 6: NVRAID utility
The screenshots above illustrate how disks are managed using NVRAID utility (Figure 5). Notice five different columns: Name, Status, Total Size, Free Space and Comments. The window is also divided into rows to distinguish between different arrays and standalone drivers: Free Drives, Raid Array One and Raid Array Two. As we’ve mentioned in the preface, NVRAID acts as a Cross-Controller RAID (Figure 6) meaning it supports both Serial ATA and Parallel ATA devices. The learning curve is short and allows for fast and easy device setup. Another great and valuable feature is that NVRAID controller allows one of the RAID drives to be booted at startup whether you need to setup an operating system or troubleshoot your hardware. The updated NVIDIA MCP definitely brings in functionality up a notch. The native RAID solution allows the users to fully optimize the workflow without the need to educate them first. With few easy steps you will be able to create, reconfigure or manage an array of disks.
NVGigE
Only five years ago Gigabit Ethernet was considered a luxury networking solution something only companies could implement and manage. NVIDIA is the first company to offer integrated Gigabit Ethernet at a minimal cost to its AMD customers. NVGigE delivers ten times more bandwidth than standard Fast Ethernet 100Mbit interface. The great thing about Gigabit Ethernet is that it operates on CAT5 cables so no additional cabling is required (if you have CAT5-based network). As the name implies, Gigabit Ethernet functions at 1 Gbps (1 gigabit per second or 1,000 megabits per second).
NVIDIA GigE FEATURES
- NVIDIA Enhanced Communications
- Gigabit Ethernet
- Integrated 10/100/1000 Mbps third generation NV MAC
- Jumbo Ethernet frame support (up to 9000 bytes)
- Checksum offloads (IP, UDP, and TCP)
- TCP segmentation offload
- IEEE 802.3x flow control
- Traffic prioritization (IEEE 802.1p/Q)
- Wake-on-LAN support
- Capable of waking from S3 or S5
- Remote wake-up (PXE)
- Network management (CLI, Web, and WMI script)
- Alert Standard Format (ASF)
- IPv6
- Security
- NVIDIA firewall technology
- Hacker defense
NVGigE Architecture
Current add-on network devices work over the PCI-bus, however it had to be shared with other high-speed PCI solutions. With that in mind, those connections did not exceed maximum bandwidth of the bus (Figure 1).
Figure 1: Ethernet and Fast Ethernet adapters were usually supported over the PCI-bus
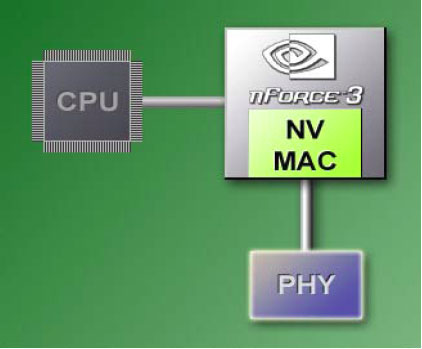
Figure 2: NVIDIA Gigabit Ethernet: A dedicated connection and open interface
With NVIDIA Gigabit Ethernet, PCI-bus limitation is not the case. Native chip-level NVIDIA MAC solution takes care of any bus limitation problems and accomplishes fantastic throughput results. NVIDIA provides what they call a Reduced Gigabit Media Independent Interface (RGMII) for 1000BASE-T Gigabit Ethernet PHY (Figure 2). This is a busless design where NVIDIA MAC is integrated in the core-logic GigE appears as a PCI system device however. With low latencies, NVIDIA claims their Gigabit Ethernet solution is the fastest on the market, while performing at maximum throughput rates.
GigE Performance and Benefits
NVIDIA Gigabit Ethernet operates at a maximum rate of 1,000Mbps or 1Gbps. The optimized Ethernet port was designed to maximize transfer rates and minimize CPU usage, making it a very competitive network solution. NVIDIA’s GigE includes standard IPv4 support as well as IPv6 for future network designs in mind.
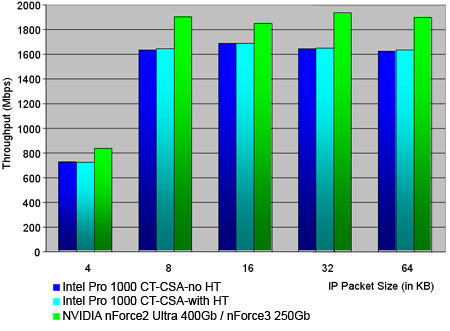
Although we did not have the ability to test GigE’s throughput against other solutions, NVIDIA kindly provided us their scores. Going against Intel network adapter, the native Gigabit Ethernet on both nForce platforms performs quite well throughout five different tests (For each test different packet size is used).
For bandwidth hungry applications, GigE is a blessing. The benefits of choosing a Gigabit network over Fast Ethernet network are outlined below.
- Affordability Integrated Gigabit solutions are becoming less expensive and easier to implement
- Compatible cabling A CAT5 network is Gigabit-ready, no need for cable upgrades or modifications
- Backward and forward compatibility Whether you are on the same or mixed network, GigE can easily coexist within different types of network implementations
Another benefit of using NVIDIA Gigabit Ethernet is the ease of using it. You can manage your connection with included drewCLI (network management suite) — user interface or command line. This user-friendly and intelligent system application is comprehensive and lets you administer over 80 Ethernet parameters.
Gigabit Ethernet is becoming a mainstream solution a crucial part when trying to eliminate bandwidth bottlenecks. It’s simply the next generation of Ethernet standard. Over the years, some argued that they can live with 100Base-T connectivity, but let me tell you; if you transfer large files over your network or share applications at server level Gigabit Ethernet is something to consider. Of course you’d need a Gigabit switch or hub if you were to transfer data over several machines, but with this new standard, limitations tend to disappear and bottlenecks do not exist.
NVFirewall
NVIDIA Firewall is a packet-based hardware implementation of network firewall integrated into nForce2 Ultra 400GB and nForce3 250Gb MCPs. This is truly a revolutionary shift by NVIDIA in terms of motherboard features technology that was there, but was never actually implemented into motherboard chipset. NVFirewall is fully compatible with NVIDIAs Gigabit Ethernet. Although this is a desktop solution, it carries features that can be found in large standalone gateway firewalls.
NVFirewall FEATURES
- Packet-filtering Firewall
- Stateful Filtering
- Stateless Filtering
- Scaling
- Advanced Management Features
- Web-based Browser Interface
- Remote Access
- Logging And Monitoring
- Anti-Intrusion And Anti-Hacking Protections
As you can see, NVIDIAs firewall implementation is pretty impressive. There is more to each feature of course, but that deserves another article something we may do in future.
Packet Filtering Firewall
It is important to differentiate between firewall types in order to understand NVFirewall’s architecture and nature. NVIDIA Firewall is a packet-based hardware filtering implementation. It means that it acts as a Stateless Firewall as well as Stateful Firewall. A Stateless Firewall has been around since early 1990s. It is controlled by deny / permit rules which act on inbound and outbound packets. Each rule consists of Ethernet Type, IP Source or Destination Address, IP options, IP Protocol, ICMP Type and/or Code values, TCP or UDP Source or Destination port, and TCP options. With NVIDIA Firewall traffic can be filtered by Ethernet type, IP Protocol, and IP and TCP options rules. Packets are then matched with each rule, if test is passed traffic is permitted if not, traffic is denied. The more rules, the longer it takes to match each packet (performance hit). Basically, Stateful Firewall is an improved type of Stateless Firewall. This is where Scaling kicks in. Once the connection is made, an entry is written to the connection state tracking table. Then future packets that match that connection are analyzed against the table of allowed connections this eliminates the need of comparing all packets against all sets of rules, thus decreasing the CPU cycles. To determine whether the current packet is in any way linked to previous connection, Stateful Firewall computes the per-packet hash entries denying or permitting the packet.
Advanced Management Features
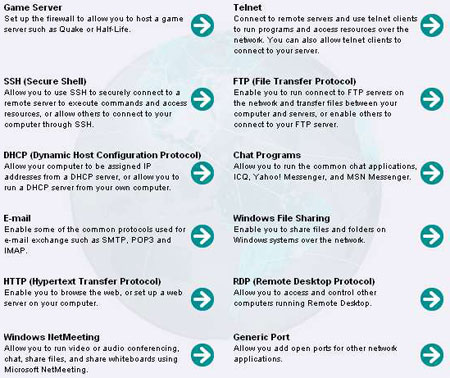
Let’s put behind all this tech gibberish and take a look at how one can configure the NVFirewall. NVIDIA has deployed a very comprehensive and easy to grasp Web-Based Browser Interface . Here you can configure your firewall, check out logs or monitor your connection. Besides the typical firewall parameters and rules, you can enable Remote Access . Imagine being away from your computer, be it a LAN party or office. You desperately need to transfer some files using the FTP client, but you have not yet granted access to port 21 from your remote internet connection. Do not fear, with Remote Access you can do just that and even more just type in your home machine’s IP address in the browser, followed by port number (3476 by default) and voilà!

NVFirewall basic configuration
NVFirewall wizards

NVFirewall Logging
I’m sure some of you are eager to know how firewall Logging works and why is it there in the first place. The nature of a firewall is to block unwanted or unauthorized access, but on the other hand you also want to explicitly permit some access by configuring your firewall rules. In many situations logging is used as a form or debugging you want to make sure that the rule you set is actually working. That’s one example; however a more practical one would be to collect the data and analyze it for future usage. When we talk about network Monitoring we mean a live stream of data (packets) coming through your network interface device. It’s also a useful feature when analyzing network data.
Anti-Intrusion and Anti-Hacking Protections
If you are somewhat interested in networking, you must have heard the term IDS (Intrusion Detection System) or NIDS (Network Intrusion Detection System) it’s usually a software-based solution for detecting connections and port scans to your machine. NVIDIAs implementation takes these ideas a bit further and tries to prevent a possible attack by negotiating with the attack library and thwarting the intruder with the Anti-Intrusion Protection system. When it comes to Anti-Hacking Protections , it’s a bit different story it’s more of a marketing term. Remember real hackers don’t attack random systems (that includes home computers), though the phrase Hacker is what average Joe wants to see. People who break into computers just to cause chaos are crackers or better yet script kiddies.

NVFirewall Packet Status
Anti-Hacking implementation will protect your machine from very popular DDoS attacks an attack everyone is vulnerable to. Most hardware (and some software) firewalls (including NVFirewall) use some sort of attack library from which attacks can be identified and stopped. DDoS stands for Distributed Denial of Service. Basically this type of attack is launched from multiple compromised hosts (using the master host to initiate commands), generating a huge amount of traffic (UDP packets are more severe and harder to track). This is achieved with a technique called IP spoofing. NVFirewall has been implemented with anti-spoofing and anti-sniffing capabilities at the hardware-level to prevent possible DDoS attacks.
There is a whole lot more to NVFirewall than what we’ve discussed above. It’s a drop in the sea if you will. The technology is very advanced, so wise and thought-out configuration will prevent intruders from gaining access to your nForce machine. Again, most DDoS attacks cannot be stopped if the traffic sent to your machine is twice the amount of your available bandwidth unless of course you are behind a five thousand dollar filtering router and a decent 2Mbit connection, though that device would have to be configured properly at your ISP-level. Most ISP’s don’t bother with this and do not filter fragmented UDP packets so most internet users are on their own. Overall we feel that implementing a hardware firewall into a chipset is a great move by NVIDIA, something none of the chipmakers have done in the past.
NVSU
Although the NVIDIA System Utility has been out for quite some time, there have been plenty of updates and tweaks since the first release. Some nForce2 and nForce3 based motherboards are not supported right of the bat, you have to grab the OEM information file and load it up; some are simply not supported at all. For more information go visit NVIDIA motherboard support page
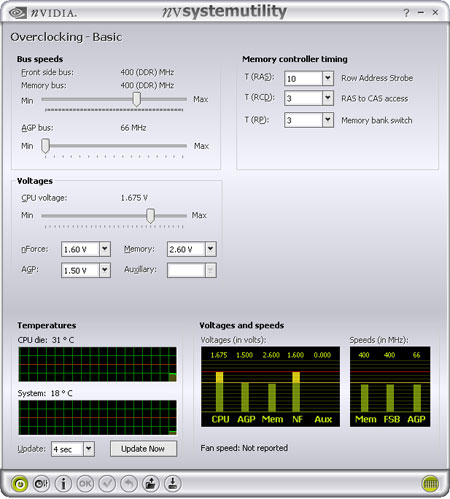
Overclocking Basic Page
As mentioned above some motherboards do not carry NVSU support, however you should be able to load the Basic Page on almost all nForce2 and nForce3 systems. Some settings may be disabled or not functional due to manufacturers BIOS limitations — usually the motherboard maker will include the OEM information file on their website. If you are an overclocker the most annoying thing for you must be resetting your machine all the time for changes to take place. With NVSU however this is done on the fly (live) except for few parameters where rebooting is required. On this page you can adjust the Bus speeds (Memory bus and AGP bus) Memory timings as well as Voltages. As with NVMixer the Graph View Page can be detached by clicking the bottom-right button this will hide the Temperatures and Voltages graphs. You can also change the graph’s update interval if you want.
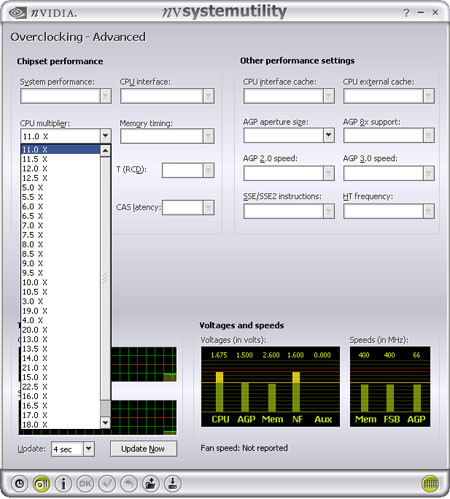
Overclocking Advanced Page
This portion of NVSU is really OEM specific, that’s why some motherboards are not supported by default. Here, most of the options require a reboot because the changes must be made to the CMOS itself. As you can see, NVSU provides a wide variety of multipliers to choose from.

Information Page
Here you can learn more about your nForce chipset (along with motherboard maker information), processor or RAM. This is pretty similar to CPU-Z output though it’s not as detailed. The temperature and voltage meters are very helpful and easy to read. Unfortunately NVSU does not have the option to hide the application to system tray (NVMixer does on the other hand) though we are sure this will be implemented with future versions.
NVIDIA System Utility contains some minor quirks here and there but we are positive those will be ironed out sooner or later. Also when I ran the utility on my other machine I noticed huge CPU usage spikes as well as mouse lags a very weird occurrence, but I’m guessing it’s the BIOS I’m using (not very current one). Overall NVSU is a useful app if you want to replace your 3 rd party monitoring utility, though it would be nice to see better motherboard support something that really shines in 8rdavcore utility.
NVMixer
With the introduction of Forceware Unified Driver 4.24, NVIDIA has introduced a brand new NVMixer for its SoundStorm users. The new mixer replaces the SoundStorm Control Panel found in drivers prior to 4.24. Here is a list of improvements NVIDIA has made to their audio package.
- Audio Driver Improvements
- Introduced NVMixer replaces SoundStorm Control Panel for all audio configuration tasks. Note that NVMixer operates best when run at 1024×768 16-bit color
- Introduced improved AC ’97 / Soft Audio driver adds EQ, speaker cloning, and speaker wizard support
- Introduced Speaker Wizard incorporates all NVSwap features, ensures correct speaker setup on analog or digital speaker systems
- Introduced Cinesurround virtual 5.1 mixdown to headphones or 2 speakers
- Introduced new Environments simple, preset driven sound environments
- Enhanced ASIO support and added support for AC ’97 / Soft Audio systems
- Added user adjustable rear channel creation support adds off, clone, reverb and delay
- Added support for Realtek ALC655 codecs, Realtek ALC658 codecs, and 7.1 support for Realtek ALC850 codecs
- Added support for WMV-HD audio streams and WaveFormatExtensible calls
- Improved playback of mono content
- Addressed audio issues in numerous games and applications
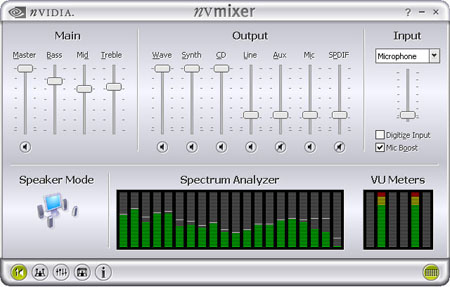
Main Page
In order to install the new NVMixer you must have DirectX 9.0 or higher most likely because of improved hardware audio acceleration. Once you open the mixer, you are presented with bunch of buttons and sliders. On the bottom you will see taskbar-like menu with six buttons. Most are self explanatory, but if you want to learn more just hit the ? in the upper-right corner and point to the slider or a button. You can also get tips on Speaker Mode and Spectrum Analyzer. The tips are very handy if you are looking for instant help.
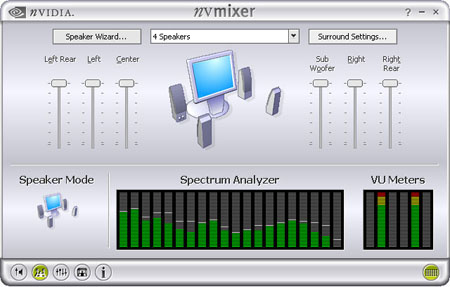
Speaker Page
This page is dedicated to setting up and configuring your speakers. Notice that the bottom portion of NVMixer does not change as you swap between pages. It’s really nifty as it always shows you the Speaker Mode, Spectrum Analyzer and Volume Unit Meters. The sliders here are handy for optimizing and configuring your speakers. In the top middle section you will see a drop down listbox from which you can choose your speaker setup as you can see, mine is set to a 4 Speaker mode. Even if you don’t use surround speakers you can still adjust Left Rear, Right Read and Center parameters if the sound is being pre-mixed down from surround-mix. However Sub-Woofer slider is exclusive to 5.1 and up speaker setup.

NVIDIA Speaker Wizard
For configuring your speakers you can either do it manually by choosing your speaker setup (above) or you can use the wizard. It’s a very handy and easy to use tool if you are unsure of what kind of speakers you have. It’s a step-by-step process where the wizard will ask you friendly questions note that you must connect all your speakers according to your manual. Same applies to other devices such as headphones and microphone.
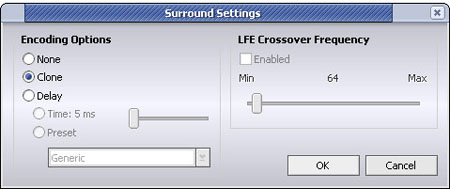
Surround Settings
Here is where help tips might come in very useful. If you have a surround speaker setup, use the Surround Settings parameters (located to the right of speaker configuration options right upper-hand).
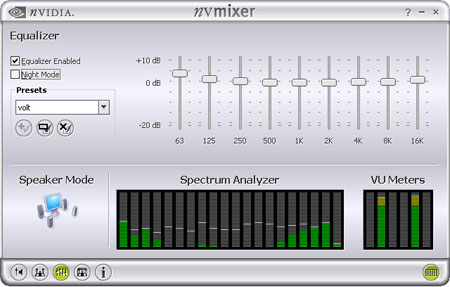
Equalizer Page
The NVEqualizer is one of the coolest options in NVMixer. The sliders here are for adjusting frequency range. You can set those manually or use one of the presets provided by NVIDIA about twenty of them. The new audio panel also includes the Night Mode setting for quiet playback.
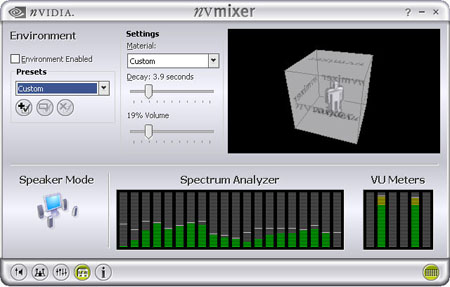
Environment Page
Environment effects in the new NVMixer are somewhat different from the old mixer though the same principles apply. You will notice a new parameter here called Material. It’s used to adjust the room environment. Not all rooms are built the same. In other words you have three presets to choose from: cloth, plastic and material to fit your room setting and objects. There is also a custom option if you want to adjust the material setting manually just use the Decay and Volume sliders. The Presets listbox contains around thirty NVIDIA entries alas no more Alien preset.

Information Page
This page contains information about your nForce APU, driver versions as well as some audio statistics useful for gaining quick information about your chipset or built-in audio codec. There is also an option to revert back to System Defaults which basically resets all the options and parameters. Last but not least is the button on the bottom-right side. Should you feel your NVMixer is too cluttered just press that button and the Meter View (Speaker Mode, Analyzer and VU Meters) will magically disappear.
The NVMixer is a nice addition to the whole Unified Driver package. Most users will find it friendly to navigate around it and will appreciate the ample amount of parameters to play around with. No need to hit Apply button, the sliders are interactive and changes are immediate.
Conclusion
As we can see NVIDIA has continued to expand the capabilities of the MCP and has done an excellent job in bringing their newest technologies to the nForce2 family for AMD XP users. Native RAID, Gigabit and Firewall are the three major features included in the updated MCP — definitely technology to consider if you are looking for an overall system upgrade. We can safely say, the new nForce2 Ultra 400Gb is a all-around multimedia platform. We will be using this system along with our nForce 3 150Pro system in forthcoming video card reviews. This will let our readers know how well the new products work with Athlon XP systems.
We cannot comment on products under NDA from NVIDIA but the company has some really cool surprises coming in the near future. They will continue to build the MCP technology for home, corporate users as well as hardware enthusiast.