Will the Ballista satisfy our reviewer’s need to hurl?
Introduction
Sometimes I just want to hurl. Not that excretory function that college students and new parents are so familiar with, but the act of making stuff fly for long distances. There’s just something wonderfully visceral and cathartic about making things fly through the air and smash into the ground. That’s why I started a quest for my very own siege engine.
A siege engine is a term used for weapons designed to break or bypass the walls of a fortress, city, or shelter. The classic Hollywood catapult is an example of a siege engine, although in reality it didn’t actually exist in the form commonly depicted on the silver screen (giant spoon used to shoot fake boulders and wooden rabbits at heckling Frenchmen). Recent depictions in “LOTR: The Return Of The King” and “Timeline” more accurately depict working trebuchets, which is what were really used in times of old to knock down castle walls. TV surfers may have seen a fascinating documentary on The History Channel that depicts many siege engines, including modern day versions used by hobbyists to chuck pumpkins and other squishy objects. Viewers of The Discovery Channel’s “In The Name of Science” may have recently seen an episode where the crew constructed a 4 story steel trebuchet and used it to launch flaming wooden pianos and a junked car (Opel Manta, to be precise). Very inspiring stuff!
I was interested in having my own catapult before watching The History Channel documentary, but viewing it just sealed the deal for me: I had to have my own! I started searching for “catapults” on the Internet and found that “trebuchet” is what modern day builders are really looking for. There are numerous Web sites that offer experiential information and rudimentary plans for siege engines, most of them trebuchets. And most of those sites point to the One Source for hurling, Ron L. Toms’ Trebuchet.com.
Ron Toms is a siege engine hobbyist who took advantage of a dot-bomb layoff to live his dream of running his own business (see his bio). Today he operates several Web sites that sell kits and information on siege engines and cool toys. In fact, he was the evil genius behind the Discovery Channel’s steel trebuchet. I decided to take the comparatively easy route of buying a kit for my first siege engine. I thought it would be best to let someone else do the engineering and then build upon the building experience with future (and hopefully bigger) iterations.
Going Ballistac
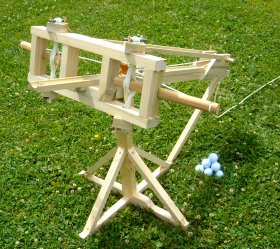
What I really wanted was a trebuchet capable of hurling melons. Unfortunately, my discretionary income didn’t allow for that. Smaller trebuchet kits, such as the Scorpion, looked promising, but I wasn’t sure how much of a payload they could handle. An even greater knock against them was the fact that I had money in hand and they were out of stock! I eventually settled on a Ballista because 1) it looked pretty cool and 2) it looked as though it might be able to hurl interesting objects.
A Ballista is a pre-cursor to the crossbow. Instead of a bow, the Ballista uses twisted skeins of rope to provide resistance and the rebound action for two swing arms. The Greeks and Romans used Ballistas of varying sizes, and according to Ron Toms the largest ones could throw projectiles weighing up to fifty pounds as far as 400 yards! The kit version claims it “shoots golf balls, tennis balls, eggs, lemons, tomatoes or just about anything small and round.” The advent of more efficient siege engine designs relegated the Ballista to history’s trash bin, but even today it still looks pretty lethal.
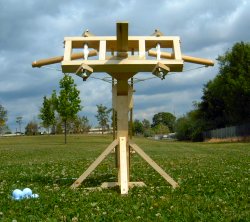
Having made my decision, I placed my order and within a week a large box was waiting on my doorstep. The completed kit is 41 inches long and 24 inches wide (not including the sweep of the arms). It stands 31 inches tall and, according to Toms, is capable of hurling a golf ball over 200 feet. I was immediately impressed with the quality of the materials. I’m not a craftsman, but I’ve put together enough prefab furniture in my life to appreciate good machining. All wooden parts were true, smooth, and dry-fit together perfectly. It was quickly apparent that one cannot make a kit like this from scratch without some serious woodworking tools. My tool collection gets better every year, but I’m a long way off from owning all the equipment required to produce parts like these!
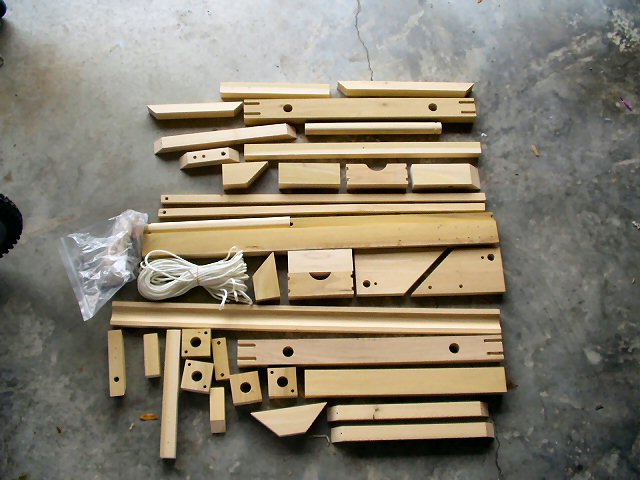
The parts all laid out.
Building A Ballista
The Ballista’s Web site claims, “All parts…can be assembled to a working model in one evening.” That might be true if you use instant or fast-setting glue, but I would count on at least a week of evenings to finish it. The load bearing parts MUST be completely set before subsequent assembly can begin and I highly recommend taking one’s time to ensure the glue dries completely. I used Gorilla Glue, but epoxy or wood glue would also work well. The instructions are pretty straightforward and for the most part easy to follow. Some of the photos used in the instructions are a bit dark and grainy, but are still usable. Tools required are standard: A screwdriver, rubber mallet, and clamps are all you really need. However, I HIGHLY recommend that you invest in large-size clamps. A cheap set of C-clamps will do, but spending a little more on something similar to what I have will pay off for many future projects. The clamps are essential for proper construction and tightening the skeins of rope around the swing arms.
|
As far as I got in construction the first day. The feet belong to my two-year old who was a tremendous help, especially with hammering and asking, “What’s that, Daddy?” about a million times. |
The tail end which houses the drawstring winch. |
You need big clamps! Those boxes in the background are wood flooring that I was supposed to be installing instead of building dangerous toys. |


|
Lotsa clamps, and we’re about ready to add skeins. |
This is the business end. Don’t look down this barrel when it’s cocked and loaded. |


Construction initially went very quickly, but then I discovered dowels required for securing the frame were missing. I sent an e-mail to RLT.com and within a day they had shipped the replacement parts by priority mail. The remaining assembly went very smoothly until I ran into two problems, one self-induced and the other designed into the kit.
The skeins and swing arms are secured by steel capstans and metal pins. Holding the upper and lower sets in place is difficult without an extra set of hands. Having just two of my own, I had the brilliant idea of securing the capstans with tape while I threaded and tightened the nylon rope. Bad idea. I stupidly left the tape in place between the wooden frame and capstans. The instructions clearly state that friction is all that holds the capstans in place once you tighten the skeins. As you’ve probably guessed, the tape lowered the friction quotient and allowed the capstans to move once tightened. To fix the slipping capstans I ended up taking the slippery side apart and sanding down the slick wood. This resolved the problem with the bottom capstan, but I could not get the top to stay in place once tightened. In the end I tightened it as much as I could, then drilled a hole into the capstan assembly and frame and secured both with a wooden dowel. The dowel is removable should I need to re-tighten the capstan at a later time. I worked around the problem, but could have saved myself a lot of effort had I just used my brain a little.
The second issue is probably a little brain-related, but I also attribute it to design and/or the instructions. The payload is held in place by a leather pouch, much like a slingshot’s. However, I had great difficulty getting the leather pouch centered and tight enough to reliably fire a projectile. The instruction’s illustration of the pouch was, unfortunately, the worst of all the diagrams in the packet. I believe I followed the directions correctly, but this area continued to be problematic. I’ll describe more about it in the test firing.
Fire!
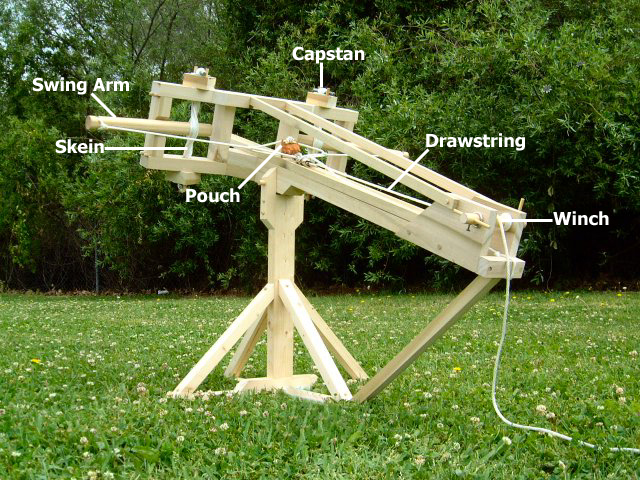
Once assembled, firing the Ballista is pretty simple. A drawstring is attached to a dowel that has two small handles. The other end of the drawstring attaches to the steel trigger mechanism which, in turn, attaches to the pouch assembly. The two small handles are used to crank the drawstring tight. This isn’t necessarily easy if you put a lot of tension in your skeins (which you will do because you want to hurl stuff as far as possible). In fact, it’s tedious. My list of to-do’s includes building a fast-loading handle assembly. Once the drawstring is fully tightened, a wooden dowel holds it in place. The firing mechanism is triggered by pulling firmly on an attached rope and then the payload is hurled into the air with an impressive “thwack!” when the swing arms hit the frame.
At least that’s the way it’s supposed to work. I, unfortunately, saved my initial firing for Easter and the satisfying payload of dyed eggs. In front of a large and eager audience. I quickly discovered that the tension between my two swing arms was unequal and that both arms were not centered properly in the skeins. This resulted in the egg hitting the crossbar and showering me with egg bits. My audience found this amusing, but I didn’t find it quite as satisfying as shooting the egg at high speed at its intended target (a retention pond, not my neighbors).
This educated me to be patient when aligning and tightening the skeins. The directions state how important it is to provide equal tension and to center the arms. I, of course, failed to follow those instructions in my haste to hurl. Following the directions yielded far better results. Out of eggs, I switched to golf balls and I believe I was able to achieve the stated results of 200 feet. I’m not entirely sure, because I shot the golf balls into a retention pond and woods behind my house. There’s too many snakes in the woods to trek through with a tape measure and swimming in fertilizer/pesticide water isn’t high on my list of things to do, either. Therefore I estimate that the travel distance is correct.
Alas, there’s a rub to this story. Although I was able to achieve hurl status, I have yet to do so reliably. Something always needs to be tweaked. The swing arms must have equal tension, which means I have to carry around the large clamps used in construction to tweak the capstans. The payload pouch doesn’t reliably launch the projectile, either. I’ve tried at least half a dozen variations, but none work any better than the kit’s design. I believe that the design is sound because I’ve read numerous accounts of success using the same or similar designs. It is possible, even probably, that I’ve managed to dork up the process and that one day the Light of Understanding will allow me to make more sense of the design.
Conclusion
I did experience problems building and operating the kit. However, most were entirely my fault. I’m still not sure if the pouch assembly is the design possible and the constant aligning and tensioning of parts deters from the fun (if your primary goal is to hurl stuff). With that in mind I am awarding the Ballista 7.5 out of 10 with a few caveats and notes:
- The Ballista is not the most efficient siege machine ever built. If you ultimately care most about distance and size of payload, buy or build a trebuchet. Or a cannon.
- I enjoy building things as much or even more than actually using them. Building the Ballista kit was a lot of fun for me, but if you’re more interested in using than building, you may want to reconsider purchasing a kit. RLT does not sell assembled items, but you may be able to find a friend or relative willing to have a go at it for a nominal fee.
- The Ballista is designed to be, or at least look, historically accurate. As such, not everything is as efficient as possible for firing. The crank mechanism for the drawstring, for example, is a bit of a pain to use. If you favor function over form you will want to make modifications that simplify or speed up operations. If you want to retain the original look, the Ballista will never be a rapid-fire machine.
- If you intend to own just one siege engine, I would not suggest the Ballista as your first and only purchase. However, military historians and hobbyists may think that it’s the coolest thing ever. Heed my warnings and learn from my mistakes, but don’t let my experience dissuade you from experimenting with multiple siege engines.
These few qualifications aside, the Ballista is a truly unique, well-designed and manufactured kit. It’s fun and relatively easy to build and has barely whetted my appetite for more destruction. As soon as I have the time, I’m moving on to building a floating arm trebuchet from scratch!


