AKVIS Noise Buster is a plug-in that works with the the above captioned video editors as well as many others to reputedly help reduce and smooth the ill effects that digital noise creates in your photos and other digital imagery.
INTRODUCTION
The advent of digital photography has proven to be a godsend to both professional and amateur photographers alike. This technology has freed us from the confines that once existed with film based photography where most amateur photographers and some professionals were merely willing participants in a three-step process that led to a finished image. Those steps consisted of: 1) Capturing the image on film; 2) Processing or developing the image (creating a negative); and 3) Printing the image on photographic paper. In short, you could capture the best photo possible, but your “work of art” was at the mercy of the person(s) involved in the final two steps. Today’s digital cameras have given consumers somewhat of a free reign over the complete presentation of their work.
Digital photography is not however without its drawbacks. The digital consumer has had to learn a whole new bunch of tricks to perfect his/her work; namely becoming proficient with the use of digital editing software. Many excellent software products such as Adobe Photoshop, Corel (Jasc) PaintShop Pro, and Ulead PhotoImpact have been developed solely for this purpose, and each does its job quite well. Even with powerful tools such as these there are still some areas of digital editing that need strengthening. The product we’re going to study today, AKVIS Noise Buster, fills one of those gaps.
AKVIS Noise Buster is a plug-in that works with the the above captioned video editors as well as many others to reputedly help reduce and smooth the ill effects that digital noise creates in your photos and other digital imagery.

A CLOSER LOOK
For the record, let me state I am at best an amateur photographer who uses digital imagery primarily in capturing photos for presentation when reviewing computer related products and also for taking and archiving family photos. I have an average knowledge of this subject, so this product review will hopefully be a learning experience for me as well as those that read this article.
What Is Digital Noise?
While I have a fair understanding of the concept of digital noise, I thought it in the best interest of this review to find a solid working definition that was simplistic enough for the beginner yet meaty enough for the more advanced digital photographer. Was this an easy task? Absolutely not! For that reason, I chose to paraphrase and cut and paste excerpts from several more technical references to meet the need of this review.
Digital Noise: anything visible in the captured image that was not present in the scene you originally photographed. Noise can consist of random flecks of color that serve to degrade the smooth or transitional color of an image. While digital noise can appear in many forms, it can be predominantly seen as grains that compromise the smoothness of the photo. It is especially annoying on the skin as it makes it appear uneven. This kind of noise is called luminance noise. There is chroma (color) noise, which is perceived as random red and blue pixels spoiling the color accuracy of the image. Digital noise can be produced by a number of factors: heating of the camera sensor, long exposure shooting, small pixel size, high ISO settings, radiant light reflections, etc.
AKVIS Noise Buster claims the ability to reduce both luminance and color noise on digital images without spoiling other aspects of your photo. We’ll investigate this claim in more detail later in the review.
Installation
Remember AKVIS Noise Buster is a plug-in so setup is incumbent upon having one of the following photo editing tools installed:
- Windows Products:
- Adobe Photoshop
- Adobe Photoshop Elements
- Corel Photo-Paint
- Corel Painter
- Corel (Jasc) PaintShop Pro
- Ulead PhotoImpact
- ACD FotoCanvas / Photo Editor
- Macromedia Fireworks/MX 2004
- Microsoft Digital Image Suite
- Photo-Brush
- MAC Products:
- Adobe Photoshop
- Adobe Photoshop Elements
- GraphicConverter X
My editing program is Jasc PaintShop Pro version 9.01 (the last version produced entirely by Jasc prior to being purchased by Corel), one of the supported packages. Installation was completely straightforward, consisting of starting the setup file (akvis-noise-buster-setup.exe) and following the on-screen instructions. Noise Buster requires registration and licensing once the 10-day fully functional trial period has elapsed. A registration code is emailed to the user after paying the $49.95 USD registration fee.
SOFTWARE FUNCTIONALITY
To access the Noise Buster plug-in using Corel (Jasc) PaintShop Pro, first open any image in the editor window and then click on Effects -> Plugins -> AKVIS -> Noise Buster:

Click to Enlarge
Clicking on “Noise Buster” brings up a separate screen with the image you chose along with Noise Buster’s editing features:

Click to Enlarge
The screen is divided vertically into three areas: 1) The Before tab which shows the initial image selected without any filtration; 2) The After tab which shows the filtered image; and 3) The Navigator area contains the various automatic and manual filtration tools.
In the upper right portion of the window there is a Toolbar with the status bar and the following buttons:
- The
 button launches filtration of the whole image. Before you press this button the filtration result is shown only in the preview area.
 - The button allows applying the filtration result to the image and closes the AKVIS Noise Buster window.
- The button allows calling information about the program.
- The button is designed to call the Help files of the program.
- The button allows selecting the language of the program’s interface. To switch to another language, you should left-click the button and select the required language from the fall-out menu.
- The button allows closing the program window without applying the filtration result.
Navigate and scale an image using the Navigator window. In the Navigator you can see the reduced copy of the image. The red frame shows the part of the image that is now visible in the Image Window. You can drag the frame to make other parts of the image visible. To move the frame, bring the cursor inside the frame, press the left mouse button and, keeping it pressed, move the frame in the Navigation window.
The slider area ![]() just below the Navigator window allows the user to zoom in (up to 600%) and out (down to 5%) on the image to determine the area of detail to be filtered.
just below the Navigator window allows the user to zoom in (up to 600%) and out (down to 5%) on the image to determine the area of detail to be filtered.
The next button moving vertically downward is Automatic Filtration. Applying automatic filtration of the image by pressing the button Automatic Filtering” will allow the software to pick a portion of the image to filter. The result of the filtration will be shown in the “After” tab in the preview area. The preview area represents a dotted frame. You can drag the frame or draw it anew on any part of the image, thus analyzing different parts of the photo. With a left-click on the image you can temporarily switch to the Before tab and compare the result of automatic filtering with the original photo in the preview window. To filter the whole image, press the ![]() button.
button.
If the result of automatic filtration is not wholly satisfying you can adjust the settings to achieve the best result. The task of noise reduction is to find that optimal point between suppressing noise and keeping detail. Besides, it is important to take into account the psychological characteristics of visual perception: when comparing the original and the filtered photo pay your attention not only to details but to the overall impression as well./p>
The Manual Controls
Next we’ll view the manual controls that allow the user a more complete freedom in manipulating the noise factor of their image.
Fade: This parameter sets the mixing ratio of the filtered image and the original. The parameter values vary between 0 and 100%. At 100 % all elements of the photo defined as noise are smoothed in accordance with the value of the parameter Smooth Level. As you move the slider to the left (i.e. reduce the value of the parameter), the original image noise mixes into the filtered image; at 0% there is no filtration at all. In most cases certain amount of original noise adds to the natural look of an image and allows restoring small details.
Luminance & Chroma Noise
- Noise Level: This parameter defines which elements of the image are to be considered noise (luminance or color) and which are to be considered important details. At high value of the parameter small details can be defined as noise and, therefore, be smoothed.
- Smooth Level: This parameter sets the extent to which the elements defined as noise should be smoothed. The higher the parameter, the smoother the filtration result. However, at high values of the parameter, an image can lose in detail and look flat. High values of the parameter Smooth Level for color noise can produce an alteration of colors and loss of small color details.
In addition to the five main parameters there are two optional or advanced parameters for use:
- Blur: This parameter allows increasing smoothness of an image, if needed. The higher the parameter, the smoother the image surface. The parameter can be helpful for retouching of portraits; when small details are not so important and it is essential to smooth the skin and add “glamour” to a portrait.
- Sharpen Edges: Noise suppression may also affect the sharpness of a photo. The parameter allows regulating the sharpness of the objects’ edges. The default value usually offers a satisfactory result, but it is possible to increase the value of the parameter to improve sharpness. However, it may also cause retrieval of the original noise.
TESTING
Testing Methodology
To test the ease of use and real benefit of this, I’ll select a few of my photographs. Each photo will initially be in its original context. Next, we’ll attempt automatic filtering of the entire image and see what benefit if any we gain. Finally, I’ll attempt to adjust the photo using the manual adjustments available along with the advanced options to ascertain any improvement in the noise reduction. Each of the photos was taken using a Fuji® FinePixS5200 5.1 megapixel camera using fully automatic settings as not to add any additional filtering by the camera’s built in features. Photos were taken a different resolutions to where possible enhance the digital noise for this test. I’ll use the following acronyms to show the amount of change made to the images:
- Luminance Noise Level = LNL
- Luminance Smoothing Level = LSL
- Chroma Noise Level = CNL
- Chroma Smoothing Level = CSL
- Fade = F
- Blur = B
- Smoothing Edges = SE
Picture #1 … Our Dog
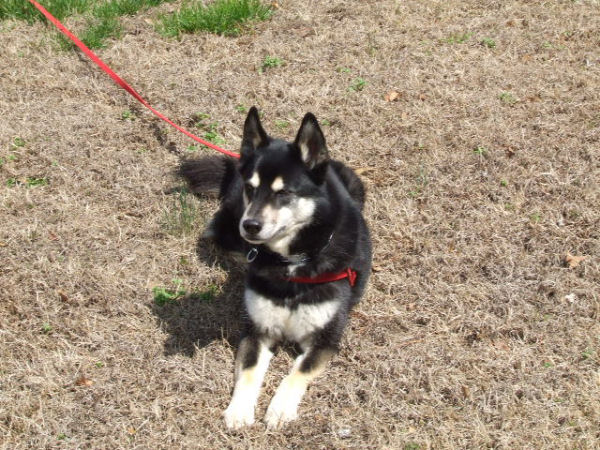
Original Context
Automatic Filtering
F: 75% LNL: 16 LSL: 2 CNL: 33 CSL: 4 B: 0 SE: 0

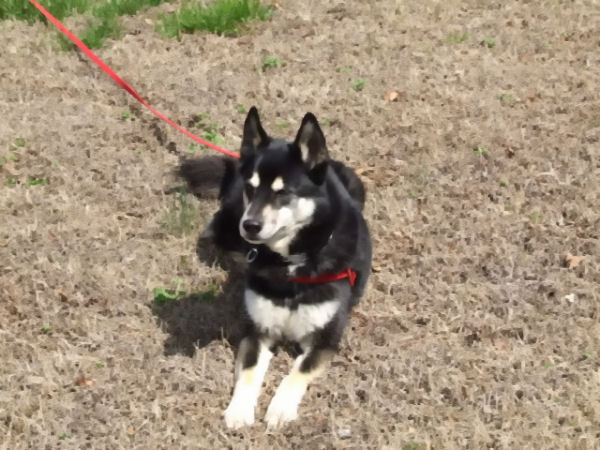
Manually Filtered
F: 75% LNL: 22 LSL: 2 CNL: 24 CSL: 4 B: 0 SE: 10
Picture #2 … Outdoor Flower

Original Context
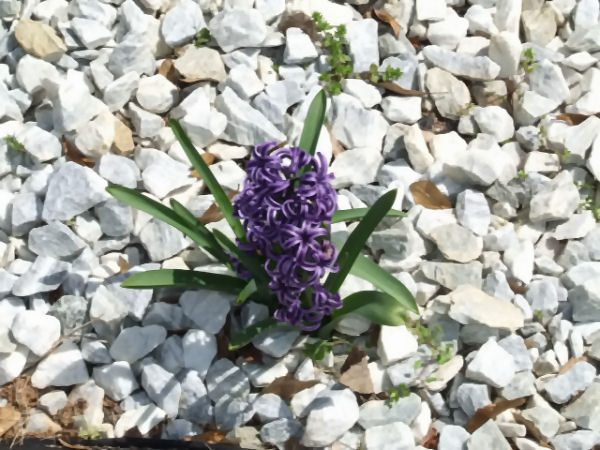
Automatic Filtering
F: 75% LNL: 6 LSL: 1 CNL: 19 CSL: 2 B: 0 SE: 0

Manually Filtered
F: 65% LNL: 10 LSL: 4 CNL: 12 CSL: 4 B: 2 SE: 4
TESTING cont’d.
Picture #3 … XFX REVO64 Bundle
Sorry I simply couldn’t resist it! I had to throw in a computer picture for which I most use my digital camera. Looking at this image of the complete package associated with the XFX REVO64 RAID system makes it obvious I need some help.
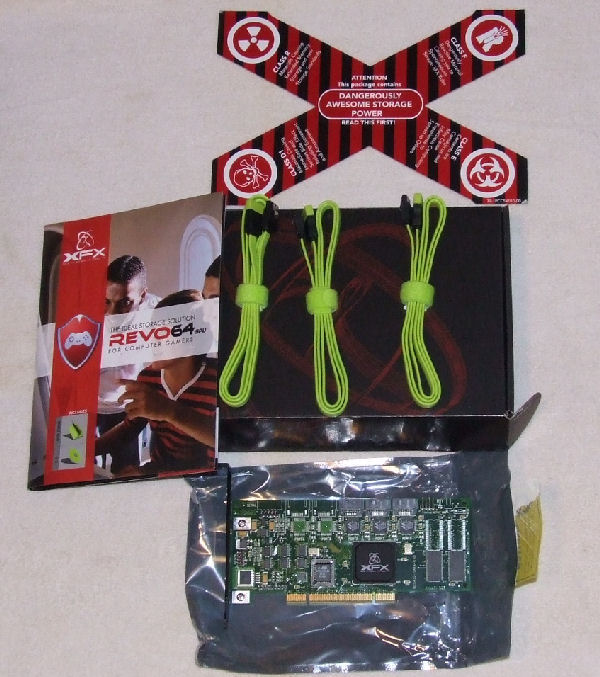
Original Context

Automatic Filtering
F: 75% LNL: 10 LSL: 1 CNL: 32 CSL: 3 B: 0 SE: 0

Manually Filtered
F: 60% LNL: 6 LSL: 1 CNL: 20 CSL: 2 B: 2 SE: 6
There is no doubt in my mind that there is improvement using this tool, in some cases very significant. It’s also pretty obvious that the automatic filtering is better at making the changes than this author is.
CONCLUSION
Well I’ll have to admit when the opportunity to do this review was first presented to me, I was somewhat reticent. Namely because digital photography is not my strong suit. Art in general has always been a perplexing mystery to me and that’s one reason I married a professional artist another is so that my clothes would match on a daily basis. I chose to do the review an present it from a “real life” perspective and hopefully make it a learning experience for you as well as I. Learn, I did!
This product along with a desire to improve my floundering skills when it comes to digital imagery made me do a fair amount of research and inturn learn some very valuable lessons that I will proper from. As far as AKVIS Noise Buster is concerned, I found nothing at all wrong with it other than a price tag that I feel $49.95 is on the high side. For that asking price I feel a few more editing features should have been included. Noise Buster does however perform those editing functions it advertises rather flawlessly which is a rare commodity in today’s marketing hype filled world.
Although I’ll never be a professional photographer, I fully intend to add this package to my arsenal and use it with almost every digital image I produce in the future. For that reason alone I know both you and I will prosper from exposure to this excellent product! I highly recommend it to those you that fit in the same category as me, the artistically challenged. For those serious professionals that certainly better know how to manipulate the buttons than I, you’ll too prosper from this product’s manual noise reduction features, unless of course the photos you take never have this problem :-).
Pros:
+ Easy setup and implementation
+ Automatic Filtering
+ Excellent manual controls for both noise reduction and smoothing
+ Overall ease of use
+ Blur & Sharpen Edge parameters
Cons:
– Price tag is a bit high
– Not as feature laden as I would have liked for the asking price
Final Score: 8 out of 10 and the Bjorn3D Seal of Approval


