This has to be one of the best cases I have played around with and actually used. Your PC components are kept cool with four large fans. On the other side, the fans are not loud at all; the smaller ones are controlled so you can either crank them up or lower them to a point where they are pretty much silent.
Introduction
There are legions of companies out there selling all kinds of PC cases. Buying one actually creates a problem. Have you ever browsed an online store – let’s say newegg or komplett – to pick a case? If you haven’t, then just look through and try to pick a box that’s right for you. Unless you know what you’re looking for, your mind gets saturated with all kinds of designs, colors and innovative technology. If you don’t know what to choose, then reading Bjorn3D will help you make up your mind — and that applies to anything.
For the sake of this article, let’s just say you’re looking for an ATX (with BTX compatibility), server-like case with lots and lots of room inside. Narrowing your search, you want a lot of fans (great if they were featuring blue LED too), tool-free assembly, side window and at least 8 x 5,25″ drive bays, but you don’t want it to be too expensive.
Heck, I have just that and even more! In our lab today, I have Thermaltake’s Armor steel chassis for your reading and viewing pleasure. Some will say, “Steel sucks; it’s too heavy or warms up too quickly.” You’re correct, but only partially. First things first, so let’s start from the beginning.
Features
- Support to 11 5.25’’ drive bays
- Relocateable front control panel (Power, Reset switch, HDD & PWR LEDs)
- Support up to Extend ATX & BTX
- Ventilation opening on top ( 62% opening ratio)
- Built-in 5.25’’ drive bay accessory box
- High efficiency ventilation: Dual 12cm silent fans in front & rear, 9cm fans in rear & top
- Dual USB 2.0, IEEE 1394 Firewire, Audio & Speaker ports
- Retractable foot stand
- Removeable HDD cage
- 3 x 3.5″ HDD module with 12 cm blue LED fan
- HDD & FDD rack Relocate-able HDD & FDD drive bay
- Tool-free installation for 5.25″ devices
- Screwless slots for easy assembling
- Extra large thumb screws for easy open side panel
- Side Panel lock
Specs
Should you need more detailed specifications of Thermaltake’s Armor VA8000BWS, here they are right below.
Package & External Design
The Thermaltake Armor case arrived in a yay big box — and I do mean it. At first glance, I thought it’s twice the size of a regular tower. Only when I took it out, it looked much smaller. The carton it came in was not damaged at all, and everything seemed to be going smoothly. The design of the box is looking nice, highlighting the main features of the case as well as actual picture of what you’re receiving.
I must say I was happily surprised about the equipment. There are a lot of accessories that are mounted inside, including 4 fans (2x120mm and 2x90mm), drive cages, accessory box and PSU support hook. The package came of course with user manual, a pack of screws (all kinds), watercooling protection tubes for retaining holes, cleaning cloth and equipment I’ve already mentioned above.
Click a picture to see a larger view


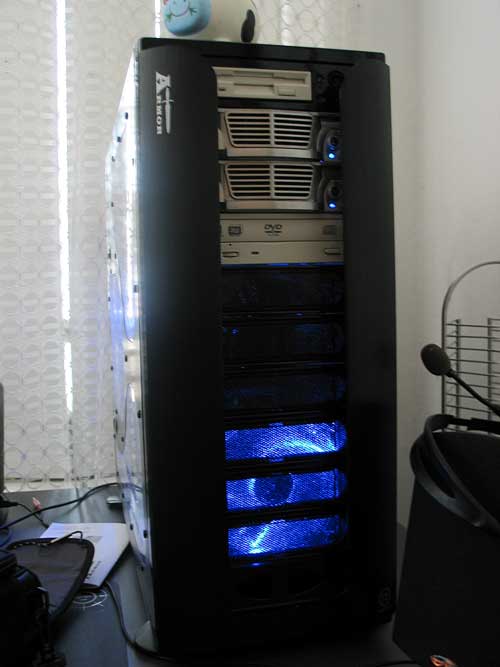
Looking at the back, you can see a PSU opening that is mounted vertically and a 90mm fan. If you look closely, you’ll notice those 4 retaining holes for watercooling kit that I talked about. Thermaltake also includes lock keys at the back of the case which can be seen above the back fan. Notice extra large thumb screws for your panel. This is actually a good solution as it’s easier to grip than regular thumbscrews.
The lock on the side door isn’t necessarily something everyone will use, but the opening has been thought of. In order to open the door, you need to push both buttons and swing the side panel out. On the top of the case, you’ll find ventilation holes that are used for the top fan. As you can see from above images, Thermaltake includes USB / Firewire / Audio ports on the top instead of placing them vertically on the side. It’s a cool idea as it comes with small closing doors to cover it up when not used.
On the far bottom, you’ll find an accessory box fitted into one of 5,25″ drive bays. Drive bay covers are made out of a plastic cover, some sort filter and a mesh. Anything on the front panel can be interchanged, meaning you can place your accessory box and drive tray with power button anywhere you like. Of course how could I forget about the aluminum swivel doors? The last four pictures nicely show the little addition by Thermaltake. It’s only for aesthetics, and it doesn’t really serve any purpose other than to look nice.
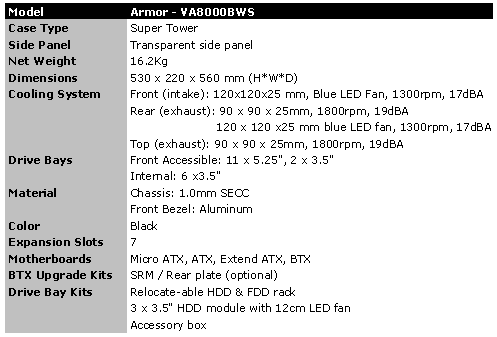
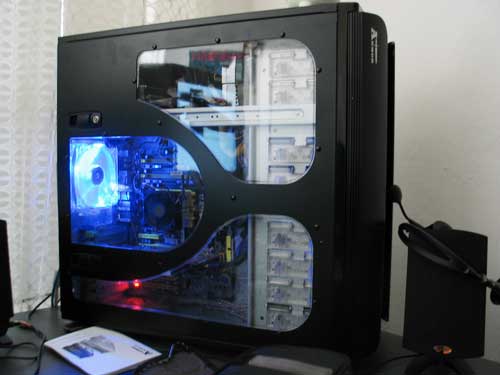
Internal Design
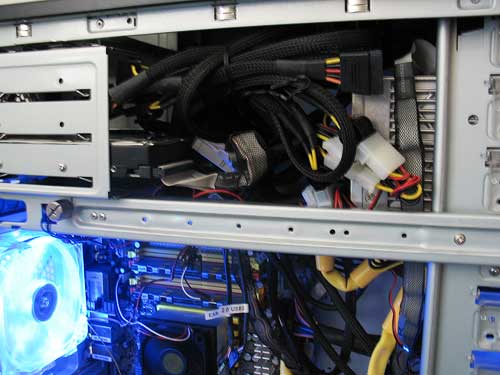
The internal is as interesting as the external design, though there are more gadget-like accessories to play around with: fans, drive cages, front IO panel, tool-free mechanisms and more. The size of the case gives users a lot of freedom and ability to mount a watercooling kit without any hassle. Should you need BTX compatibility, Thermaltake has it all for you — just order it from their website, and you’re set.
Let’s get it started and go over some of the inside ideas in detail.
Click a picture to see a larger view


As the name of the case implies (Armor), Thermaltake implemented a sort of security system (besides the lock of course). There is this micro switch right next to the front panel. When you connect it and someone opens up your case, an alarm will go off.
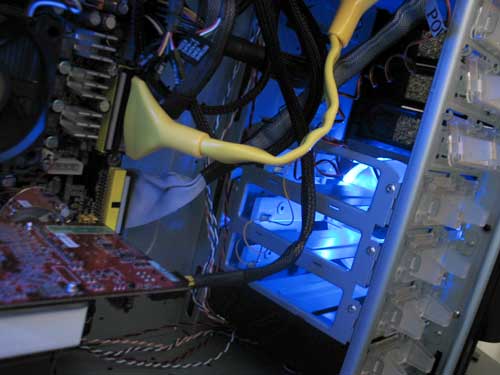
The front cage can be taken out just by unlocking the tool-free clips. In there, you can put anything you like (must be 3,5″ though). When you take out the cage, you’ll notice that the front 120mm LED fan is mounted to it. Of course, you can slap the cage somewhere else if you like. The floppy drive cage is not totally tool-free. You need to unscrew both sides before you can remove it and put your FDD inside. Also the 4th drive bay from the top is not tool-free at all because of the horizontal steel support component going across the chassis.
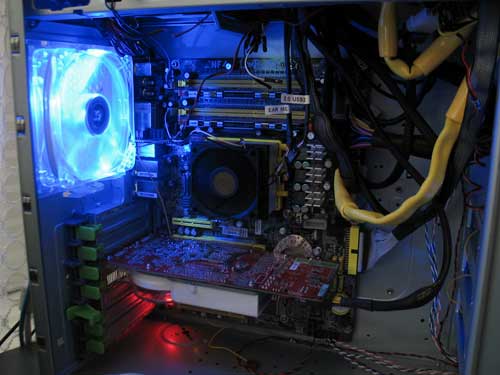
Unfortunately, this case does not come with a removable motherboard tray. As for the PCI slot tool-free mechanism, I’m not liking it very much. It holds devices pretty tight, but fitting a dual-slot RADEON X1900 XTX created a bit of a problem. I had to bend the support plate on the back of the card to fit it in. The plastic clips do not open wide enough, which is why you might experience such an issue.
Installation
This procedure took me around 1,5 hours, which I believe to be too long. Before I go into problems, let me just say a few other things. First of all, when you take off the panel, you’ll see a huge space for your motherboard and other components. Even when everything is installed, you will be left with plenty of distance — ventilation shouldn’t be a problem at all. Because Thermaltake cares for overclockers and case modders, there is enough room to put in a watercooling system.
Thoughts
This has to be one of the best cases I have played around with and actually use. Of course, it has its weaknesses and dents here and there, but overall Thermaltake delivered a good product. Your PC components are kept cool with four large fans (2x120mm, 2x90mm). Additionally, the fans are not loud at all, and the smaller ones are controlled so you can either crank them up or lower them to a point where they are pretty much silent.
Thermaltake Armor is an eye catchy case. It looks great. It’s designed to withstand thieves and unauthorized personnel. It comes with tool-free PCI clips, 3,5″ and 5,25″ tool-free drive bays and HD cage positioned at the top of the chassis. Additionally, the company inlcludes a PSU support hook for extra security — amusingly not compatible with Thermaltake ToughPower PSU. As for drive bay covers, they have filters and mesh that adds to the already nice design. The accessory box is handy, and swivel doors give this case a very secure look (as it’s meant to be).
For as low as $139.99, it can be yours now. 🙂
+ A lot of room inside
+ BTX compatible (needs an upgrade)
+ Ready for watercooling kit
+ Tool free design (in 95%)
+ Side panel
+ Great airflow
+ Accessory box
+ Big thumbscrews
+ HD cage
Cons:
– Steel
– Heavy
– Tool free PCI clips not compatible with dual slot VGA
– Some sharp edges For great looks, awsome airflow and design, the Thermaltake Armor gets the rating of 8.5 (Very Good) out of 10 and Bjorn3D Seal of Approval Award