My initial thoughts were that Antec had arrived at a pleasant compromise between the utility of the previously mentioned server environment with a design that could be used effectively by the Computer Enthusiast. Please join me to see if those initial thoughts were accurate while we investigate the inner workings of the Antec’s Studio Series Take 4, 4U Rackmount Enclosure.
INTRODUCTION
For the last five years my “paying job” daily puts me in constant contact with over 100 rackmounted servers that use a variety of different Operating Systems. I have always been somewhat enthralled with the idea of finding a solid, decent looking rackmounted case that would allow me to install all or at least most of the goodies I currently run in all of my home system(s). The primary reason behind these thoughts is to allow for adding various test systems to a single three to four foot tall rack while to effectively maximize the space I currently have available in my computer room.
After doing a bit of research I became even more convinced that this type of array coupled with a KVM switch that had DVI connections would allow me the flexibility that I was looking for. I got hung on the idea of just how to make this system visually appealing and more importantly how to incorporate some if not all of “enthusiast grade” features my rigs contained as opposed to the rather sparse array of “enthusiast grade” features used in most rack mounted boxes. After some time searching to no avail for an enclosure to meet my needs I gave up on the idea and purposefully wiped from my memory’s circuitry until recently when I was asked to review a new rack mount enclosure from Antec®.
As is my practice, prior to receiving any item for review I do as much preliminary research as is feasibly possible into both the forthcoming products features and the market that the manufacturer is hoping to gain credibility in. Antec®, as it turns out, is targeting the home media lab, the home music studio, and both the home and small business server markets. These thoughts alone were certainly stimulating and rekindled my idea of a home system of this type from days gone by. When this enclosure first arrived and I was able to view it first hand I felt with a minimum degree of certainty that this just might be the product that I had been searching for. My initial thoughts were that Antec had arrived at a pleasant compromise between the utility of the previously mentioned server environment with a design that could be used effectively by the Computer Enthusiast. Please join me to see if those initial thoughts were accurate while we investigate the inner workings of the Antec’s Studio Series Take 4 Rackmount Enclosure.
A CLOSER LOOK
Packaging
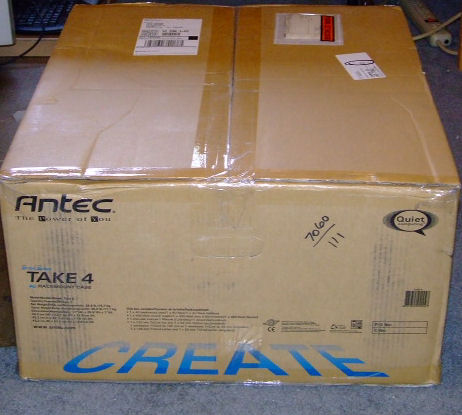
The enclosure arrived in a very large, heavy (about 35lbs) box that gave me the initial impression that it contained a very rugged and solid piece of equipment.
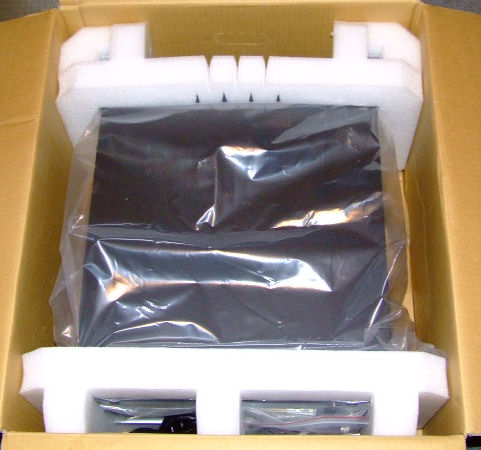
Unpacking the contents allowed me to further observe the obvious care Antec® had taken to insure the valuable commodity within was completely protected from the rigors of shipping. As you can see in the image below this baby is obviously safe and secure!
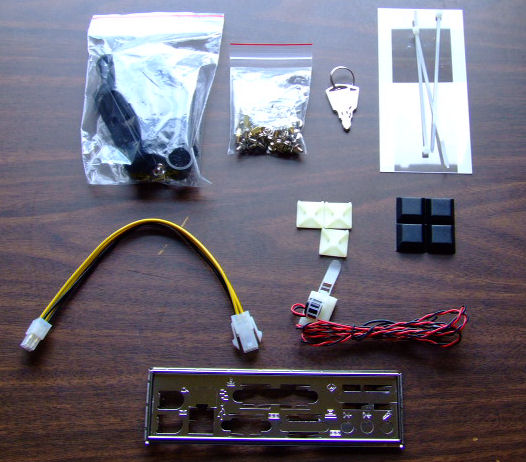
Inside the package in addition to the case itself was a large bundle of accessories that included a plastic bag of various parts, a fairly complete instruction manual and a power cord.
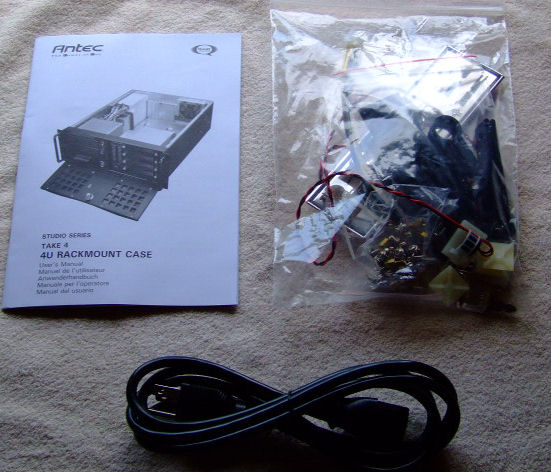
A closer look inside the bag of parts revealed the following:
- Several black plastic cord organizers
- Smaller bag of assorted screws and motherboard standoffs
- Keys for locking the enclosure front
- White plastic wire ties and cable stay
- System speaker
- Plastic label shield
- 12v four pin cable extension
- I/O shield
- Four black rubber adhesive feet for non-rackmount case operation
A CLOSER LOOK cont.
Exterior View
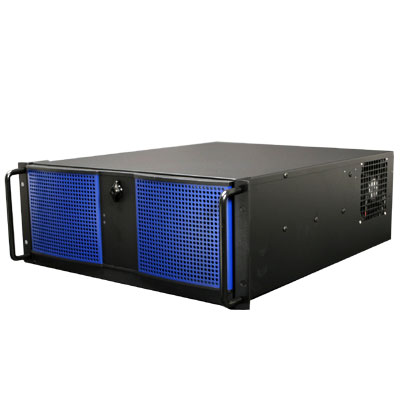
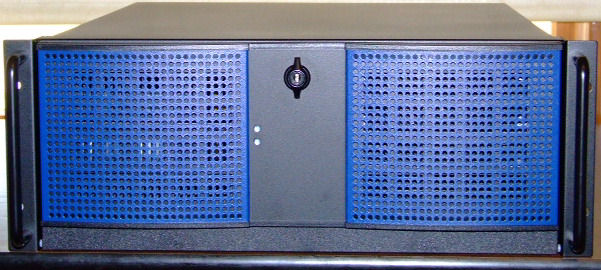
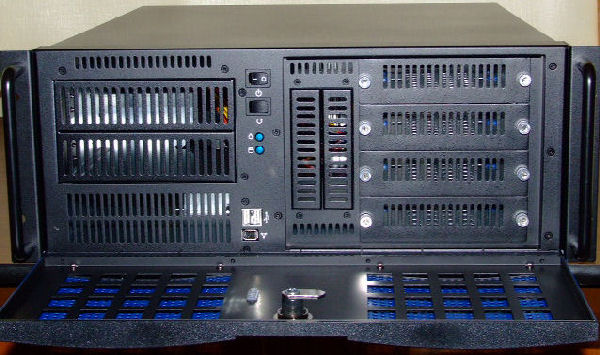
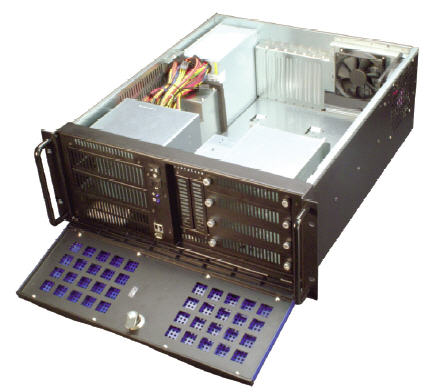
A view of the front of the enclosure with the service door closed shows the blue mesh intake ports which nicely contrast with the remainder of the case which is flat black in color. At the center top of the enclosure is a solid, lockable case latch which nicely secures the service door. Moving down the front center you will also see two lights just to the left. These lights are not the actual case LEDs but instead carry their signal through a plastic fiberoptic port with the top indicating system power and the bottom showing hard drive activity. Finally, there are two very solidly mount steel handle for manipulation of this unit on either side of the case.
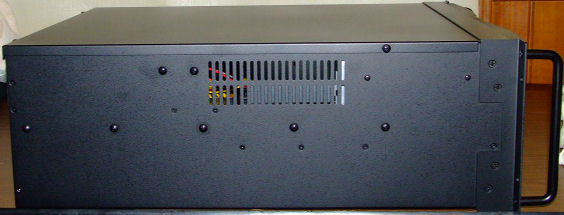
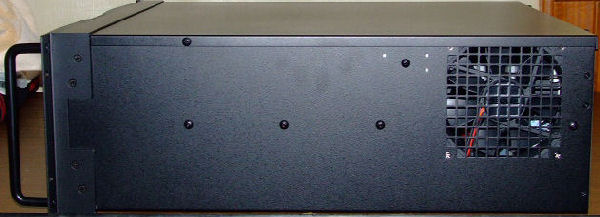
Rotating the enclosure counter clockwise we view the left side of the case which offers various attachment sites for either railing or other rackmount installation hardware. You also see one medium sized air intake port covered by a grill immediately adjacent to the optical drive bays. This port is passive and airflow is induced by negative pressure from the two rear case fans.
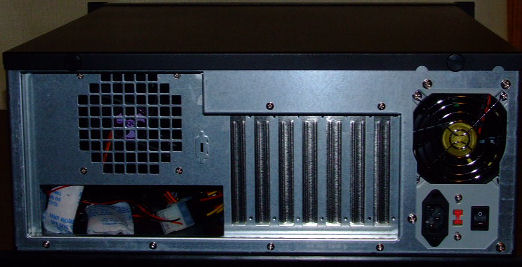
Rotating another quarter turn brings us to the rear of the case which allows you to visualize the vertical alignment of the power supply, the seven PCI slots, the I/O shield slot, and the grill for the Antec® 92mm TriCool™ fan. Notice the large grill openings which offer almost no resistance to air flow.
A final quarter turn brings us to the right side of the case which again offers a mirror image of the left side of the enclosure with regard to mounting hardware options. You also see the grill for the Antec® 120mm TriCool™ fan which again is designed to maximize air flow.
Lowering the service door using the spring tensioned latch allows us to see the main control area along with the two optical drive bays on the left and the four spacious hard drive bays on the right each accessible by simply removing two thumb screws. Notice just below the two optical drive bays is an intake exclusively for power supply air intake. Also notice that the entire front of the case is essentially open to maximize airflow thus optimizing interior case cooling.
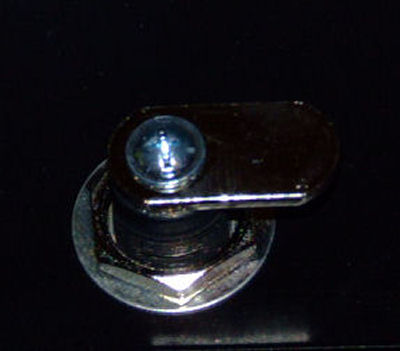
A close up inside view of the spring tensioned, lockable latch shows very solid construction and it does an excellent job of securing a rather heavy all steel service door.
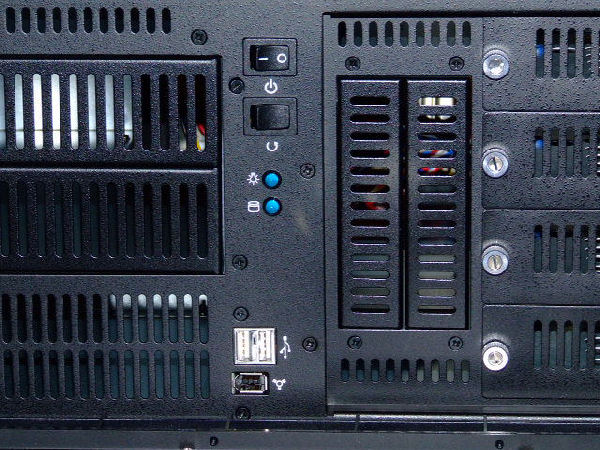
A close up photo of the front shows us the heavy duty rocker style switches for system power and reset that have been used in this enclosure. Just below you can see the two bright blue LEDs for system power and hard drive activity. Below that are two front mounted USB ports and a IEEE 1394 Firewire port. To the right are to externally available 3.5 drive bays that can be used for a flopy drive, a card reader or two additional hard drives.
A CLOSER LOOK cont.
Component Features & Specifications
Before moving to an internal view of the enclosure I thought it appropriate to view the components in more depth and look closely at the features that each component brings to the table.
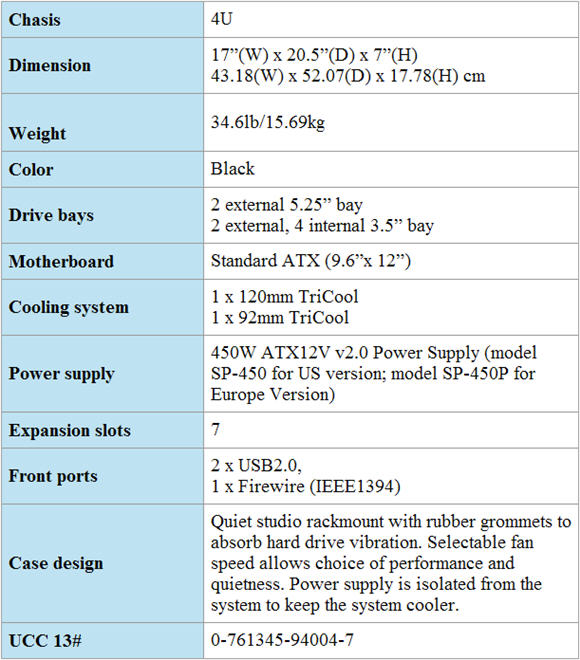
Take 4 Enclosure
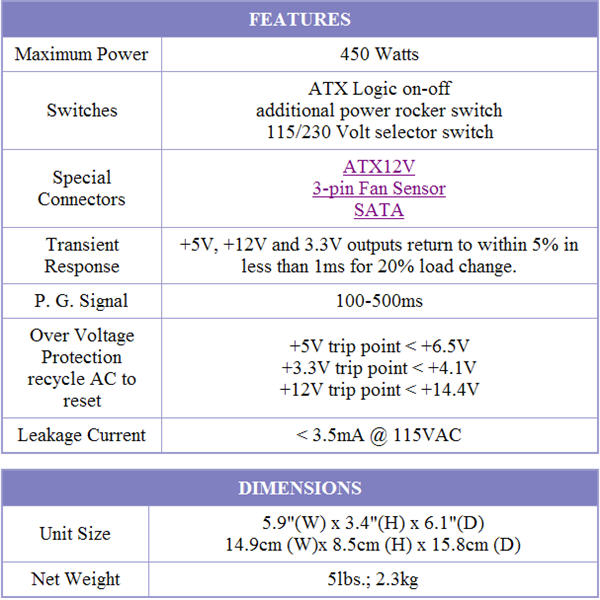
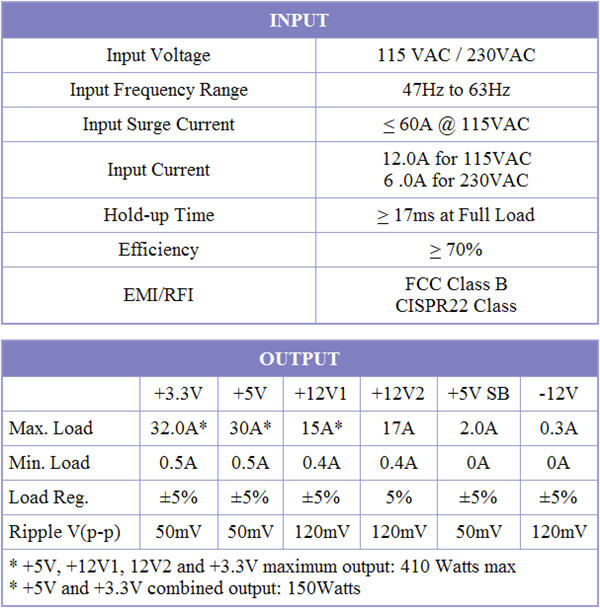
Smart Power SP-450 Power Supply
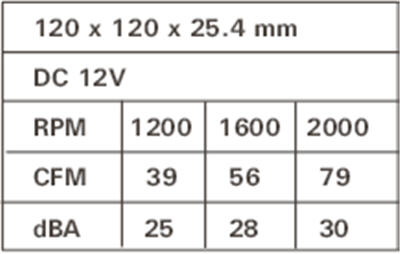
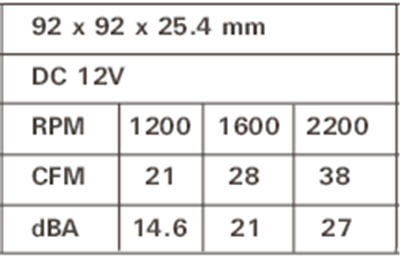
TriCool 120mm fan
TriCool 92mm fan
A CLOSER LOOK cont.
Interior View
Our first angled view inside the case gives the impression of a less than ample workspace; in fact, nothing could be further from the truth! Removing the top cover consists of removing two thumb screws in the rear of the case and two phillips head screws one on each side which firmly hold the cover in place.
A close up gives us a much better perspective of the enclosures massive, clutter free interior. The first image shows the interior with the stabilizer bar in place which adds strength and rigidity to the system’s structure. This view from the rear of the case also shows quite well the four spacious hard drive bays on the left, the two external 3.25 bays in the center and the two optical drive bays on the right.

An even better perspective of the case’s interior is shown in the next image with the stabilizer bar removed and shot from a slightly different angle.
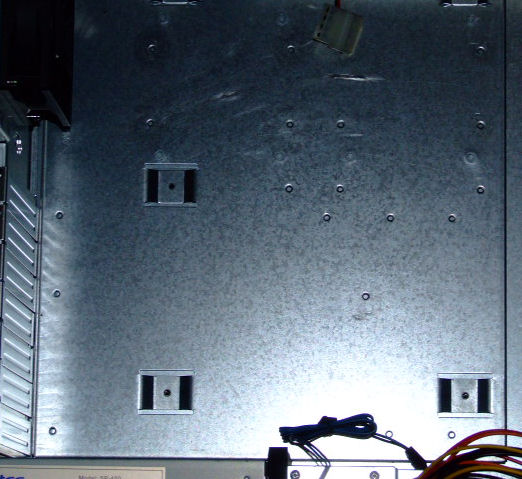
The motherboard tray is a totally flat solid piece of thick sheet metal and not in attached to the fan bays therefore being removable in the traditional sense as in a sliding removable motherboard tray is not available. The tray can be removed however by removing five screws on the underside of the enclosure and allowing the tray to be lifted out. With this particular design I don’t feel removing the tray is advantageous. besides there’s plenty of room to work without need for a removable tray.
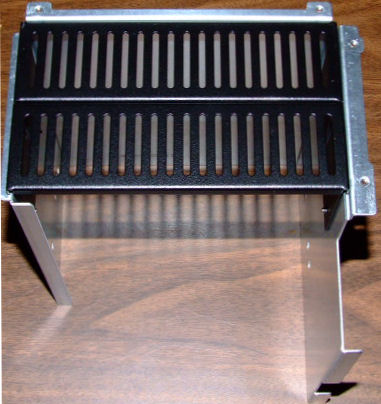
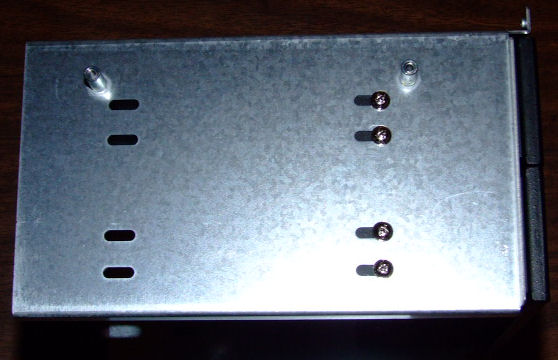
Removing the optical drive bay is not a simple task, yet not overly difficult either. It entails the removal of six screws, four in the front and two on the side of the enclosure. The images below depicts the bay once it has been removed with it’s grills still in tact. If you haven’t noticed already this enclosure is far from a tool-less design, but given it’s usage I’m not sure you’d want it to be.
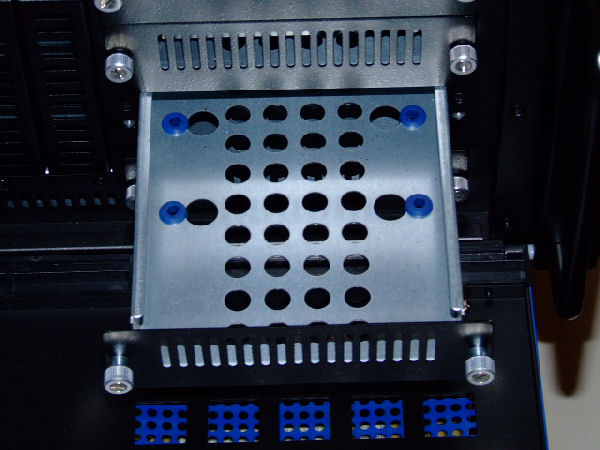
A close up interior view of the rear of the hard drive bays emphasizes just how roomy these bays actually are.
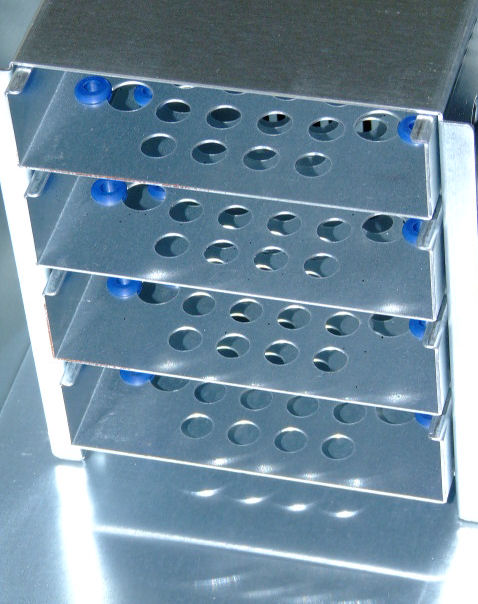
A close up exterior view of the front of the hard drive bays shows that each bay is totally independent from the rest. Each removable bay features built in rubber mounting grommets to assure your hard drives remain quiet and your system vibration free.
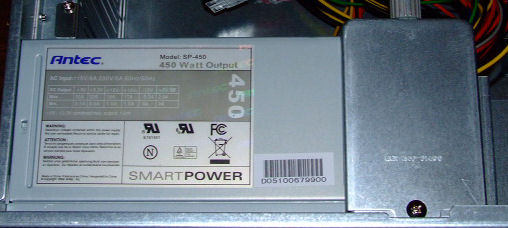
A close up of the Smart Power 450 watt power supply shows it mounted vertically. The power supply air intake system is totally separate and completely sequestered from the remainder of the system as not to interfere with cooling of the motherboard and other internal components.
Notice the the 92mm and the 120mm TriCool fans are mounted at a right angle to each other in the right rear of the case. These two fans provide the only active cooling cooling for components. The position of the fans which form a right angled barrier around the HSF should greatly optimize CPU cooling by quickly exhausting heated air removed by the HSF fan. They should also provide some degree of extra active cooling for the CPU by drawing cool air from the vents in the front of the system across the fins of your heat sink.
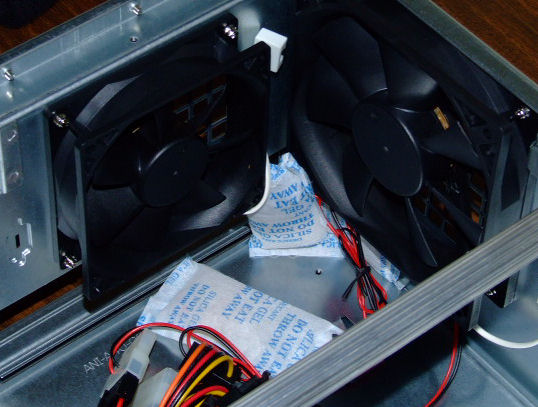
My only concern with this arrangement is that all of the enclosures air flow (which with both fans at high speed should be around 117 CFM) is negative pressure oriented. Given the fact that the front mesh provides almost no filtration this could definitely lead to drawing an excess of dust and other particulate matter into your system. This would be quite evident in computer rooms like mine that are carpeted.
INSTALLATION & TESTING
I have already mentioned that some of the components such as the optical drive bays required the removal of several(6) screws before installation of these drives could proceed forward. Then each of the grills on the two drive bay also had four screws that needed to be removed prior to beginning the optical drive installation. After this a minimum of four and a maximum of eight screws need to be installed to secure each optical drive inside its respective bay. A side view of the removed bay details my statements.
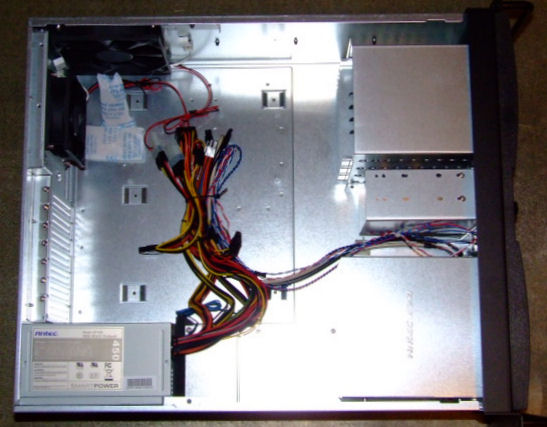
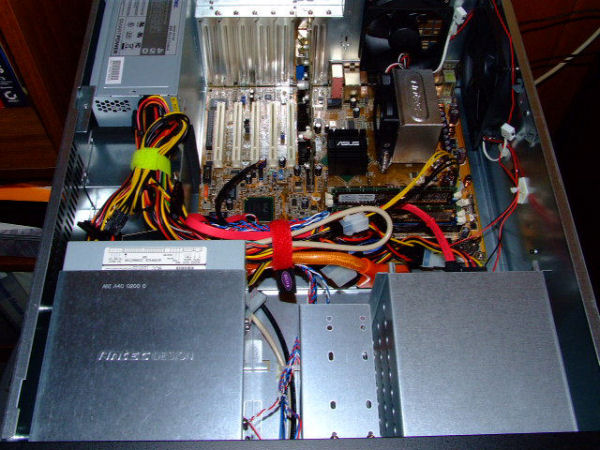
This was really the only aggravating portion of the installation and I feel it was somewhat overkill with regard to component security and stability. The rest of the installation was very simplistic, straight forward, and without need of further comment. I found that the fit and finish of all this enclosures various constituent parts is impeccable and making finished product look quite eloquent. I was rather lax in my cable management as my time was somewhat limited, but there is more than adequate room to adequately hide excess wiring and probably enhance the system’s efficiency a bit more. The next image details the completed installation.
Test System
- Motherboard: Asus P4C800-E Deluxe, Rev. 2
- Processor: Intel 3.2 GHz Northwood
- Power Supply: Smart Power SP-450 450 watt Power Supply
- HSF: Antec® Performance CPU cooler
- Video Card: ATI X800XL run at default speed throughout testing
- Optical Drive: Plextor PX-712A
- Hard Drives: Seagate Barracuda 7200.7 120 GB SATA drive
- Memory: 2 GB (2- 1,024 MB sticks) OCZ EL DDR PC-3200 Dual Channel Platinum XTC (review)
- Case: Antec Take 4, 4U rackmount enclosure
- Case Fans: Rear: Antec™ Triflo® 120mm & 92mm fans
Test Methodology
I compared the cooling performance of the Antec® Take 4, 4U rackmount enclosure to that of other cases I’ve tested and/or own that are also in the midtower category. To achieve the load I will run a session of CPU burn while looping CPU Mark 2001 for a period of 15 minutes and ascertain the temperature reading of each case. Temperatures will be measured using SpeedFan.
Not having a decibel meter, I have devised a subjective noise quantification system to measure perceived system noise, it consists of five measurements at different distances from the computer. Each is incrementally scored from 0-2 with 0 being the best and 2 the worst. The scores are then totalled for a possible (or should I say impossible) score of “0” to a hopefully impossible score of “10”. While still not perfect it will have to suffice for now. It should also be noted that I have mild to moderate hearing loss from years of not using proper hearing protection in various arenas where noise was a factor when I was was in my youth. These deficits should if anything cause me to err on the side of being conservative in my quantification of noise levels.
Test Results: Temperature & Noise
|
Case
|
System Temp (C)
|
CPU Temp (C)
|
Mean HD Temp
|
Noise Scale
|
||||
|
Idle(C)
|
Load(C)
|
Idle(C)
|
Load(C)
|
Idle(C)
|
Load(C)
|
Best=0 Worst=10
|
||
| Antec® Take 4 |
24
|
29
|
28
|
48
|
24
|
29
|
4
|
|
| Thermaltake® Matrix VX (Supplied Fans) |
32
|
36
|
44
|
56
|
34
|
38
|
6
|
|
| Thermaltake® Matrix VX (Alternate Case Fans) |
28
|
32
|
40
|
54
|
28
|
32
|
7.5
|
|
| Antec® P150 |
24
|
28
|
25
|
46
|
24
|
28
|
4
|
|
| Antec® SLK3000-B |
25
|
30
|
26
|
52
|
23
|
27
|
5
|
|
Impression
When I fired this system up to begin testing the first thing I noticed was just how quiet it was; right up there with the Antec® P150 that I reviewed several months ago. The Take 4 has no sound insulation like the P150 so I must attribute the results to both product design and the heavy steel construction of the Take 4. The Take 4 also cooled within a couple of degrees or so of P150 and the P150 was using two 92mm Panaflo M1A fans on the intake side in addition to TriCool 120mm fan for exhaust. Probably the most surprising test result was the hard drive’s cooling using the Take 4 which was also within a degree of the P150 and the P150 used same two Panaflo fans previously mentioned for direct active hard drive cooling. I’m not just impressed, I’m somewhat flabbergasted by the results!
During the testing I kept a very close eye on the power supply expecting an untoward voltage drop during load conditions, especially since I had used a very stable 550 watt Silverstone Strider PSU in my previous tests. Well these expectations were also not to be realized, the Antec® Smart Power SP-450 450 watt Power Supply never dropped more than 0.1v from the prescribed on all the power rails. In fact, the 12 volt rail never dropped below 12.1v. Talk kicking ass, this Antec® Take 4 truly takes no prisoners!
You may have also noticed in the test system that I used the Antec® Performance CPU cooler which I felt would be adequate, but never expected it even be close to the Zalman CNPS7000B-ALCU I use as a reference cooler. That in itself is the topic for a forthcoming review, but suffice it to say I was very impressed with the overall case performance. Better cooling of the CPU in this enclosure would most certainly have been realized had I used my reference HSF.
CONCLUSION
I’ll have to admit I expected this product to shine, but never as brightly as it did. This is one superb case, enclosure, divine box, rig home, or whatever you may choose to call it. The Antec® Take 4, 4U rackmount enclosure far surpassed even my wildest expectations and from this point forward will serve in my cadre of computer cases that I showcase whenever my geeky friends pay me an unexpected visit. I’m sure they’ll be green with envy. I’ll probably also use it as a reference case for some upcoming reviews.
This enclosure, as perfect as the results may indicate is not without a few minor drawbacks. First and foremost is the complexity of the procedure necessary to remove certain key components to facilitate installation, namely the optical drive bay. Next, while I certainly appreciate the rugged system design that Antec® built into this enclosure and realize the obvious benefits of it’s all steel construction, when fully loaded it weighs well over 40 pounds. Even though the power supply is quite easily removed, I believe that replacement options would be limited if they were to effectively use this system’s power supply isolation system. Effective replacements would require the use of a front and rear fan as opposed to the currently more commonplace single 120mm fan. Oversized power supplies might also present a problem as space in this area might restrict their installation.
As per usual, I wait until after the review is completed to determine the cost/value of the product I’ve just reviewed as not to be biased prior to completing the article. I was a bit taken back by Antec’s MSRP for this case of $339.00 USD. However, a quick search of Price Grabber quickly showed a much more palatable average price of around $250.00 USD. For the quality if this case I do not find the average price to be the least bit unreasonable, but fully realize it’s not a price that everyone would be willing to pay.
In summation, I find this enclosure extremely appealing; so much so that I’ll almost certainly buy a small modular rackmount to better facilitate it’s use. While I realize that the Antec® Take 4, 4U rackmount enclosure is not for everyone, I certainly now feel that the market for this case is not as narrow as I originally feared. I can say without reservation, that to date it’s one of, if the finest cases I’ve ever had the pleasure to review and can highly recommend it to anyone who would appreciate the inherent quality this enclosure exudes.
Pros:
+ Stylish and eloquent design for a rackmount enclosure
+ Excellent cooling performance
+ Extremely quiet operation
+ Isolated power supply ventilation system
+ Excellent component fit and finish
+ Extremely rugged design
+ Rubber grommets to absorb hard drive vibration
Cons:
– Complexity of component removal
– Quite heavy
– Power supply replacement options may be limited
Final Score: 8.5 out of 10 and the Bjorn3D Seal of Approval.