What’s beer got to do with computers? Nothing, but it can be as fun to brew your own beer as it is to build your own PC! Read about Mr. Beer here.
INTRODUCTION
“Beer is living proof that God loves us and wants us to be happy.” Benjamin Franklin
That quote may be a bit of an overstatement, but there’s no doubt that beer is popular the world over (in alcohol-consuming areas, that is). While beer has nothing to do with computing, it is an indulgence for many of us PC geeks. I recently began brewing my own beer and the management of B3D graciously allowed me to write about it for my fellow B3D imbibers. The product I used for home brewing is called Mr.Beer® and this review will give you some background on making your own suds as well describe the product and process in detail.
.jpg)
What is beer and why would I want to make my own?
So why would you brew your own when it’s easy enough to head to any number of stores that will sell you whatever you like in any amount? Because it’s fun, it can taste better than store bought, and it’s potentially cheaper than the six pack from the 7-Eleven. I also look at it the same way as I do building my own PC’s: I could buy a PC from any number of builder, but I can aslo easily build my own PC exactly the way I want it. It’s a little more work than buying one off the shelf, but I know what went into it and I can take pride in what I’ve created. Well, now I can feel the same satisfaction by brewing my own beer!
Beer is made from fermenting cereals and hops. Flavorings such as honey and fruit can also be added. Yeast feeds on the starches within the cereals, hops, and water mix and the output of their feeding (yeast is a living organism) is alcohol and carbon dioxide gas. Your lovely glass of bubbly beer is produced by a complex chemical process that is surprisingly easy to accomplish at home. The types and amounts of cereals, hops, flavoring, and aging processes create the many wonderful types of beer such as Lagers, Ales, Stouts, Porters, etc.
THE MR. BEER® SYSTEM
I’ve long been interested in home brewing, but friends who have tried it before discouraged me from doing so for several reasons. First, most home brewing setups produce 5 gallons at a time. Which is great if you like beer, but you’ve got to store it somewhere and I’ve never had room to store 5 gallons worth of bottled beer. They also mentioned the distinct aroma produced by cooking all the ingredients (one friend likened it to cooked lawn grass). My spousal unit isn’t keen on a fridge full of beer or cooked grass smells in the kitchen. Besides, who wants to drink the same beer day in and day out? Which is what you’d be doing with 5 gallons of beer laying about!
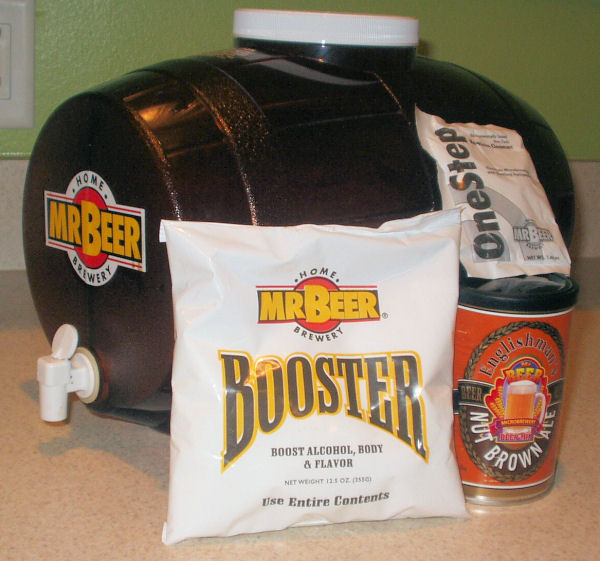
I’ve seen Mr.Beer® advertised in newspaper ads for the past few Christmas seasons. Unlikely beer sources like Linens N Things carried Mr.Beer® kits and their holiday gift idea ads aroused my curiosity. I didn’t try them because I thought, “It’s sold at a house wares store – how good can it be?” This past Christmas my curiosity finally got the better of me and I spent some gift money on the Mr.Beer® Deluxe Brew Kit. It includes:
• Brew Keg & Lid (8.5 quart capacity)
• Tap, Washer & Nut
• Beer Mix & brewing Yeast (West Coast Pale Ale)
• Logo Bottle Caps (12)
• OneStep™ cleanser
• Booster™ pouch
• Complete, Easy to Follow 4 Step Brewing Instructions
• Brewing with Mr.Beer® – Brewer’s Guide
Since I had low expectations, it sat in my closet for a few weeks before I got around to trying it. Once I finally got around to making a batch, I liked the results so much that I’m now fermenting my 5th batch and have also gotten a few friends into it, too!
How To Brew
My friends who are former home brewers cited other reasons for giving up the brewing hobby. They grew tired of chasing down ingredients, cleansing and sanitizing the large cooking pots and bottles needed for the beer, and the amount of time spent in the kitchen cooking all the ingredients (the spousal factor playing a role here as well). The Internet has made getting top grade ingredients a breeze, and Mr.Beer® removes the other concerns. Here’s how it works for the West Coast Pale Ale recipe:
Cleanliness is essential. Stray microbes in the beer can give it off or odd flavors, so every piece of equipment that will come into contact with the ingredients must be sanitized. This includes pots, spoons, can openers, the keg, bottles, and caps. So the first step is add sanitizing liquid to the two-gallon Brew Keg. The Kit contains a sanitizing agent called OneStep™. One tablespoon of OneStep™ mixed with water will sanitize the keg and all utensils (just throw them in the keg and let it all sit for 10 minutes). Next pour the OneStep™ mix out of the keg and into a sauce pan to sanitize it. A bleach solution can also be used for sanitization, but I have found OneStep™ to be very easy to use and in addition it leaves no taste behind (no rinsing is required, either). And it’s inexpensive and available from Mr. Beer’s Web site.
Now you’re ready to cook. Each Mr.Beer® recipe includes at least one can of beer mix. The brew masters of Mr.Beer® do all the hard (and fragrant) work of cooking the cereals down to a syrup. All you have to do is open up the can and scoop the syrup into water. A package of Booster™ is also added to the water. Booster™ is corn sugar and it provides the carbohydrates for the yeast. Once the water is boiled, the Booster™ dissolved, and the beer mix stirred in, the mixture (called “wort”) is poured into the keg (which contains 4 quarts of cold water to prevent the heated wort from cracking the keg). Stir up the wort and the water, add the yeast, and set it aside for a week. Room temperature is required, so I advise you to find a nook in your closet, pantry, or other climate controlled locale. Do not stash the brew keg in your garage, unless you live in a place where the temperature is a constant room temperature!
After a few hours, you’ll start to see science in action. The mix will cloud up, foam will appear on top of the liquid, and sediment will settle on the bottom of the brew keg. All of these are indicative of the yeast feeding and producing alcohol as an output of the process. The keg lid is vented so that carbon dioxide doesn’t build up during fermentation. An exploding keg would be a very bad thing. You may notice some subtle smells as the keg vents, but they are barely noticeable. I keep my kegs in may bedroom closet and if they got even a little funky my wife would let me know about it!
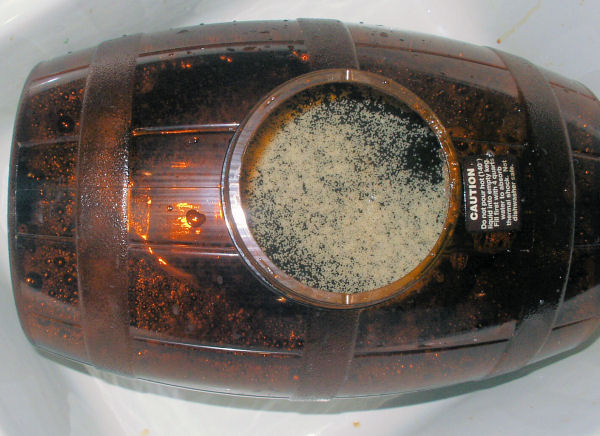
Science in action! That’s yeast on the wort.
After a week (some recipes may take longer), you can begin bottling. There are many bottling options. Tailgating soon? Maybe you want to bottle your brew in big plastic soda bottles. In fact, any size plastic soda bottle is ideal because their caps are re-sealable and the plastic expands to accommodate carbonation. If you’re a purist, however, you may want to use glass bottles. If so, Mr.Beer® sells a capper and caps. They do advise that you practice capping first and you MUST be careful with carbonation or the bottles will explode. Try explaining that to your spouse! For my first batch, I used 20 oz. plastic soda bottles and the bottle caps provided in the Deluxe Edition kit.
The first step in bottling is to sterilize your bottles. I used the included OneStep™ to do so. Once the bottles are sterilized, add ordinary table sugar (cane sugar) to your bottles (the amount will vary according to the the bottle size). The sugar is used to stimulate the yeast one last time and produce carbon dioxide for fizziness (a process called “bottle conditioning”). Use the brew keg’s spigot and fill each bottle, then stash them away for another week while they get nice and fizzy. Assuming you used plastic bottles, you’ll know they’re ready when a week has passed, the liquid is clear, and they are rock hard from the carbonation.
Ready to drink? All you need now is 2 days in the refrigerator! Once properly chilled, you can drink as many of your home brews as you want. Although we encourage moderation, of course. A note about home brewed beer: It is unfiltered. The beer you buy in the store or drink from a tap has been filtered to remove all sediments. Your beer made at home will contain sediments. A small amount will settle to the bottom of the keg and also to the bottom of the bottles. By exercising a little care in pouring into a glass you will avoid almost all the sediment. Even if you drink some you’ll hardly notice it. In fact, if you actually like Vegemite (a by-product of beer fermentation) then you’ll want to drink it all!
MR. BEER.COM AND VARIETY IS THE SPICE OF LIFE
.jpg)
My first batch of home brew was West Coast Pale Ale. It was good, but not really special . I realized right away that I wanted to continue to home brew, but that I wanted beer with a little more bite. Enter MrBeer.com! Mr.Beer®’s Web site is a wonderful resource if you make the commitment to home brewing with their beer system. They sell a dizzying array of recipes that are guaranteed to make the beer lover drool as he or she reads the descriptions. Each recipe includes all necessary beer mixes, malt extracts (more about that in a minute), hops, Booster™ (if required), and instructions (which are also downloadable for free). I ordered new mixes even before I finished off my West Coast Pale Ale! Here’s a brief summary of my batches that followed the West Coast Pale Ale:
- Bewitched Red Ale: A sweet red ale, very pleasant and not heavy at all.
- St. Patrick’s Irish Stout: Dark, but not bitter. A very nice stout.
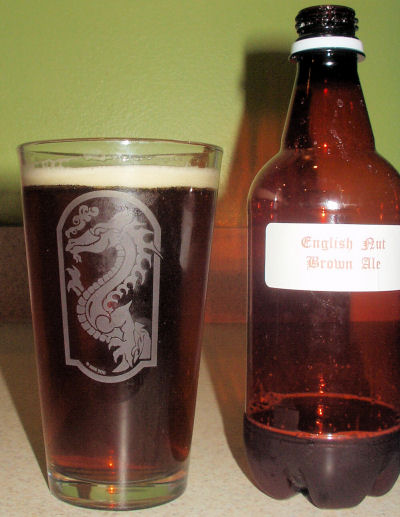
- English Nut Brown Ale: A traditional English Ale, also light enough to drink while lounging during summer’s hottest days.
All three beers are made with Booster™ and a standard Mr.Beer® mix. They each require a week in the keg to ferment and a week to carbonate in the bottle. All are as good or better than their commercial equivalents and very similar in price to the equivalent amount of a good beer.
My friend Tom, however, wasn’t content with just a beer mix and Booster™. A bottle of my West Coast Pale Ale convinced him to try his hand at brewing and his first batch was Augsburg Dark, a dark beer that uses a beer mix (Whispering Wheat Weizenbier), hops, and Creamy Brown Unhopped Malt Extract (UME). UME’s replace Booster™ in many recipes and they give the beer more complexity and body. They generally require longer to ferment and bottle condition, so if you’re not the patient type you may want to try Booster™-based recipes at first. Tom’s patience (2 weeks fermenting, 1 week bottle conditioning) yielded an outstanding beer. It was easily as good or better than any commercial dark beer I’ve tried. Given Tom’s experience with UME’s, I decided to be patient also and tried sever UME recipes (Bengal Tiger I.P.A., Fallen Friar, and Elkhorn Point Pale Ale). Bengal Tiger I.P.A. takes a while to bottle condition, but the results were outstanding. Very hoppy, full-bodied, and high alcohol content – yeeha! Fallen Friar is an excellent dark beer. In fact, Tom ranked it among his favorite beers ever. The Elkhorn Point Pale Ale is good, but not really noteworthy.
I noted at the beginning of the article that brewing with Mr.Beer® can be cheaper than buying beer in a store. For example, my St. Patrick’s Irish Stout yielded sixteen 16 oz. bottles. The cost per ounce is $.05 (1 beer mix, Booster™, and OneStep™ is $11.70). A Sam Adams Cream Stout 6 pack was $7.75 where I last looked, coming out to $.11 per ounce. But there’s a catch: Mr.Beer® charges for shipping and it ain’t cheap. It’s not high by mail order/Web standards, but it definitely adds to the unit cost of your beer. If you’re buying just one or two recipes per visit, the shipping costs will definitely remove much or all of the price advantage of home brewing.
Fortunately there are several cost-defraying options available through Mr.Beer®’s Web site. The simplest is to order $100 worth of merchandise at a time and get free shipping. They also offer a “Buy 5, Get 1 Free” deal that offsets shipping costs. Finally, there’s the Brew Club. This deal requires an initial purchase of $29.99 (no cost to join), but shipping is free. Your order will be automatically sent to you 4 times a year, but you are given the option of modifying it before it ships. What it really comes down to is Mr.Beer® is guaranteed a revenue stream and you’re guaranteed free shipping. Plus you get a free gift with each order. Both Tom and I signed up and we’ve been enlisting co-workers into our own little beer club so we can trade bottles back and forth.
CONCLUSION
I am clearly very happy with my initial Mr.Beer® Deluxe Brew Kit purchase. It greatly exceeded my expectations and, in addition to producing great brew, it’s fun to make your own beer. With the right purchase plan, it is also economical, especially if you tend to purchase more expensive beers like me. Here’s some advice if you’re interested in becoming a home brewer:
- Buy your Mr.Beer® Deluxe Brew Kit at a local retailer to save shipping costs and see if you’re really interested in home brewing.
- If you think you want to pursue home brewing, get your friends interested and purchase multiple recipes to get free shipping.
- Otherwise, join the Brew Club.
I’ve made a few purchases along the way that have been really helpful:
- A plastic funnel for pouring the wort into the Brew Keg (you don’t want to waste a drop!).
- A Priming Sugar Measure. It’s an easy and accurate way to add sugar to your bottles.
- A second Brew Keg. Having two allows me to make a complex, long-fermenting beer without/out tying up my only keg for weeks at a time.
- A Funnel with Strainer. This is very handy for removing stray hops or sediment from your Brew Keg when bottling.
- A Muslin Hop Sack. This is VERY important, and very cheap ($.50). I made the mistake of forgetting to use one the first time I added hops to a recipe and it was a royal pain in the butt to filter out the hops. Use the sack and you won’t have to deal with any mess.
- Plastic P.E.T. bottles. 22 oz. plastic soda bottles work fine, but sometimes 22 oz. is too much (like when your mooching relatives comes over). And they look pretty ugly compared to the beautiful brew you’ve just fermented. I bought 48 16 oz. amber plastic bottles from Quality Wine and Ale Supply and a big bag of re-usable P.E.T. caps from Mr.Beer®. The bottles look great, clean easily, won’t burst if the carbonation gets out of hand, and are easy to store.
Pros:
+ It’s surprisingly easy, clean, and fun to brew your own beer with the Mr.Beer® system.
+ Tastes great!
+ Excellent recipes and ingredients available from MrBeer.com.
+ Relatively small size of the Brew Keg makes it easy to store.
+ Did I mention that it tastes great?
Cons:
– Shipping really adds to the cost per ounce of beer unless you take advantage of one of Mr.Beer®’s free shipping offers.
– Booster™ based recipes are a little thin and not all that different from commercial brews.
– UME based recipes can take a while to ferment and condition, which means you must plan ahead well in advance for seasonal favorites, parties, etc.

Tom and I enjoy a brew at B3D’s Secret Swedish Testing Lab.


