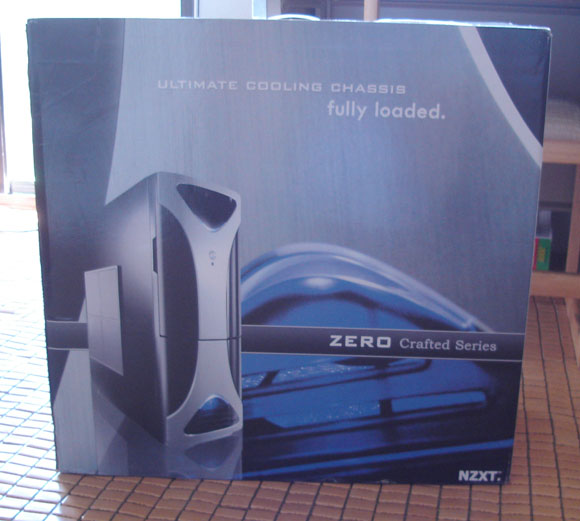
Today, we are going to take a look at the first product in the Crafted Series, the Zero. Zero is a full tower aluminum case that is targeted for enthusiasts and gamers who need lots of expansion and comes with ample of cooling solutions to keep the system cool. Join us and lets take a closer look at Zero and see if the case is just as unique as the name implies.
Introduction
What is the first thing that people notice about your computer setup? I am sure that most people will answer the awesome looking case that they have. Sure you can have the top of the line components installed, but they are usually hidden inside that little box which we call case. A computer case does not only need to house all the components, it also needs to offer enough expansions for any possible future upgrades. It also has to be easy to install, as well as have enough cooling solution to keep a good airflow in order to keep the components cool. Of course, an awesome looking, stylish, jaw dropping exterior will not hurt either. A perfect case would require to have all these features and maybe priced just at that right spot. Today, we are going to take a look at NZXT’s new case—Zero and see if this could be the perfect case for you.
I am sure that many of our readers have heard of NZXT. They are fairly well-known computer case manufacturer. NZXT has been making some cool looking midrange cases. However, they are moving toward enthusiasts’ area with their latest line of cases, Crafted Series. Today, we are going to take a look at the first product in the Crafted Series, the Zero. Zero is a full tower aluminum case that is targeted for enthusiasts and gamers who need lots of expansion and need great cooling solutions to keep the system running cool. The name Zero is somewhat unique and attention catchy. Does this case live up to it’s unique name? Let’s take a closer look at Zero and see if the case is just as unique as the name implies.
Let’s start by take a look at features and specification of Zero.
Features
- Full tower light weight aluminum chassis
- Quad 12cm fans optimized for sli and crossfire configurations
- Fully equiped cooling system with seven 12cm fans and 1 8cm fan
- Aluminum plated front panel
- See-through smoked acrylic
- Screwless installation for 5.25″, 3.5″ and pci devices
- Quad 12cm side fan setup
- Large capacity for hard drives and drive bay devices
- Ext. ports: 2 x usb 2.0, mic, ieee 1394/firewire,
- Intel hd audio ready headphone jack
Specification
|
MODEL |
Zero SERIES |
|
CASE TYPE |
Full tower Aluminum Chassis |
|
FRONT PANEL MATERIAL |
Plastic/Aluminum 3 |
|
DIMENSIONS (W x H x D) |
210.5 X 532 X 520 mm |
|
COOLING SYSTEM |
FRONT, 1 X 120 mm fan (included) |
|
DRIVE BAYS |
13 DRIVE BAYS |
|
MATERIAL(S) |
Aluminum Construction |
|
EXPANSION SLOTS |
7 |
|
POWER SUPPLY |
500 WATT PS2 ATX 12V 2.0 ( OPTIONAL ) |
|
WEIGHT |
7.35 KGS (W/O Power) |
|
MOTHERBOARD SUPPORT |
MOTHERBOARDS: ATX, MICRO-ATX, BABY AT, MINI ATX |
Closer Look–External
Opening up the box, you will notice the sheer size of this case. I have a mid-tower Antec Sonata case and Zero really looks big next to it. The case measures 210.5 x 532 x 520 mm (WxHxD). I guess it’s expected to see a large case as this case is full tower and packed with expansions. The case is made of primarily aluminum with some plastic parts, so it’s quite light (7.35 kg without the power supply).


Notice that there are two plastic transparent stickers on the front panels to protect them from breaking during shipping. Very thoughtful by NZXT. The outside of the case is coated with shiny plastic material and it’s panted black. The finish is quite nice, although the black surface does make dust and fingerprints easily be seen, but I like it. As you can see from the picture, the coating is quite reflective.


The front of the case has a aluminum-colored X-shaped symbol across it. The front is not too flashy but it’s very nice looking as it looks elegent, simple, and stylish, yet not too boring. You will see there’s virtually nothing shows up on the front as all the drives are hidden under the front cover. The only thing that you see on the front is the power button and the light/HDD indicator. I love that the drives are all hidden under a cover and I specially love that NZXT put the power button outside of the cover, so the computer can be turned on without opening the cover. On the top of the front cover, you will see a see-through smoked window which allows the first 5.25” drive to be seen from the outside of the case. This would be very useful for those who got the multi-functional drive bay or indicators with LED lights that fits on the 5.25” drive space.
The front cover is held together to the case with two magnets. It opens very easily and opens to the right. I like this as I always keep my system on the right side of the desk, so by having the panel opens to the right side, the drives are not blocked by the cover like some other cases (however, people who keep their system on the left side of the desk may not like this orientation). Once the front cover is opened, you will see the five external 5.25” drive bays and 2 external 3.5” drive bays. In addition, you see a reset button just next to the 3.5” drive.


The case also comes with ample number of front ports that are located on the on the left bottom side of the case. There are two usb 2.0, headphone, MIC, and one IEEE 1394/firewire ports. The audio port actually supports both Intel HD audio or AC ’97 jack headphone jack. It’s unfortunate there’s no cover for the front connectors, which means it will collect quite a lot of dust bunnies.
Looking at the bottom of the case, I am really surprised to find that feet of the case look like a home entertainment system’s feet. They are screwed onto the case (hence they are removable) and have some foam on the bottom to help lower the system’s noise. You will also notice a mesh with dust filter that allows air to flow into the system.
Turn to the back, we will see two large 120mm fan as well as the usualy ATX PSU space. In addition, you will see seven expansion slots. Notice that the left side of the case is screwed with thumb screw to allow easy access while the right side is screwed in with conventional screws.


Turning to the right side, the side panel that can be removed by unscrewing the two thumb screws on the back. The side panel is held together on a rail that is on the front of the case. The panel first is mounted to the rail and then just lift it up to open it. Unfortunately, on the outside of the panel, there’s no handle to help lifting the panel up, so you would have to pull the edge of the panel to lift it up. There’s also no latch to hold the panel in or a lock in order to seal the system. What’s most apparent on the right side is a big fan filter which covers four exhaust fans. The fan filter is removable via the four screws inside of the panel. Nothing out of ordinary is on the left side of the panel.


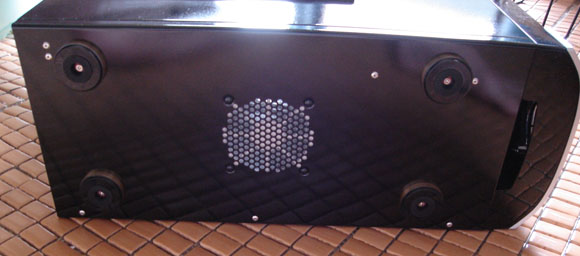
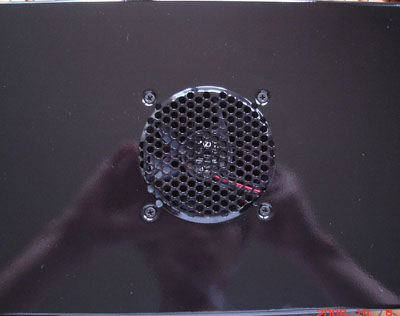
On the top, you see an opening where NZXT has put a 80 mm fan underneath it. There’s no filter on this fan, which is quite unfortunate as it lets dust easily fall into the case.
Closer Look–Internal
Let’s open this baby up and see what’s hidden inside. The front bezel is easily removed. According to the manual, you just hold to top of the case firmly and pull the bottom of the bezel, then it will come off. Removing the front bezel reveals a 120 mm fan with a fan filter as well as the drive bays with metal platre attached to the slot. You will notice that the front bezel is completely detached from the system, so do not pull it too far apart from the case as the cables might get broken.


Opening up the side panel, you will see all the drive bays on the front of the case. In addition to the aforementioned five external 5.25” drive bays and two external 3.5” drive bays, Zero also has six internal 3.5” drive bays. Notice that the internal 3.5” drive bays are all rotated 90 degrees for easy access and installation. Very nice (I think this should be implemented in all cases in the market). The hard drive cage is not removable.
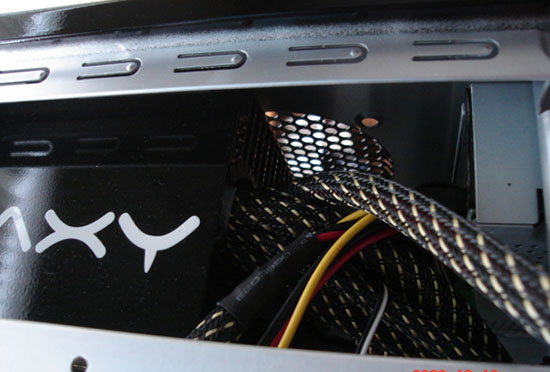
As Zero is designed for enthusiasts and hardcore gamers, it is not surprising to find multiple fan slots on the case. The fans are in clear view once you open up the side panel. When you look under the right side panel, you see four 120mm fans (yep, you read it right, FOUR). In addition, there is an 80 mm fan installed on the top of the case, one 120 mm fan on the front (with a filter that is removable), and two 120 mm fans on the back of the case. What’s really nice is that NZXT includes ALL the fans. You don’t usually see companies to include all the cooling fans with their cases. Kudos to NZXT. Not only that the fans are included, it’s really nice that NZXT chooses all 120 mm fans, with the one 80 mm fan exception. Larger fans are quieter when moving the same amount of hot air, so 12mm fans are very welcome. With so many fans, it would be interesting to see the noise vs temperature performance of Zero. All together, the case comes with six 120 mm fans and one 80 fans. All the fans come with 4pin molex connectors and have the Y-type connector so that they won’t take up the 4 pin molex connectors of the PSU. Unfortunately the fans are sleeve-bearing rather than ball-bearing. Also, none of the fans are temperature sensored or controlled. You will see that there’s another opening on the bottom of the case that is covered with a filter for cool air to enter the case.


Zero supports motherboards ranging from ATX, MICRO-ATX, BABY AT, to MINI ATX. The motherboard tray is not removable. It’s somewhat disappointed to see this but nonetheless it’s nothing major to whine about. The motherboard hole is clearly labeled on the try, so it’s easily to see which holes to use for different type of motherboards. The motherboard tray is located on the bottom of the case, so there is a space about 8cm from top edge of the tray to the bottom of the PSU. I wonder why NZXT does not make the motherboard tray slightly higher since it will offer a much easier access to the bottom portion of the motherboard.


The expansion slots are held together with a metal bar that has a handle to opens and closes the bar. There is a handle that will lift the bar so you can replace/install the expansion cards. Notice that each slots comes with a cover that can be reuse so if the slot is not being used, you can put the metal cover on to prevent dust from coming into the system. The metal bar holds the card fairly well. However, if you don’t feel safe using the bar you can always screw the cards since the metal bar also has screw holes on it.


Looking at the front panel cables, you will notice that they are very well sleeved. You see that NZXT has bundle the USB cables with just single connector. The firewire comes with both the single connector or individual pin connectors in case your motherboard has non-standard pinout. The audio comes with both HD Audio and AC 97 connector as well as individual pin connectors for non-standard pinout. It’s nice to see the individual connectors, but these loose, non-used cables are somewhat cumbersome if all you need is the one big bundled connector.


Zero comes with three different rails for the 5.25’’, 3.5’’, and FDD drives. They are plastic rails with pre-determined length and have metal screws (they don’t the grooves to be screwed on rather it’s more like a little metal rod) sticking out to fit into the drive’s hole. The metal rods are removable and can be replaced with screw if they don’t fit into your drive. The rod’s position shouldn’t pose too much trouble as most of the drive’s holes are fairly standard. Unless you have got some drives (such as multifunctional unit) which sometimes doesn’t have the screw holes in standard position, you shouldn’t encounter too much trouble with the rail.
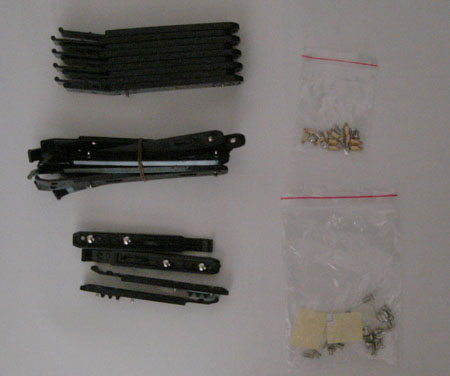
Finally, the accessories that Zero comes are as follows: a manual, a box with accessories, which includes the rails for the drives and a bag of screws, and a plastic cable ties. There are also two transparent tapes, which I am assuming is for labels.
Installation and Impression
Installing components into Zero is quite straightforward. The ample space makes it easy to put motherboard onto the tray and mount the power supply. I did encounter a problem with the top 80 mm fan and my slightly longer power supply, Enermax Galaxy 850W, as the length of the power supply overlaps with the fan. Therefore, I had to remove the fan in order to install the power supply. Also if you have a longer 5.25’’ drive installed on the first slot, it may also pose problem. For most people, it shouldn’t be a big issue. Although, I do think NZXT should include a way to close the 80 mm fan opening if the fan is removed in order to prevent dust from falling into the system (since the fan opening does not comes with a dust filter).
The installation of power supply and the motherboard went quite smoothly. However, I encounter a little trouble when I try to install the floppy drive. Zero requires you to remove the front bezel when install the 3.25’’ drives because the rail will not slides in and out of the system with the bezel attached. The 5’25’’ drives can be installed with the bezel attached, so they can easily slide in and out of the slot. This is not a big problem but somewhat annoyance as the 3.5 drive is not easily removed once it’s installed.
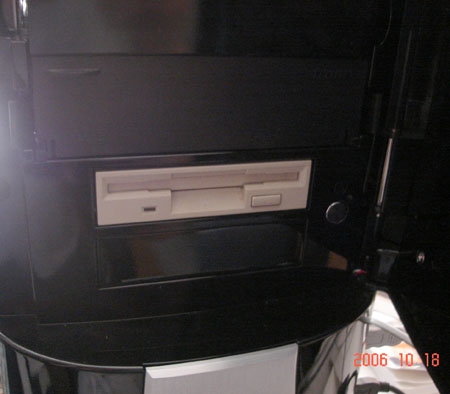
The floppy installation requires to remove the front bezel as it does not slides in and out of the slot like the 5.25” drives.
The rail system works fairly well. At first, when I see the rails without any screws or any support for the drives, I was a bit skeptical as to how it will hold the drive firmly. After putting the first one onto the drive, I was pretty surprised to see how well it held the drive. The metal rod fits the screw hole on the drive very well and quite tight, so the drive is not loose at all. The metal rod on the rail can be removed if your drive does not fit, so you can use screws to secure the rails if you prefer. There is a minor issue that I encountered with the rail. First, a couple of the rail’s metal rod do not get pushed into the rail far enough (picture on the right). It causes some friction when try to slide the drives and may prevent the drive from slides into the bay. Therefore, when you are installing the drives, be sure that the rod is pushed into the drive deep enough.


The metal rod does not get to push into the drive far enough, so it may cause problem when slides into the bay.
Despite the fact that the fans all come with adapter for the power supply, it would still require a power supply that has a few free 4 pin molex connectors in order to power all the fans as the fans are far apart. NZXT has actually chain linked all four side panel’s fans already, so it only need one molex. It is somewhat odd that NZXT choose to use four 120 mm fans rather than one big side panel fan. I guess there is advantages of using four 120mm fans instead of one big fan. Having four fans allows user to choose number of fans to turn on, they are also much easier and cheaper to replace than one large fan. Still, by having one large fan could simplify the design and maybe also help to keep the system even quieter. They fan do get the job done though. However, the large opening means that it collects quite a lot of dusts (I had to wipe dust off the fan grill like every few day since I live in a fairly dusty area and my system is next to an opening window almost all the time.
There are couple issues that I have with the case. First, the case is big but it does not offer enough room to work, specially the boom of the case. Since the placement of the motherboard tray is toward the bottom of the case, it makes it hard to access the bottom of the motherboard. In addition, despite the fact that the front cover opens really nicely it doesn’t stay all the way open at 90 degrees when it’s open, it swings back to around 60-80 degrees with a slight movement. This is really annoying as when you open up the DVD drive, the tray will hit the front panel quite often.


Furthermore, I think the included front panel cables are really nice, but I wish NZXT can provide a way to organize the loose individual pin connectors if they are not used. Maybe a adapter for the individual pins to the bundled connector is a good idea to keep the non-used connector away from already clustered system. Also, as you can see on the left of the picture above, the case does not leave too much space on the bottom (where the 3.5 and the expansion cards are located). The space is fine for my GeForce 7800GT, but it pose some clearance problem for a slightly longer graphic card, such as the upcoming GeForce 8800 GTX.

Notice the sharp edges when remove the 5.25 metal cover. Most cases do come with these metal protection but they often produce sharp edges when they are removed. It’s unfortunate that NZXT still uses the metal plates for the drive bays.
Temperature Reading
I move my current system setup from my old Antec Sonata case into NZXT’s Zero. Everything is the same, except the case.
Testing System
- Processor: AMD Athlon 64 X2 4200+ Manchester
- Memory: 2x G.Skill Extreme Series (F1-3200PHU2-2GBZX)
- Motherboard: DFI Lanparty nF4 SLI-DR (BIOS NF4LD406)
- Graphics Card: Gigabyte GeForce 7800 GT (GV-NX78T256V-B)
- Sound Card: SoundBlaster Audigy 2
- Power Supply: Enermax Galaxy 850W EGA850EWL
- Hard Drives: Maxtor DiamondMax Plus10 250GB Hard Drive (Maxtor 6B250S0), 250GB, 7,200 rpm, 16 MB Cache, SATA 150
- Coolings:
- Antec Sonata: one 80mm front fan(mounted behind the hard drive cage), one 120mm back fan
- NZXT Zero: four 120mm side panel fan, one 120mm front fan (mounted in front of the hard drive cage), two 120mm back fan,
|
|
Antec Sonata
|
|
NZXT Zero
|
||
|
Temperature Zone
|
Minimum
|
Maximum
|
|
Minimum
|
Maximum
|
|
Motherboard
|
37
|
49
|
|
37
|
48
|
|
CPU
|
31
|
44
|
|
28
|
42
|
|
North Bridge
|
44
|
49
|
|
45
|
49
|
|
GPU
|
50
|
78
|
|
46
|
76
|
|
WDC WD1600JB-00GVA0
|
31
|
39
|
|
39
|
41
|
|
Maxtor 6B250S0
|
34
|
37
|
|
41
|
43
|
As you can see that NZXT Zero performs quite well. It keeps the CPU, Motherboard, and GPU much cooler than the Sonata case. You will notice that the temperature for both of my hard drives is much higher with the NZXT, this is probably due to the placement of the hard drive as well as the front fan of the case is blowing air to the hard drives but being atleast partially obstructed by the metal hard drive cage. However, the difference in the temperature between the minimum and maximum means that the fan is working quite well keeping the temperature of the hard drive cool. Not only that the system is generally running at much cooler temperature, what’s really noticeable is how quiet the system is running. The system is much quieter than my Sonata’s case with the loud 80mm fan that I had to keep the nForce4 chipset cool. All in all, I think Zero is doing an excellent in keeping the components that generates most heat (graphic card, CPU, chipset, and memory) cool when keeping the system’s noise down.
Conclusion
Overall, I think NZXT Zero is a good case but not without its faults. The case is nice looking and it has ample of expansions and features, ranging from light weight to the included HD audio and AC’ 97 audio. In addition, the included 8 fans are really nice features of Zero. However, there are just many little cons that really make this case the perfect case. For starter, the lack of some fan filter and the use of sleeve bearing fans are somewhat unfortunate. Also, the lack of handle on the side panel and the fact that front panel does not stay open at 90 degrees are minor issues that otherwise would make this a great case. It may sound like I am being a slight too picky but when you spend close to $150 for a case, you would expect to have these minor things included.
Still, with these minor issues, NZXT Zero is a good case and I think the best selling point for this case is its ability to keep system running cool while keep the noise absolutely down. I have been using this case for the last week or so and I am really happy to “hear” how quiet it is. I think if NZXT can improve on some of the minor details, this case will be an awesome case for many people who seek such stylish quiet case. This is a really nice case from NZXT for their attempt to enter into the enthusiasts’ world, I cannot wait and see what NZXT can bring to the market with their next generation of enthusiasts’ cases.
For all the great features and the ability to provide a quiet cooling case, NZXT’s Zero will recieve a 8.5 out of 10 score (good) won our Seal of Approval.

Pros:
+ Quiet
+ Tool-less installation
+ Light weight
+ Great cooling: seven 120 mm and one 80 mm fans
+ HD Audio and AC’97
+ Ample front connectors: 2 USB 2.0, 1 firewire, headphone and MIC
+ All the fans and accessories are included
+ Front cover
Cons:
– Front panel cover doesn’t stay all the way open at 90 degrees
– The side panel is a little weak/thin
– Problem with longer PSU
– No fan filter on some of the fans (most notably the top one)
– No cover for the front connectors


