CoolIT Systems’s Freezone is an all-in-one CPU cooling that is build base on thermostatic cooling technology. It has provided an excellent alternative for those who wish to keep their processor cool and system noise down, yet do not want to go through the trouble of installing water cooling kits. The unique “Chiller” also is environmentally safe and free from biological growth, hence no maintenance is required. Read more as we put the Freezone to a typical air cooling and see how well it performs and out thoughts on this new product.
Introduction
There is always a balance between keeping a system cool and keeping the noise down. Most of us are trying to keep our system cool by adding multiple fans and replace inefficient stock CPU fan with aftermarket CPU coolers and fans. There are also the option of using a watercool setup to keep the components cool and quiet. One thing that is always bugging me about water cooling is the need to connect all the cables and keep maintaining the fluid. Recently, there has been a trend of “all-in-one” type of water cooling, such as Cooler Master’s Aquagate, which really simplified the whole liquid cooling installation and free from maintenance. Last year, a new company, CoolIT Systems has made a splash into the computer cooling scene with their “all-in-one” liquid cooling. Today, we’ll be taking a closer look at the Freezone from the CoolIT Systems.
The company
Many of people might have not heard of CoolIT Systems. It is a company based in Calgary, Alberta, Canada. They have recently made quite a lot of news with a lot of big system builders, such as Shuttle, DELL, Alienware, and Velocity Micro, chose their product to integrated into high end gaming PC. They are selling primarily liquid PC cooling products. Unlike other liquid cooling products, “the CoolIT system is not a water-cooling system. Unlike water-cooling products, CoolIT does not use a radiator. Rather use a proprietary ‘Chiller’ which incorporates multiple TECs or peltiers to chill the liquid coolant. CoolIT systems provide far greater thermal efficiency, increased reliability, run quieter and are easier to install than the raw components of comparably sized water-cooling kits.”
The Freezone
I think the founder of the CoolIT Systems is very keen with the naming of both of the company and the product. Not only the company name implies they are specialized in keeping the system cool, the name Freezone is also a catchy name. Well, let’s see if the product can live up to the name.
Specification:
- System Type:Liquid Chill
- Thermal Transfer: 0.10C/W
- Noise at full system output: Active Automatic
- Non-Toxic
- Vapor Resistant Tubing
- CPU FHE (Fluid Heat Exchanger):
- Design:Monolithic copper, multi-cell, single channel
- Dimension: 42 x 42 x 17 mm
- Weight: 195g
- TCM (Thermal Control Module):
- Design: Dual IC SMT PCB w/outboard IC sensor
- Input: 12VDC, 5VDC
- Dimensions: 89 x 53 mm
- Weight: 30g
- Function: Thermal controller to adjust TEC and fan power output
- Design:Monolithic copper, multi-cell, single channel
- Chiller and Pump Module:
- Heatsink:
- Design: Dual dissipation plate, anodized alloy, laminar flow array
- Dimension: 89 x 53 mm
- Weight: 850g
- TECs:
- Design: Six solid-state heat pump wafers
- Dimens: 40 x 40 x 3.5 mm (each)
- Weight: 20g (each)
- Function: Active coolant thermal reduction
- Chiller FHE’s:
- Design: Dual anodized alloy distribution, multi-channel w/laminar flow
- Dimension: 121 x 41 x 12 mm (each)
- Weight: 80g (each)
- Fan:
- Noise: 26dBA – 37dBA
- Bearing Type: Enhanced life ceramic
- Life Cycle: 50,000 hrs
- Dimension: 92 x 92 x 25 mm
- Function: Heatsink convection, chassis exhaust
- Pump and Reservoir:
- Design: 12VDC coreless outrunner pump w/integrated expansion vessel*
- Noise: <15dBA
- Life Cycle: 50,000 hrs
- Dimension: 50 x 50 x 75 mm
- Weight: 360g
- Heatsink:
*This pump is produced under licensed technology which is the property of AVT Canada. AVT Canada retains sole licensing rights.
Technology
Before we take a deep look into the CoolIT Systems’s Freezone, let’s talk about the technology at which it uses to cool the CPU. Instead of using the mechanical cooling, such as the heat sink and fan, or the water cooling, the Freezone uses Thermoelectric Cooler, aka peltier. Basically, a peltier is a ceramic substrate that consists of two sides, one hot side and one cold side. Without going too much detail in the physics, the whole underlying concept is that heat is related to the difference in the voltage potential of the two sides of the substrate. When energy is applied, the heat is transferred from the one side of the substrate to the other. The whole idea of the thermalelectric cooler is that once the energy is applied to the system, the heat will be transfered from the cold side of the substrate to the hot side and the heat from the hot side is then transferred to a heat sink or other means for removal.
Freezone–Detailed Look
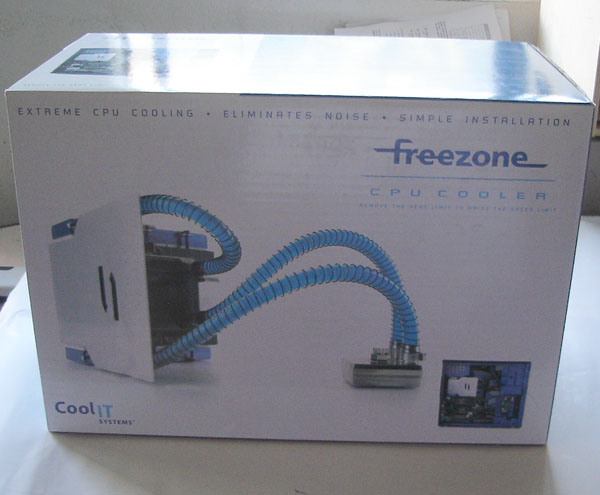
As mentioned before, the Freezone is an all-in-one liquid cooling system. Thus, the tubes, the pumps, and the fan are all pre-assembled. When I received the shipping box from CoolIT Systems, I was amazed by how big the box is. Upon opening the box, I realized why CoolIT Systems choose to package the Freezone in such a large box. The Freezone is actually packaged in a styrofoam box so it could be protected from any bumps and tosses which the package might encounter during the shipping. The unit arrived without any damage whatsoever.
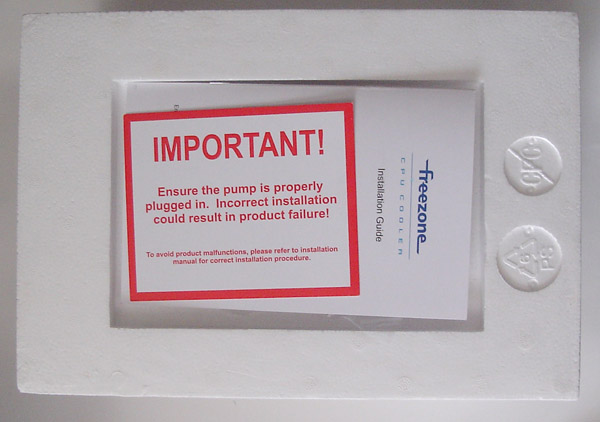
Opening up the box, the first thing you will noticed is a big warning card that warns the customer to check and be sure that the pump is properly plugged in. I guess CoolIT Systems just want to be sure that nothing comes loose or is broken during the shipping. In addition to the warning card, you will also notice a manual and the retention bars laying outside of the styrofoam box.
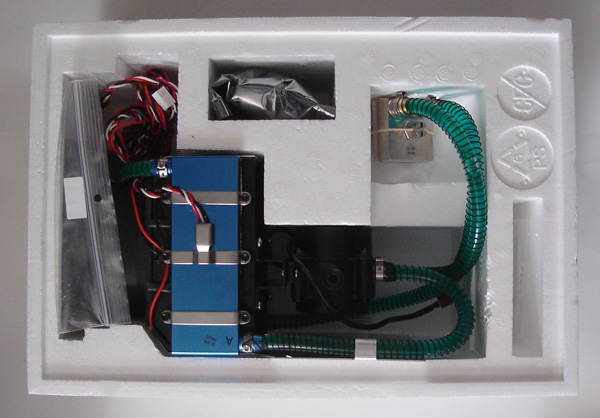
Lift up the cover and you will see the whole unit in plain sight that. The styrofoam box is pre-cutted to fit the Freezone and its accessories.
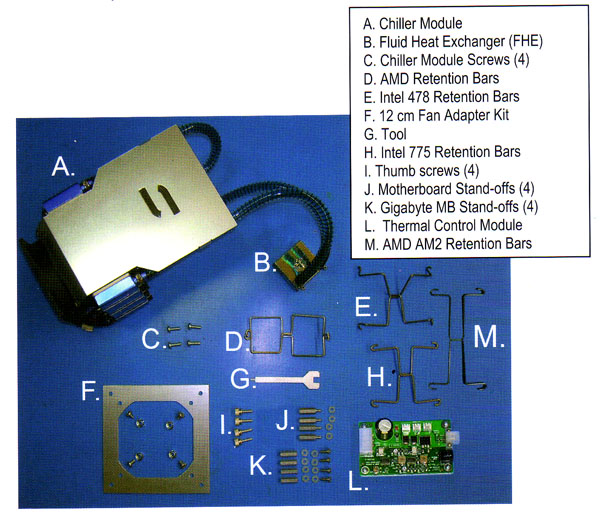
Here is a list of what you will be received with the package:
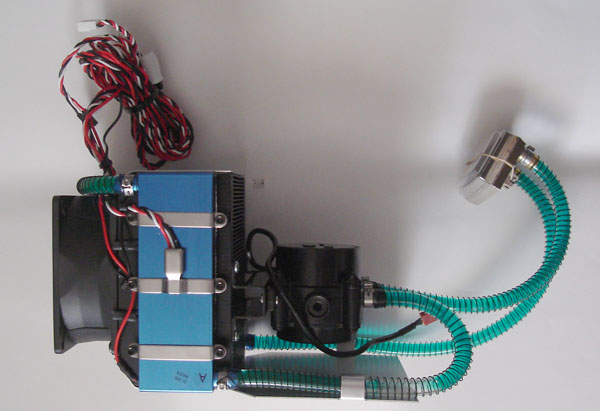
Freezone is assembled with a dual thermal plate heatsink, 6-TECS, two laminar flow FHEs, and a low speed 92mm fan. The tubes are pre-cut to a given length and the liquid is pre-filled to the unit, so there’s no need to worry about potential leaks and the length of the tubes or how to route them.
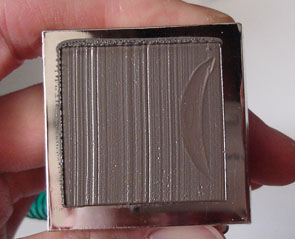
The CPU Fluid Heat Exchanger (FHE) as CoolIT Systems called is a single-channel, multi-cell monolithic (single block) copper block which acts as the low resistance medium to transfers heat from the CPU to the coolant. Its dimension is 42 x 42 x 17 mm. As you can see it comes with thermal compound pre-applied. This is truly an all-in-one unit, you don’t even have to apply your own thermal paste. The thermal compound is well protected with a plastic cover during shipping.
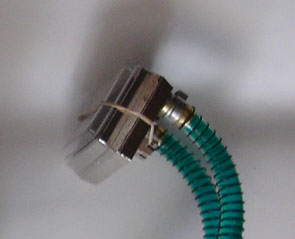
Take a look at the tubing. The liquid coolant is already filled inside the ¼’’ vapor resistant tubes. According to the CoolIT Systems, the Freezone’s coolant is an environmentally friendly liquid coolant. It “is a mixture of low-toxic PPG (polyproplene glycol) and distilled water.” Since it is not water, “biologicals cannot propagate in this environmentally friendly, recyclable solution.” Furthermore, in order to “prevent coolant from escaping and contaminates from entering the system, it is constructed with vapor resistant materials and fitted with gas resistant plumbing.” What this all means is that you don’t have to worry about things growing inside the tubes and you may never have to add the coolants.
Move along and we will the pump unit. The pump is a 12VDC coreless outrunner pump with an integrated expansion vessel and features dual in-fluid sapphire bearings. According to the information provided by CoolIT Systems, the pump’s dimensions are 50 x 50 x 75 mm, its noise is less than 15dBA and it has a life cycle of 50,000 hrs. Also, notice the black cable coming off the pump is actually a fan connector which goes to the motherboard’s CPU connector to receive the power for the pump.

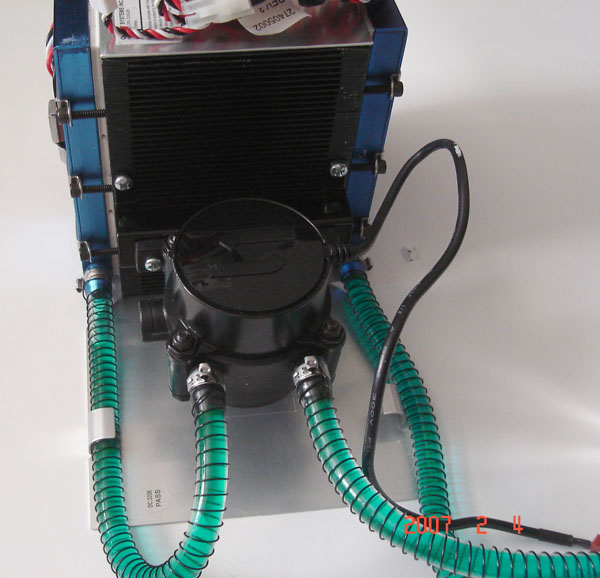
The pump is attached to a black colored 89 x 53 mm dual dissipation plate made of anodized alloy that functions as a heatsink to cool the hot side of the six TECs used to chill the coolant. Next to where the black colored heatsink is attached to is a blue reservoir which contains the six TECs. The hot coolant comes in from the CPU will enter the FHE and chilled by the six TECs and then circulate back to the CPU. The heat that’s being generated by the TECs will then be exhausted by the rear 92mm exhaust fan out of the case.
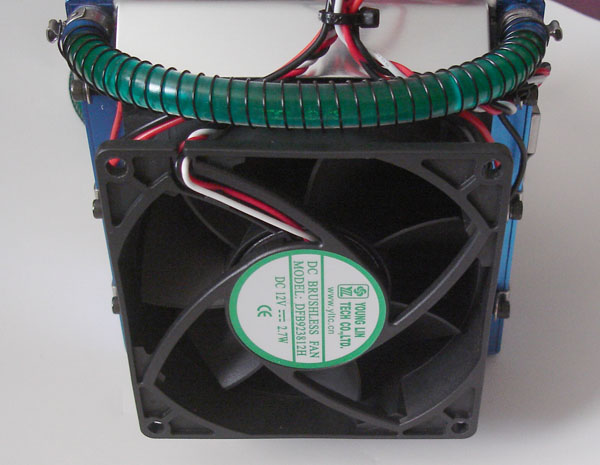
The exhaust fan is made by Young Lin Tech Co. It is 12VCD, 92mm, rated at 26dBA – 37dBA, and 50,000 hours of life cycle. It has the dimension of 92x92x25 mm and the bearing is enhanced life ceramic. It’s a bit disappointing to see the 92mm as I think a 120mm fan would be much appreciated and quieter. CoolIT Systems does include an adapter to fit the fan to a 120mm fan slot, so no modification is needed if you got a 120mm fan slot. If your system only comes with 80mm fan slot, then some modification would be needed.
Accessories
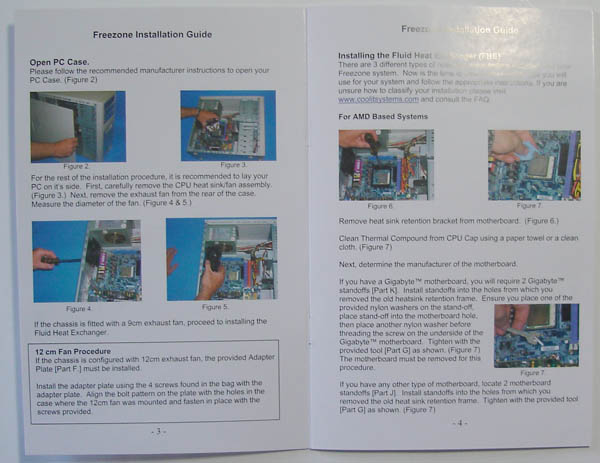
I think it is worth mentioning that the Freezone’s manual is full-colored with detailed pictures on parts and a step-by-step installation procedure. It’s not often that you will see a colored manual (if there even a manual to be found) nowadays as many companies are trying to cut the cost by either include the manual in a CD or simply provide a very simple black and white manual.
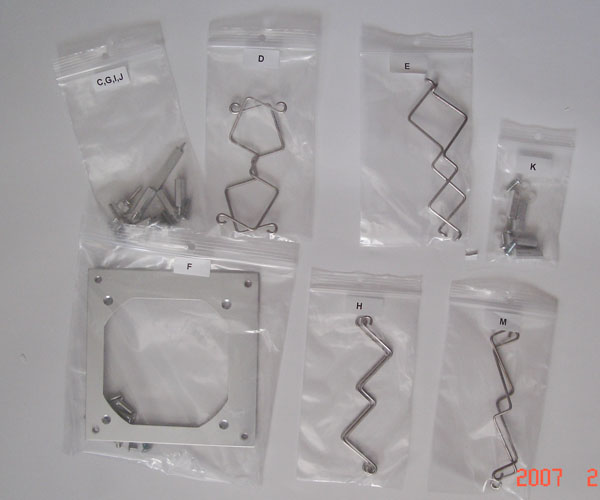
Also, as you can see from the retention bars included in the kit, the Freezone works with Intel 478, 775 CPUs and AMD 754, 939, 940 and AM2. So it works with all the processors that’s in the market for the last few years as well as the latest one. In addition, the Freezone CPU Cooler supports all ATX motherboards, most BTX motherboards, and most mATX motherboards (althought I couldn’t find the list of non-supported BTX and mATX motherboard on CoolIT Systems’s site). Addition, notice the “F” bag. This is the included bracket used to accomodate the 92mm fan to the 120mm fan slot.
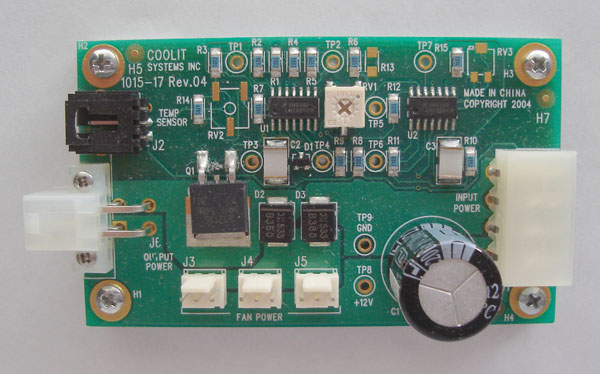
The Freezone comes with a Thermal Control Module. It basically functions as a thermostat which you can adjust the temperature/fan’s rotation speed. On the left, you see the 4 pin output power which connects to the TEC lead from the Chiller and the temperature sensor cable from the Chiller (black color). On the right, you see a 4 pin molex that powers the Thermal Control Module. On the bottom, you see three fan connectors, which you would connect the Chiller module fan and other fans inside the system. On the back of the TCM, there’s two pieces of double sided tape which allows you to tape the module anywhere inside the case.
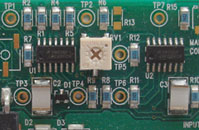
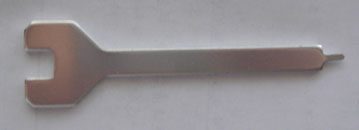
The middle of the TCM has a tiny little adjustable potentiometer labeled RV1. This is where you will use the “tool” that is provided by the unit to adjust the temperature. If you turn the potentiometer to the counterclockwise (with the three fan connectors facing the bottom), the unit will get colder and when it’s turned clockwise direction, the unit will be quieter.
The potentiometer is really tiny and a bit hard to use if you plan to adjust the temperature as it would require you to open up the side panel and use the tiny tool (or a 1/16’’ slot screwdriver) to adjust it. I would suggest CoolIT Systems to maybe use a 5 1/4’’ (or a 3 1/2”) panel to allow users a easy access to the potentiometer outside of the case. Furthermore, a digital potentiometer would be appreciated as well.
Installation and General Impression
The installation of the Freezone is extremely easy. Although the unit looks complicated, the installation is very simple with the colored manual and the whole process can be finished in about 30-45 minutes. If you are not sure how to install it, and want a more information, you can even check out CoolIT Systems’s site (link) as they got a video clip on how to install the Freezone. Furthermore, all parts individually packaged and clearly labeled with letter in their appropriate motherboard type, so you only have to pick up right bag for your given motherboard.
Since I am using the EVGA 680i motherboard, which uses Intel Socket L775, that does not have the heat sink retention bracket, I only have to remove the heat sink and fan. Once that’s removed, I had to remove the motherboard from the case to mount the four stand-off to the back of the motherboard. Be sure to use the included washer (one on each side of the motherboard) to prevent any potential electrical damage.
After the stand-offs are installed, I then follow the instruction provided by the manual and putting the Freezone on my hard drive cage and mount the Fluid Heat Exchanger. I actually mount the retention bars to the Fluid Heat Exchange before I place it over my CPU because I think this is a better way than pushing the bar into the position with the Fluid Heat Exchanger on top of the CPU. Once everything line up, I then screw the four thumb screws (be sure to screw them in alternating fashion so the FHE will be screwed in evenly). To be sure that it’s screwed tight, I also push the retention bars downward so I can thread a little bit more to be sure it is tight enough.
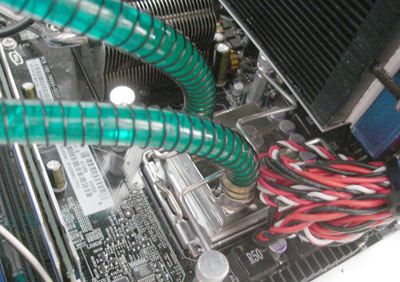
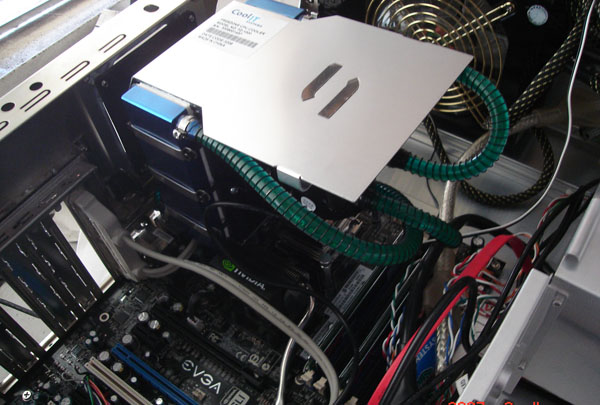
After the FHE is installed, I then remove the 120mm fan on the back of my NZXT Zero case and use the included 120mm fan adapter on the back of the Freezone and mount the Freezone to my case. The Freezone is quite heavy, so be sure that you have a case that is not made of cheap thin aluminum as it could potentially be too weak to support the weight. Once it’s installed, I then connect the TCM to with the appropriate cables as it is directed on the manual and the whole thing is done. All together the installation is finished in approximately 40 minutes.
General Impression
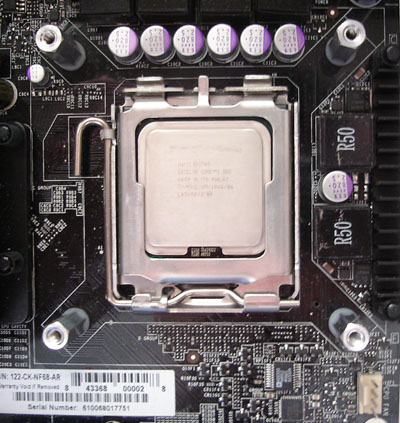
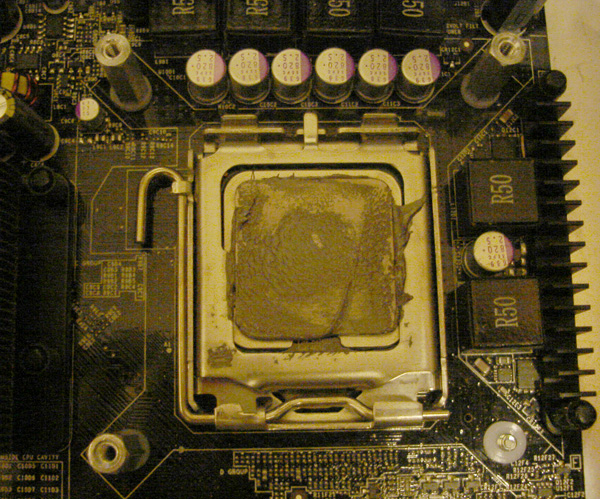
Despite the fact that it’s good to see the CoolIT Systems has pre-applied the thermal compound to simplify the installation process, it’s actually a much better idea for them to include a small tube of the thermal compound because they have applied way too much on the Freezone. As you can see from the picture below, I took off the FHE after it has been used and the picture I saw was not pretty. You can see the thermal compound was all over the place, I had to spend quite sometime cleaning up the mess.
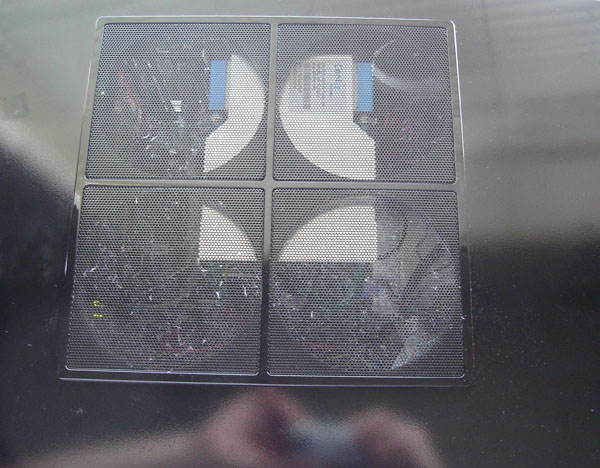
The first problem that I discover when I install the Feezone to my NZXT Zero case is that the unit is huge and it comes close to the side panel, so it could potentially pose a slight problem to some people to close the side panel. Furthermore, my NZXT Zero comes with 4 120mm fans on the side panel to help cool the components and the Freezone’s large size prevented the use of the fans. I ended up having to remove all four of them in order to close the side panels as the fans will get in the way. Of course, this could also be blamed to the fans’s placement on the Zeros’s case. Therefore, be sure to check and see if your side panel fan’s location relative to the CPU and be sure that you have enough clearance if you plan to use the Freezone, specially if you rely heavily on the side panel’s fan to cool certain components.
In addition to the clearance of the side panel, you would also want to make sure that your PSU can handle the power requirement of the Freezone as it will require about 70W of the power. Futhermore, the large Chiller may also pose some problem for those who may have a large heat sink on their chipsets. My EVGA 680i just had enough space between the top of the chipset heat sink and the Chiller.
As for the fan noise, I found that when I set the Freezone to the lowest setting (~3000 rpm) the unit is absolutely silent. However, when it is set at highest setting (~7000 rpm), the noise is definitely noticeable and it is much louder than what I would have liked. Considering that my system was consisted with quiet 120 mm fans, the rated 37 dBA fan noise is specially loud at night when it’s quiet. I would have preferred if CoolIT Systems would replace the 92mm fan with more efficient and quieter 120mm fan. I found that ~5000 rpm seems to be a good balance between noise and performance.
In addition to the fan noise, the placement of the fan controller is also a bit dissappointing to me. Since the Thermal Control Module is actually placed inside the system, adjusting the temperature would be slightly cumbersome. It would be a good idea if the CoolIT Systems could also route the Thermal Controller Module to the 5 ¼’’ slot or 3 ½‘’ slot and offer an easier way to adjust the rpm.
In addition, the Thermal Controller Module could have be better designed. The module would require to use a small flat tool (either with the included tool or a flat screw driver which you use to repair your eye-glasses) to adjust the rpm. It would be a better idea if it could be replaced with a knob to allow easy adjustments.
Testing
System Configuration
|
Processor
|
Intel E6600 Core 2 Duo
|
|
Motherboard
|
EVGA nForce 680i SLI (BIOS P24)
|
|
Memory
|
|
|
Hard Drive
|
|
|
Graphics Cards
|
Gigabyte GeForce 7800 GT (driver 93.71)
|
|
Cooling
|
|
|
Power Supply
|
|
|
Case
|
|
|
Sound Card
|
Creative Audigy 2 ZS
|
| Keyboard and Mouse |
|
| Monitor | Dell 1905FP |
|
Operating System
|
Windows XP Pro SP2
|
| Additional Components |
|
I decided to test the Freezone with my normal system setup. My normal system consists of the 6 120mm fans (2 are on the back pulling hot air out and 4 are on the side blowing air to the CPU and GPU) that are included in the NZXT Zero case. In addition, the processor is being cooled by the Thermalright SI-128 with Scythe S-Flex SFF21F fan. I purposely did not do a direct test of the Freezone to my Thermalright SI-128 and Scythe S-Flex SFF21F fan because I think this test gives a much better perspective on the overall efficiency of the liquid cooled Freezone with a common system cooling solution that consists of heat sink and multiple fans.
The Freezone is mounted the same NZXT Zero case but the 4 120mm side panel fans are removed. Furthermore, one of the back 120mm fan on the back is also removed in order for me to mount the Freezone’s 92 mm fan.
The readings are taken with the Intel Thermal Monitor and Speedstep turned on. The idle temperature is taken with the system booted into the Windows after about 10 minutes to allow any background programs to finish loading. The load temperature is taken with the Intel Thermal Analysis Tool setting both cores running at 100% CPU usage for 10 minutes and the highest temperatures are reported. The temperatures are all taken with the Intel Thermal Analysis Tool.
Result

As you can see from the result, the Freezone does a fantastic in keeping the CPU cool but it would require the fan to be set at high speed. When the fan is set at the absolutely quiet, low speed of ~3000 rpm, the temperatures of both load and idle are significantly higher than the air cooling provided by the Thermalright SI-128 and SFF21F. We can see that under the load condition the temperature reaches to 60 °C when it’s set at low setting (it is probably not good idea to keep the CPU running at such temperature).
When we crank up the fan speed to the higest (~7000 rpm), the Freezone really shines. It lowers our idle temperature by 7 °C for both cores compare to our air cooling setup. What is more amazing is the load temperature with the Freezone set at highest setting, we see that the Freezone is able to lowered the temperature by as much as 13 °C for the second core and 15 °C for the first core. That’s extremely good performance. Imagine that running your processor at maximum performance yet it never break even 40 °C.

Let’s take a look at the efficiency of the Freezone with the E6600 overclocked to 3.2GHz from the stock 2.4GHz. Once again, when the setting is at low, we see that the Freezone is not able to compete with the air cooling of the Thermalright SI-128 paired with the Scythe S-Flex SFF21F fan. However, when we set the fan to run at the maximum rpm, the Freezone is able to cool the temperature of the CPU for about 17 °C during the idle comparing to the air cooling setup.
When we set the cores to run 100%, the Freezone is able to reduce the temperature of the CPU for about 7 °C compared to the SI-128 and SFF21F fan. One thing we can notice when we overclock our processor is that the Freezone is able to keep the system running extremely cool at idle, but when we load the CPU, the efficiency does decrease from the stock speed.
It seems to me that the Freezone may not be able to cope with the tremendous amount of heat generated when the CPU is overclocked too extreme. One thing I did notice during the load test of the CPU running at 3.2GHz is that the initial temperature jumped to around 50 °C when I started the load, then the temperature slowly climbs up as test is progressing. Thus, I have a feeling that the fan is just not able to keep the TEC cool enough to keep the temperatures down to the setting which the TCM is set.
Conclusion
The CoolIT Systems’s Freezone is an excellent product. I have to say it’s one of the best cooling solutions out there for those who wish to keep their CPU cool while do not want the whole trouble of water-cooling setup. I really love the fact that the Freezone is extremely easy to install. The performance of the Freezone is also amazing. As we can see from the result, the Freezone is able to keep the CPU temperature much cooler than the air cooling setup with multiple fans.
The Freezone is almost a perferct product. Despite the great performance, I do have a few complaints about the Freezone. First of all, despite the included 92mm fan does a great job exhausting the hot air, it is noisy when it’s turned at the maximum level. As we can see from the result, the Freezone really is only efficient when the fan is turn at fairly high rpm. This will generate some undesirable noise, so I would personally prefer a quieter 120mm sized fan instead. Additionally, the included Thermal Controller Module could have been better designed to offer easier adjustment and maybe even easier access by mounting it to the outside of the case.
Still, with these minor complaints, I still strongly recommend the Freezone to anyone out there who is looking to keep their CPU cool. I don’t think that the Freezone can fully replace any water cooling setup at the moment because it only has the CPU cooler (at the time this article is published, CoolIT Systems has a new Quad-SLI-Freezone which comes with 4 blocks for the Quad SLI GPU) and not chipset cooler. Furthermore, it seems like there’s a limit as to how the Freezone is able to cope with excessive heat. Thus, it won’t be the cooler for extreme overclcokers out there. Personally I prefer the Freezone over water-cooling setup because of its compact size and easiness of installation and maintenance.
With a retail price of $399.99, the Freezone is not cheap. It is in fact quite expensive but the performance speaks for itself. You would really come to appreciate the ingenuity of the engineers at the CoolIT Systems for designing such excellent product once you start using it. This could be the best cooling solution out there without going to the phase change solution. It’s quite amazing that the CoolIT Systems is able to bring such innovation to the market and I can’t wait to see what they have come up with next.
For the excellent performance and easiness of installation, the CoolIT Systems’s Freezone will receive a 9 out of 10 (extremely good) and bjorn3d’s coveted Gold Bear Award.

Pros:
+ Easy installation
+ Excellent performance
+ Adjustable fan speed
+ Maintenance-free
+ Excellent design and construction
+ All-in-one unit, all pre-assembled (even the thermal compound)
+ Compact design
+ Peltier Cooling
+ Excellent manual and detailed installation instruction
Cons:
– Expensive
– 92mm fans
– Slightly hassle in adjusting the fan speed
– A tad noisy when it’s running at maximum rpm
– Might be some problem for some large chipset and intake fans
– No chipset cooler


