For recovering from annoying glitches to complete meltdowns, I’ll show you some good habits to keep and share when it comes to protecting yourself from data loss.
INTRODUCTION
I know many of you may be familiar with the idea of backing up data as it has become increasingly easy to purchase huge hard drives and DVD-burners for this purpose. But there exists a whole world of people oblivious to the idea that their data can one day disappear, never to been seen or heard from again. This is what I intend to focus on today, good backup habits and how to save your data.
- System Restore
- Saving files to DVD/CD with Windows writing wizard
- Creating a complete image of the hard drive
Let’s begin.
TO RESTORE OR NOT TO RESTORE
Even if you are new to computers the first thing you should do is familiarize yourself with the System Restore feature of WindowsXP. It is a useful feature if you should ever install a program or driver that causes havoc with the rest of your system. With the click of a button you can return your computer to a previous state before the offending application or driver was installed. This sounds like the only feature you may ever need to save your data until you realize that it does not backup any files you have but only installed programs and settings. The flip side of this is that if you are working on an important document (you are saving it every 10 minutes right?) and you need to restore your computer to a previous state, to a week prior for example, your document will be waiting for you when you complete the process.
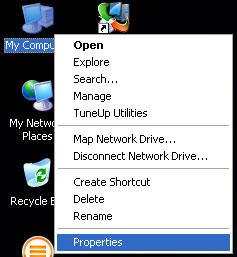
To check the status of System Restore you can right click on you’re my computer icon and select properties.
This will open a new window with many tabs located at the top. Selecting the system restore tab will bring you to the section where you can adjust the amount of hard drive space dedicated to the application or you may turn it off completely (Not recommended).
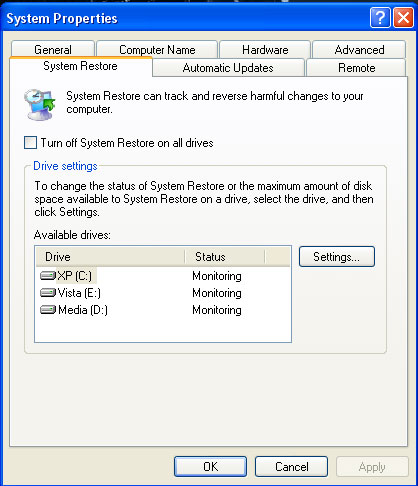
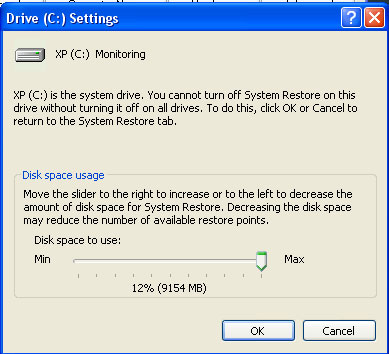
Reducing the amount of space will reduce the amount of restore points you have available to you if something should go wrong. With hard drive space being so inexpensive today you should leave this setting at its default.
Many of the other features for System Restore can be accessed by clicking Start -> Programs -> Accessories -> System Tools -> System Restore.
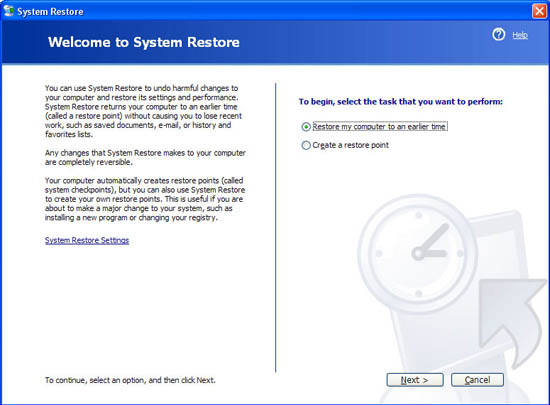
From here not only can you adjust the settings I just mentioned but you can also restore your computer to a previous point or select to create a manual restore point. This begs the question, how often will Windows create an automatic restore point? From the MS website:
For example, restore points are created before new device drivers, automatic updates, unsigned drivers, and some applications are installed. These healthy system checkpoints are created without prompting or intervention from the user the first time the computer is started after Windows XP is installed and, by default, on a daily basis after that. You can also manually create restore points.
One important point to be aware of is that should you ever encounter a time when you need to restore your computer using System Restore always try to use the most recent restore point available to you. A one year old restore point does not count as a valid backup.
All of this is well and good but have you spotted the fundamental limitation with System Restore? If you said the data itself resides on the hard drive you get 10 points! System Restore works well enough as long as the hard drive hasn’t blown up, melted down or become otherwise corrupt. In order to protect ourselves from this occurrence we need to kick things up a notch!
SAVING PRIVATE DATA
Now most people probably understand the importance of backing up their data but they may fail to realize just what must be done in order to ensure its survival in the face of a total catastrophe. There are different ways to accomplish this of which we will go over 2 of the more popular methods, backing up data to a DVD/CD and using a third party program to create an images of the entire drive.
DVD’s and CD’s have become so inexpensive that their use for saving important files exists without question. It makes sense then that people should become familiar with how to save important files to them on a regular and most importantly, simple, basis. There are many applications that exist for the sole purpose of writing data to a CD or DVD such as Roxio and Nero just to name a couple. While these serve their purpose quite well there is also a way to do this from within Windows without the need to buy any additional software. Who says there is no such thing as a free lunch?
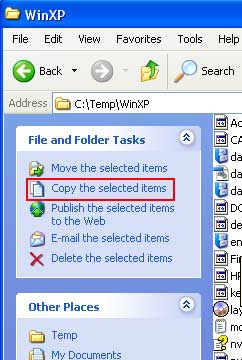
You may not have known such a useful feature is already embedded within Windows and how easy it is to utilize it. All that is required for you to save your data to a DVD/CD is a writable drive, a blank disc and a few moments of your time. We begin by clicking on the my computer icon and navigating to the folder where you keep the files you wish to backup. Simply highlight the files you wish to save and on the left side of the window click copy the selected items.
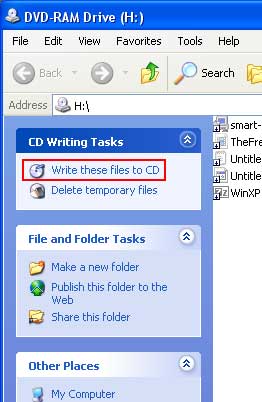
In the new window that appears select your (re)writeable DVD/CD drive. A message will appear at the bottom of your screen alerting you that you have files waiting to be written to disc. Clicking on this alert will open a window containing all the files you have selected for writing.

Once you are satisfied that you have selected all the files you wish to back up you should look to the left and click write these files to CD.
This will open the writing wizard where you can now assign a name to the disc you are creating. By default Windows inserts the current date. While some may find this to be sufficient I would caution you to use a more descriptive title. Perhaps something pertaining to the type of content you’re recording. Eg. Family photos, office files, music, etc.
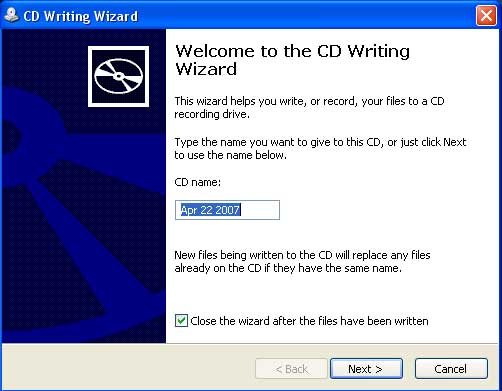
When you are ready, clicking next will start the process of recording and within minutes you have saved your important files from sure destruction should your hard drive ever fail. Just be sure to keep your disc in a safe place and the data will be accessible for years to come.
IMAGING ALL THE PEOPLE
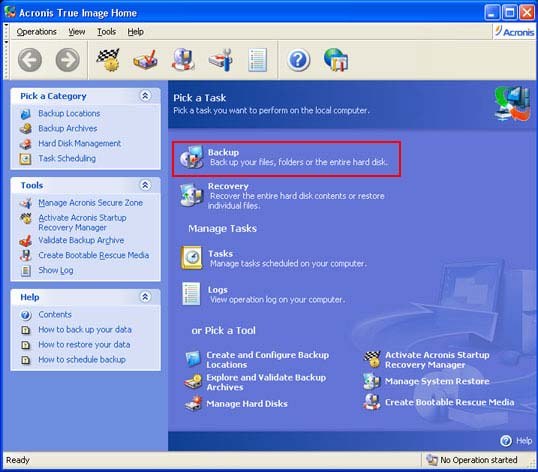
I mentioned there were 2 methods of backing up your data and as promised here is the 2nd method. Now the first method was free as it’s included with WindowsXP and for all intents and purposes will get the job done. But what happens if you want to go one step further and not just save your files but every last bit and byte on your hard drive? Say, if you wanted an exact copy of everything on your drive should catastrophe strike? You my friend are in luck! Many wonderful programs are available to do just that and more. While these programs do not come with Windows the services they provide are well worth the money they cost. Reviewing each program that can image your hard drive is beyond the scope of this article so instead I will walk you through one of the more popular ones and my personal favorite, True Image© from Acronis.
But why should you want to create an image of you disk if you could just save the important stuff to CD? Besides the fact that creating an image of your hard drive is both easy and harmless to the drive itself, you may want to have an image handy should your hard drive stop working entirely and you wanted to get back up and running in the least amount of time. This is where the true value of an image comes into play though it is not without its other uses.
A quick description of True Image reveals just how powerful this application is. It provides you with many options for saving your data some of which include:
- Restore your entire PC from an image.
- Restore specific files.
- Explore archives.
- Create incremental and differential backup.
- Restore your entire PC from an image
Entire articles have been written describing in detail the potential of this program. For the sake of brevity I will focus on creating a disk image (an exact copy, bit for bit, of an entire hard drive) with this application.
Start by clicking on the icon to open the application. Once opened, we are greeted with the main screen of the program where you can access all of the features of the program with a click of your mouse. For our purpose we will be clicking on the Backup task.
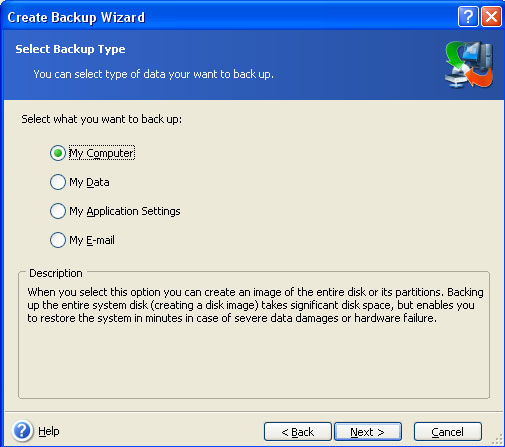
After clicking next on the following window we are presented with a chance to select what we would like to backup. Since we are creating an image of the entire PC we will select My Computer.
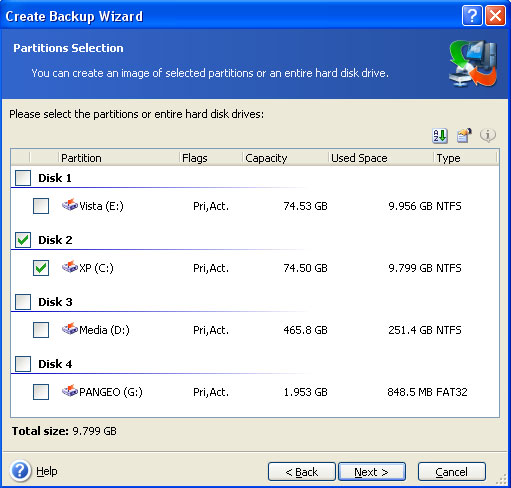
The next screen you see will allow you to select which hard drive or partition you would like to image. If you have only one hard drive then your screen will look a bit different.
Upon clicking next you are now asked where you would like to store the image file once it is created and to provide a name for the file. You can select any available hard drive (if you have more than one) or you can choose to put it straight to a blank DVD/CD.

You are now given the option or creating a differential, incremental or complete backup of the disc.
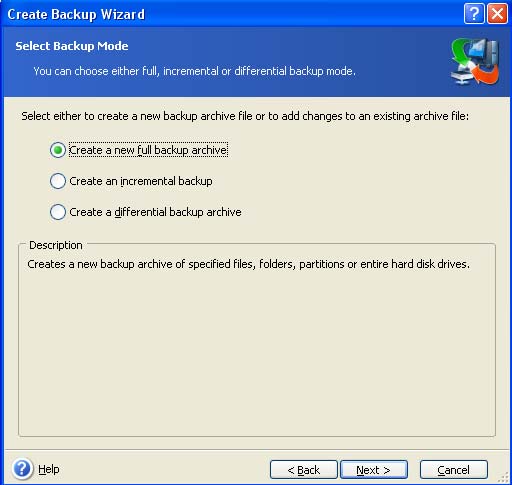
To describe each briefly,
Incremental Backup
- Backs up only changes that were made since last backup.
- Requires the creation of a full backup before starting an incremental backup.
- Requires less space than a full backup.
- Upon restoration the full backup will need to be provided along with all additional incremental ones.
Differential Backup
- Backs up only changes that were made since last backup.
- Requires the creation of a full backup before starting a differential backup.
- Requires less space than a full backup but more space than an incremental backup.
- Upon restoration the full backup will need to be provided along with the differential backup.
Complete Backup
- Creates a new backup archive of all selected files, folders, partitions or hard drives.
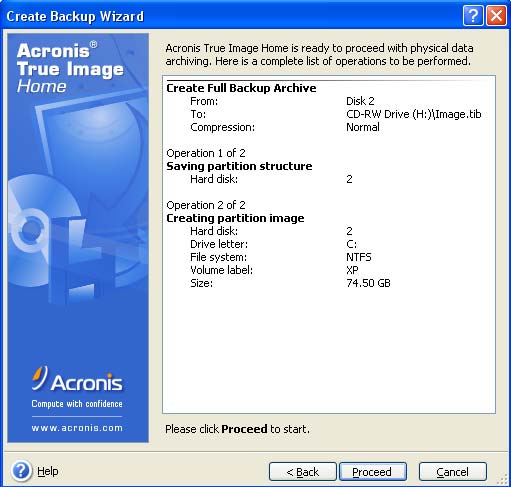
For this article we are creating a complete backup and once you click this option you will be asked to accept the default settings or to manually adjust them. Some of these settings include adding a password to the image, how much compression you want applied, the level of priority the computer should use to create the file and others that are not commonly used. For our sake clicking on default options will suffice and you can now decide to leave yourself comments within the image. This is useful if you plan to make many images or if you just want a reminder of what is contained in the image. True Image will now show you the options you’ve selected one more time before asking for a final confirmation to begin creating the archive.
CONCLUSION
There was a time when you could be forgiven for not having good backup habits. Sure, you always had a floppy disk available to you but was this really any better then just keeping the files on your hard drive to begin with? As technology has matured so has the ease at which we can copy and backup our most precious documents. Today I have shown you a method for saving program settings, a method for saving individual files and a method for creating an exact copy of your entire hard drive. Each method has its strengths and weaknesses and by themselves would not protect you as fully as you might like. Taken together though they provide you with all the protection you’ll ever need from a hard drives inevitable failure. The time for excuses is over my friends and if you think it can’t (won’t) happen to you then I leave you with this; it’s only a matter of time.
FINAL WORDS
It is never too late to practice good habits when it comes to backing up data. Perhaps you already have good habits but know of someone who may be in need of little enlightenment. I know I could have used some. Inevitably all things stop working, whether it’s a CPU or a video card or a hard drive. The only difference is how much of an impact it will have on you when its electronic life comes to an end. CPU’s and video cards can be replaced in a flash but when a hard drive crashes it tends to take your data down with it. Be sure you incorporate a regiment of saving your data on a regular basis and you will never have to suffer the pain and agony I suffered from losing all that pr0… all those family photos. (I love you hunny).