Sure, trying new things can be scary. Unless of course it is from a well established company like XFX. New to the motherboard scene XFX offers a solid product at an amazing price.
INTRODUCTION
What comes to mind when you think of the word ‘value’? Do images of cheap construction or poor build quality come to mind? In recent years the word value has come to be a polite way to describe a product that is cut down and offers little in the way of features for a low cost. Certainly a misnomer given the little value these items offered. Now, what if I told you that the word value was about to take on a whole new meaning? That a company well known for world class video cards is going to offer a motherboard packed with features at a price many of us can afford? Have I piqued your interest yet? Good, let’s begin.
XFX 650i Ultra
XFX

XFX®, is a company that is well known to the gaming community as they produce some of the most extreme graphic products around. As a company they operate on the following corporate philosophy:
“XFX® dares to go where the competition would like to, but can’t. That’s because, at XFX®, we don’t just create great digital video components–we build all-out, mind-blowing, performance crushing, competition-obliterating video cards and motherboards.” “Oh, and not only are they amazing, you don’t have to live on dry noodles and peanut butter to afford them.”
XFX is a division of PINE Technologies, a leading manufacturer of state-of-the-art processing components. To learn more about PINE, click here.
FEATURES AND SPECIFICATIONS
Performance
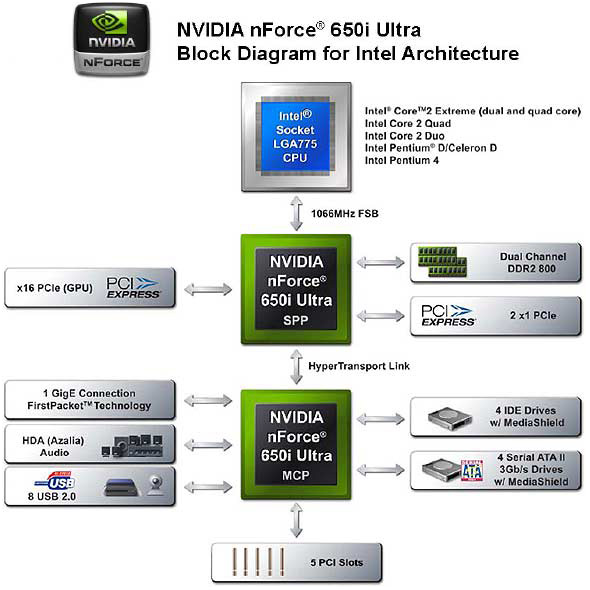
Based on NVIDIA nForce 650i Ultra Chipset
Supports Intel Core 2 Extreme, Intel Core 2 Quad, Intel Core 2 Duo, Pentium EE, and Pentium processors
1066/1333* Mhz Front Side Bus
Memory
4 x 240-pin DIMM sockets
Dual Channel DDR2
Maximum of 8GB of DDR2 533/667/800MHz
Expansion Slots
1 x PCIe x16
2 x PCIe x1
3 x PCI
Storage I/O
1 x UltraDMA133
1 x Floppy disk drive connector
4 x Serial ATA 300MB/sec
RAID 0, 1, 0+1, 5
Integrated Peripherals
8-Channel (7.1) High Definition Audio (Azalia)
1 x Gigabit LAN
Multi I/O
1 x PS2 Keyboard
1 x PS2 Mouse
8 x USB 2.0 ports (4 external + 4 internal headers)
Audio connector (Line-in, Line-out, MIC)
Form Factor
ATX Form Factor
Length: 12.0in – 304.8mm
Width: 9.6in – 243.6mm
As we can see from the list Nvidia does a good job of packing features into this chipset while keeping costs low. Now let’s take a look at how this chipset stacks up against its bigger brother the 680i LT.
Specification comparison
| NVIDIA® 680i LT & 650i Ultra Motherboard Specification Comparison |
||
|
|
nForce® 680i LT | nForce® 650i Ultra |
| Segment | Extreme Performance SLI | Performance |
| Chipset | nForce 680i SLI MCP | nForce 650i Ultra MCP |
| MSRP Retail | $199 | $149 |
| CPU | Core 2 Extreme(dual and quad core) Core 2 Quad Core 2 Duo Celeron D Pentium 4 Pentium D 9XX Pentium D 8XX |
Core 2 Extreme(dual and quad core) Core 2 Quad Core 2 Duo Celeron D Pentium 4 Pentium D 9XX Pentium D 8XX |
| PCB | Green | Green |
| FSB | 1333MHz | 1333MHz |
| Overclocking | Good | Good |
| SATA 3GB/sec | 6 (eSATA-Ready) | 4 (eSATA-Ready) |
| PATA | 1 port/2 drives | 1 port/2 drives |
| Gigabit Ethernet Ports | 1 | 1 |
| Audio | HDA (Azalia) | HDA (Azalia) |
| USB (rear/onboard) | 4/4 | 4/4 |
| GRAPHICS | ||
| NVIDIA® SLI™ Technology | Yes | No |
| Third PCIe Expansion slot | No | No |
| MEMORY | ||
| SLI-Ready Memory with EPP | 800MHz | No |
| JEDEC DDR2 Memory | 800MHz | 800MHz |
| SLOTS | ||
| PCIe x16 slots | 2 (2 x16) | 1 (1 x16) |
| PCIe x1 slots | 2 | 2 |
| PCI slots | 2 | 3 |
| STORAGE | ||
| RAID | 0,1,0+1,5 | 0,1,0+1,5 |
| NVIDIA MediaShield™ Storage Technology | Yes | Yes |
| NETWORKING | ||
| NVIDIA FirstPacket™ technology | Yes | Yes |
| NVIDIA DualNet® technology | No | No |
| Teaming | No | No |
| TCP/IP Acceleration | Yes | No |
| PEFORMANCE UTILITY | ||
| NVIDIA nTune™ Utility | Yes | Yes |
While the only things most people will notice are the lack of SLI and a couple less SATA ports it is worth noting the MSRP of this board is listed at $149 USD. That’s a great price for a motherboard as we are seeing more and more motherboards priced well over $200 USD. Not only that but I have easily been able to find this board for under $120 USD! That makes it an awesome value and all the more easier to accept two less SATA ports and no SLI.
PACKAGING
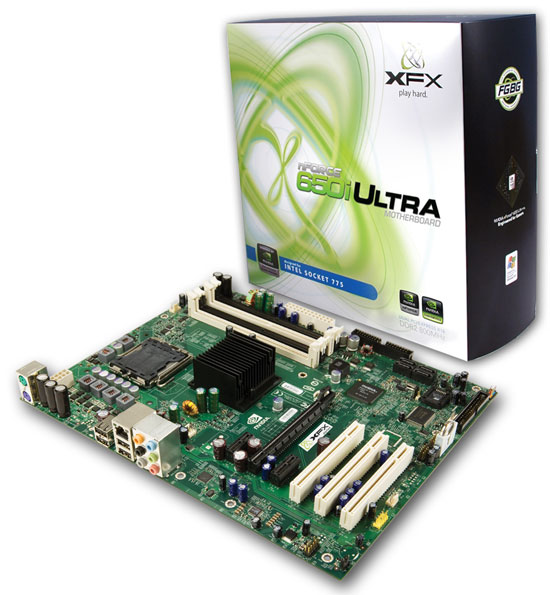
I have to say when I received this unit in the mail I was a little struck by the size of the box. It is quite a bit larger than the boxes my Asus motherboards of yore have come in. This turns out to be a good thing as they are double boxed for added safety. Not only do the boxes serve to protect but they also serve to inform. Flipping the box over we see a breakdown of what the board contains as well as some curious information regarding overclocking. I say curious because while many manufacturers are aware of the popularity of overclocking few have gone so far as to say it right on their packaging that this unit can handle some overclocking goodness. Thumbs up XFX.


XFX Box Front & Rear
(Click to enlarge)

XFX’s reminder
CONTENTS
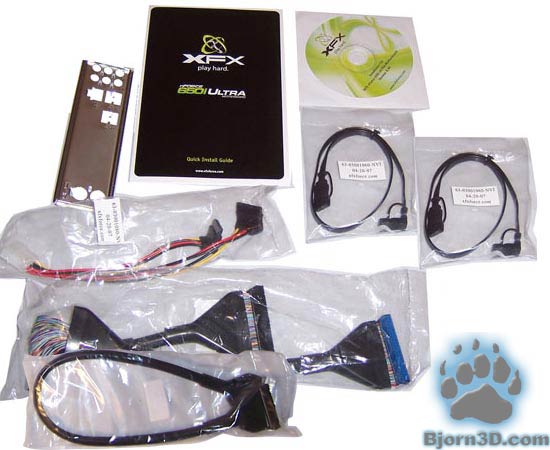
Opening up the box reveals the standard inclusion. Since this board is targeted at the mainstream user this suits me just fine as I like to keep costs down.
Cables & Accessories
Package Contents
- 1 – Quick install manual
- 1 – Driver CD
- 1 – Rear I/O plate
- 1 – Molex to SATA adapter
- 1 – Floppy drive cable
- 1 – IDE cable
- 2 – SATA cable
LAYOUT
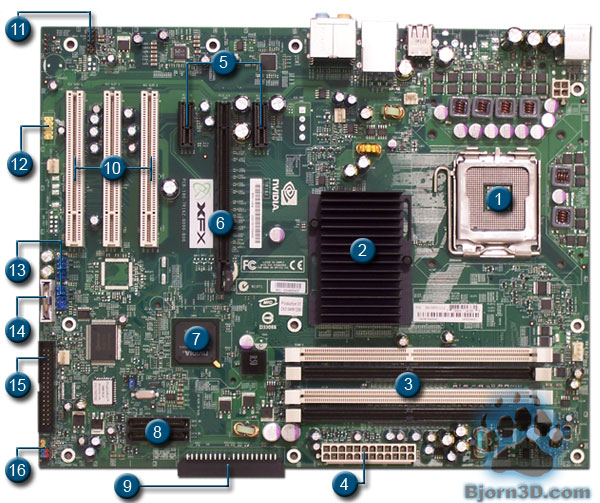
Looking at the layout of this board we see XFX adhering to the reference design right down to the last transistor. This is a good thing in my opinion as everything is well spaced out. There are all solid capacitors around the CPU area allowing for plenty of clearance. The 24-pin plug is easy to get to and the 4-pin CPU plug is only tricky when using a very large heatsink like the Big Typhoon. The only minor annoyance is the location of the USB headers on the board as you will see in the next page. The floppy drive port, while it is on the very bottom of the board, is acceptable as I don’t recall the last time I had to use a floppy drive. (Edit: Updating your bios from XFX will require you to have a floppy drive as the utility they provide is only extractable to a floppy disk. We hope XFX changes this in future versions.)
XFX 650i Ultra Layout
- LGA 775 Socket – Lan Grid Array sockets places the signal pins inside the socket rather than the CPU.
- 650i Ultra SPP – AKA the Northbridge, it controls the memory and PCIe interface.
- 240-pin DIMM Socket – Allows for use of DDR2 memory in dual channel mode by utilizing the same color socket for each stick of RAM.
- 24-pin ATX Plug – Allows the use of an ATX power supply to power the motherboard.
- PCIe 1x Slots – Two slots used for expansion cards, it operates at speeds up to 250MB/s in each direction.
- PCIe 16x Slot – One slot used for video cards, it operates at speeds up to 4000MB/s in each direction.
- 650i Ultra MCP – AKA the Southbridge, it controls the hard drives (IDE & SATA), USB ports, PCI slots, audio output and network connection.
- SATA Ports – Four ports for connecting Serial-ATA hard drives or optical drives.
- PATA Port – One port for connecting two IDE hard drives or optical drives.
- PCI Slots – Three 32-bit PCI slots for connecting expansion cards.
- Front Panel Audio – Connects to the audio ports of most cases. Used for plugging in microphones and headphones.
- Serial Connector – Used for connecting a serial port into an available expansion slot.
- USB Headers – Two internal headers allowing up to four additional USB ports to be connected.
- CMOS Battery – Provides power to the CMOS for storing the system time and system settings for your computer.
- FDD Port – One port allowing one floppy drive to be connected.
- Pin Out – Connects to the case switches (Power LED, HDD LED, Reset and Power)
REAR I/O
The rear I/O section of the board looks barren in comparison to some boards out there. But let’s not forget that those boards cost quite a bit more money and honestly speaking, I never used a parallel or serial port. I was pleased to see the inclusion of PS/2 ports on this board since plugging in a USB mouse and keyboard lowers the throughput of other devices attached through the shared connection.
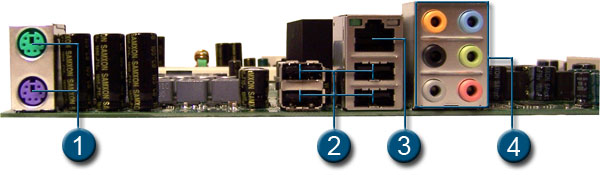
Rear I/O
- PS/2 Ports – Connections for keyboard (purple) and mouse (green)
- USB 2.0 Ports – Four Universal Serial Bus connections. Used to connect newer mice and keyboards as well as other devices such as digital cameras, printers and external drives.
- Ethernet Port – Plug a RJ-45 cable into this port for broadband access to the internet or to setup a home network. Supports speeds up to 1Gbit (1 Gbit = 1000 Mbit)
- 8-Channel Audio – Plug up to seven speakers and a sub-woofer thanks to the Azalia High Definition Audio chip. Also a microphone and an audio input port.
INSTALLATION
Installing this board was relatively straight forward though it was not without a couple points of concern. Looking at the picture below we see that installing a card, in this case a Creative Audigy 2 ZS sound card, in the bottom slot causes a very cramped situation should you want to use the USB headers on the board. While using the next PCI slot up was a possibility, I prefer to give the GPU as much room as possible to breath. Installing the USB cables first was an easy fix but should you find yourself installing your system outside the case on a removable tray like I did, you’ll quickly realize that you have to uninstall whatever card is occupying the bottom slot to access the headers.
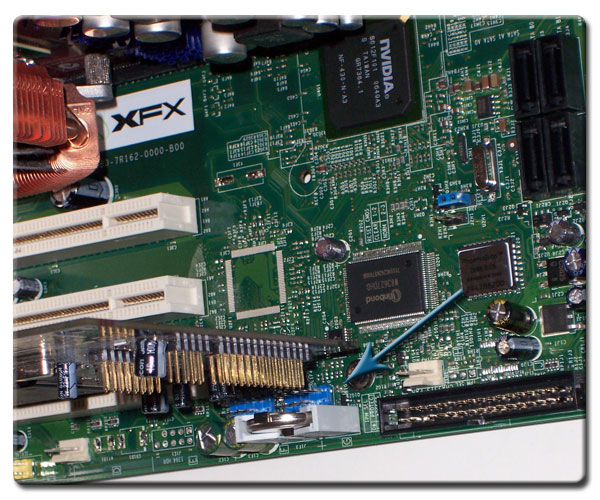
A little close for comfort
The second point of concern, although a minor one, is worth pointing out. In order to run your memory in dual channel mode, using two sticks of similar memory, you insert each one into the same colored socket. (e.g. white & white or black & black) This is common practice in the industry but what differs here is that the numbering of the slots is not in the usual order. By using the same colored slots your memory would ordinarily be numbered 0 & 2 or 1 & 3. On this board it will be 0 & 1 or 2 & 3. Again, this is a minor point but if you weren’t paying attention and you looked under a program like CPU-z or nTune you may think you installed your RAM in the wrong sockets and aren’t getting the full potential of your memory.
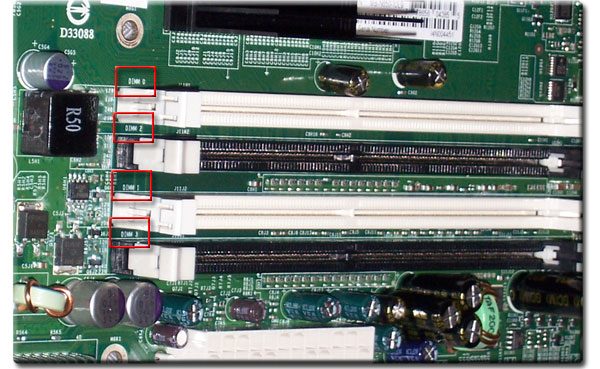
Easy as A, B, C – 0, 2, 1, 3
Aside from these rather minor installation issues this board was a breeze to setup and fit quite easily into my case. It is even able to handle a Thermaltake Big Typhoon with ease thanks to the all solid capacitors surrounding the CPU socket. Certainly not an easy task.
THE BIOS
Turning to the BIOS or the Basic Input Output System, we have an Award BIOS similar to the ones on the 680i LT and the 680i. In our case we have a few less advanced overclocking options.
Starting at the beginning we have our main page followed by our Standard CMOS Features for date, time and drive setup. Next we have the Advanced BIOS Features where we can setup the order we want our drives to boot up and select if we have any removable drives we want to use for boot up.


Click to enlarge
Moving on we have our Advanced Chipset Features. This is where our overclocking takes place and we can set our clock speeds and voltages as necessary. Selecting the System Clocks we see this is where we adjust the CPU multiplier, the various spread spectrums, and the HT multipliers. The last page here is the FSB & Memory Config page and this is where most of the magic happens. From here we can change the Front Side Bus of the CPU independently from the RAM and adjust our memory timings for maximum performance.


Click to enlarge
Here in the Memory Timing Setting page we see a fairly robust collection of memory settings for us to tweak. The majority of overclockers should only be concerned with the top portion containing the main five settings for adjust memory performance. Next we come to the CPU Configuration page. One may think these settings have little to do with overclocking but in fact these are also important. I will go into more detail in the overclocking section. The last page geared towards overclocking and by far the one where caution must be used is the System Voltages page. Doing exactly what it sounds like we can increase the voltage for different components to help increase performance.


Click to enlarge
The following set of pages deals with the more mundane settings. You will pretty much set these and forget them. Starting with Integrated Peripherals for your hard drives, USB setup and enabling/disabling the integrated audio on the board. Next we come to Power Management Setup followed by PnP/PCI Configuration. The latter one allowes you to select which bus the board should look at first for video display, PCI or PCIe.


Click to enlarge
Last but certainly not least we come to the System Monitor page. Allowing for very easy checking of system temps and voltages this is a good place to start to ensure everything is working properly and your heatsink has been properly installed. Remember though, the BIOS reads these numbers, like many other Windows programs, through software and should be cross-referenced with hardware testing.

Click to enlarge
TEST SETUP
All tests were conducted on the following platforms. A format of the hard drives followed by a fresh install of the OS was done. The latest drivers were then installed and all non-essential applications were halted.
| Test Platform | ||
| Processor | Intel Core 2 Duo E6420 @ 2.1 GHz | AMD Opteron 165 @ 2.7 GHz |
| Motherboard | XFX 650i Ultra | ASUS A8N-SLI Deluxe |
| Memory | 2 GB (2 x 1 GB) of G.Skill DDR2-800 | 2 GB (2 x 1 GB) of Patriot DDR-500 |
| Drive(s) | 1 – Seagate 80GB Barracuda SATA 1 – Samsung HD501LJ SATA |
1 – Seagate 80GB Barracuda SATA 1 – Samsung HD501LJ SATA |
| Graphics | MSI 7900 GT | MSI 7900 GT |
| Sound | Creative Soundblaster Audigy2 ZS | Creative Soundblaster Audigy2 ZS |
| Cooling | Thermaltake Big Typhoon | Stock AMD cooler |
| Power Supply | OCZ GameXStream 850 watts | Antec Truepower 2.0 – 430 watts |
| Display | Westinghouse 37″ LVM-37W3 | Vison 19″ LCD |
| Case | Coolermaster Stacker 830 | Tech station |
| OS | Windows XP Pro SP2 | Windows XP Pro SP2 |
| Synthetic Benchmarks | |
| PCMark05 | Default, CPU, Mem, GPU, HDD |
| SiSoft XI | CPU, Mem Bandwidth |
| HDTach | Single SATA Avg. Read, Burst |
| SuperPi Mod 1.5xs | 1M, 2M |
| Games | |
| F.E.A.R. v1.08 | 640×480 No AA/AF Highest in game settings, Soft Shadows off |
| Quake 4 v1.4.1 | 800×600 No AA/AF Highest in game settings, Ultra Quality |
| Company of Heroes v1.5 | 800×600 No AA/AF Highest in game settings |
OVERCLOCKING
Anyone who has read my previous articles knows I like to get right to the overclocking portion. It is exciting to see how far we can push a piece of equipment and increase its performance. As with any new piece of hardware I did a bit of research on preparing the board for overclocking since every board/chipset is different. I started at the CPU Configuration page in the BIOS and turned off the thermal control and enhanced halt state. I don’t want any under voltage happening when my overclocked CPU is idle. From there I went to the FSB & Memory page, set my memory clock mode to unlinked and was able to reach 355 MHz without any increase in voltage resulting in a CPU speed of 2840 MHz. To reach the max of this CPU I had to up the voltage of the CPU to 1.5 with 1.4v on the Northbridge resulting in an impressive FSB of 437.5 MHz!
The little CPU that could
Exploring the maximum potential of the board I lowered the multiplier to 6x and was able to reach a Prime95 stable FSB of 475 MHz. Wow! This from a motherboard costing under $120 USD. Remember though every piece of silicon varies slightly and my overclocking results should never be taken as a standard but rather one of many possibilities.
XFX redefines the word ‘Value’
TEST RESULTS: CPU PERFORMANCE
To test the performance of the CPU on this motherboard I used the PCMark05 suite, SiSoft Sandra XI and finally compare times from SuperPi. Results are compared from the 650i Ultra, 650i Ultra overclocked and the A8N-SLI Deluxe running an overclocked Opteron 165 @ 2.7 GHz.
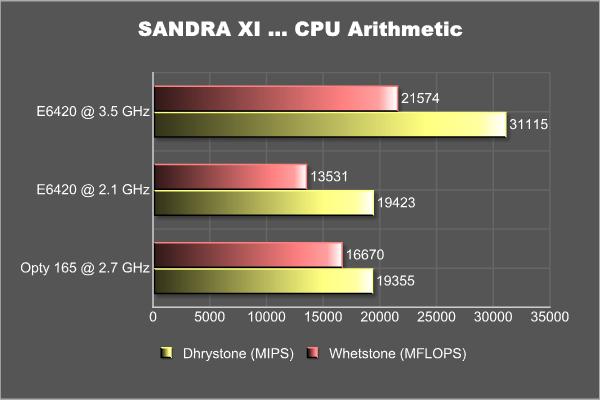
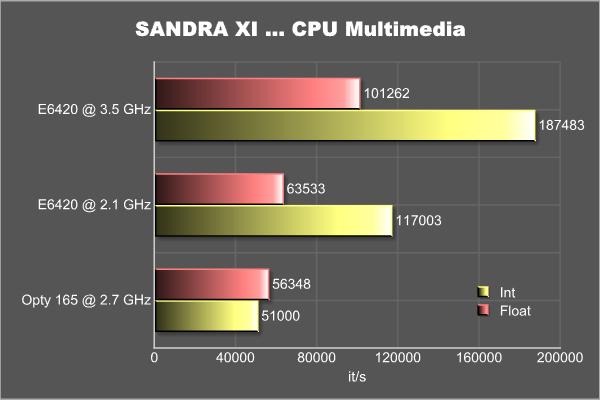
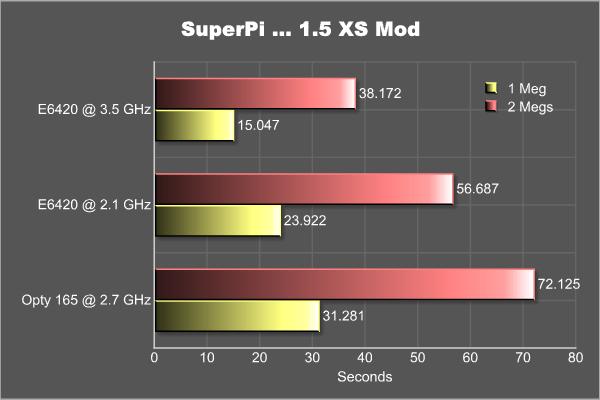
Looking at these numbers we see how strong the architecture of Core 2 Duo really is. The 650i board really gives this chip room to run and overclocking it just increases the raw power. Best of all, at no time did any system crashes or hangs occur with any overclock up to 3.5 GHz.
TEST RESULTS: MEMORY PERFORMANCE
To test the performance of the RAM on these systems I used the SiSoft Sandra XI memory bandwidth test and the PCMark05 memory test.
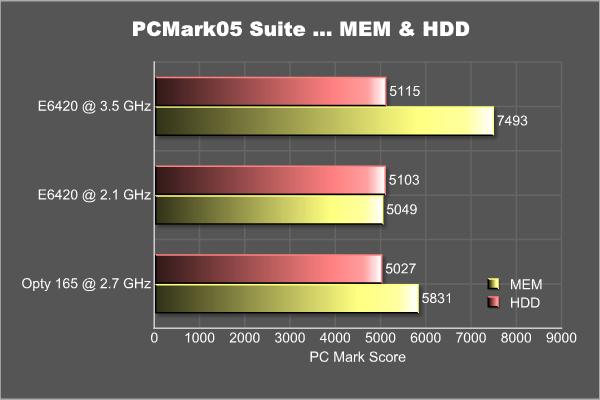
What we see from these tests is that even with DDR-500 memory and an integrated memory controller the AMD system can only eek out a small victory over the stock Intel chip. Once we overclock the Core 2 Duo the victory is snatched right back.

Also, take note of how much of an increase we see in bandwidth by overclocking the CPU. The RAM is still running at 800 MHz which tells me that at stock CPU speeds the RAM isn’t being pushed to the limits. Once again a solid design by XFX allows complete stability during all these tests.
TEST RESULTS: GPU PERFORMANCE
To test the performance of the motherboard’s GPU subsystem I ran all games at their lowest settings with no image enhancements to remove the video card from the equation. The frames rendered in these tests will be directly influenced by the speed of the CPU delivering data to the video card across the system bus and not the speed of the video card.
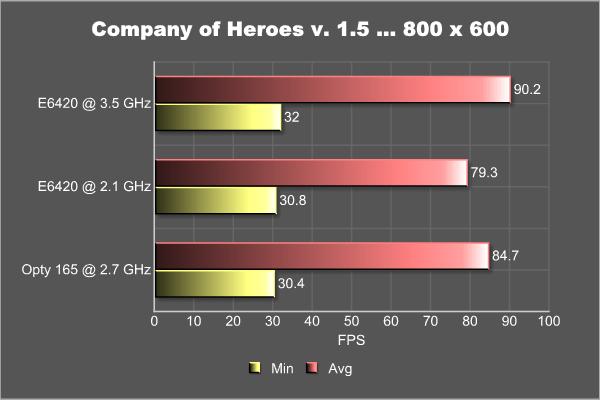
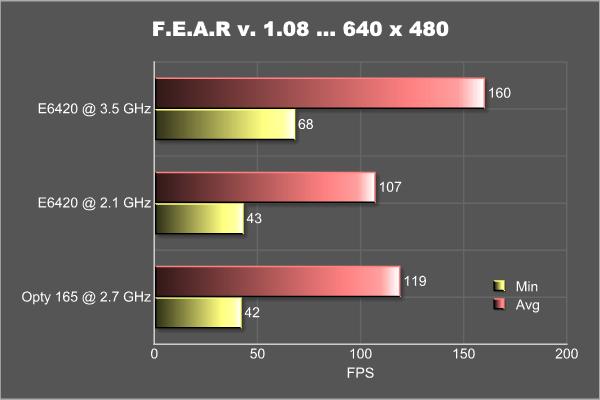
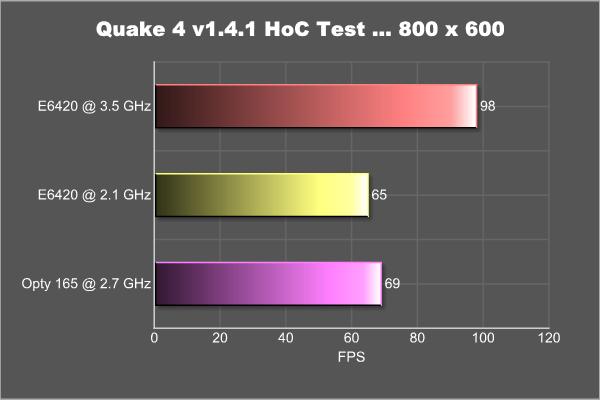
As we can see from the tests the 650i delivers an awesome display of rendering here. Allowing the CPU to work at its full potential gives the Intel chip plenty of power to get the job done. It would take a hefty 50% overclock on the part of the AMD chip to keep up with the stock E6420. Continuing with the trend no abnormalities were observed during GPU testing.
TEST RESULTS: HDD PERFORMANCE
To test the performance of the motherboard’s HDD subsystem I used HDTach. Since we are not testing the real world performance of the hard drive but rather the maximum potential of the motherboard’s subsystem this test would work quite well. It would reveal if one system was weaker, even slightly, in this area.
.gif)
XFX 650i Ultra
.gif)
Asus A8N-SLI Deluxe
Looking at the results we see both setups return very similar scores though the XFX does take better advantage of the built in cache on the Samsung drive by offering slightly higher burst rates.
Same thing goes for the PCMark scores. Both boards have strong throughput to the hard drive subsystem.
CONCLUSION
This board has a lot going for it and during my testing the board remained rock solid and offered such a great level of performance I would almost feel guilty for paying such a small price for such a great product. The board does have a couple of issues though none of them were deal breakers for me. As long as you take your time and plan ahead while assembling your rig you should have no problems with this motherboard. Overclocking was stellar, the board remained stable and gaming at 3.5 GHz was a real pleasure. This is a great board offered at a great price. Value has a new meaning.
FINAL WORDS
When the 6-series boards hit the scene they were plagued with problems left and right. It seemed as though the chipset would never reach its true potential. I am excited to say that during my time with the 650i Ultra from XFX I never encountered any problems that existed in the other versions. Additionally many people have stated that the best chipset for an Intel processor is an Intel chipset. This may have been true as recently as a year ago with the only competition coming in the form of the 5-series from Nvidia but times are changing. The 6-series brings with it rock solid performance, superior overclocking options and a multitude of configurations. This trifecta is a force to be reckoned with and during my time with this motherboard I would happily suggest this board to anyone looking for a solid foundation. XFX has a winner on their hands here and with the price this board is selling for you won’t find a better value out there.
Pros:
+ Highly overclockable
+ Supports a wide range of Intel CPU’s
+ Supports new 1333 MHz FSB
+ Supports large CPU heatsinks
+ Very stable
+ Excellent value
Cons:
– Internal USB headers too close to bottom PCI slot
– Naming of DIMM slots might confuse some
– No cooling on southbridge
Final score: 9 out of 10 and the Bjorn3D Golden Bear Award.


