Looking to build a HTPC? Maybe you just want a really energy efficient platform. Well, look no further than the G33m-S2H from GIGABYTE. With integrated HD-Audio and HD video outputs this is as efficient as they come.
INTRODUCTION
Integrated. Among enthusiasts this has become a four letter word never to be uttered in their presence. It has come to mean lacking, underpowered and weak. But there is another side to integrated. Efficient, flexible, and simple. If you are looking to put together a home theatre PC (HTPC) then finding the right motherboard with integrated components is crucial. You don’t need blazing fast graphics or the highest signal to noise ratio, that’s what discrete cards are for. What you need is small, quiet and cool. That’s exactly what GIGABYTE offers with their new G33 series motherboard. As if including audio and video weren’t enough this board actually has an HDMI port on it. You want to talk about integrated, how about both your audio and video on one cable! Now that’s what I call efficient.
GIGABYTE GA-G33M-S2H
GIGABYTE: The company
![]()
GIGABYTE is known throughout the industry as a leader in mainboard and VGA technology. Pioneering such technologies as the i-Ram and all solid capacitor design of their motherboards, it’s easy to see why they have grown to be a world class provider of technology to the home user. Here is an excerpt taken from their web site:
GIGABYTE, one of the most well-known IT brands in the industry, started as a motherboard technology research laboratory with the passion of a few young engineers two decades ago. With the vision and insights to the market, GIGABYTE has become one of the world’s largest manufacturers. On top of motherboards and graphics accelerators, GIGABYTE has further expanded its product portfolio to include notebook and desktop PC’s, digital home entertainment appliances, networking servers, communications, mobile and handheld devices. GIGABYTE has risen from an eight-man office to a world class enterprise in the IT industry.
FEATURES AND SPECIFICATIONS
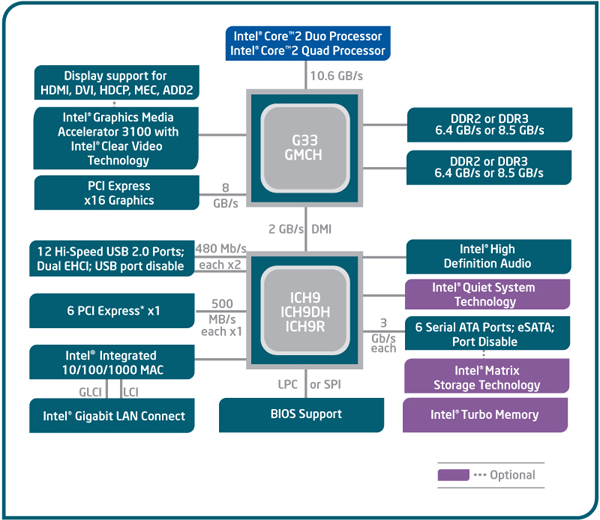
Intel G33 Chipset Diagram
Performance
Based on Intel G33 Chipset
Supports Intel Core 2 Extreme, Intel Core 2 Quad, Intel Core 2 Duo, Pentium and upcoming 45nm processors
800/1066/1333 Mhz Front Side Bus
Chipset
Northbridge: Intel© Express G33
Southbridge: Intel© ICH9
Memory
4 x 240-pin DDR2 DIMM sockets
Dual Channel architecture
Maximum of 8GB of DDR2 667/800 MHz
Expansion Slots
1 x PCIe x16 (operates at x4 mode)
1 x PCIe x1
2 x PCI
Storage I/O
Southbridge
- 1 x Floppy disk drive connector
- 3 x SATA-II 300MB/sec
JMicron 368 chip
- 1 x IDE ATA-133 connector (Up to 2 devices)
Integrated Peripherals
8 Channel (7.1) HD Audio Realtek ALC889A controller
1 x Gigabit LAN (Realtek 8110SC)
Integrated Intel Graphics Media Accelerator 3100 (Intel GMA 3100)
Multi I/O
1 x PS2 Keyboard
1 x PS2 Mouse
1 x VGA
1 x DVI
1 x HDMI
1 x SPDIF out port (Optical)
12 x USB 2.0 ports (4 rear + 8 internal headers)
1 x IEEE 1394 port
1 x eSATA port
1 x RJ-45 port
8 ch. HD Audio connector (Center speaker/Subwoofer Out, Rear speaker out, Side speaker out, Line-in, Line-out, MIC)
Form Factor
MicroATX Form Factor
Length: 9.6in – 244mm
Width: 9.6in – 244mm
PACKAGING
Anytime an item comes my way I like to take a moment and inspect what sort of packaging it comes in and how well secured everything is. This lets us know to expect broken pieces should the packaging be sub-par.
Starting with the outer box we see the usual affair of information on the front atop a rigid cardboard box. Flipping the box over we see GIGABYTE touting the built in features of the board and the benefits they bring. All items arrives safely without any signs of damage so the packaging receives a thumbs up here.
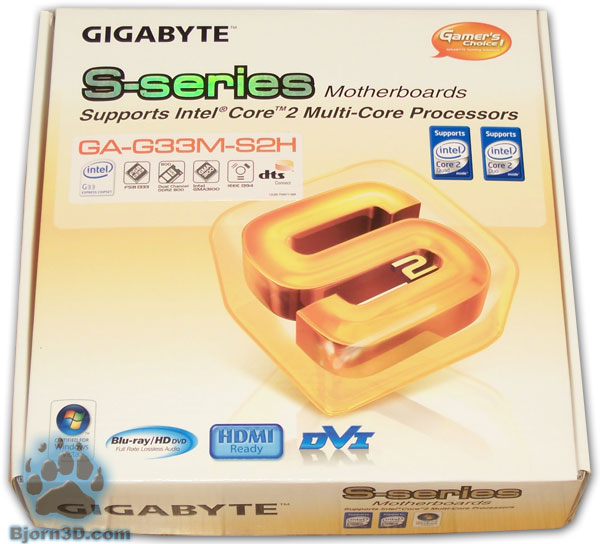
Packaging Front
The rear of the box is full of useful information though it would appear that it omits some of the most important. Nowhere to be found is the fact that this board supports upcoming 45nm CPU’s or that it uses Ultra Durable 2 components. I suppose the fact that this board has these features is the more important point but it never hurts to advertise the strengths of your product
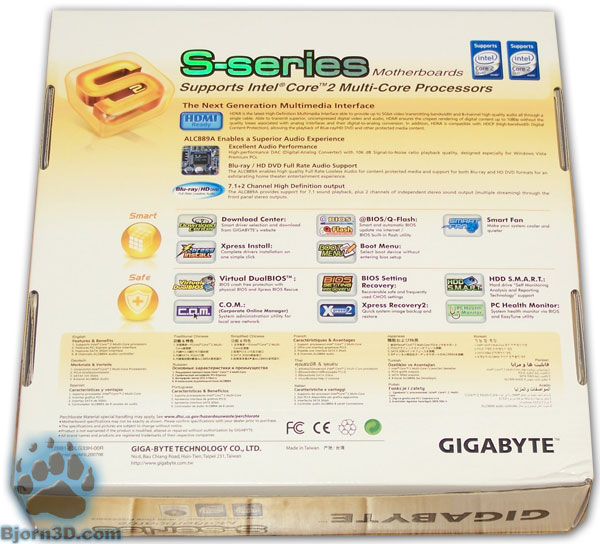
Packaging Rear
CONTENTS
Opening the box up revealed a pretty basic assortment of accessories. You have the cables necessary to install your hard drives and optical drives though I was disappointed at the lack of any eSata cables as this board natively supports it.
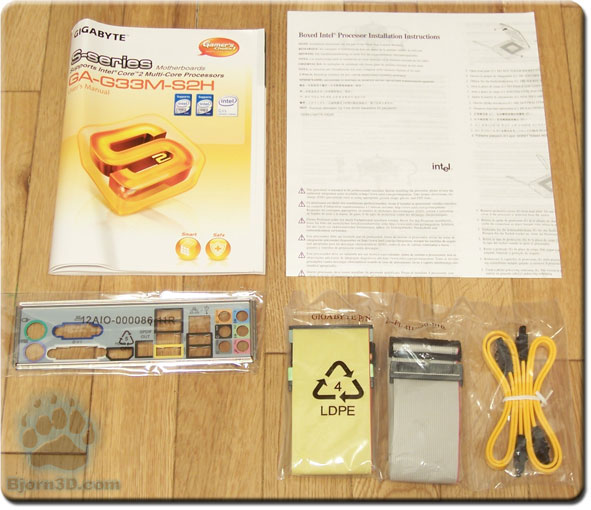
Cables & Accessories
Package Contents
1 – User manual
1 – Driver CD
1 – Floppy drive cable
1 – IDE cable
2 – SATA cable
1 – Rear I/O plate
1 – Processor installation instructions
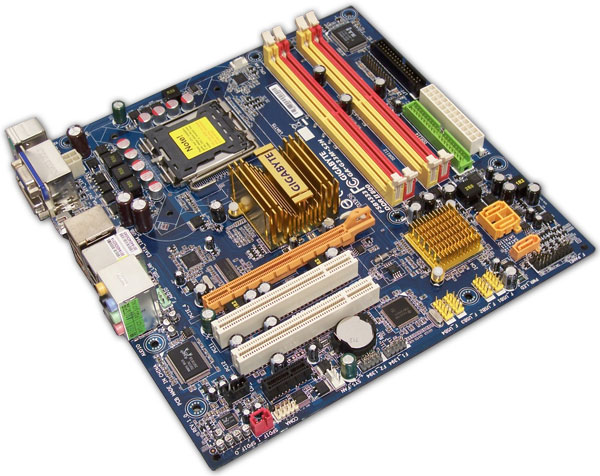
LAYOUT
Looking at this board GIGABYTE did a really good job of including a lot of features while at the same time spacing everything out. The CPU socket is clear and can accommodate large heatsinks, while the IDE slot, FDD slot, and ATX plug are along the edge of the board. Overall a very good design with only a couple minor issues which we will go over in the next page.
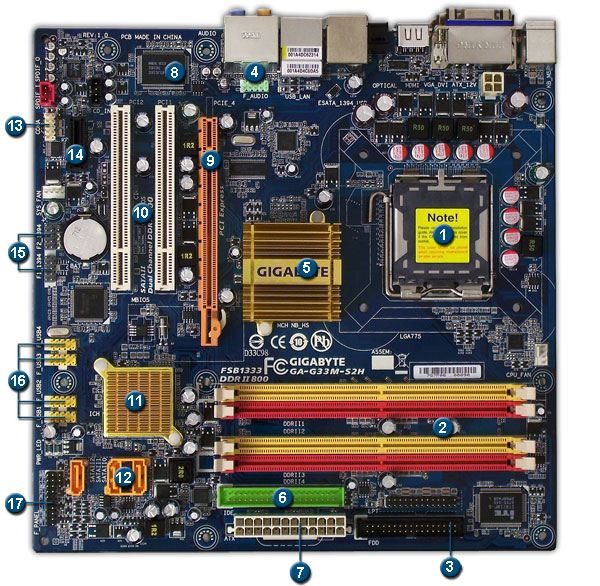
GIGABYTE GA-G33M-S2H Layout
- LGA 775 Socket – Lan Grid Array sockets places the signal pins inside the socket rather than the CPU.
- 240-pin DIMM Socket – Allows for use of DDR2 memory in dual channel mode by utilizing the same color socket for each stick of RAM.
- FDD Port – One port allowing one floppy drive to be connected.
- Front Panel Audio – Connects to the audio ports of most cases. Used for plugging in a microphone and/or headphones.
- Intel G33 Chipset – AKA the Northbridge, it controls the memory and PCIe interface and is cooled by the large passive heatsink.
- PATA Port – One port for connecting two IDE hard drives or optical drives.
- 24-pin ATX Plug – Allows the use of an ATX power supply to power the motherboard.
- Audio Realtek ALC889A -This chip provides the surround sound capabilities of the board.
- PCIe 16x Slot – One slot used for video cards, it operates at speeds up to 1000MB/s in each direction.
- PCI Slots – Two 32-bit PCI slots for connecting expansion cards.
- Intel ICH9 Chipset – AKA the Southbridge, it controls the hard drives, USB ports, PCI slots, audio output and network connection.
- SATA-II Ports – Three ports for connecting Serial-ATA hard drives or optical drives (Backwards compatible with SATA-I).
- Com Port – Used to plug in an external com port for legacy devices.
- PCIe 1x Slots – Three slots used for expansion cards operating at speeds up to 250MB/s in each direction.
- IEEE 1394 Headers – Two internal headers allowing up to two additional Firewire ports to be connected.
- USB Headers – Four internal headers allowing up to eight additional USB ports to be connected.
- Pin Out – Connects to the case switches (Power LED, HDD LED, Reset and Power)
REAR I/O
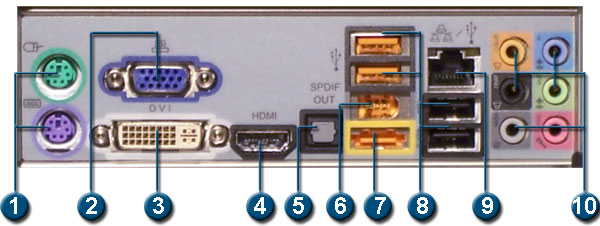
Rear I/O
- PS/2 Ports – Connections for keyboard (purple) and mouse (green)
- VGA Port – Connection used for older CRT and LCD monitors.
- DVI Port – Digital video port providing the best picture without audio
- HDMI Port – The newest digital connection supporting both video and audio through one cable.
- S/PDIF Out Port – Provides digital audio out to an external audio system that supports digital coaxial audio.
- IEEE 1394a Port – Firewire port used to connect various A/V products needing a high-speed path.
- eSata Port – Used to connect an external hard drive while maintaining the fastest possible connections.
- USB 2.0 Ports – Four Universal Serial Bus connections. Used to connect newer mice and keyboards as well as other devices such as digital cameras, printers and external drives.
- Ethernet Port – Plug a RJ-45 cable into this port for broadband access to the internet or to setup a home network. Supports speeds up to 1Gbit (1 Gbit = 1000 Mbit)
- 8-Channel Audio – Plug up to seven speakers and a sub-woofer thanks to the High Definition Audio chip. Also a microphone and an audio input port.
INSTALLATION
Installing this board was relatively straight forward though it was not without a couple points of concern. Looking at the pictures below we see the majority of issues will arise from the center of the board. First off, if you decide to use a discrete video card with this board you will run into trouble should you need to remove or install any sticks of RAM. This shouldn’t pose a problem unless you are constantly swapping out parts but it is worth noting.
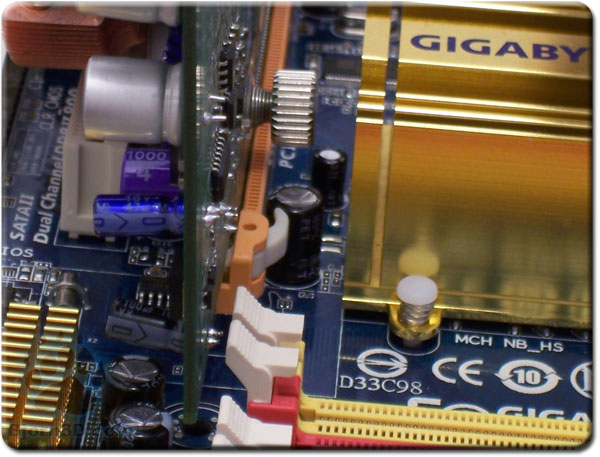
A little close for comfort
The second point of concern, although a minor one, is worth pointing out. After installing the 8600GTS with an aftermarket cooler I noticed how close the screws came to the Northbridge heatsink. Now in a case like this there is no problem but let’s not forget we are talking about silent computing here and that means passive heatsinks. I have seen some coolers for VGA cards that hang over the back and this would most likely cause a problem here since the PEG slot is at the highest position on the board. Again, this is something to take note of in case you go the passive cooling route.
Aside from these rather minor installation issues this board was a breeze to setup and fit quite easily into my case. Being able to handle a Thermaltake Big Typhoon with ease while not an easy task is one that all you quiet computers will be thankful for.
THE BIOS
Turning to the BIOS or the Basic Input Output System, we have an Award BIOS similar to previous ones found on the P35 series of GIGABYTE motherboards with minor changes for its form factor.
Starting at the beginning we have our main page. In order to access ‘hidden’ settings under the MB Intelligent Tweaker page you would press the ‘CTRL’ + ‘F1’ combination here. Next we have our Standard CMOS Features for date, time and drive setup. Last in this row we have the Advanced BIOS Features where we can setup the order we want our drives to boot up, select if we have any removable drives we want to use for boot up, enable/disable S.M.A.R.T. monitoring and adjust some CPU thermal modes. This is also where we set our options for the integrated video. You can set it to turn off if a plug in card is installed or you can set it to run even with a video card installed.


Click to enlarge
Moving on we have our Integrated Peripherals . This is where we adjust settings for the onboard components such as USB ports, onboard sound, SATA settings and the parallel port. Next in line is the Power Management page where we can setup auto-power functions and power up by keyboard or mouse modes. The last page here is the PC Health Status page and this is where I have a problem. Instead of displaying what the actual voltage of each item is, it merely lists it as ‘OK’ or ‘FAIL’. The problem I have is for new users this is far too confusing and I even had the board tell me my DDR was a FAIL only to have it work just fine. While GIGABYTE is trying to make these settings fool-proof I fear they have gone to far and made them unreliable. Without having the knowledge of what is safe or unsafe you put your trust (and expensive components) in the hands of the board. This problem, as some of you may remember, existed in the P35 board I reviewed some time ago.


Click to enlarge
Lastly we come to the MB Intelligent Tweaker (M.I.T.) page. This is where our overclocking endeavors begin. Here you can set your CPU multiplier and your ‘CPU Host Frequency’ more commonly known as your FSB (Front Side Bus). Moving down we see what is called the System Memory Multiplier. These are dividers used to control the speed of your RAM in relation to the CPU. Sadly, there is no setting lower than 1:1 (2.00 on this screen) so without very fast RAM (800/1066 MHz) you will be overclocking your memory as you up your CPU speed. The next two settings, High Speed DRAM DLL & Performance Enhance, seem to have been unfinished as they did nothing for increasing my speed regardless of setting used.
The next setting refer to the timings of the RAM and these are only viewable if you have used the ‘CTRL’ + ‘F1’ combination from before to reveal them. With the amount of damage you can do with the other settings why GIGABYTE has decided to still hide these is a bit beyond me. Finally, at the very bottom is where we adjust your voltage settings. This is NOT for beginners. Rather then show you the voltage you are giving the component GIGABYTE has their BIOS set up so you select an increment to the voltage. i.e. +.1v, +.2v, etc. Without knowing what the default voltage is you can really do some damage here and I would strongly suggest some research before changing these settings.


Click to enlarge
TEST SETUP
All tests were conducted on the following platforms. A format of the hard drives followed by a fresh install of the OS was done. The latest drivers were then installed and all non-essential applications were halted.
| Test Platform | |
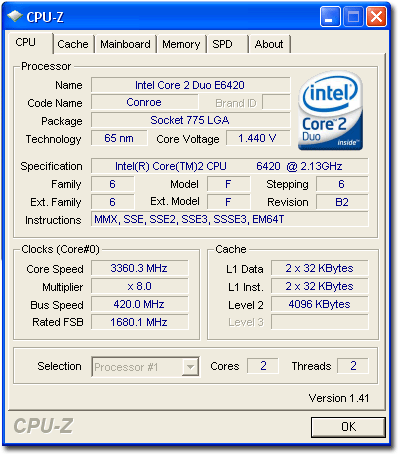
| Processor | Intel Core 2 Duo E6420 @ 2.1 GHz |
| Motherboard |
Board 1 – XFX 650i Ultra |
| Memory | 2 GB (2 x 1 GB) of G.Skill DDR2-800 |
| Drive(s) | 1 – Seagate 80GB Barracuda SATA 1 – Samsung HD501LJ SATA |
| Graphics | MSI 7900 GTX |
| Sound | HD Audio Realtek ALC889A |
| Cooling | Thermaltake Big Typhoon |
| Power Supply | Antec Earthwatts 430 |
| Display | Westinghouse 37″ LVM-37W3 |
| Case | Antec Fusion Black 430 |
| OS | Windows XP Pro SP2 |
| Synthetic Benchmarks | |
| PCMark05 | Default, CPU, Mem, GPU, HDD |
| SiSoft XI | CPU, Mem Bandwidth |
| HDTach | Single SATA Avg. Read, Burst |
| Everest Ultimate 4.0 | Mem Read, Write, Copy, Latency |
| SuperPi Mod 1.5xs | 1M, 2M |
| Games | |
| F.E.A.R. v1.08 | 640×480 No AA/AF Highest in game settings, Soft Shadows off |
| Quake 4 v1.4.1 | 800×600 No AA/AF Highest in game settings, Ultra Quality |
| Company of Heroes v1.7 | 800×600 No AA/AF Highest in game settings |
OVERCLOCKING
Anyone who has read my previous articles knows I like to get right to the overclocking portion. It is exciting to see how far we can push a piece of equipment and increase its performance. As with any new piece of hardware I did a bit of research on preparing the board for overclocking since every board/chipset is different. Also, we are dealing with a board designed for quiet computing and overclocking causes more heat which in turn requires faster (louder) fans and this is NOT condusive to a quiet living room. But we can’t pass up such a juicy opportunity can we?
TEST RESULTS: CPU PERFORMANCE
To test the performance of the CPU on this motherboard I used the PCMark05 suite, SiSoft Sandra XI and finally compared times from SuperPi. Results are compared from the P35-DS3P, P35-DS3P overclocked, 650i Ultra and the A8N-SLI Deluxe running an overclocked Opteron 165 @ 2.7 GHz.
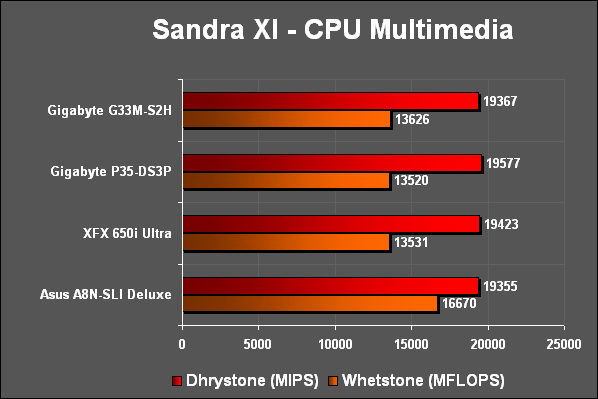
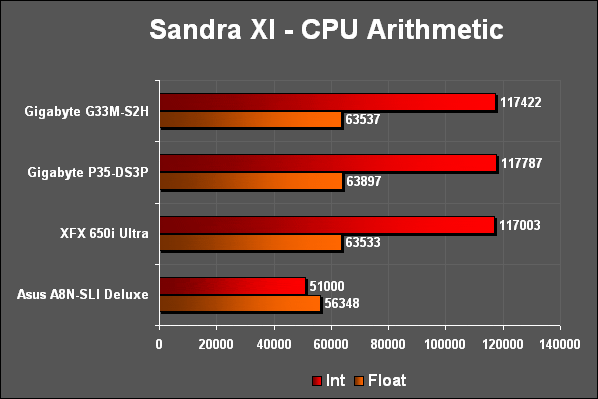
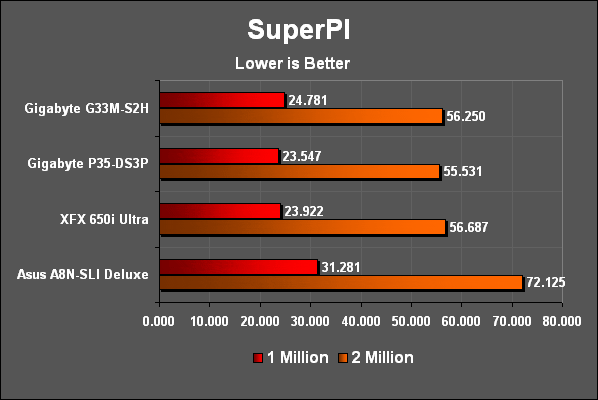
On the CPU side of things you can see how this board is able to easily keep pace with the more feature rich, mainstream boards. A good start for the media center platform.
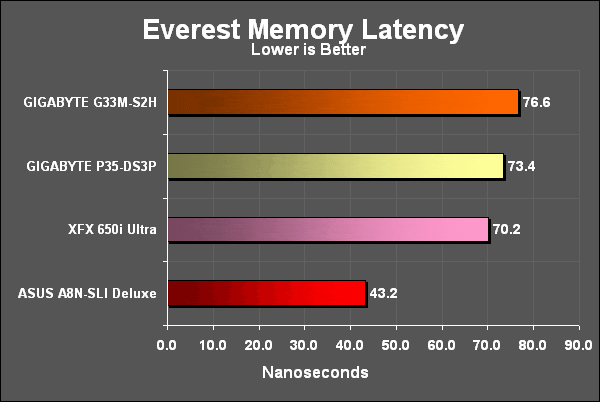
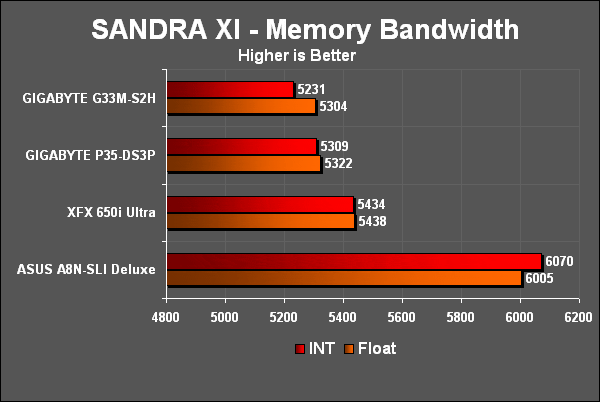
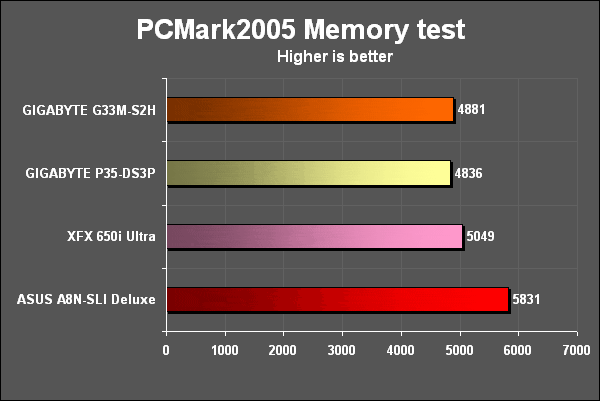
TEST RESULTS: MEMORY PERFORMANCE
To test the performance of the RAM on these systems I used the SiSoft Sandra XI memory bandwidth test and the PCMark05 memory test.
Similiar to the P35 board from GIGABYTE it appears they continue to preset their boards with a very conservative MCH strap for the memory settings. After using the Memset33 application I was able to set a more aggressive strap inline with what other boards offer and this confirmed it for me. While the scores shown here are with stock settings, at agressive settings I increased my Everest read scores by 1000 MB/s after some tweaking. It appears GIGABYTE has no intentions of changing these settings so it will be up to the end user the extract as much performance as possible from these boards.

TEST RESULTS: GPU PERFORMANCE
To test the performance of the motherboard’s GPU subsystem, I ran all games at their lowest settings with no image enhancements to remove the video card from the equation. The frames rendered in these tests will be directly influenced by the speed of the CPU delivering data to the video card across the system bus and not the speed of the video card. Additionally we would test the integrated graphics (IG in the charts below) to see if they can provide any sort of playable experience.
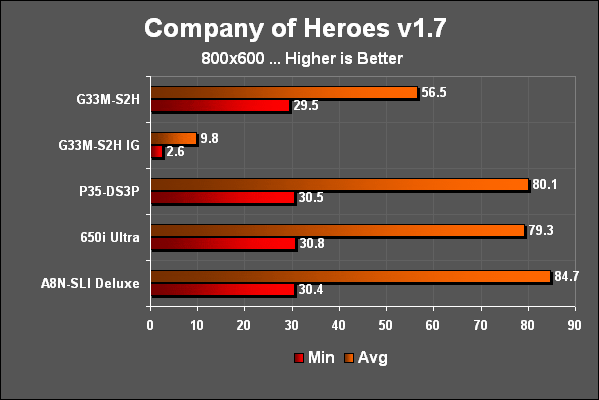
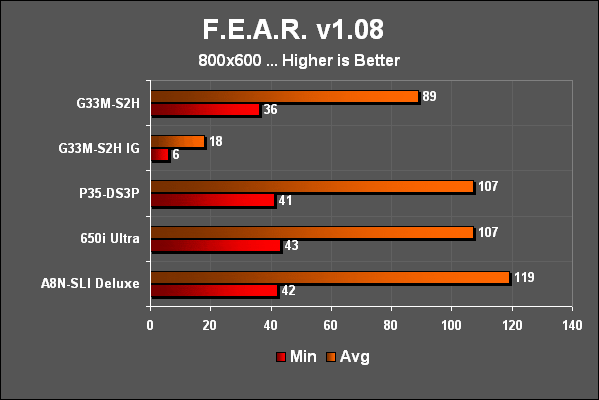

These tests show how the x4 graphics slot on the G33M really cuts down on the performance. While a media center motherboard may not be used primarily for gaming on I think including at least an x8 slot would go a very long way to providing the complete media experience. While this is not completely the fault of GIGABYTE there have been other boards that have increased the PCIe lanes to create a wider range of capabilities.
While integrated graphics continue to evolve it is painfully obvious that this board will not let you game at any resolution. While surfing the web and doing a wide range of 2D things I encountered no issues you should remember to bring your own video card should you want to game on this board.
TEST RESULTS: HDD PERFORMANCE
To test the performance of the motherboard’s HDD subsystem I used HDTach. Since we are not testing the real world performance of the hard drive but rather the maximum potential of the motherboard’s subsystem this test would work quite well. It would reveal if one system was weaker, even slightly, in this area.
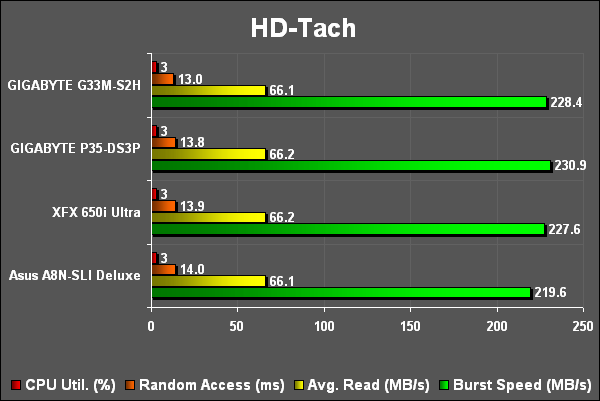
Looking at the results we see all the setups return very similar scores though the GIGABYTE does take better advantage of the built in cache on the Samsung drive by offering slightly higher burst rates.
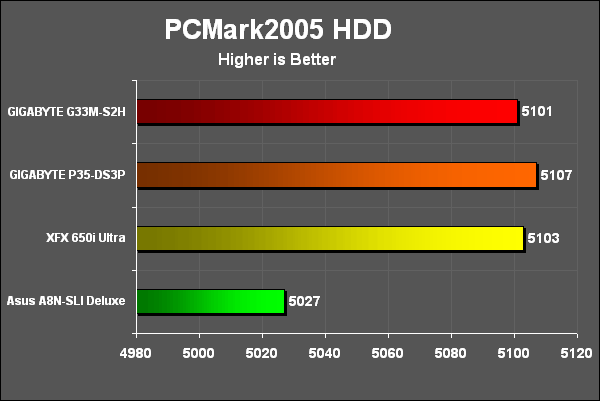
Same thing goes for the PCMark scores. All boards have strong throughput to the hard drive subsystem with the GIGABYTE and the P35 chipset offering a slight advantage.
CONCLUSION
The GIGABYTE GA-G33M-S2H is one board which is really a joy to work with depending on your needs. On the one hand with integrated graphics and sound this board sips electricity. Sitting at the Windows desktop I was astonished to realize that only 62 watts of power were being used (minus the monitor). This does come with a price though and if you intend to play any games with this board you will need a discrete video card. Though I wouldn’t get my hopes up since the board only offer speeds up to x4 for the PEG slot. This will limit your resolution and quality settings. Sorry, no HD gaming here. But on the media side of things this board fits into any case and stays nice and cool. I was really sorry to see the board only uses the all solid capacitors around the CPU socket area. Finally, let us not forget that this board will support the new 45 nm chips from Intel dubbed Penryn.
FINAL WORDS
Pros:
+ Supports a wide range of Intel CPU’s
+ Supports new 1333 MHz FSB
+ Supports large CPU heatsinks
+ Very stable
+ Supports new Penryn chips
+ Very low power usage with integrated graphics and sound
Cons:
– Graphics slot handicapped by x4 bandwidth
– Stock memory performance set very conservatively
Final score: 7.5 out of 10


