In late September 2007, XFX announced the introduction of three new small-form factor motherboards with integrated GeForce® 7 series Graphics. Targeted at the mainstream user on a budget, join us as we take a closer look at the XFX nForce® 630i with integrated GeForce® 7150 graphics to see if it hits the mark.
INTRODUCTION
In late September 2007, XFX announced the introduction of three new small-form factor motherboards with integrated GeForce® 7 series Graphics. Billed as the “most affordable—and graphically intense—triplets ever delivered”, the boards include the XFX nForce® 630i with GeForce® 7150, nForce® 630i with GeForce® 7100, and nForce® 610i with GeForce® 7050.
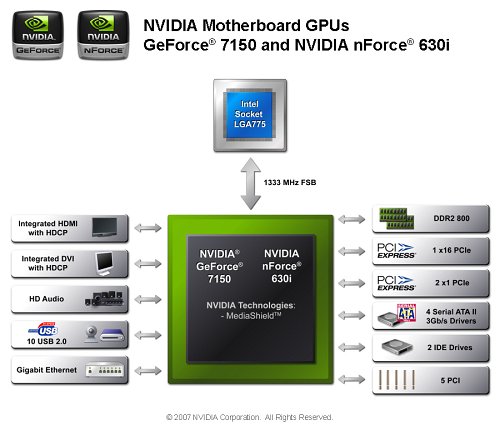
All three are microATX form factors with support for a full range of Intel socket 775 CPUs from Celeron to Core 2 Quad. They can each handle up to 4 GB (2 x 2GB) of DDR2 memory. Some of the major differences other than the obvious chipsets include a 1066 MHz Front Side Bus (FSB) and support for 667 MHz DDR2 on the nForce 610i/7050, whereas its more robust siblings (630i/7100 and 630i/7150) both sport a 1333 MHz FSB and native support for 800 MHz DDR2. Additionally, both flavors of the 630i include onboard DVI and HDMI ports for high definition output while the 610i has only a VGA port.
For the purpose of this review, our focus is the “big brother” of these triplets – the XFX nForce® 630i with GeForce® 7150 integrated chipset (MG-0630I-7159). Let’s get started:
ABOUT XFX
XFX is a global presence in the world of electronic gaming. With its focus on taking gaming to the extreme, XFX has developed an exciting array of video cards and accessories that are designed to maximize the entire entertainment experience. A division of PINE Technologies, XFX operates its own manufacturing facility and maintains an R&D team that features some of the industry’s most renowned talents. Learn more about XFX at www.xfxforce.com.
FEATURES & SPECIFICATIONS
Performance
Based on NVIDIA nForce 630i chipset with GeForce 7150 graphics
LGA775 socket with support for Intel Core 2 Quad/Core 2 Duo/Pentium Dual Core/Pentium D/Pentium 4/Celeron D/Celeron Processors
FSB 1333MHz/1066MHz/800MHz/533MHz
Chipset
NVIDIA nForce 630i MCP
Onboard Graphics
NVIDIA GeForce 7150 GPU with HDMI, DVI, VGA ports
256MB DDR2 Memory (Adjustable – 256MB Max)
630 MHz Core Clock
300 MHz RAMDAC
DirectX 9.0 Shader Model 3.0 Support
OpenGL 1.5 Optimization and Support
Memory
2 x 240-pin DIMM slots with maximum memory capacity up to 4GB
10 x USB 2.0 ports (4 external ports + 3 internal headers supporting up to 6 ports)
1 x eSATA port
4 x SATA II 3GB/s with support for SATA RAID 0, RAID 1, RAID 0+1, RAID 5
1 x IDE connector (supports 2 x IDE devices – ATA 66/100/133)
1 x Floppy disk drive connector
Dimensions MicroATX Form Factor Length: 8.86 in (22.49 cm)
Width: 9.64 in (24.5 cm)
Height: 1.5H in (4.0 cm)
KEY FEATURES:
High Definition Audio (HDA)
High definition audio brings consumer electronics quality sound to the PC delivering high quality sound from multiple channels. Using HDA, systems can deliver 192kHz/32-bit quality for eight channels, supporting new audio formats.
Networking with NVIDIA nForce NVIDIA networking delivers the highest network throughput at the lowest CPU utilization. The manageable and stable NVIDIA networking solution results in better networking management and a lower total cost of ownership.
NVIDIA MediaShield™ Storage Suite of features that safeguards your most important digital media assets; always reliable, scalable, and accessible. Includes RAID and SATA drive support.
NVIDIA Native Gigabit Ethernet The industry’s fastest Gigabit Ethernet performance eliminates network bottlenecks and improves overall system efficiency and performance.
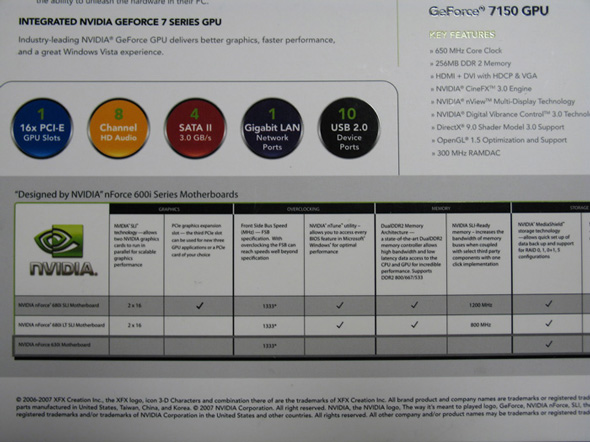
Integrated NVIDIA GeForce 7 series Graphics
Industry leading GeForce graphics delivers better graphics, faster performance, and a
great Windows Vista experience.
Integrated HDMITM with HDCP
On board HDMITM connector supports HDCP and security specifications for Blu-ray
and HD DVD formats, allowing the playback high definition movies on PCs when
connected to HDCP-capable displays.
Integrated DVI with HDCP
On board DVI port to drive flat-panel displays supporting single-link TMDS at
162MHz pixel clock. The DVI port supports HDCP and security specifications of the
Blu-ray and HD DVD formats, allowing the playback of high definition movies on PCs
when connected to HDCP-capable displays.
Microsoft® Windows VistaTM Premium Ready
Vista ready when coupled with 1GB of system memory.
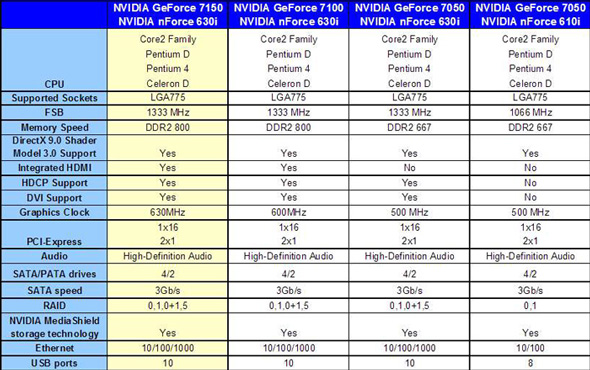
Now after viewing the specs on this board, one might almost forget that it’s a microATX form factor. XFX does a nice job packing as much as possible onto this small board, but how does it stack up to its siblings? See the chart below for a side-by-side comparison. Note the differences in front side bus, memory support, and graphics clock. One comment about memory speed – although the 630i with GeForce 7150/7100 both support DDR2 800, this is only in single channel mode. None of the boards have dual channel capability.
SPECIFICATION COMPARISON
CLOSER LOOK
PACKAGING
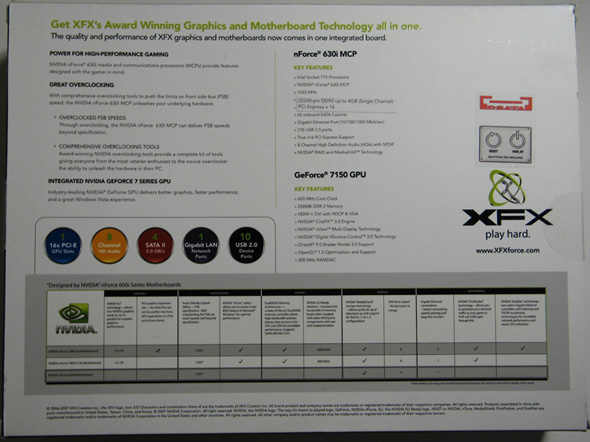
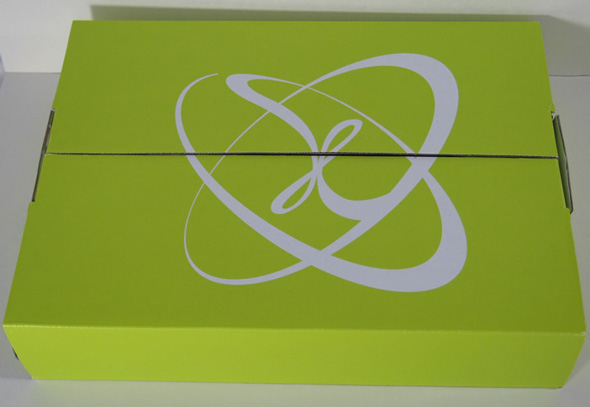
When I opened the shipping box and got my first look at the packaging of the 630i/7150, it was immediately obvious that this was an XFX product by the black, white, and neon-green design of the box (not to mention the immediately recognizable XFX logo prominently displayed in the upper left corner!) The cover of this one is a bit busy for my taste as you can see from the picture, but all of the essential details are clearly visible. There’s no doubt that this is an nFORCE 630i motherboard with onboard 7150 GeForce graphics designed for the Intel socket 775 processor.
The sides and back of the box are full of great detail about the board in an easy-to-read format, although I found it odd that nowhere on the package does it mention form factor. I knew in advance that this was a microATX board, and maybe it’s just a pet peeve of mine, but I prefer to see this listed someplace on the box.
The back of the box is especially informative and includes full specifications and a chart comparing features of the 680i SLI, 680i LT SLI and 630i motherboards. Unfortunately though, it’s not a very fair comparison and the 630i looks a little weak when put up against these particular models. A more suitable comparison might have included the two flavors of the 630i (630i/7150 and 630i/7100) and the 610i/7050. These are at least sibling boards whereas the 680i’s are more like distant cousins. Regardless, the comparison is a nice touch.
The only information I found to be a little confusing, if not a tiny bit misleading for the average non-techie, is the verbiage about “power for high-performance gaming” and even more so the section describing “Great Overclocking”. It refers to comprehensive overclocking tools, yet the comparison chart clearly shows the lack of a checkmark under the NVIDIA nTune utility column for the 630i – meaning that much of this marketing hype is actually talking about the other boards in the comparison, not the one in this particular box. I guess I was expecting everything written on the box to apply to the board inside, but that’s not the case here. Not to be too critical of XFX, but it’s a little like seeing a cereal box with the words “low sugar” on the back, only to find out that it’s referring to a different box of cereal made by the same company.
Alas, I digress and most people are smart enough to figure out which specs apply to the 630i. It’s just a minor gripe and not one to dwell on at all. The 630i/7150 does somewhat support NVIDIA’s nTune application in spite of what the chart shows, but most of the more key features such as system tuning and motherboard adjustments are not available. It does appear that nTune provides the ability to overclock the GPU, but the benefits seem negligible as I saw relatively little change in performance regardless of how hard I pushed the settings. I suspect that the GPU overclocking utility is more for an external video card than the one built into the board.
Can’t really see the chart well, but that mostly empty row going across the bottom refers to the features of the 630i/7150. The screen shot is primarily to point out the lack of checkmarks.
Upon opening the flashy exterior package, one is treated to a bright, rather cool looking and well-constructed box that safeguards the fragile contents. I not only like the way it looks, but found it to be very functional and durable. Additionally, it’s a minimal approach that does what it’s supposed to do without using layer after layer of cardboard and nested boxes as has been my experience with some other companies. Nicely done, XFX.
CONTENTS
Continuing with the minimalist theme, XFX keeps the contents down to a few key items. Considering this product is designed for the mainstream user without a big budget, it’s a welcome approach as one doesn’t end up paying for unnecessary extras.
Package Contents
Install Manual
Driver CD
2 x SATA Data Cables
IDE Cable
Floppy Cable
SATA Power Cable
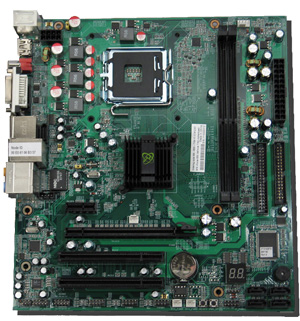
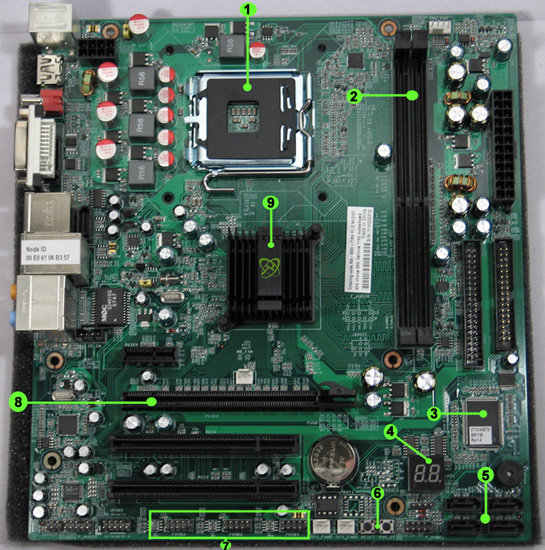
LAYOUT
1. Socket 775 support up to 1333MHz FSB
2. DDR2 DIMM Slots supporting memory up to 800 MHz
3. NVIDIA Multimedia and Communication Processor (SouthBridge)
4. LED POST codes display
5. Serial-ATA II 3Gb/s
6. Power on/off and Reset switch
7. Three USB headers supporting up to six USB 2.0 ports
8. True PCI Express x16 slot
9. NVIDIA SPP with passive heat sink (NorthBridge)
As you can see by the layout above, XFX does a nice job putting a lot of features on the board without overcrowding the components. Since this is a microATX form factor, there’s little room for fat, and XFX wastes no space on clutter. Note that there are only 2 memory slots that run in single channel mode only. Personally, I would have given up the IDE and Floppy Disk connectors in favor of more memory slots.
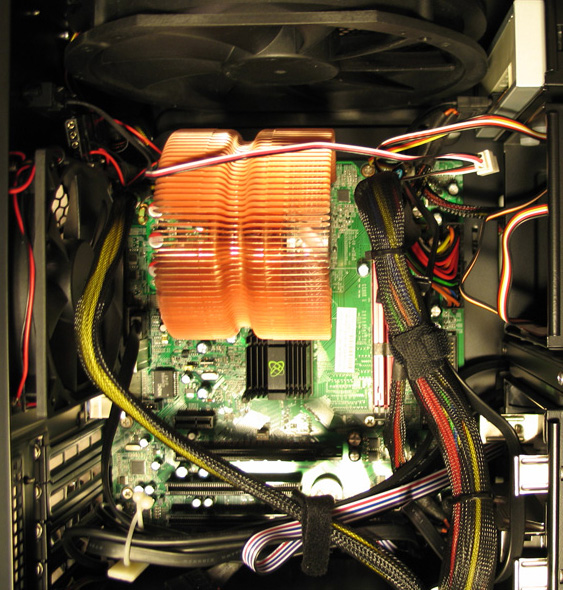
I was glad to see that even with space limitations, there’s nothing crowding the CPU socket, which allows for easy installation of even the largest CPU coolers. I put in an Intel Core 2 Duo E6750 processor with a Zalman CNPS9500A LED ultra quiet CPU cooler and found that I had room to spare. It’s not the biggest cooler out there, but it certainly isn’t the smallest at 85 x 112 x 125 mm (3.35 x 4.41 x 4.91 inch) and weighing in at 530g (18.69 oz). In the picture above, you should be able to just make out the holes around the CPU socket for installing a support bracket. This should provide a good indication of the clearance available, which as I mentioned, should be sufficient for the majority of coolers (provided they fit in whatever case you choose).
Something else to note by the location of the Input/Output header is that the memory slots sit directly between the CPU and the back of the case. This creates an excellent opportunity for air cooling due to the airflow between a rear case fan and the CPU cooler, provided of course you use a CPU cooler with a fan attached. In the case I used (Antec Mini P180 – see review on Bjorn3D.com), the combination of a rear case fan and the Zalman cooler creates a nice airflow around the CPU and the memory, cooling both for the price of one.
Two of my favorite features are the LED POST codes display and the onboard Power on/off and Reset switches. How did we ever get along without these in the old days?? I can still remember listening and counting beeps as a system tried to come to life, then translating that into error codes to diagnose the problem. What a pain that was. But no more! Now all we have to do is read the code, look it up in a handy dandy guide (which is often easier said than done), and TADA! Error diagnosed, solution implemented, problem solved! Well, not always quite that easy, but certainly better than listening for beeps. I’m glad to see these displays becoming more and more common on motherboards – and I was pleasantly surprised to see these on a lower cost board like the 630i/7150.
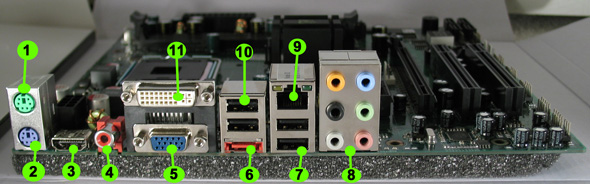
REAR I/O
1. PS/2 MousePort
2. PS/2 Keyboard
3. HDMI
4. SPDIF In
5. VGA
6. External SATA
7. USB 2.0 Ports (2)
8. 7.1 Channel Audio
9. LAN (Gigabit Ethernet – 10/100/1000 Mbit/sec)
10. USB 2.0 Ports (2)
11. DVI
INSTALLATION
As mentioned earlier, the board has a nice layout and I was able to get everything set up fairly quickly including the Zalman CPU cooler. The XFX 630i/7150 is a well-built board and easily stood up to my fat-fingered abuse as I installed it in the Antec Mini P180 case. Here’s a screenshot showing the marriage of these two quality products.
I did have a few challenges during the system build, and as it turns out, the LED POST codes display and onboard power switch turned out to be lifesavers. When I initially installed the board into an Antec Mini P180 case, I had some difficulty connecting the front panel switches and indicators. Probably most of the difficulty had to do with my aging eyes, but however it happened, I couldn’t get the power switch on the case to function. That made me begin thinking I might have installed the power supply wrong, or possibly I had a dead motherboard, or… you know the drill. I began thinking it might be a hundred other things and I started worrying about how to diagnose the exact problem. But then I realized I could use the onboard power switch, and if that worked, then it was just an error connecting the switch. One press, the system came to life and I immediately knew what the problem was. I had simply missed a pin while connecting the power switch to the motherboard. A flashlight and magnifying glass later, the switch was properly connected and the problem solved.
The LED POST codes display came into play during the next stage of my build as the system tried to boot up. For some reason, I could see nothing on my LCD screen, but I could see the little numbers and letters change on the small display on the motherboard. They finally stopped and froze on “7F”. For some reason, this code seemed really familiar but I just couldn’t place it. Regardless, I thought to myself – look it up and the manual will tell me what to do!
Not so simple. “7F” wasn’t listed in the error codes of the user manual. For some reason, this code seems to permeate the Internet and I found plenty of examples of people getting the same error code on a variety of systems. Unfortunately, no one seemed to know what it meant, yet I continued to have this odd feeling that I had seen it before. Finally I stumbled across a forum where someone mentioned it indicated “no keyboard found”. Bingo! I knew the answer! I realized that on a previous system build I had run into the exact same issue and knew how to solve it. For some reason, the motherboard would not recognize a USB keyboard during initial POST. The system would hang, refusing to go on unless a keyboard was found. Solution – plug in a PS2 keyboard.
I’m still not quite sure why I couldn’t get an image on my screen using the DVI port on first boot except that this was a completely new system build using a newly formatted hard drive. The good news is that I was able to get an image using the VGA port on first boot, and since installing Windows Vista, the DVI port has worked just fine. It seems that my issues were all related to lack of drivers on a clean install.
This leads me to another question about the design of the XFX 630i/7150 – why not just eliminate the PS2 keyboard and mouse ports and go with USB ports? (Although having said that, I was glad to have a PS2 keyboard port or I would have never gotten the system running!) I can only assume that in designing an affordable board for the mainstream market, XFX opted to include older technology like PS2 ports and IDE & Floppy Disk connectors for those of us still in the process of migrating to SATA drives and USB peripherals. The benefit obviously being that many of us still using some older components can port them over to a new build and then upgrade over time. Since the XFX 630i/7150 has onboard audio and video, you could really get this thing up and running with a minimal investment.
Overall, in spite of the challenges I encountered, this board was fairly easy to install and configure. My biggest challenge as I mentioned earlier was that I kept getting the “7F” error on boot, which turns out to mean that the system is waiting for input, or in simple terms, looking for a keyboard. By connecting a PS2 keyboard, all issues were resolved. Then, once I set up Windows Vista on the new system and installed USB drivers, I could switch back over to a USB keyboard. I also mentioned issues with getting the DVI port to work and couldn’t see anything on my LCD screen. This was likely due to the system not being able to find a driver when first booting, but again, after Windows and the drivers were loaded, the DVI port worked fine.
One other issue worth mentioning is the onboard Gigabit Ethernet port. The first day I had the system up and running, I had no problem connecting to the Internet. However, a day or so later, I started having intermittent connection issues. I updated the drivers and tweaked about every setting I could think of, but to no avail. I just couldn’t keep a reliable connection going. After several days of frustration, I ended up installing a 10/100 PCI network card, which has worked flawlessly. It’s possible my network just couldn’t handle the Gigabit port since I’m only running a Linksys 10/100 router. Since I didn’t have the time or resources to build a new Gigabit network, I won’t blame this problem on the motherboard, but thought it worth mentioning.
BIOS
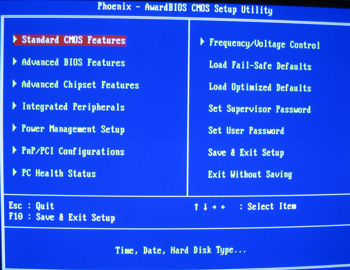
Configuring the XFX 630i/7150 is relatively simple and straight forward. XFX uses a Phoenix-Award BIOS with the usual array of features and a few nice extras. For the purpose of this review, I thought it best to focus on some of the more interesting features that were more specific to this board.
Look familiar? Main BIOS screen.
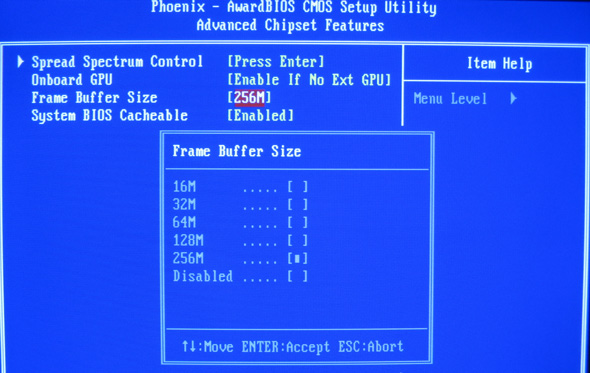
Under the third option on the main screen “Advanced Chipset Features” is where you’ll find the settings for managing the memory allocated to the GPU (onboard video). This falls under the “Frame Buffer Size” option, and you can choose from 16, 32, 64, 128 or 256 MB. You can also disable it altogether, such as when you have an add-in video card and want all memory available to the system. In order to maximize the capabilities of the GeForce 7150 GPU, I set this to 256MB. There’s also an option to turn off onboard video if an external video card is detected or you can keep it on at all times.
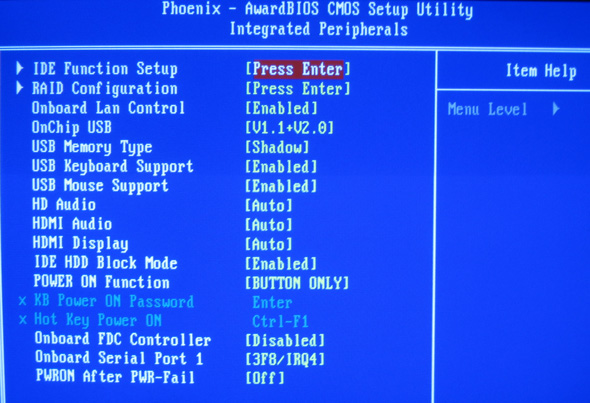
The next screenshot shows the settings available under “Integrated Peripherals”. Note the sections for USB keyboard and mouse support. Apparently these are set to “disabled” by default, resulting in no keyboard found on first boot. By using a PS2 keyboard, I was able to get into the BIOS to enable USB support. Of probably more interest on this screen is RAID configuration. A screenshot of RAID options follows.
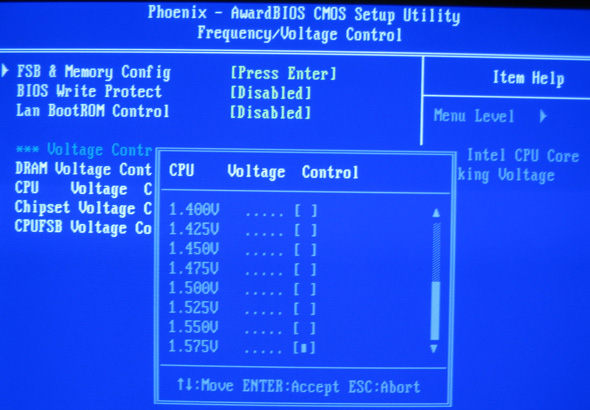
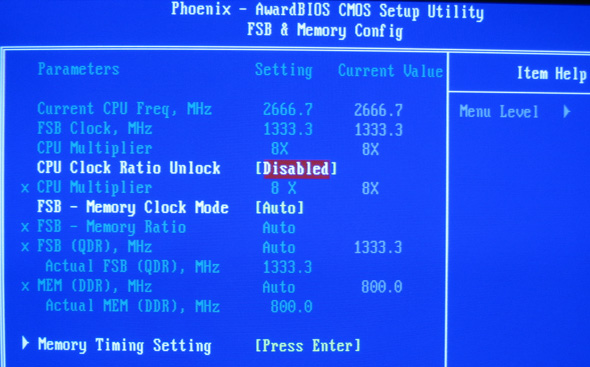
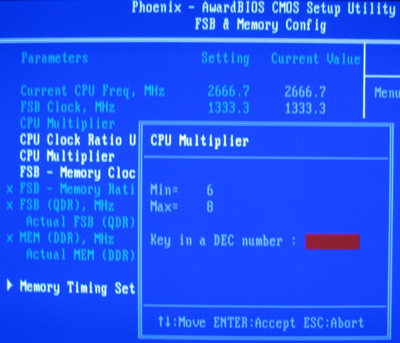
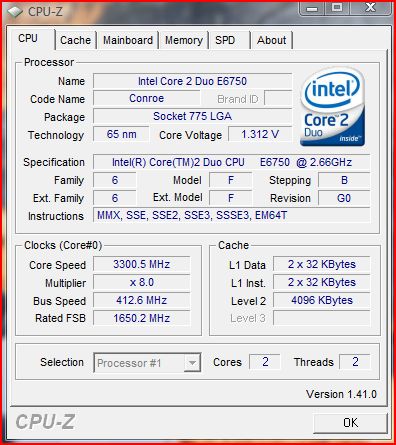
Now here’s where the fun starts – the front side bus (FSB) and memory configuration section. From the main menu, select “Frequency/Voltage Control”. Here you can adjust voltages or leave everything set to “Default”. Hit enter on the “FSB & Memory Config” section at the top of the page and this takes you to the following page where you can adjust a variety of settings including the CPU multiplier (6, 7, or 8), FSB speed and memory timings. As you can see, everything is safely set at factory settings and we have a 2.66 GHz processor with a 1333 FSB with memory running at a conservative 800 MHz. Perfect for anyone simply wanting to go on cruise control and let the BIOS configure everything automatically.
To change settings, unlock the CPU clock ratio by selecting “Enable”. The section under that (CPU Multiplier) then becomes accessible and you can change this setting to 6, 7, or 8.
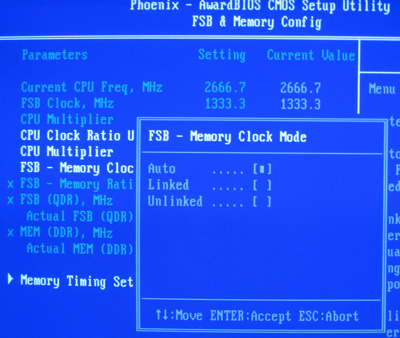
The option below this allows you to change the FSB-Memory Clock mode, either allowing the system to handle it automatically, link the FSB speed to the memory clock multiplier, or unlink FSB and memory clock so that you can set the front side bus speed independently. I experimented with all three and what I really liked is that you have the option of allowing automatic handling, a combination of automatic and manual (linked), or completely manual (linked) depending on how hard you decide to push the system and which elements you want to overclock.
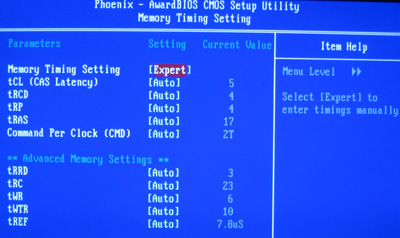
The last option on this page is “Memory Timing Setting”, which again provides options for automatic settings (“Optimal”) or user-defined settings (“Expert”). Optimal is basically the same as “automatic” in this case, and Expert allows users to manually configure some or all of the settings. I was pleased that I could customize some of the more common memory settings such as CAS latency while allowing the system to automatically handle the more complex ones. In the screenshot here, you can see that I’ve changed it to Expert, which then allows me to adjust my memory timings as I see fit. In this example, the others still show “Auto”, but didn’t stay that way for long. Rather than adding yet another exciting BIOS screenshot, I thought this one should suffice to show you the available options.
To sum up the BIOS section, there’s plenty here for everyone from the basic user to the more advanced overclocker. I was pleased with the options available and the freedom to tweak a lot of settings in order to get the most out of this motherboard.
TEST SETUP
In order to test the performance and stability of the XFX 630i/7150, I used the following components:
Test Platform
Processor
Intel Core 2 Duo E6750 @ (stock speed of 2.66GHz, overclocked to 3.3GHz)
Considering the chart on the back of the XFX 630i/7150 box and the lack of a checkmark in the overclocking column, I didn’t have very high hopes for pushing this board too hard. To begin, I made sure that all power management settings were turned off in the BIOS including Intel SpeedStep. I then went into the FSB and Memory Configuration settings (under Frequency/Voltage Control on the main page) and changed the FSB – Memory Clock Mode to “Unlinked”. From there, I was able to bump the FSB up from 1333 MHz to 1650 MHz resulting in a speed of 3.3GHz (3300.5 MHz technically speaking). Not too bad for a board priced at about $80.00 US!
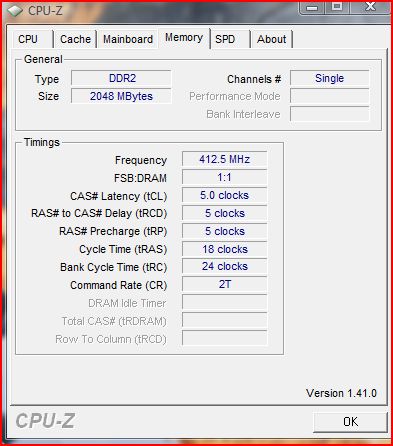
Now don’t get me wrong – I didn’t just suddenly wake up and decide to set the front side bus at 1650 MHz. There was a lot of trial and error involved (and rebooting, and clearing the CMOS…), and I found that anything above 1675 seemed to lead to instability and ultimately lock up the system. I also tweaked memory timings quite a bit, but found little benefit to using more aggressive settings. If the board supported dual channel memory I would have expected at least modest gains, but since it doesn’t, there’s not much reason to spend too much time (or money) configuring high-end DDR2 on this unit. As you can see here, I did overclock the memory slightly, but it might as well be running at stock speed.
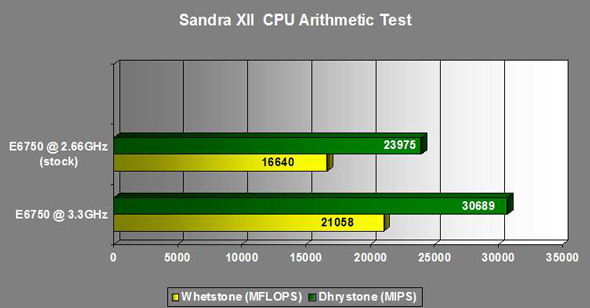
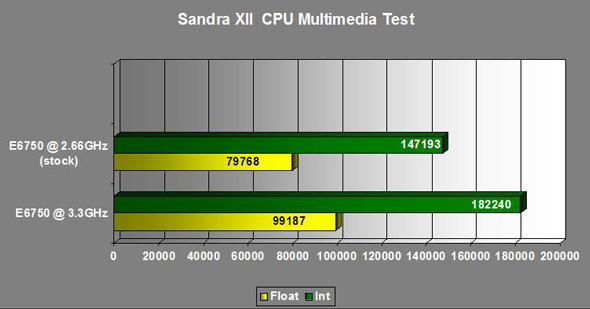
Test Results: CPU Performance
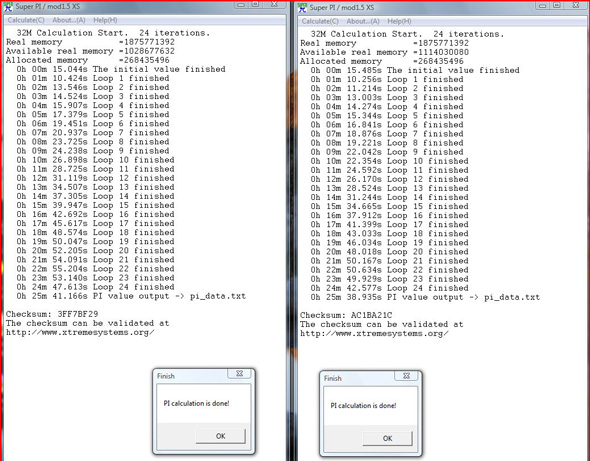
For testing the performance of the CPU, I used SiSoft Sandra XII and then compare times from SuperPi v1.5 xs mod.
Overall, the numbers demonstrate a strong performance by the Intel Core 2 Duo processor on the XFX 630i/7150. I saw no system hangs or crashes during any of these tests. While my overclocking is conservative, I felt it was appropriate for the mainstream user for whom this board is targeted, especially considering the air cooling challenges one might experience with a typical microATX case. Having said that, I was very impressed with the Antec Mini P180 case and the amount of airflow this thing produces while remaining whisper quiet. All components including the CPU remained fairly cool even after hours of testing.
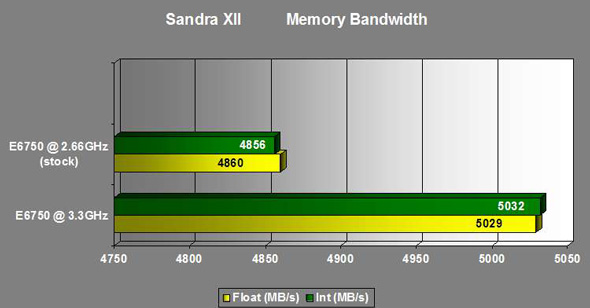
TEST RESULTS: MEMORY PERFORMANCE
Next up: A quick memory performance testing using the SiSoft Sandra XII memory bandwidth test. I was extremely curious about what this would show considering the single channel mode operation of the DDR2 installed.
Overall, not too shabby! Performance was actually better than I expected with definite gains from overclocking. Again, no instability or crashes during testing.
Test Results: GPU Performance
Now the section I was really looking forward to testing – the onboard GeForce 7150 GPU. Again, the specs on this are 630MHz core clock, 256MB DDR2 memory (set in the system bios, selectable up to 256MB max from the system memory), and 300MHz RAMDAC.
Perhaps not too surprising, I had a few challenges finding a recent game that would run with the specs on this system and allow me to do fair benchmarking. Crysis was a bust with an average frame rate of about 1. Yes – I said 1 as in “one”. Probably not much of a surprise either.
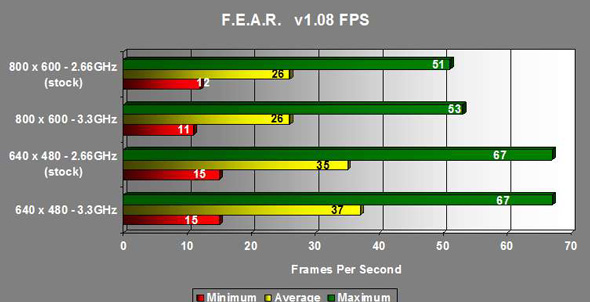
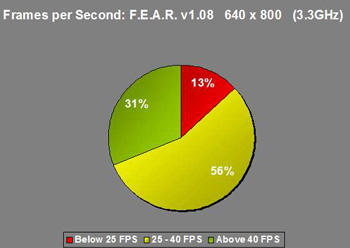
Anyway, this section is likely the least “scientific”, if you can call any of section of my review that, but I did finally have success doing benchmarks with F.E.A.R. v1.08. I ran the game at maximum settings with soft shadows off and a resolution of 640 x 480 and again at 800 x 600. Notice there’s really no difference between the CPU running at stock speed of 2.66GHz or overclocked at 3.3GHz.
In addition to providing minimum, maximum, and average frame rates per second, I also thought it important to show where the majority of the frame rates fell. The pie charts show the percentage of FPS in each category, and they clearly show that the game is playable at 640 x 480, but the system seemed to struggle a bit at 800 x 600. I started to add a second set of charts showing the frame rate distribution when running the CPU at stock 2.66GHz speed, but they were virtually identical.
It’s pretty clear that the onboard GPU is like a good entry level card that will at least get you in the game, but to really do any gaming with this board, you’re going to want to add in a PCI Express video card.
Video performance for playing DVDs on the other hand is excellent. The GeForce 7150 easily handled everything I threw at it and the onboard HDMI port is a very nice feature. Regardless of whether I used the VGA, DVI or HDMI port, playback was beautiful, sharp and virtually flawless. While viewing “Matrix: Reloaded” at 1680 x 1050 resolution on a 22” LCD monitor, the picture was actually so good that it nearly ruined the movie for me. During one fight scene when a hoard of Smiths descends on Neo, the shift from live action to CGI suddenly became so obvious that I almost felt like I was watching a cartoon! Every little detail showed so clearly that I was simply amazed. At that point, this motherboard won me over completely as a prime choice for a home entertainment system.
TEST RESULTS: HDD PERFORMANCE
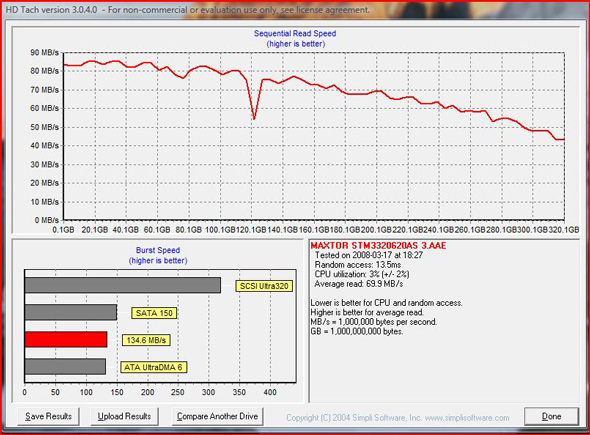
To gauge hard drive performance, I used HDTach to examine the motherboard’s HDD system. The goal here was simply to get a general idea of what one could expect using a single, basic SATA drive (Maxtor 320GB).
Nothing to write home about, but overall fair performance for a single SATA drive running in IDE mode. With a couple of fast drives in RAID formation, you could probably squeeze a lot out of this board. Keep in mind that there are only 4 SATA connectors (plus 1 eSATA port) built in. Personally, I would have preferred if XFX had left off the IDE and Floppy Disk connectors in favor of more SATA connectors, but they’re a nice touch for anyone on a budget porting over older hardware until they can upgrade.
CONCLUSION
I have to admit, I was a bit skeptical about this board when I first heard about it. My past experiences with onboard video had me thinking “Internet PC”, which is a kind way of saying budget desktop incapable of doing much more than surfing the net. Immediately upon even seeing the box for the XFX nForce 630i with GeForce 7150 graphics, I knew this motherboard was different. When I pulled it out of the box and saw I/O header, I suspected I might be in for a treat. I’m glad to say I was! The board is very stable, performs well, and has a lot of features packed into a small space. I find it an excellent value for the money.
FINAL WORDS
Overall, this is a strong board for the mainstream user with excellent video capabilities right out of the box. I especially liked the HDMI port right there on the motherboard, making it ideal for a home entertainment system. It’s not immediately suitable for high-end gaming, but with the addition of a nice PCI express video card, one could have a solid rig that will stand up to just about anything. The onboard Gigabit Ethernet adapter was a bit quirky, but that could have been an issue with my home network. I’m still not sold on the benefits of putting PS2 mouse and keyboard ports in newer systems, but luckily for me they were there after the issues I had trying to boot up the first time. From a price standpoint, I was amazed at the features packed into this microATX board for around $80 US. When XFX decides to launch a “value” line, they don’t mess around! I highly recommend the XFX nForce 630i with GeForce 7150 graphics for use in a home entertainment system dedicated to watching/recording movies. For the mainstream user and even gamer, it’s a good basis for building a solid system in a small package.
Pros:
+1333 FSB, Supports a wide range of Intel socket 775 processors
+Plenty of room around the socket to install large CPU heatsinks
+Onboard HDMI and DVI ports with HDCP support, excellent video playback
+Light overclocking capabilities
+Excellent value
Cons:
–Only 2 DDR2 memory slots
–Memory only runs in single channel mode
– Older connectors such as PS2 mouse/keyboard, IDE, FDD (but could be a + to some)
–Potentially quirky Gigabit Ethernet performance
Final Score: 8 out of 10 and the Bjorn3d.com Seal of Approval