Established in 2004, NZXT is a relative newcomer in the field of computer components. Primarily known for cases and power supplies, they focus on the development of quality, high performance products targeted at the PC gamer and enthusiast market. NZXT’s latest offering in their crafted series of cases is the Tempest – also referred to as “Airflow King” due to its included six case fans. But is the Tempest full of hot air or does it really live up to its nickname? Read on to find out…
INTRODUCTION
For many enthusiasts venturing into the world of PC building, selecting a case can be quite a challenge these days. Important factors to consider include quality, size, functionality, and now more than ever – style. Well-built enclosures with incredible features are important, but without a bit of flash and beauty, they might as well stay sitting on the warehouse shelf (and probably will!). However, there’s also another aspect of case selection that’s very important to many builders, especially those new to the game – price. Being on something of a strict diet myself when it comes to purchasing new hardware, I certainly appreciate a company that can combine all of the above mentioned features in a single product. Enter NZXT and the Tempest midtower case. Did they pull it off and create a budget-friendly winner? Let’s find out.
ABOUT NZXT

NZXT, a company built upon gamer’s dreams, hopes to create products that put consumers first. Our objective is to provide every gamer with a case that they can identify with. Combining unique design and case performance, consumers will finally be able to find a quality case that will represent their own style and personality.
In the future, NZXT wishes all gamers who desire a personalized case to find it at NZXT. With the unveiling of every product, NZXT improves upon on weaknesses and strives for excellence. Achieving perfection is not an easy task, however, NZXT is determined to meet and surpass consumer expectations.
Our dedicated sales and customer service team will also work diligently to earn your trust and loyalty. All our products are built with high quality material and engineered in the best conditions.
NZXT products are designed and engineered in the United States and manufactured overseas in China and Taiwan.
NZXT was established in 2004 in Los Angeles, California.
FEATURES AND SPECIFICATIONS
Established in 2004, NZXT is a relative newcomer in the field of computer components. Their current line consists of computer cases, power supplies, and a couple of accessories (notebook cooler and a temperature monitor/fan controller panel). At the time of this writing, NZXT has two lines of computer cases: The Classic Series and the Crafted Series. Each line currently has seven models, with the Tempest being the latest addition to the Crafted Series. There doesn’t seem to be a clear distinction between the two categories, but the Crafted Series does seem to have been designed to look a little more like a custom, user-modified unit.
Our focus today is the Tempest, which is crowned the “Airflow King” by NZXT due to the fact that it comes preconfigured with six fans. When I first learned about this case, I heard a few rumblings comparing it to Antec’s Nine Hundred midtower case, so I decided to throw in a few comparisons between the two along the way. Let’s start out by looking at the specifications:
|
Feature/Spec |
NZXT Tempest | Antec Nine Hundred |
|
Case Type
|
Midtower
|
Midtower
|
|
Material
|
Steel with Plastic Front Panel
|
Steel with Plastic Front Panel
|
|
Dimensions
|
521.5 (H) x 562 (D) x 211.5 (W) mm
20.5″(H) x 22.1 “(D) x 8.3″(W)
|
493 (H) x 467 (D) x 206 (W) mm
19.4″(H) x 18.4 “(D) x 8.1″(W)
|
|
Weight
|
24.7 lbs (w/o power)
11.2 kg (w/o power)
|
31.1 lbs (w/o power)
14.1 kg (w/o power)
|
|
Drive Bays
Front Accessible
Internal
|
9 Drive Bays
3xExternal 5.25″ Drive Bays ( up to six 5.25″ )
1×3.5″ External bracket
8xInternal 3.5″ Drive Bays Screwless Rail Design |
9 Drive Bays
3xExternal 5.25″ Drive Bays
6×3.5″ OR
6×5.25″ & 3×3.5″ OR
9×5.25″
|
|
Motherboard Support
|
E-ATX, ATX, mATX, BABY AT
|
ATX, mATX
|
|
Cooling System
|
FRONT, 2 X 120 mm Blue LED (included)
REAR, 1 X 120 mm (included)
SIDE PANEL, 1 X 120mm Blue LED (included)
TOP, 2 X 140mm Fan (included)
|
FRONT, 2 X 120 mm Blue LED
TriCool Fans (included)
REAR, 1 X 120 mm TriCool Fan with
3-speed switch control (included)
SIDE PANEL, 1 X 120mm case fan (optional – not included)
TOP, 1 X 200mm TriCool Fan
(included)
|
|
Expansion Slots
|
7
|
7
|
As you can see from the specifications above, the Tempest and the Nine Hundred have a lot in common. The Tempest is just slightly larger than the Nine Hundred, but interestingly enough, the Nine Hundred weighs a bit more than the Tempest. You’ll also notice that the Tempest comes with six case fans pre-installed. The Nine Hundred comes with four fans, but considering it has a single 200 mm fan on the top of the case while the Tempest has dual 140 mm fans, they are fairly even – with the Tempest having just one additional fan included in the side panel. Also note that the Tempest will accommodate an E-ATX board, which is great for those thinking about using this case for a server. And for those installing an ATX or smaller motherboard, this means plenty of room to spare.
NZXT Tempest Features:
Dual radiator ready: The NZXT Tempest is pre-drilled for mounting a dual 120mm radiator at the top of the chassis, currently compatible and tested with Swiftech MCR220, Asetek Dual radiator solution, and Thermaltake TMG2.
Airflow King: Dual 120mm intake, Dual 140mm Exhaust with an additional side 120mm fan and rear 120mm fan all included.
Maximize Expandability: E-ATX support allows more compatibility with high end components including large graphics cards
Easier accessibility & cable management: Cable routing is pre-drilled on the motherboard so users can hide cables behind the motherboard tray, allowing a cleaner look and better airflow. Power, E-SATA, USB and Reset buttons are mounted at the top to give better accessibility.
Bottom mounted PSU: PSU mounting at the bottom allows for more security and separation of heat from the CPU
Server-like HDD space: Dual 120mm fans cool cages that hold up to 8 HDDs allowing for large capacity systems while maintaining cool temperatures
PACKAGING
The NZXT Tempest arrived in very attractive packaging with the case prominently displayed on the front without an excess of marketing verbiage. The back shows another nice photo of the case, this one taken from slightly above to provide a better view of the top fans and front panel. Also on the back is a list of key features, with specifications clearly listed on each side panel.


Upon opening the box, we see what appears to have become fairly standard packaging these days for quality enclosures. The case is clearly wedged between two foam inserts and sits safely in the middle of the box. At first glance it appeared to have been simply enclosed within a plastic bag, but when I pulled the unit out, I found that in addition to the bag, it was surrounded by over 25 feet of plastic wrap! It took me a few minutes to unwrap this mummy, but it was nice to see that NZXT took such steps to protect the product inside. Needless to say, the Tempest was in perfect shape without a single scratch or dent.


CONTENTS
In rather typical form, the screws and accessories were packed inside of the case itself. However, in a rather different approach, NZXT apparently decided to stuff the small box of parts into one of the internal drive cages. On a positive note, the box certainly stayed in place during shipping. On the negative side, the box wanted to stay in place and nearly remained there permanently. It took a lot of effort to get the box out, and you can see by the pictures that it was not just jammed into the drive cage, but more accurately was impaled there! I nearly lost a knuckle pulling this thing out.


Once the box was finally freed from its prison (and my hands rendered proper first aid), I had a chance to inspect the contents. Aside from the usual suspects, I was a little surprised to find a small little unit labeled “speaker”. Interestingly enough, the manual doesn’t even mention this piece or what to do with it. My assumption is that NZXT decided to throw it in for those interested in using it rather than bearing the cost of installing a speaker in the chassis that hardly anyone uses anymore anyway. I actually like this approach and just set it aside to focus on the more familiar parts: the screws, drive rails, cable guides/ties and the user’s manual. NZXT did a nice job of sorting the parts into individual plastic bags with labels, taking all of the guesswork out of which screw to use on which component.


I really appreciated this extra attention to detail, although I have to admit I was a little confused by the whole “power & air duck screw” thing. Perhaps my kit was missing the water fowl, or more likely, a few things were lost in translation. I found this to be the case in a few areas of the user’s manual too, but my English isn’t always the best either. All in all, not that uncommon and certainly not major issues. The main thing is that the key items were included as expected and the English was good enough to get the point across.
EXTERNAL VIEW
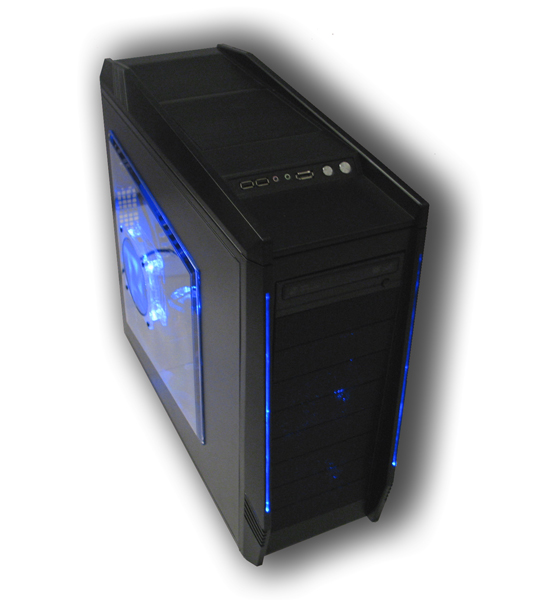
As I mentioned earlier, the Tempest has a strong resemblance to Antec’s Nine Hundred. The two have very similar dimensions, a large window on the left side, large fan(s) on top, and front case fans with blue LEDs in pretty much the same location. Even the top section of the case is similar with power button and external ports positioned at a slight angle adjacent to a small tray. The Tempest does have a few additional light effects in the front of the case, which you’ll see in later pictures, but overall the two seem to have a lot in common. However, since this review is about the Tempest after all, let’s take a closer look at it.
Starting with the left side, we can see the Tempest has very sharp lines and a nice finish to it. The black metal sides and plastic top/front sections are well matched, making it very difficult to distinguish between them visually. Only by touch does it become obvious that the case is not all steel. The window on the side is very large and well designed to show off the internal workings very nicely. The beveled edges are a nice touch and actually seem to serve a purpose since they make the window stand out from the side, providing a few extra millimeters of clearance above the motherboard. By comparison, Antec’s Nine Hundred has a flat window that sits flush with the side panel. Both have adequate clearance for even the largest of heatsinks, but the Tempest seems to have just a little bit more breathing room. Also note that the Tempest comes with a 120mm fan preinstalled in the side window while Antec provides only the mounting bracket and not the fan.


Looking at the top of the Tempest from a slight angle and again from straight on, the two 140 mm fans mounted in the top of the case become clearly visible. Antec’s Nine Hundred sports a single 200 mm fan in the same location, but again, the look is very similar. Overall nice design and the Tempest seems poised for strong air cooling.


The right side is fairly plain, although the angles of the front and side panels are more evident from this view. Personally I found this design refreshing and I like the clean, sharp lines. I do have to admit though that a couple of times I’ve found myself associating this design with something one might find in Bruce Wayne’s Manor or even down in the Batcave! OK, so it’s not that dramatic and maybe I’m thinking of a Lego world version of Batman, but the design is still very appealing to me.

From the front we can see the removable panels for installing external drives. Note that the top three are ready to be taken out and the lower six actually sit in front of the two internal hard drive cages. The cages must be removed if these bays are to be used for external drives. Also, not visible at this point, there are two 120 mm fans with blue LEDs installed in the front of the hard drive cages. Between the nine lower panels and the fans sit removable filters, which you’ll also see in later photographs. Lastly, note the front panel with two USB ports, audio ports, e-SATA, Reset and Power buttons.


And finally, the back of the case. Most notably, you can see that the power supply sits at the very bottom. Also worth noting are the two rubber seals located just above the seven expansion slots. These cover the pre-drilled holes for installing water cooling components. The last shot here is the bottom of the case, which shows off the nice rubber feet as well as the interior and the two top case fans. Note the pre-drilled holes between the fans. For those interested in water cooling, these allow for mounting of a radiator at the top of the chassis. A nice touch if you ask me.


And as you can see by the last picture, I’ve opened the case, so let’s take a closer look inside:
INTERNAL VIEW
As you can see here, the Tempest has a very roomy interior and the power supply mounts at the bottom of the case. That small, rectangular bar is designed to support the power supply and can be removed if necessary. Although I’m a fan of the bottom mounted PSU design, I would have preferred for NZXT to include something softer to support it other than a metal bracket (such as rubber or silicone grommets) to reduce the potential for vibration and case noise. At the front of the case (right side of picture) we can see the nine drive bays, with the two internal drive cages taking up the lower sections. Visible at the back and top of the case are the power connectors for three case fans (two fans in the top, one in the back). Notice how the wires for the front panel come nicely bundled in a small bag, making for quick separation by simply opening up the package. Note the red E-SATA cable for the front panel.


Upon taking a closer look at the drive bays, we see the two cages in the lower portion of the case, each holding enough rails to accommodate up to four vertically mounted hard drives (for a total of eight maximum). These cages are removable as I mentioned earlier. However, if you decide to pull out a cage and put an external drive in its place, you lose the front case fan. Personally, I think the three external bays at the top of the case are plenty for most users and doubt many would need to remove a cage anyway, but I thought it worth mentioning. The second picture below shows the top three external drive bays, with the lowest containing an adapter for a 3.5″ drive (for anyone still using a floppy disk drive). The adapter is easily removed for those who prefer to put a 5.25″ drive in this slot instead. In the third picture below, the NZXT case fans are clearly visible at the front of the drive cages. The rest of the pictures show the bays from the front, with the 3.5″ adapter clearly visible pulled halfway out to illustrate just how easy it is to remove. The air filters in front of the fans are equally easy to remove by sliding them up. The fans themselves can also be taken out if one decides to remove the hard drive cage and convert this space to three external drive bays.


You may have noticed the small black devices on the outside of the top three drive bays. These are actually screwless brackets designed for quick installation of optical drives. Once a drive is inserted into the bay, one simply lines up the bracket with the screw holes on the drive and twists the knob to lock it into place. Unfortunately these are mostly made of plastic and feel a bit flimsy. It’s difficult to determine exactly when they “lock” into place and they just don’t seem very secure. I like the concept, but I would like to see NZXT improve on the quality of these brackets.


Moving on to a few other views, the first picture below shows the rear 120 mm case fan. The next shot shows the dual 140 mm fans in the top of the case. Again, notice the holes between these two fans, which are pre-drilled for those interested in installing a radiator for water cooling purposes. The third picture below is a close-up of the motherboard tray, with an easy to follow key for inserting motherboard standoffs depending on the size of the board you install. All of the holes are numbered, and the guide tells you exactly which holes to use. The final picture shows the cable management system under the motherboard tray. Not exactly what I expected, but the slots provide a very simple, basic way to route cables. Unfortunately there is not really any good way to secure cables with this system.

.jpg)


INSTALLATION
For the purpose of testing this case, I used the following components:
- Gigabyte GA-P35-DS3L socket 775 motherboard (ATX form factor, 12″ x 8.3″)
- Intel® Core™ 2 Duo E8400 processor
- Zalman CNPS9500AT cooling fan/heatsink
- Raidmax Volcano 630 Watt modular power supply
- Super Talent DDR2 1066 (PC2 8500)
- Seagate Barracuda 750GB SATA hard drive
- Samsung SH-S203 20X DVD drive
- BFG 8800 GT PCI-E Video Card (512 MB)
As you can see in the first picture below, the Tempest is a very clean case and has plenty of space for installing components. I began by following the guide included in the bottom of the case for inserting motherboard standoffs, but with the Gigabyte board I used, they didn’t quite match up. I ended up doing it the old fashioned way – by setting the motherboard in the case and noting where to install the standoffs. Either way, the motherboard was easy to install and had plenty of room to spare around it as you can see in the second picture. I also found it very easy to connect the power, reset, audio, LED, USB, and E-SATA ports.


Next I installed the power supply, which sits at the bottom of the case. This was extremely easy, and at first I thought I might be missing something, but the PSU simply sits on the bracket and attaches with four screws from the back of the case. Again, note how much room there is to spare around it once installed.


For the following component, I chose to install the SATA hard drive in the lower cage. It could have easily gone in any of the eight slots available within the two hard drive cages, and I simply chose the spot that I did thinking it would show easier in the photo. I was a little skeptical about the installation since the rails just slide into the cages and don’t seem to be very secure without a drive in place. However, I was pleasantly surprised in the process. The pictures below show the hard drive and rails, which attach without any screws. In the second photo, you can just make out the small pointed tabs that insert into the holes on the drive. The third photo shows the rails “installed”, but note that the only thing really keeping them in place is the small edge of the rail and gravity!


The drive is installed by holding the rails in place and sliding the unit into the slots in the cage. Between the pressure created by the unit itself and the rails snapping into the slots, the drive is held secure. And when I say secure, I mean secure! When I tried wiggling the drive back and forth, I noticed that there is absolutely no movement once the rails snap into place. It also removes in an equally simple manner by squeezing the tabs at the end of the rails. As skeptical as I was, I found this system of screwless hard drive installation to be very good. It’s quick, easy, and very secure.


Finally, time to tackle the optical drive installation. I chose to put the Samsung DVD burner into the top external bay. The first step was to pull off the front panel of the case, which is fairly easy. The Tempest has an open slot underneath the bottom of the front panel and by pulling on this, the panel can be worked free of the tabs holding it on. Once off, the bay covers can be removed by pushing on either one of the small tabs holding them in. The next step is to remove the screwless retention bracket by twisting the knob in the middle and pulling it off. Slide the optical drive into the bay, snap on the front panel to make sure the drive lines up correctly, and insert the retention bracket. Make sure that the prongs go into the holes lining up with the screw holes in the drive. Push on the bracket and twist to lock it into place. That simple, the drive is installed. Again, I was a little skeptical about the mechanism, but it really does hold the drive securely in place.


With installation of the major components complete, I plugged in a PCI-E video card, connected power and data cables, and routed the wires under the motherboard as much as possible. I wasn’t very impressed with NZXT’s idea of a “cable management system” which essentially consists of two large slots in the motherboard tray, but it was adequate for the purpose. Unfortunately there’s not really any way to secure the cables under the tray, so it took a little effort to get the side of the case back on while keeping the cables in place. Below is a snapshot of the final product. Not the cleanest cabling job, but not terrible considering this was a relatively quick build for demonstration purposes. With a little extra time and effort, one could manage a bit better, but this should at least give you a good idea of the Tempest’s features and capabilities.

CONCLUSION
Considering many people will compare NZXT’s Tempest to Antec’s Nine Hundred, I thought it might be helpful to show the two cases side by side. In the shots below, you can see that although they do seem to share some common DNA, the two really are distinctly different cases. The first is the Tempest by itself and the rest show it next to the Nine Hundred. The Tempest is the taller and longer unit (on the left) in these photos:


I have to admit, I’ve long been a fan of Antec and having recently built a new rig using the Nine Hundred, I’ve been very pleased with its design and performance. However, after spending some time getting to know the Tempest, I have to say that NZXT has a quality product on their hands and is quickly becoming a strong competitor in the world of computer enclosures.
The Nine Hundred is definitely quieter (nearly silent with fans on low/medium), but the Tempest is still pretty quiet considering the number of fans. The noise level is very low and would be fine for all but the most demanding users. The Tempest is well built, has plenty of room for just about any type of system one might wish to build (including a server), and has strong air cooling capabilities. With its included assortment of six fans and an aggressive price point of around $100 (US), this case packs a lot of bang for the buck and is worth recommending.
Final Score: 8 out of 10 and the Bjorn3d.com Seal of Approval


