The Thermaltake Armor+ MX case and Prowater 850i Water Cooling kit it up for review today on Bjorn3D. Join is in an in depth review of the Chassis and Water cooling Kit.
INTRODUCTION
There are almost as many cases to choose from today as there are stars in the sky. Making the right choice can be quite challenging as the face of computing evolves so quickly. Things to consider are size, material, construction, layout, and to me style has become important over the years.
A well constructed case containing a ton of features might never make it out of the warehouse if it’s an eyesore. Todays consumers are much more computer savvy than the early days of ugly beige boxes that are stuffed into a desk cubby so having a little panache helps to move the units off the shelf.
Price is a major consideration with a lot of people but with cases I tend to take the long view. It’s well worth spending a few extra bucks on a case if you can use it through several evolutions of that killer gaming rig you’ve got in the computer shrine. Thermaltake has been making cases and cooling products for quite a while now, they’ve managed to combine their cooling expertise with their case design and come up with mid priced quality Chassis that takes cooling into consideration from the word go.
Have they managed to blend an eye catching case with a functional water cooling kit that will meet your needs today and in the future? Let’s take the Fifty Cent tour and find out.
Thermaltake: The Company
We live in a world where most things seem to move at the speed of light. At Thermaltake, we feel the same way and that is exactly how Thermaltake conducts itself to deliver innovative, reliable and customer-centric solutions to the worldwide market.
Since the beginning of Thermaltake in 1999, it has been at the forefront of creating new and exciting products at a time where most computer users were provided little to no choices for components that may seem irrelevant, but in reality crucial to the performance of a PC.
Thermaltake Server Series solutions, with years of thermal experience and industry leadership, sets its goal on reforming total thermal management in server segment by formulating the perfect mixture of versatility, efficiency and thermal management with each respective server product category: Rackmount Chassis, Server Fixed & Redundant Power Supply and Server CPU Cooling Management Solutions.
With its comprehensive line of products available, it enables Thermaltake’s core customers to enjoy a one-stop-shop experience, reduce product design-in evaluation period and most important of all, flawless integration process. Each of Thermaltake’s strengths enables its customer to focus on their core business while taking advantage of the skills and efficiency of a single thermal management solution partner.
Values & Principles
While still a relatively young company, established in 1999, Thermaltake is built on unwavering will and dedication to address issues and innovate at the same time for computer enthusiasts and corporate users worldwide .
With strong support of Research & Development team standing behind the brand, Thermaltake is committed to never-follow but always-lead.
In past decades, the industrial and technological advancements in different fields have shaped the world we live in today and have also made a big impact on the environment. Thermaltake takes great measures to ensure the product that we produce relieve these impacts by being first to act on 80 PLUS® specification for computer power supply that greatly reduces the amount of electricity that a computer consumes.
Always striving to be the best, we continuously benchmark our performance against the very best internally and externally.
Customers are our greatest asset and Thermaltake does not take that for granted. That is why Thermaltake is the industry leading in customer service and customer support with around-the-clock automated product return service.
FEATURES AND SPECIFICATIONS
Thermaltake isn’t new to the computer industry and I’ve been using their products for quite some time. Currently they offer a large line of cases, air cooling and water cooling products, power supplies, keyboards, mouse pads, storage solutions, and docking stations. Their line continues to grow with the ever changing Computer Industry’s needs, adapting and expanding into areas to fill the unique needs of todays enthusiasts.
Our focus today is Thermaltake’s Armor+ MX chassis and Prowater 850i entry level water cooling kit. My contacts with Thermaltake assure me the Prowater 850i and the Armor+ MX go together like bread and butter, me I’m more a beer and peanuts kind of guy, so we’ll see if their blending of chassis and water cooling have succeeded in creating an eye catching chassis with a water cooling solution to satisfy the enthusiast in all of us.
| Thermaltake Armor+ MX Specifications |
|
| Case Type | Mid Tower. |
| Material | 0.8mm SECC (Steel, Electrogalvanized, ColdRolled, Coil) |
| Front Bezel Material | Aluminum |
| Side Panel | Transparent Window |
| Motherboard Support | 12″ x 9.6″ (ATX), 9.6″ x 9.6″ (Micro ATX) |
| Motherboard Tray | N/A (Non Removeable) |
| 5.25″ Drive Bay | 5 |
| Ext. 3.5″ Drive Bay | 1 |
| Expansion Slots | High-speed storage interface supports faster transfer rate for improved data access. |
| Front I/O Ports | USB 2.0 x 2, eSATA x 1, HD Audio |
| Cooling System | – Front (intake) : 120 x 120 x 25 mm blue LED fan, 1300rpm, 17dBA – Rear (exhaust) : 120 x 120 x 25 mm TurboFan, 1300rpm, 17dBA – Side (intake) : 230 x 230 x 20 mm blue LED fan, 800rpm, 15dBA |
| Liquid Cooling Capable | Yes |
| Liquid Cooling Embedded | No |
| Power Supply Supported | Standard ATX PSII |
| Power Supply Included | No |
| Dimension (H*W*D) | 21.1 x 9.4 x 19.3 in 535 x 240 x 490 mm |
| Net Weight | 23.8 lb 10.8 kg |
| Security Lock | No |
| Application | Desk Top or Small Server |
| Warranty | 3 Years |
| All information provided related Thermaltake products and plans is preliminary and subject to change at any time, without notice. | |
Features
Lets take a quick look at the features of the Thermaltake Armor+ MX
| Thermaltake Armor+ MX Features |
|
| Cooling Compatibility | Optimized design for both liquid cooling and air cooling system |
| Upgradable | Sliding hood with toolbox on top (upgradable to LCS) |
| Tool/Tool Free | Tool-free design for 5.25” device and PCI slot |
| Thermal Management | Independent thermal management for CPU, VGA & HDD |
| Cable management | Cable management system for better cable routing and internal air flow (Micro ATX) |
| Motherboard Tray | Micro ATX, ATX supported |
PACKAGING & BUNDLED ACCESSORIES
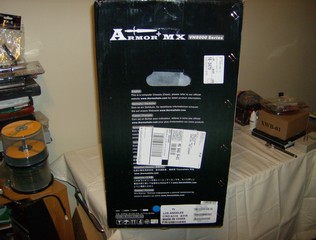
Case packaging, at least among good manufacturers has become a standardized art. Big cushions of foam isolating the case from the sides of the box. The box itself is made of heavy duty corrugated cardboard.
It’s much better than in years past when up to half of the cases I bought were damaged with dents, dings, or broken bezels. Thermaltake has packaging down to an art and the last 3 cases I’ve received from them, including this one, were immaculate.
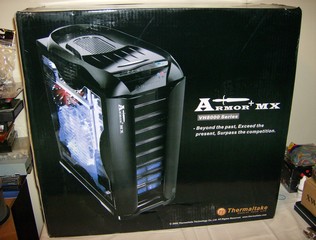
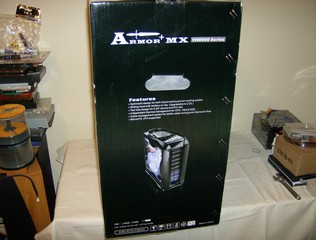
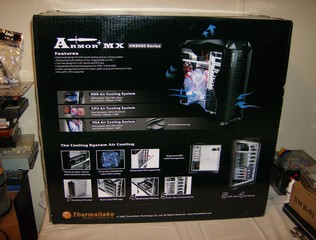
It’s a quite sturdy box and contains a plethora of information pictures and specifications. There’s enough information there that any savvy buyer can find the information that they need to make an informed purchase.

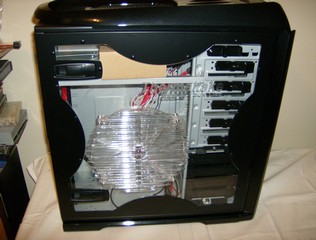
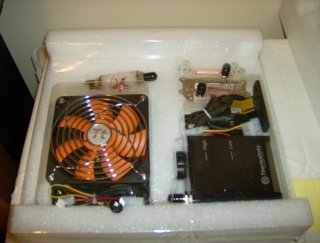
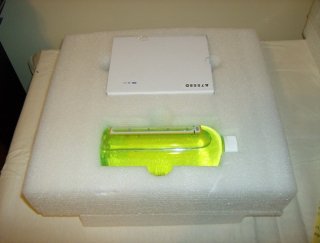
There’s a peek at the cushion it’s nestled in and the mesh bags to further protect the finish. Then a look at transparent windowed side with the accessory box safely in place. You can tell a lot about the packaging by the condition of the windowed side and lack of movement of the accessories box. The window is in great condition and the accessories box hasn’t moved an inch. It wasn’t even wedged in there very well yet the packaging and thought behind it kept it safely in place.
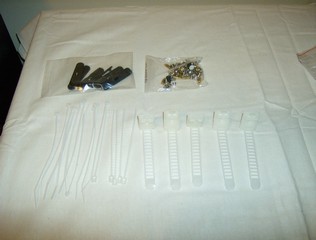
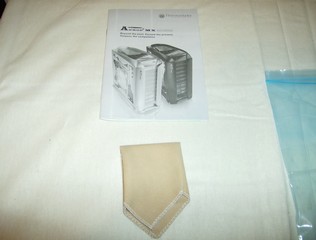
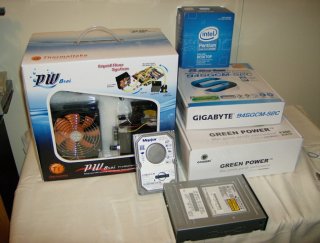
The Accessory Pack might look to be a little sparse but there are a few surprises tucked in there and there’s every thing you need plus a few extras for after the build. Most cases come with a little bag of screws so this is quite generous.
There’s more than a dozen zip ties, and adhesive backed cable management ties that are reusable and really keep those cables under tight wraps. Then there’s the manual and a micro fiber cloth to touch up any fingerprints you might get on this gem of a case.
You’ll also find some black plastic hard drive holders that are used for the tool less hard drive instillation, and the manual. One item of interest is a two sided Motherboard standoff screw with a small post coming out of the top. You can put it into the mainboard toward the back and it’ll hold the mainboard in place while you install the other screws. If you’ve ever tried to put a mainboard in the first screw is a three handed monkey job unless you’ve got a tri pronged screw holder common to many computer toolkits. With the double sided hex standoff I was actually able to put the case upright and it held the whole board by itself making it a snap to get the rest of the screws in without having to bend over the case. Now that’s innovation! Some times the smallest things are the most appreciated.
IMAGES & IMPRESSIONS
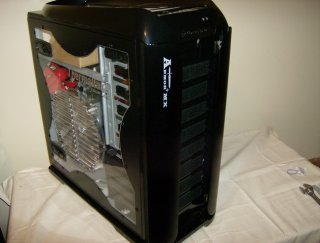
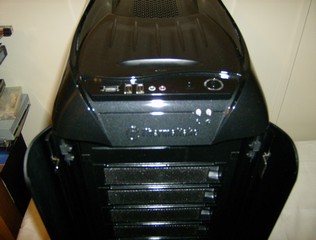
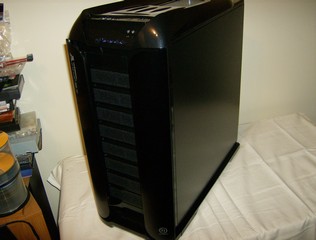
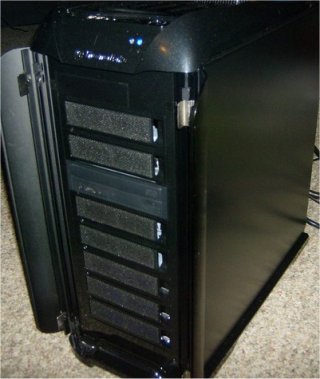
I have to tell you that the Armor+ MX got a few brownie points right out of the box just on looks alone. The lines are smooth and flow into one another with an effortless grace. The 230mm side fan promises to provide excellent air flow and Easy release mesh drive covers had me drooling for the first minute I slipped the cover off this sexy chassis.
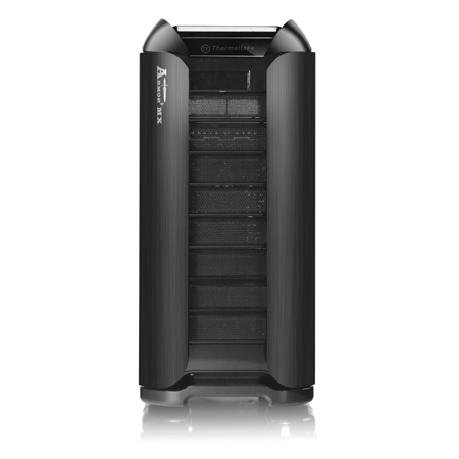
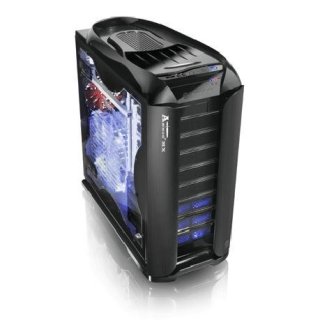
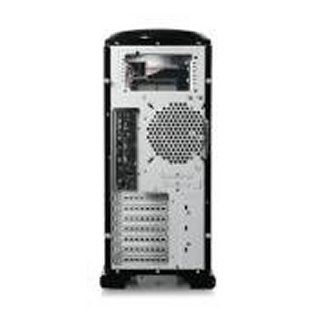
From the mesh drive covers to the lighted 120mm intake fan and lighted 230mm side fan this thing just oozes sexy. The top panel is well designed and includes the on/off switch, microphone and headphone jacks, two USB ports, and a handy E-Sata port as well as the reset switch. The right side is unremarkable but helps to give it that forbearing look of domination that is enough to impress people casually strolling by.
Even the top of this chassis is sweet looking and also manages to incorporate function into the well thought out design. There’s a tool tray for people to keep the extras from the bundle, and for bay water cooling people you can remove the tray and have direct access to the filling port on your bay mounted water cooling setup.
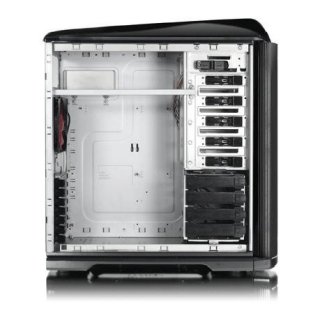
Taking a quick look at the inside of the case you can see the side mounted drive bays, they open from the front and you don’t have to remove the cage itself to pull or install a drive. Now that’s luxury! The 3 ½ inch drives go into a plastic tray, you snap on the drive holders and slide it into place and your drive is held nice and snug with no discernible movement or vibration. The 5 ¼ inch drives are held in place by a superior design plastic clip that takes a second to figure out but once you get used to it you’ll be in love with the method. There was no noticeable movement of drives during operation or by trying to jiggle them, for the doubting Thomases Thermaltake also made a proviso for screws to be added to that Veloci Raptor or BluRay you’ve had your eye on.
The bar you see there on the side is removable for large power supply installs, and of course I had to install a big honker in there. A 1350 watt Coolmax that’s 1 ¾ times the size of a normal power supply. The power supply went in to the mid tower with little to no effort and there’s vent openings that you can easily adapt for a top fan but Thermaltake left that out of this chassis, there’s no problem with over sized power supplies or adding a top exhaust fan later. The two are mutually exclusive because as you’ll see later on there’s no room for both.
Here’s the structure graphic I snatched from the Thermaltake website that’ll show you a lot of the less obvious features.
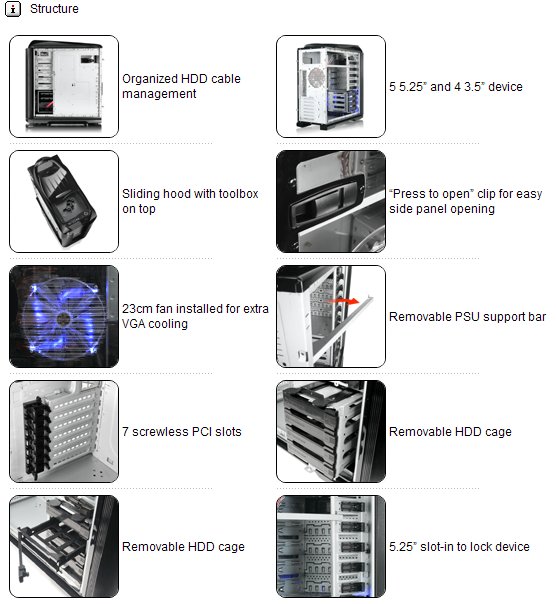
There’s so many features on this case that with out a handy Structure graphic I found over on the Thermaltake website we’d never be able to cover them all in a reasonable length so I’ll let the graphic speak for itself and move on to the cooling design.
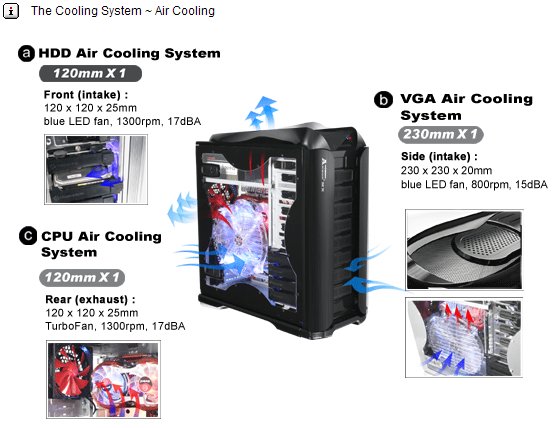
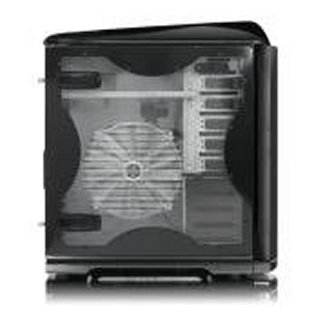
The 230mm side fan spinning at a whisper quiet 800 rpm producing a mind blowing 15dBA or almost blissful silence provides good air flow over those expensive video cards we’re all so fond of these days. It draws it in and with the louvers angled slightly upward moves it into the air stream created by the front intake and rear exhaust 120mm 1300rpm 17dBA fans. With the water cooling kit installed you can’t hear this beauty over ambient room noise. If the excellent positive pressure airflow doesn’t remove all the heat just from the air movement the vented top design will allow any heat it missed to escape from the top of the case. The front intake is also responsible for removing the heat from the hard drive cage which it does nicely.
I’m so impressed with this case that I could go on about it for an eternity but I’m going to move on to the Prowater 850i kit from Thermaltake which I’ll be installing and testing in this monolithic beauty.
THERMALTAKE PROWATER 850i
Here’s the legnthy specifications of the Prowater 850i Water Cooling Kit. The sheer amount of components involved put some people off Water Cooling but once you’ve set up one kit it’s no big deal.
| Thermaltake Prowater 850i Specifications |
|
| Water Block : | |
| Dimensions | 58mm(L) X 58mm(W) X 35mm(H) |
| Material | All copper designed |
| Tubing & Hoes Clip | For 9.5mm ID (3/8”) tubing |
| Weight | 336(g) |
| Pump : | |
| Dimensions | 75(L) x 70(W) x 75(H) mm |
| Bearing | Ceramic bearing |
| Maximum Capacity | 500 L/ hr |
| Rated Voltage | DC 12V |
| Input current | 600 mA |
| Connector | 4 pin |
| Noise | 16 dBA |
| Life time | 80000 hr (MTBF) |
| TMG Radiator : | |
| Dimensions | 153(L) x 120(W) x 28(H) mm |
| Material | Aluminum |
| Tube Design | Aluminum, Dimple |
| Fin Design | Aluminum, Louvered |
| Tubing & Hose Clip | For 9.5mm ID (3/8”) tubing |
| Fan Dimension | 120(L) x 120(W) x 25(H) mm |
| Fan Speed | 1300 ~ 2400 RPM |
| Noise | 16 ~ 30 dB |
| Fan Connector | 4 pin |
| Liquid Tank : | |
| Dimensions | 86(L) x 66(W) x 110(H) mm |
| Capacity | 350 c.c |
| Tubing & Hose Clip | For 9.5mm ID(3/8”) tube |
| iStripe : | |
| Length | 300 mm x2 pcs |
| Material | TPU |
| Flow TX : | |
| Dimensions | 60mm(H) x 35 mm (W) x 25 mm (D) |
| Tubing & Hose Clip | For 9.5mm ID(3/8”) tube |
| Tube : | |
| Dimensions | 9.5mm ID(3/8”) tube |
| Material | Green UV |
| Coolant : | |
| Capacity | 500 c.c |
| Major Material Ingredient | Propylene Glycol |
| Application : | |
| CPU | AMD AM2 series AMD K8 series Intel LGA775 Intel P4 |
My apologies for such a long specifications table but were dealing with a lot of components that have to be mated exactingly. As you can see with this kit Thermaltake has gone to a 3/8 inch tubing design which makes it compatible with other after market 3/8 inch tubing water cooling parts.
There are some ups and downs with this kit which I’ll address immediately. The Water Block is Copper, and the Radiator is Aluminum. Copper and Aluminum don’t play well together and you’ll get galvanic corrosion using Copper and Aluminum on the same loop. The corrosion over time will reduce the the efficiency of the cooling kit and a copper radiator would have been nice in this entry level kit. Entry level kit being the keywords there. It’s a good place to start from, but your house is a good place to start from but you wouldn’t want to stay there all the time. For the beginner this is a good way to go but you’ll be wanting to upgrade the kit to a larger radiator of copper design later, and possibly go with a different water block. This gives you every thing you need to get started and nicely done instructions in a quite large manual in several languages making it much easier to get started water cooling.
Here’s a quick and dirty explanation of Galvanic Corrosion originally pulled from Wikipedia. Which I found in a review by “The Gonz” of the Thermaltake Bigwater Kit
Source: Wikipedia. (Our emphasis)
Galvanic corrosion is an electrochemical process in which one metal corrodes preferentially when it is in contact with a different type of metal and both metals are in an electrolyte.
When two or more different sorts of metal come into contact in the presence of an electrolyte a galvanic couple is set up as different metals have different electrode potentials. The electrolyte provides a means for ion migration whereby metallic ions can move from the anode to the cathode. This leads to the anodic metal corroding more quickly than it otherwise would; the corrosion of the cathodic metal is retarded even to the point of stopping. The presence of electrolyte and a conducting path between the metals may cause corrosion where otherwise neither metal alone would have corroded.
It should be noted that the galvanic corrosion process is a slow one, but it’s going to happen over time and you should be aware of it and what it is
I went the extra mile and contacted Ramsom Koay from Thermaltake and he assured me that with proper maintenance galvanic corrosion won’t be an issue with the Prowater 850i. We spoke at length and as long as you follow a reasonable maintenance schedule by changing out the coolant every 90 days or so like you need to do to avoid algae and bacterial growth, and use the approved coolant or a mixture of 10-15% antifreeze and distilled water the Prowater 850i will be around long after the current sockets it’s designed to be compatible with are long obsolete. Another option is to use a Non-conductive coolant and it’s non conductivity should avoid the whole electrolyte issue to begin with. Nuff Said.
Thermaltake took upgrading into consideration in the design of the kit and designed it with 3/8 inch tubing so later you can enjoy customizing it just the way you want. To that end I’ll be doing a project review of the modification of an entry level kit to an enthusiast kit so keep your eyes peeled for it.
Here at Bjorn3D we go the extra mile to give you not only what you want to see but what you need to see.
Features
| Thermaltake Prowater 850i Features |
|
| Brazing Copper Waterblock: | 1.Pure Copper Water Block for maximum heat conductivity from heat source.
2.Advanced Brazing technology improves reliability and leakage free. 3. All-in-one mounting design supports all latest CPU from Intel & AMD. (Includes: Intel Socket LGA775 and AMD K8/AM2.) |
| 12cm Motorsports Radiator : | 1. DTT – Dimple Tube Technology swirls the coolant within the radiator to increase thermal transfer.
2. An all-aluminum radiator featuring expanded outer fins and tube style for maximum performance. 3.Silent 120mm variable resistor fan spinning from 1300 to 2400rpm |
| Durable and powerful 500 liters-per-hour pump: | 1. The P500 pump provides years of reliable service
2. The pedestal can be secured onto the case by screws included 3. Ceramic bearings significantly increase the life expectancy of the pump 4. Professionally designed inlet and outlet, eliminating any blockage |
| High-capacity Liquid Tank: | 1. Holds up to 350cc of coolant for continuous usage 2. Easy to refill and maintain |
| Flow meter: | Accurate monitoring and fast response- Transparent cover clearly shows the movement of the coolant. |
| iStripe : | 1.Complete eliminates deformation of tubes over time 2.Allows sharp bending radii while keeping liquid flow smoothly |
| Dimensions | 75(L) x 70(W) x 75(H) mm |
| Rugged and free-flowing 3/8″ tubing: | The tubes are composed of special material to prevent wear and tear as well as increasing water-flow |
A couple of the nicer features of this kit are the 500L/hour pump providing pretty decent water flow for an entry level kit actually exceeding the Swiftech MCP350 pump I use on a day to day basis on my Quad, it’s attached Reservoir makes things a little easier on install. The tubing is second to none and there’s enough to do a couple of internal installs, and plenty enough if you want the radiator externally mounted.
The Pump itself features ceramic bearings with an MTBF (Mean Time Between Failure) of 80,000 hours so it’s rated to run longer than a lot of enthusiast pumps on the market today. You get enough easy to use metal clamps that you won’t be scrambling for substitutions like radiator worm drive clamps (the type on your cars radiator).
Then it covers AMD AM2 and K8 series processors, Intel 775 and P4 sockets. With that kind of flexibility you can buy it for your old P4 and move it to your e8400 when the better half lets you upgrade.
850i PACKAGING & BUNDLED ACCESSORIES
Packaging
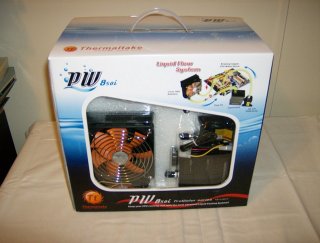
The Prowater 850i comes in an attractive box appropriately tan and black with a hint of cool blue water. The front is open and clam shelled so the consumer can see what their buying.

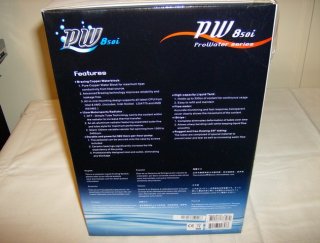
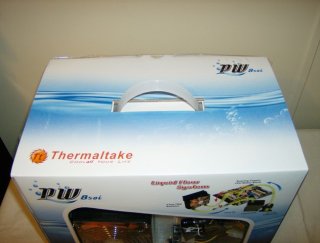
As you can see there’s plenty of pictures and information on the box to help the consumer make an informed decision about the Prowater. 850i. Feature lists, Specifications, coolant flow graphics. A really nice graphic of the installed system, and of course the clam shelled front to display the main components.
How’s the Prowater 850i packed inside you ask? I got that covered for you.

Thermaltake has the packaging and protection of the Prowater 850i covered. All the many components are protected by a thick layer of soft foam. Even though the box took a minor hit every thing arrived in pristine condition. The minor box damage is a shipper thing and not to be attributed to Thermaltake. Their equipment arriving in pristine condition despite the rough handling is testimony to their packaging R+D department.
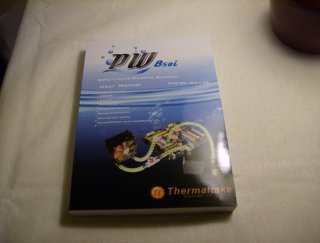

There’s a shot of the manual you’ll find in the bundle, that’s an ordinary “AA” battery in front of it for scale. Don’t worry though it’s size is a little misleading and it’s printed in several languages and is well translated, easy to understand and easy to follow. (yes I followed directions just this once to make sure they are viable)
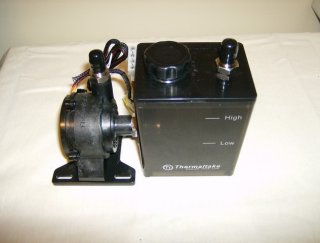
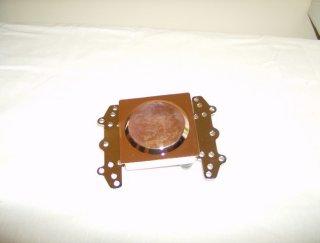
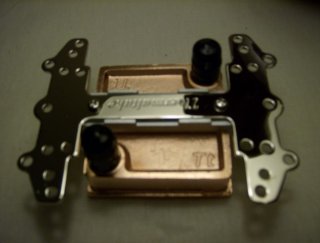
The pump is capable of pushing 500L/H which is pretty generous coolant movement for an entry level kit, as you saw earlier it’s average life is 80,000 hours or 8 years under normal use given proper maintenance. The fan on the Radiator is rated at about half that but still 4 years use and having to replace a fan that’s nothing to whine at. The Water block is solid copper with a chromed steel hold down plate and the block itself is of typical Thermaltake one piece design. I really prefer to have a block with interchangeable barbs but the words “Entry Level Kit” keep coming to mind so I’m not criticizing. There’s a little clouding on the bottom of the block but it’s nice and flat and that’s what counts. The Radiator is aluminum and the whole kit uses 3/8 inch barbs.
I can feel this coming so I might as well get it out of the way. (Minor rant coming) Entry level kits aren’t designed or priced like DIY build it yourself kits. Performance is now, always has been, and always will be a function of money. More money more performance. You shouldn’t judge an entry level kit against any thing else but entry level kits of the same type. Comparing a water kit to an air cooler is okay for temperature comparisons, but the prices will in no way be comparable. If your looking for killer cooling then go with a much more expensive cooling solution or mod the entry level kit. Each product should be judged within its category and price range. Comparing this entry level kit with my DIY Swiftech setup is like comparing an economy car to a Porsche. (End Rant)
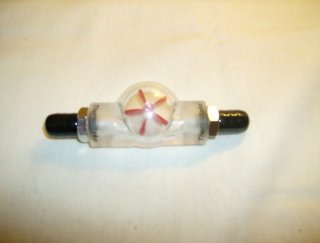


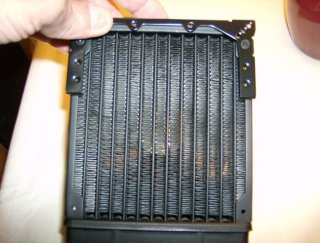
The inclusion of the flow meter is a nice touch, a little wrangling to get it installed in a mid tower case like the Armor+ MX is required but it serves to ease the mind of the first time water user. As the water flows through the meter the wheel spins showing you the coolant is flowing. Additionally the pump has a Mobo fan connector that lets you know from 3rd party software utilities that the pump is still spinning. The tubing is UV reactive green and as you can see it’s 3/8 inch tubing, compared to the cheap stuff I normally use pictured on the lower left this stuff is first class. The radiator is a Motor Sport aluminum radiator and the cooling fins are nice and tightly packed to help the single radiator transfer heat more effectively.
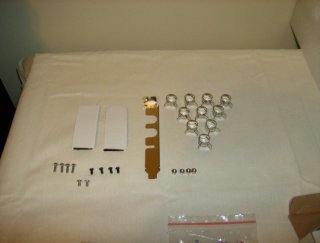
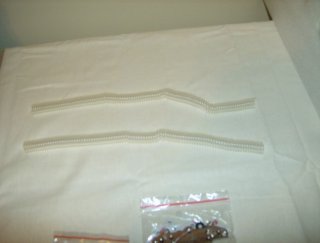
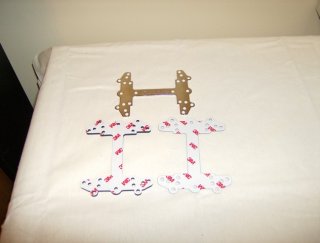

You get a generous 10 metal clamps, a PCI bracket hose attachment if you want to go external with the radiator. Adhesive Velcro pads if you don’t want to hard mount the pump. You also get the screws and nuts if you want to hard mount like I did. Then there’s a couple of very nice iStripes that you wrap around the tubing to keep it from crimping when you bend the tubing. They went nice on the backplate and foam electrical insulation. The mounting kit is some screws that go through the foam backed backplate and are held in place while you mount the board by a set of hex screws. That arrangement is really handy. If you’ve ever lost a backplate behind a Mobo mounting a Swifty block you know what I mean. In amongst the myriad of accessories you’ll find a little bag of TIM, and a mysterious yellow paper you’d better read. It tells you about leak testing and that you need to be careful when you remove the safety caps on the barbs because the components are wet tested and there might be some water still in them. Take my word for it there’s water in there, if I hadn’t had the foresight to put a towel over the components we’d have had a small coolant incident when I uncorked the barbs. But then I actually read the instructions so if you fail to do that your probably going to have your first coolant accident.
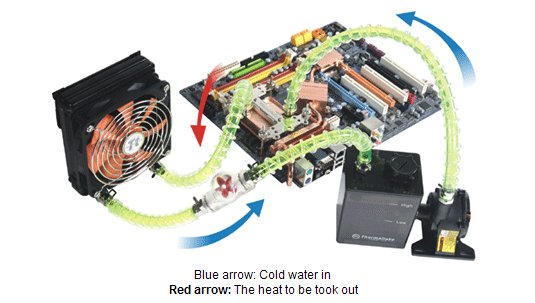
I found this coolant flow image over on the Thermaltake website and it gives you what Thermaltake sees as the optimal connection of the Prowater 850i. I should tell you that in the Armor+ MX mid tower I had to put the flow meter on the pump to CPU block section to avoid crimping the hose. You can expect to have to make small adjustments like that it’s normal in different case layouts. It really makes no difference to the cooling capacity of the loop. Just make sure you go from the Radiator to the Reservoir, pump to the CPU Block Cpu block to the radiator. That way starting out you know that the cooled water coming from the radiator is coming in to the reservoir going to the pump and then out to the CPU. There’s a whole school of enthusiasts that talk about reverse flow and use a different loop, but if you’ve purchased an entry level kit and are just starting out then follow the diagram.
IMAGES & IMPRESSIONS: PROWATER 850i
I usually like to include a section that lets me show you things I think you need to see, and general impressions of the equipment before I move on to Testing and Methodology and the Conclusion. So welcome to the Photos & Impressions Section.
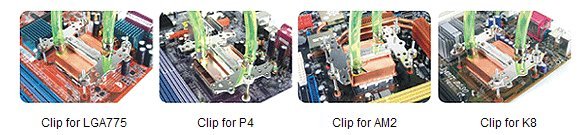
I snatched this graphic of the compatible CPU sockets so your not scrolling back and thinking does this fit my socket. It also gives you an idea of how it attaches to each socket.
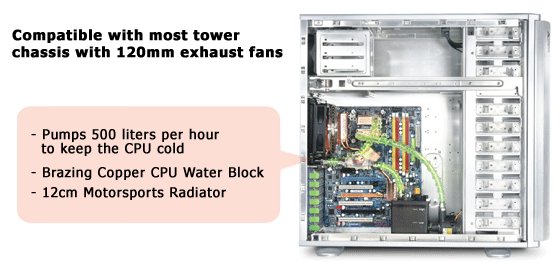
I grabbed this shot so you can see how a typical install is supposed to go. Notice the flow meter is right up against the radiator. It’ll fit but if they are that close it’s hard to get the flow meter on there and your much more likely to damage the flow meter or radiator if you go that route. If you look at the room between the pump and CPU that’s a much easier install for the flow meter and less likely to crimp the tubing.
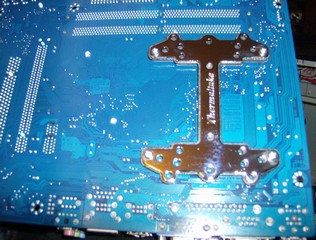
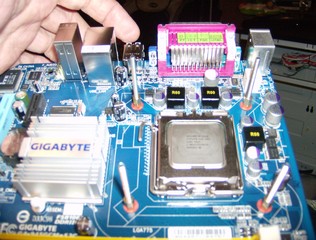
There’s the backplate mounted on the Mobo and how it looks from the front with the insulating washers and hex bolts used to hold it in place.

Then through the magic of the Internet there it is ready to go except for a couple of electrical connections that need to be made. Notice the distance between the Radiator and Reservoir? If you think the flow meter is going to go there in a mid tower you are fooling yourself. The loop is running Pump to CPU Block, Cpu Block to Radiator, Radiator to Reservoir. I did some cable management a little later but that’s as good as I shot and I’d hate to endanger my cable impaired status. Besides it’s all gotta come out in a day or two for further testing.
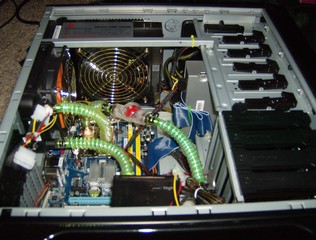
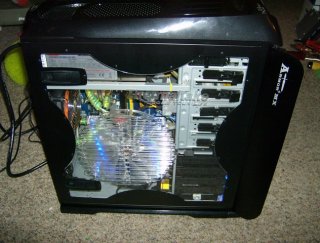
There’s a shot before I filled it with coolant and if you’ll notice the over sized power supply in there, a Coolmax 1350w and it fit nicely. Later on I filled it and forgot and laid it over on it’s side and the coolant didn’t leak anywhere, that’s worth a few points in my book. Except for that IDE cable which is coming out pretty quick and being replaced with a Sata cable that’s pretty good cable management for a test rig.
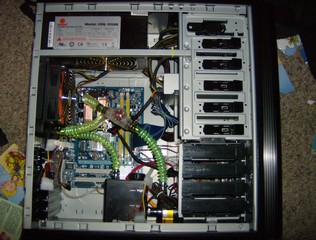
Now that I’ve said the “C” (cable management) word let me show you what your not seeing and why this case does indeed have excellent cable management features.
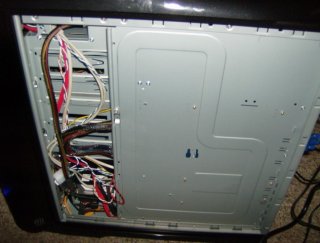
There on the left is interior shot as it is now, and on the right what your not seeing from the front. Considering I’m cable impaired this case must have pretty good cable management built in. The side door closed easily, and I was anxious to get a look at this beauty fired up and ready to go.
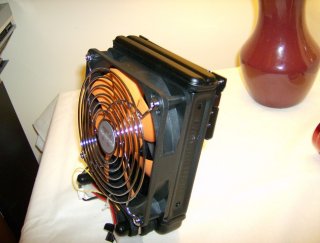
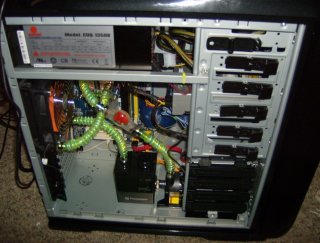
There’s the right side on shot, and the head on shot up and running with the water cooling kit installed.
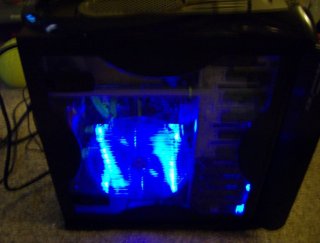
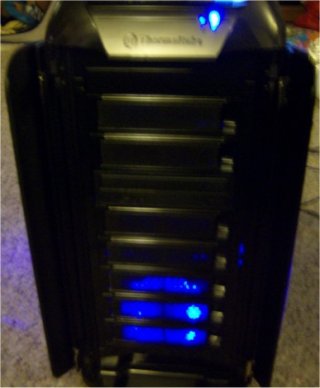
Then finally before moving on to the next section there’s the money shots with the side on fired up and running in all it’s monolithic glowing glory. This is one special mid tower.
TESTING METHODOLOGY
For testing a case all you really can do is to install a Motherboard and wire it all up and see how it turns out. I’ve done that and the case got very high marks for an intelligent design with a lot of features that I’d never even thought of. You’ve seen the detailed results of that.
For the Prowater 850i kit it’s a little different story. First let me give you the specs of the test rig.
| Test Rig | |
| Intel CPU | E2180 |
| Motherboard | Gigabyte 945GCM-S2C |
| Ram | OCZ Reaper DR2 800 |
| Power Supply | Coolmax 1350watt |
| GPU | On Board Graphics |
| Cooling | Prowater 850i |
| Case | Thermaltake Armor+ MX |
| Hard Drive | Maxstor Diamondmax 16 160 Gig |
Now a short explanation on the test rig, I could have thrown this on my Q6600 and gaming rig that I have in excess of $2k in. However a single radiator system isn’t really designed to handle a quad. The E2180 is a 65nm CPU and in testing with identical water cooling systems got very close to the results from my Quad. It’s a hot little bugger so it makes for a pretty good CPU cooling system tester.
Then on board graphics that’s nothing more than a safety issue, if your going to be testing an untried water cooling kit do you really want an untried CPU block and clamp sitting right above an expensive GPU? Probably not.
So we have a nice hot CPU, in a typical Overclockable environment, with the dangers minimized. Good for testing, and if it spews fluid all over I’m not out $2k. Best of both worlds
Coolers Tested
| Coolers Tested | |
| ThermalRight XWB-01 | Water Block |
| NexXxos X2 | Water Block |
| Intel Stock | Air |
| Prowater 850i Kit | Water Block |
Now The Stock Intel CPU Heat Sink is pretty obvious, it’s the out of the box Air cooling solution that comes with the CPU if you bought retail.
The Thermalright XWB-01 and NexXxos X2 were tested on a Swiftech Enthusiast water cooling rig on the E2180. Because in a few weeks we’re going to revisit the Prowater 850i and I’ll show you how to modify it into a DIY enthusiast water cooling system.
Enthusiast Cooling System
- Swiftech MCP350 Pump
- Swiftech MCR320 Radiator
- Swiftech Micro Reservoir
- Three Yate Loon 83cfm Fans
- Swiftech Apogee GT Extreme Water Block
- NexXxos X2 Water Block
Testing Conditions
- Ambient temperature kept at 72f
- Prowater 850i kept at stock
- All Tests ran 3 times results averaged
- Idle Temperatures taken after 30 minutes cool down time
- Allowed to idle 30 minutes at each speed at the desktop
- Load Temperature taken with Orthos driving both cores 30 minute duration
- Load tests performed after each Idle test with no cool down period
TEST RESULTS
The Thermaltake Armor+ MX
The Armor+ MX impressed me at every turn, it’s smooth lines flowed into each other creating a monolithic presence I’ve had nothing but compliments from. Visitors always stop to check it out and comment on it’s sharp looks and ask if it’s for sale (no it’s not). With any case I want at my finger tips that should tell you a lot about the Armor+ MX. I’d suspected it to be a solid choice for a case as I already have it’s big brother the Thermaltake Armor full tower.
The cable management was a snap even for a cable impaired reviewer like me. The only feature I’m going to miss is a removable motherboard tray and thinking on that I’ve never really used a removable tray. The install did take a few peeks at the manual because of a few of the more unique features such as the easily removable drive bay covers. Hook your finger in the recess and pull and the mesh opens like a door and the drive bay cover falls out. Pretty Sweet!
The bundle was plentiful and the tool less 5 ½ drive bays were top quality and held the optical drive snugly. The Hex motherboard standoff that holds the Motherboard in place while you stab the rest of the screws in has been needed for a long time and this is the first time I’ve seen one.
The two 120mm low RPM fans in conjunction with the 230mm low rpm side fan provided air flow that most cases and systems only dream of. Again the only flaw I found is no removable motherboard tray.
The ThermalTake Prowater 850i Water Cooling kit
As with any good CPU cooling solution review there’s going to be a chart. I like to lead with that followed by the data set it was derived from.
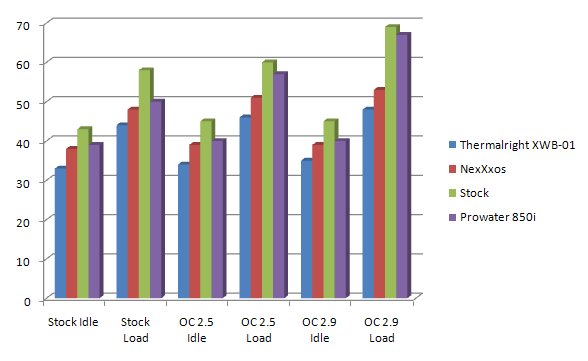
Which was derived from this Data Set.

Keep in mind the Thermalright XWB-01 and NexXxos X2 were tested on a massive Enthusiast water cooling setup.
Stock Idle 2.0 GHZ
The Thermalright came in at 33c at stock idle, followed by a lack luster performance by the Acrylic NexXxos. The Prowater 850i did surprisingly well at that point coming in only 1c behind the NexXxos and 6C behind the Thermalright. Both the Thermalright and the NexXxos had the advantage of a Triple Radiator with 3 83CFM Yate Loon fans extracting heat. The Prowater beat the Stock Intel Cooler by 4c.
Stock Load 2.0 GHZ
The Thermalright again came in first with 44C the scaling remaining intact and the NexXxos at 48C, their DIY nature with the increased radiator size is showing it’s advantages. The Prowater with it’s single radiator came in at 50C which is my personal cutoff level for a CPU cooler, if it doesn’t keep the temperature under 50C at any clock I won’t use it on my gaming rig. Again the Intel Stock cooler came in last, and unless my ears deceive me I was starting to hear it begging for mercy. I told you the E2180 was a hot little bugger, in personal testing almost every setup I used on the E2180 the temperatures mirrored the results I got with the Q6600. In the unlikely event the Prowater were to spring a leak it’d be much easier to replace than the Quad. Please note though at no time did the Prowater 850i ever exhibit any propensity to leak. The hoses and barbs are so well designed that I believe it wouldn’t leak with out clamps, though I don’t recommend testing that theory inside the case with your valuable components.
OC Idle 2.5 GHZ
I do the Idle testing knowing a lot of people don’t to save time, but it’s important to know if Idle temperatures are creeping up while the computer Idles during say a long dinner. While the Intel Cooler initially showed a little upward creep all the water kits quickly leveled off and remained at a steady temperature.
Temperatures went up a total of 1 or 2C across the board illustrating that temperatures at idle will usually increase as you increase voltages on the CPU to hold the higher speeds. Increases were insignificant with the scaling remaining true. The Thermalright kicking butt and taking names, The NexXxos headed for the testing box, the Intel Stock cooler headed for the dust collecting shelf, and the Prowater 850i still in question.
OC Load 2.5 GHZ
Here’s where the rubber starts to meet the road. Or if your kinda geeky like me the CPU meets the true nature of the cooler. The Thermalright turned in a solid performance at a respectable 46C and the NexXxos starting to lag back at 51C. The smaller radiator on the Prowater 850i was telling on it’s performance and it hit 57 and a vein in my head started to throb. The Stock Intel cooler hit 60 and I was reaching for a bottle of aspirin.
OC Idle 2.9 GHZ
The Idle tests at 2.9 only varied from 2.5 by 1c but the scaling remained true even though by this time I had increased the vcore to 1.4v to weed out the weak coolers and put this cooling adventure to a meaningful close. No temperature creep was noted at this level even though I extended the test time to an hour instead of 30 minutes.
OC Load 2.9 GHZ
If a cooler is going to fold completely it’s going to be at the OC load test, that’s why I give the CPU a little extra voltage on this test. The CPU was stable at 1.3275v but it was time to separate the scrap copper and aluminum from the CPU coolers.
The Thermalright came in under my personal standard of 50C, and the NexXxos came in at 53C which I could live with considering you seldom see full utilization across both cores for any extended period. The Stock cooler, well if I didn’t need it for further testing I’d take a sledge hammer to it. The Prowater came in at 67C here, with it’s single radiator that’s to be expected. I had expected more but this being my first single radiator system it had me scratching my head. You should note that testing with the Intel Stock cooler had to be stopped at 69c and in later testing temperatures reached as high as 74 – 75C before shutting down the test.
CONCLUSION
Thermaltake Armor+ MX
The Thermaltake Armor+ MX is destined for the Case hall of fame. The only feature missing that a few users might want would be a removable Motherboard tray. It’s sharp looks, excellent ventilation and sound dampening steel chassis make it a good choice for anyone in the market for a Midtower.
The Tool Less design was easy to use and the features hidden from the eye but quickly obvious during the build make it a Gem in the hard scrabble world of selecting a good case. It doesn’t have a ton of flash like a lot of the cases out there but most of us get past the windowed case that lights up the whole room stage pretty quickly after puberty. In the short time between the production of it’s big brother the Thermaltake Armor and the Production of the Thermaltake Armor MX+ they’ve managed to toss in a side mounted hard drive cage, mounting studs that hold the Motherboard in place while you seat the rest of the screws. A removable top tool tray if your into Drive bay Water cooling solutions, and a nice storage space for the left over accessories and screws from the plentiful bundle.
Out of the box I was impressed with it’s statesmanship looks, 230mm side fan that provides a nice LED blue glow to the inside of the chassis, and dust filtering mesh drive doors featuring a quick release system that I’ve been wishing for the last few decades.
Thermaltake has a winner with the Armor+ MX but they have my mouth watering for a full tower version of the Armor+ MX.
Pros:
+ Darn Nice Looking Case
+ Easy Release Drive Doors W/Mesh dust filters
+ Hold Mobo In Place Stand Off
+ Well Designed Air Flow
+ Top Heat Escape Vents
+ Removable Hard Drive Cage With Removable Caddy’s
+ Water Cooling Ready
+ Silent Operation
Cons:
– No Removable Motherboard Tray
The Thermaltake Armor+ MX scores a 9.5/10 (Almost Perfect).
Thermaltake Prowater 850i
The Thermaltake Prowater 850i has some ups and downs in it’s design. The mixed Copper and Aluminum components will put some people off but being an entry level kit and the corrosion being so slow as to not affect the operation during it’s useful life it doesn’t put me off much. I would have preferred to see a Copper radiator though.
While it might be good for the new 45nm design CPUs with their smaller thermal foot print I wouldn’t recommend it for Tri Core or Quad Core cooling. On the E2180 which has an older 65nm design and runs hotter than current CPUs it would be great for day to day operations with a mild Over Clock. If you want to go extreme on the Over Clock you might want to upgrade it to a Dual or Triple radiator.
The kit design and well written manual will make it easy for a beginner to get into the water cooling arena, and it’ll serve it’s purpose on dual cores of newer design which is it’s target market.
Don’t just dismiss the Prowater, I’ll be revisiting it shortly to show you how to modify it to run with the best 3/8 inch enthusiast water cooling systems out there.
At the 2.9 GHZ Over Clock Load test on the E2180 it barely did better than the stock Intel cooler. Keep in mind I was pushing extra voltage through the CPU to warm things up. During normal operation it kept the CPU to under 50C easily.
The Prowater 850i Water cooling kit is a kit with potential, but at stock that potential isn’t fully recognized. It is a good place for beginners to start in to water cooling and that was it’s intent. Thermaltake left us an upgrade path using easily obtainable fairly inexpensive parts. With that in mind it’s a good beginners kit but save the extreme Over Clocking until you’ve read my Entry Level Water Kit Modification Project a few weeks from now.
Pros:
+ Complete Kit
+ Upgradeable
+ Easy to follow Instructions
+ All Copper Water Block
+ Durable Hose And Plenty Of It
+ iStripe Hose Coils To Prevent Hose Kinking
Cons:
– Copper And Aluminum On The Same Loop
– Needs A Bigger Radiator To Keep Up With The Big Dogs
– Lengthy Install
– Price/Performance And Needs Modification To Compete
The Thermaltake Prowater scores a 7.0/10 (good).


