The Top Deck Tech Station from HighSpeedPC.Com is an open computer case for the easy testing and swapping of computer components.
INTRODUCTION
Cases today come in all colors, shapes, and sizes. Ranging from Mini Tower to Full Tower and specialty gaming chassis. Here at Bjorn3D we’re faced with special situations that normal cases just aren’t designed to handle.
Many computer shops, technicians, reviewers and home users that test a lot of equipment are faced with either putting the components loosely on a work bench, or the old put it back in the box with the anti static bag situation. It’s just not handy to have to put the mainboard into an off the shelf designed case all the time.
If your a heavy home user, technician or reviewer that goes through a lot of hardware in your quest for that perfect component, or merely testing a CPU Coolers design then you’ll be interested in checking out the Top Deck Tech Station (Large) from HighSpeed PC.
The good folks over at HighSpeed PC were nice enough to send a Top Deck Tech Station for our review, hopefully ending the never ending chore of casing, uncasing and recasing we go through on a daily basis to keep our readers supplied with good solid information on a variety of products.
Is the Top Deck Testing Station going to give the over worked staff at Bjorn3D a little relief (or maybe Scott could give us a day off), or will we be forced back to the practice of using our last good mobo box and well worn anti static bag?(While we’re at it can we get something besides stale tap water and left over Bar Pretzels Scott?)
About HighSpeed PC
HighSpeedPC, LLC was founded in the summer of 1999 and based on a love for cool PC gear and a few simple principles many of which are overlooked by online retailers:
1) Good, old fashioned personal customer service.
We value your business and want you to come back! So we’re here for you and want to help before, during, and after you place your order. Our customer service is one thing that separates us from the pack. If you have any questions about our products, your order status, if you have a problem, concern or just want to chat, you can email me here and I’ll make sure you’re taken care of. We reply to your email very quickly, and so far 100% of all our customer’s issues have been dealt with positively via email.
We are also very proud of our status on Reseller Ratings.com. The comments left by our customers speak for themselves and I encourage you to see for yourself what people say about us.
2) Keep the customer informed.
I have ordered some things from other stores online and wondered if they even got my order, no order or shipping confirmation, another example of what not to do. When you order with us you receive an instant automated receipt, soon after we receive your order we send you a personal order confirmation email, then another email to let you know your order has shipped out and when to expect it. This formula has worked well according to our customers.
3) Quality stuff at great prices.
I’ve been asked why our catalog is relatively limited, and the simple answer is we don’t want to be just another computer store selling everything from sound cards to printers. There’s enough places like that on the ‘Net. We want to offer “specialty computer hardware” that you can’t find at your local electronics super store.
PACKAGING, SPECIFICATIONS AND BUNDLE
HighSpeed PC takes a no nonsense approach to a lot of their packaging and company philosophy. The Packaging of the Top Deck Tech Station is no exception to this approach.
I must admit receiving and opening the Top Deck Tech Station was almost like a rite of passage for me, after long years of using an Acrylic UFO Cube Case for a testing station it was almost like a weight had been lifted from me. (Hey Scott can you pass me some of those pretzels?)
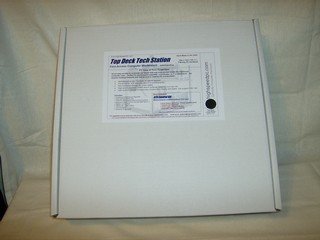
The packaging on the Top Deck Tech Station is plain white all the way around with the exception of the white sticker identifying the contents of the box. It provides enough information about the Tech Station to help you decide if it’s right for you.
| Top Deck Tech Station Specifications |
|
| Case Type | Open |
| Material | Solid Non-Conductive Ruberized |
| Design | Two tier work bench |
| Expansion Ports | PCIe/AGP/PCI/ISA card brace with thumb screws |
| Hard Drive Capacity | HDD Rails for storage/cooling for two hard drives |
| Motherboard Tray | Secure rubberized motherboard standoff system |
| Cooling | 120mm fan: HDD and motherboard cooling |
| Anti Static/Non-Slip | Neoprene mat for non-slip lower bench surface |
| Switches | ATX Control Kit |
| On/Off and Reset | Mini on/off & reset switches |
| LED’s | Power & HDD LED’s |
| Liquid Cooling Capable | Yes |
| Sound | System speaker |
HighSpeed PC has included everything you thought you needed and a little extra. I didn’t know what to expect for switches and have often resorted to shorting pins with a straight edged razor blade. HighSpeed PC has you covered there.
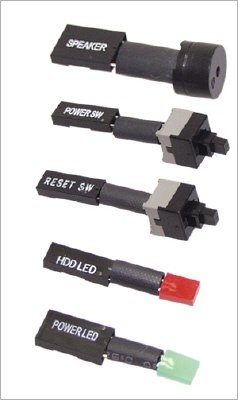
They’ve included a mini power and reset switch, a system speaker, hard drive and power LED’s that attach at the front panel header. It took me almost 5 minutes to get past the simplicity and the feeling a void in my working life had just been filled. It’s amazing that a little packet with switches in it no more than 2” X 3” can make such an impression.

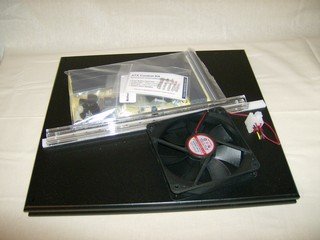
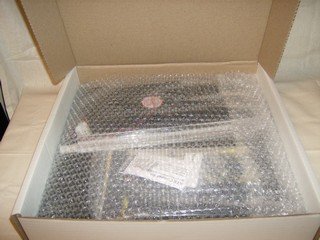
At first glance I was wondering if the Tech Station was all there or not. As it turns out it was all there and good things can indeed come in small packages. You should make note that there aren’t any spare parts or screws in the bundle so keep track of them closely. Not that I had to chase my dog across the Lab with a rubber standoff in his mouth or any thing.
A Closer Look At The Top Deck Testing Station
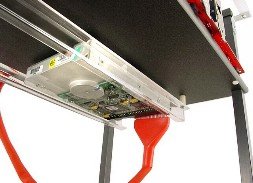


The Hard Drive Rails hang under the top platform and need to be snugged down into the pre-drilled well marked pilot holes. HighSpeed PC recommended an electric screw driver for assembly but I did it manually because they’ve never seen me with an electric screw driver. They thoughtfully included a 120mm fan to blow across the Hard Drive and MOSFET area of the Tech Station.
A particularly nice feature is the included neoprene mat for the components that just set on the bottom shelf keeping them securely in place. The only thing thus far that I’ve seen that I’d make an improvement on is the Expansion Card Rail, I’d have like to have seen an “L” shaped metal bar placed along the outside edge and extending under the Rail to provide a more substantial support. That might just be me though, some times after 13 or 14 hours of crunching at it I can be a little bit of a clutz. (Hey Scott can you pass me some of that stale tap water?)

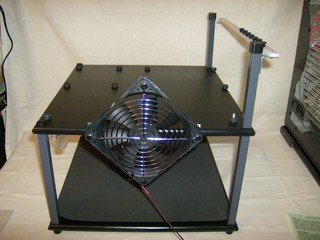

Then through the magic of the Internet there’s the finished product. The instruction pamphlet was easy to follow, the well marked pilot holes made it a snap to assemble, and the whole assembly took less than an hour using a manual screwdriver.
After assembly I had to just set back and let the functional simplicity of the Top Deck Tech Station sink in for a few minutes. To a reviewer who’s struggled for years with casing and uncasing boards it’s like one of those simple pieces of art that just draws the eye and fascinates you with it’s beauty and simplicity.
Just looking at the design I can tell you a few things with out ever putting a board on it (Yes I’m putting a board to it too). It’s going to be a fast setup on the Top Deck Tech Station even if you don’t have stock parts already on the platform. The non-conductive hold down screws are going to hold it securely, you are going to have room for backplates on the Mobo and, decent air flow under the board. The Expansion cards are going to be held reasonably firm and you shouldn’t have a problem unless you start wiggling them with the power on. You’ll be able to flip the expansion card bar and use BTX model boards on it. There’s plenty of room on the lower shelf for 2 hard drives in the rail, a power supply, optical drive, and if you want room for a 3rd hard drive on top the optical. It’s all non-conductive contact surfaces so shorting won’t be a problem. Watch putting to much pressure on the Mobo from the top, there are screws holding the standoffs down, by pressure I mean pushing on it with your hand. There should be plenty of support for the largest CPU cooler.
The biggest things that are important to me are, plenty of room for my Gorilla hands, speed and ease of seating components, and small foot print. Unless I miss my guess the Top Deck Testing Station is going to excel in all those areas.
Enough untested observations, lets get on to some real life testing.
TESTING, METHODOLOGY AND RESULTS
There’s really only one way I can think of to test the Top Deck Tech Station. Put the complete components for a computer system on it. Fortunately earlier in the day I got a PC for repair that hadn’t survived rough housing in the Dorms of the local University. If I had to hazard a guess I’d say it was Miller Light combined with a large sized elbow landing squarely on the left side of the case resulting in a sticky mess with a large amount of denting.
Got some handy components and get to test the Top Deck Tech Station in a real life situation. Sounds like a good test to me.
Starting with the components out of the case (in a pile, I’m good like that I use this system I like to call Early Disorder) I’ll be timing myself on the amount of time it takes for me to assemble the components on the Tech Station. This will be done with a highly accurate stop watch I got from Burger King, the Bart Simpson model, (It’s a Seiko I’ve had since University). Not only will I be timing the assembly I’ll be using the secondary timer to record how long it takes me to get it up and running.
We’ll also be taking a look at the finished build.
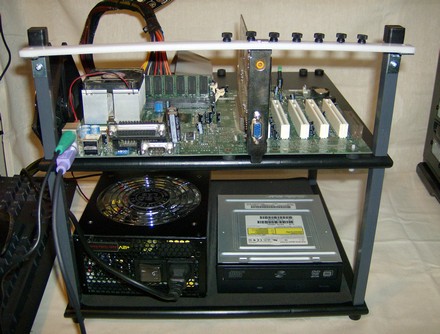
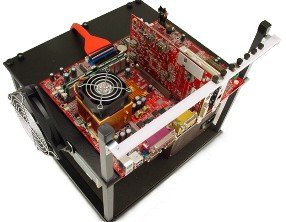
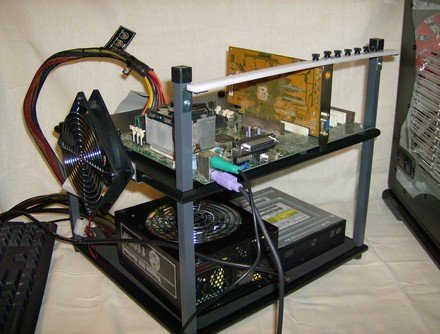
As you can see I was right there’s plenty of room to work on the Top Deck Testing Station. We’ve got a POS motherboard from a Dorm Accident, the Tagan BZ-1100 1100 Watt PSU, Sony DVD/RW, a Seagate drive hanging securely under the top level snug in it’s rails. Then there’s the GPU that was in the damaged machine, you don’t even want to know what it is. It’s an SIS AGP 4x 64 meg video card (it doesn’t deserve to be called a GPU), and the whole build start to finish switches included was (According to my Bart Simpson stop watch) 4 Minutes 7 Seconds.
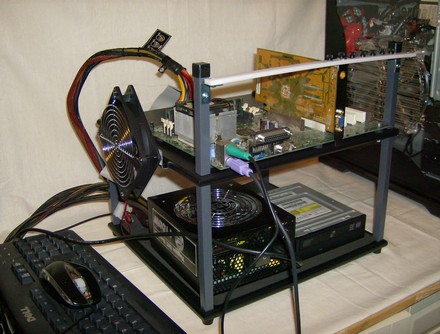
From a slightly different angle you can see the space the Top Deck affords to get in there and work. When I’m working on a board of questionable serviceability I like to keep the off switch on the PSU right in front of me, the Top Deck Tech Station was very conducive to that.
The build went easily with no snags or unexpected delays. Component placement was natural and while you have great flexibility of placement on the bottom shelf, the form of the Tech Station made cable management and component placement merely an after thought.
I wanted to see if I could safely move the Tech Station a little so I lifted it and set it at an angle on the work bench. It lifted easily and I had no problem shifting it to the right and no components moved.
Have any of you noticed any thing a little unusual yet? After I had the build done I unscrewed the screw holding the Video Card and set it on top the AGP slot with out pushing it back in the slot. To see if the Top Deck Tech Station would keep it secure with out it seated in the AGP Slot. To my surprise the Tech Station kept the card from moving at all. It remained in place despite my simulated newbee mistake. Pretty impressive if you ask me!
Total repair time was 4 minutes 27 seconds. As soon as I hit the mini power switch it fired right up confirming that Miller Light inside the power supply isn’t a good thing.
CONCLUSION
The Top Deck Tech Station was easy to build, easy to use and despite it’s simplicity was well thought out and well designed. Built correctly it’s sturdy enough to move with the components in place and the Anti-Slip neoprene pad keeps the bottom shelf parts from sliding.
I found myself wondering why I hadn’t gotten one years ago, pondering that question made me wonder how many hours I could have saved myself if a Top Deck Tech Station had been on my work bench. I haven’t had many components short out on me over the years but the Tech Station would have drastically reduced that statistic.
Component placement and cable routing came naturally on the Tech Station and it held a deliberately un-inserted video card solidly in place. The Tagan power supply weighs in at around 10lbs and it was solid enough that there was no strain on the Station during movement.
It even manages to look good doing it’s job efficiently. If your not into building things HighSpeed PC will assemble and ship the Tech Station though I’d expect to incur a little more expense for the increased shipping size and labor. They have the Large and Standard size ranging from $79.99 to $139.99 and a sale section where they have (at the time of posting) a few discounted units with a blemish or two. Given the time and effort it’s going to save you over the years of reliable service it’ll render that’s pretty much a bargain.
I’d highly recommend the Top Deck Tech Station to any one that works in a shop, reviews equipment or even a home user that switches components a lot. Now that I have a Top Dech Tech Station not having one is un-thinkable!
Pros:
+ Non-Conductive design
+ Neoprene non-slip pad
+ Plenty of room to work
+ Holds expansion cards snugly
+ Compact dimensions
+ Fast component placement
+ Hard Drive out of the way
+ Manages to look good
+ Good air flow in the right places
Cons:
– Not getting one sooner
– Price might deter some people
Final Score: 9.5 out of 10 and the coveted “Bjorn3D Golden Bear Award”.


