With the need of having not only being able to keep your most valuable computer components cool, we users also want our chassis to be stylish and also be able to dampen the sounds of our computer fans. NVXT Came up with an answer for this, The Whisper case.
INTRODUCTION
A chassis is one of the most looked over pieces of equipment we use for our computers. It not only has to be stylish, but it has to be functional, make installing computer components easy using little to no effort, be able to make cable management easy, and also dampen the fans or the noise of the components we use.
So today I bring you the Whisper. Built by NZXT, this chassis gives us users a large interior, exceptional noise damping abilites (by utilizing a sound dampening foam rubber throughout the entire interior), makes cable management easy by separating the motherboard and CD/DVD drive area into one chamber and by putting the PSU and HDD’s in another. It does all this, while at the same time giving this chassis a stylish look that we will be proud of to show off to our friends and family.
About NZXT
NZXT, a company built upon gamer’s dreams, hopes to create products that put consumers first. With the objective of designing unique products catered for hardware enthusiasts and gamers, NZXT has grown into a globally renowned brand recognized for dedication towards creating the next great gaming product. NZXT has won numerous awards from media and publications from across the globe with a product line spanning from gaming chassis, power, and gaming input devices. As a corporation formed by gamers, NZXT continues to expand into new horizons and push the limitings further with each product unveiling.
Our dedicated sales and customer service team will also work diligently to earn your trust and loyalty. All our products are built with high quality material and engineered in the best conditions.
NZXT products are designed and engineered in the United States and manufacturered overseas in China and Taiwan.
NZXT was established in 2004 in Los Angeles, California.
SPECIFICATIONS
|
NZXT Whisper Specifications |
|
| MODEL | Whisper SERIES |
| CASE TYPE | FULL TOWER Steel |
| FRONT PANEL MATERIAL | ALUMINUM/PLASTIC |
| DIMENSIONS (W x H x D) | 211.5 X 521.5 X 562 mm |
| COOLING SYSTEM | FRONT, 1 X 120mm Blue LED (included) – REAR, 1 X 120mm, 2 x 80mm fans (included) |
| DRIVE BAYS | 6 DRIVE BAYS, 6 EXTERNAL 5.25″ DRIVE BAYS, 1 3.5″ External bracket, 9 INTERNAL 3.5″ DRIVE BAYS, Screwless Rail Design |
| MATERIAL(S) | Steel Construction |
| EXPANSION SLOTS | Seven |
| POWER SUPPLY | 500 WATT PS2 ATX 12V 2.0 ( OPTIONAL ) |
| WEIGHT | 12.3 KGS (W/O Power) |
| MOTHERBOARD SUPPORT | E-ATX, ATX, MICRO-ATX, BABY AT |
FEATURES
- Silent Performance :: 10mm noise dampening foam pads on both side panels and the top panel, rubber grommets reduce vibration noise on the Hard Drives, and a padded PSU holder dramatically reduce acoustic levels within the chassis
- Maximum Expandability :: Space for 9 hard drives and a total of six 5.25″ bays with ample room for large expansion cards
- Simple Installation :: Pre-drilled wire management system makes it easy to route your cables and the screwless installation means you won’t be constantly reaching for your tools
- Advanced Cooling :: Whisper includes 4 fans (1 x 120mm Blue LED Intake, 1 x 120mm Black Rear Exhaust, and 2 x 80mm Rear Exhaust). Bottom mounted PSU separates the heat given off by the PSU and motherboard
PACKAGING


EXTERIOR
We are going to have a look at the external portion of the Whisper case.

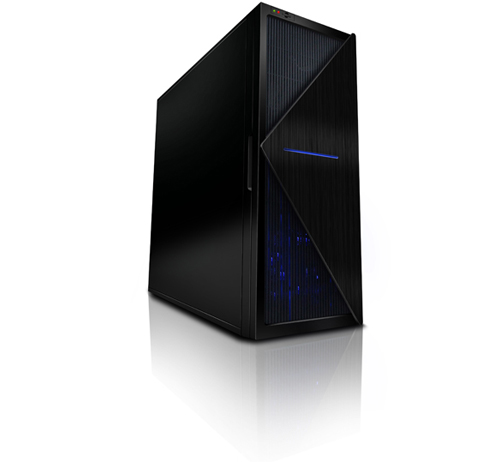
The Whisper case. Looking at the front we can see the Whisper uses vents on the front door to allow fresh air to be easily taken in from the outside for the bottom 120mm fan. On the top, NZXT still continued this design to compliment the bottom half of the door. Now, if you look up on the upper left hand side we will see the on/off switch and a couple of LED’s for the power and HDD activity.

Here’s looking at a 3/4 view of the Whisper case looking from the right side.

Another 3/4 view of the Whisper case looking from the back and the left side. You will notice the NZXT decided to put the PSU on the bottom of the case and not towards the top. This design is getting more and more popular with case designs. Right above the PSU area we will see two round vented areas. These are where two 80mm fans are internally. Moving up towards the very top of the Whisper case we see a much larger vented area (top right of the case) and we see where NZXT has placed a rear 120mm fan. While looking at the PCI expansion slots we see two little holes. These can used for an external water cooling kit so the hoses can be routed through the back of the case.

Another 3/4 view again of the right side of the Whisper case, but this time I opened the front door. This case has seven 5 1/4″ bays. If you are using a floppy drive you will need to use the included adapter (on the upper most top 5 1/4″ bay). While looking at the front with the door open and looking towards the bottom we can just make out the front 120mm fan.

NZXT placed all of the front USB, headphone/mic jacks, and also the e-SATA front IO ports on a little pop up door. So when there not in use, we can close this little door to keep these connectors from getting dirt or other debris in them. Upon opening the front door, we now see the reset button (why NVXT only allowed the on/off switch outside the door and hides the reset button behind the door escapes me).

Since we covered the exterior of the Whisper case, let’s see what the interior looks like and how all of our components look once inside the case.
INTERIOR

Looking at the Whisper case, we see that this case has a separate upper portion and a lower portion (or chambers). The motherboard and CD-ROM/DVD drives will be installed in the upper chamber, while the PSU and HDD’s will be in the lower chamber. The Whisper chassis can accommodate up to nine HDD’s, and you can use up to seven CD/DVD drives.

Let’s start off where the motherboard will be mounted. As we can see so far, the Whisper case looks like it has plenty of room to place a large motherboard and accommodate large video cards, while at the same time being able to put CD-ROM/DVD drives in with out having them interfere with the motherboard or video cards.

Now we’re looking up towards the upper portion of the 5 1/4″ bays, towards where the front IO ports are. On the very most top of the 5 1/4″ bays we can see the included 3 1/2″ floppy adapter. Also notice that NZXT used a foam sound dampening material on the inner top of the case.

Looking towards the back upper part of the case, we see NZXT included a rear 120mm fan. Also, the foam sound dampening material covers the entire top protion of the case. NZXT has incuded seven PCI expansion slot covers and near these we can see the included water cooling line holes (these holes will not accommodate large cooling lines of 5/8″ OD or greater).

Now, let’s move towards the lower portion of the Whisper chassis. Starting from the rear of the case, we see the two 80mm fans that sit right above the PSU and right in front of these fans we see the first two of nine HDD mounts (the foam rubber dampening material you see in the background is the inner side of the left side panel).

Moving towards the front, we finally see the other seven HDD mounts, and right in front of the five HDD mounts we see a cage that handles the front 120mm fan.

The picture of the front IO connectors from left to right shows the front e-SATA cable (red), the front USB plug-in, the external mic and headphone connectors, the front on/off power switch reset switch, and also the front HDD indicator LED’s. We also have a 4-pin Molex for the front power LED and finally the 4-pin Molex fan connector.

Here’s all the parts that came in that little cardboard case laid out. Starting from the left and moving right we have the instruction booklet, a rubber isolation boot that fits over your PSU mount, a speaker (for the motherboard), a little wire hold down, and seven little zip lock bags of screws you wll need to fully assemble your components in this case.
ASSEMBLY

I started to mount the motherboard into the Whisper case. Notice that this case is large enough to handle a full ATX motherboard easily.

I decided to use one of my largest CPU air coolers I have in my aresnal, the Cooler Master V8. Looking up towards the CPU cooler we see that, the V8 CPU cooler is up behind the inner lip of the top of the case (I had to pull downwards a little bit on the V8 CPU cooler to get the motherboard in side of this case). Also notice that the CPU cooler sits really close to the top of this chassis. Moving over to the motherboards EPS 8-pin CPU power plug, we notice that there is absolutly zero room for someone to get thier fingers near this plug with both the motherboard and the CPU cooler being installed in this chassis. After a few minutes of shaking my head (and also scratching it), I looked around and round the room. I seen I had an EPS extension cable somewhere (well actually I have two of them, don’t ask me how I got them, they just showed up one day). After discovering my new found friend I put it to good use. I put it on the motherboard prior to installing it into the the chassis, making my installation a whole lot easier and headache free (what you expect after so much scratching it). I should note that NZXT did not include an EPS extension cable.

Mounting the HDD’s was not difficult. Remove the HDD cage from its holder on the case, then with your HDD lined up with the holes of the holder to the bottom of your HDD, tighten down the included screws. You will find out as quickly as I did that NVXT gives you plenty of screws.

Once we got all of the HDD’s mounted on their holders, just place them in there respective spots. Slide them back in their respective spots till they lock into place.

Mounting the PSU was simple as well; just slide over the included rubber boot over the back side of the PSU (where the mounting holes are), making sure all of the holes line up properly, then put the PSU inside the case, locate the proper screws, and finally secure it to the chassis. If you notice here, NZXT made the PSU plate removable so you can flip it 180 degrees to better suit your cooling needs for the PSU.

This is what the tooless 5 1/4″ bay holders look like. Pretty simple looking really. It has two large pins coming through it (these will line up with the holes on your CD-ROM/DVD drives). to install your CD/DVD drive into the chassis, simply line up the pins to the bolt holes on the chassis and also the holes on your CD-ROM/DVD drive, push in and turn the knob 1/2 turn.

Looking at the final installation of all computer components, the Whisper chassis has more then enough room inside both upper and lower chambers to accommodate full ATX motherboards, large video cards, and also fairly large CPU coolers. The Whisper case has holes coming from the bottom of the case to the top of the case (through the divider) to help keep PSU wires and HDD cables from restricting air flow. Even with my non-cable management abilities, the Whisper case made it look easy.


This is what NZXT did to the side panels interior. NZXT used the same sound dampening foam on both side panels. Once I buttoned up this case really dropped the sound levels of all my fans.

CONCLUSIONS
There are things I feel NZXT could have done a little better on this chassis design. They could allow more room in the upper motherboard area by adding one or two of inches of height. This would make installing and removing the motherboard with larger CPU coolers easier. They could use two to three more fans on the upper motherboard area (one or two on the side panel, and one up on top of the chassis). This would allow for more air flow in this area. They could move the reset button from being inside of the door (having to open the door to access the reset button is a pain). I would prefer to have this button on the outside of the case just in case I need to reset the computer in a hurry. Otherwise, I have to stop and open the door to press the reset button. But their use of a sound dampening foam rubber actually serves two purposes. And although its main purpose will definetly quieten the internal components, it also acts as an insulator for heat. In times of high ambient temperatures, it will be fairly hard to control the computers’ components temperatures inside the case. Due to winter coming and having a high fluctuations of my room temperatures from anywhere between 17°C – 22°C range (my computer is currently in the basement dubbed “The Dungeon”), I was unable to get an accurate reading on long term temperatures of my main system components (CPU, video cards, and motherboard temperatures).
The NZXT Whipser chassis is a well thought out chassis. Having separated the upper and lower “chambers” (upper for the motherboard, lower for the HDD’s and PSU) is a good concept to help control heat and airflow. It also helps making cable management a lot easier. The Whisper case has a solid build to it. It did not bend or flex or, for that matter, twist too easily. Once all of the internal computer components were installed I did not have to worry about this chassis flexing when I moved it around the room. The sound dampening foam that was used on this chassis served its purpose well. As I kept my 4870X2 and 4870 fans ramped up to a 100% RPM’s (these fans can be rather loud), once I buttoned up all the sides up on this chassis, my video cards fans went from screaming loudly to a low hum, almost to a whisper.
During my review of this chassis, the little modder in me kept saying, “You know what self? This chassis is very sturdy. You know what be great? I could easily add a big radiator here, place a fan there, remove that there so I can put something there.” Though I really do like this case, what I feel that really hurts this chassis is its slightly high price of 150 U.S. dollars.
Pros
+ Sturdy design.
+ Sound dampening material through out the interior of case.
+ Cable management was made easy even when using a PSU with extra long wires.
+ Having a separated upper motherboard area and the lower PSU area.
Cons
– Not enough room near the upper area of the case.
– Not having enough fans on the motherboard area (intake) will make controlling temperatures difficult.
– Sound dampening material can and will act like an insulator during times of high ambient temperatures.
– Slightly high price of 150 U.S. dollars.
Final Score: 7.5 out of 10 and the Bjorn3D Seal of Approval


